Cheap & Easy 10 Gallon Rubbermaid MLT Conversion

Homebrew Talk - Beer, Wine, Mead, & Cider Brewing Discussion Forum

Help Support Homebrew Talk - Beer, Wine, Mead, & Cider Brewing Discussion Forum:

This site may earn a commission from merchant affiliate links, including eBay, Amazon, and others.
Hello AnOldUR,

I have a question if you don't mind.

You posted a photo last July, of a false bottom inside a rectangular cooler.

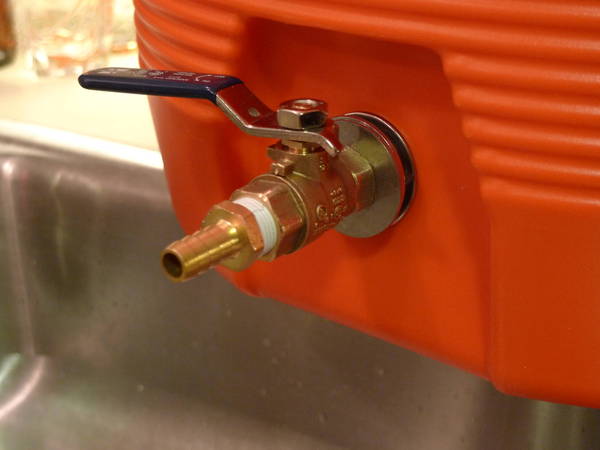
You used something other than PVC tubing to connect the false bottom to the drain. What is it? Did you use the barbed fitting that came with the false bottom?

I am looking to build a round 15 gal MLT. I think PVC tubing will crushed by heavy grain bed.

Thank you,

Art
 
Have you been back & read the conversion instructions? You don't put the faucet (or washer, etc.) adapter directly in the cooler. The idea is to just use the SS braid on the outside of the line as a filter for your grain bed. Cut off the ends, and treat it like a Chinese finger puzzle getting it off the rubber line, then follow directions per the beginning of this thread. My son & I just did a batch of big ESB yesterday, using this very conversion....worked like a charm. 73% efficiency, made a 1.060 SG.


Whoops, should read directions a little closer next time, thanks for clearing that up for me Rico
 
To obtain the SS washers I bought the "Build a Bolt" from HD and used the lock washer instead of more flat washers. It was tough to get one but filled the gap nicely. No leaks.
 
I am looking to build a round 15 gal MLT. I think PVC tubing will crushed by heavy grain bed.

How much grain are you mashing that you can crush PVC piping? It should have the PSI max stamped on the tube. What goes for PSI max on the inside can be safely assumed to be close to what it can stand from the outside. I expected it'd be in the range of 200-300 PSI. So unless you are mashing a few thousand pounds of grain, PVC pipe will hold up just fine.
 
I just put my braid in and it seems really easy to crush, should it be pretty sturdy or is it going to be enough to hold the weight of the grain? I could always slot some tubing, anything wrong with using the piece that came with the hose?
 
How much grain are you mashing that you can crush PVC piping? It should have the PSI max stamped on the tube. What goes for PSI max on the inside can be safely assumed to be close to what it can stand from the outside. I expected it'd be in the range of 200-300 PSI. So unless you are mashing a few thousand pounds of grain, PVC pipe will hold up just fine.

G1, I was assuming that this set up used flex tube. Guess I was wrong. Of course, PVC pipe wont crush under a homebrewer's grain bed.

The reason for asking the question is to find a flexible connection from the false bottom to the drain. In a round MLT, rigid pipe would make it difficult to remove the false bottom for cleaning. Also, the SS false bottom available form a few of the HB vendors has a barbed fitting.

Clear PVC flex tube would crush under a heavy grain bed. Thus my dilemma.. I'm looking for an alternative.
 
This is the false bottom under consideration.

falsie.jpg
 
I think food grade vinyl tubing made to handle some heat would do just fine. You can probably find it at McMaster-Carr.
 
One should be able to be extrapolated to the other reasonably. Since you're only talking in the range of ~100 lbs of weight in cooler AND since the tube should have liquid in it, a decently high durameter should be hard enough to maintain its shape. You could always order some of a few different types and see which one works best under a few tests.
 
One should be able to be extrapolated to the other reasonably. Since you're only talking in the range of ~100 lbs of weight in cooler AND since the tube should have liquid in it, a decently high durameter should be hard enough to maintain its shape. You could always order some of a few different types and see which one works best under a few tests.

The spec remains the same within a given tube style as well as between styles that use the same material. It is a raw material spec, not a finished product spec. Granted, a material with a harder composition will tend to be more rigid. However, a tube that is reinforced with steel will have the same duro spec as one that is not.

As you say, looks like the best way to find out is to get my hands on some tubing. It shouldn't be too hard to find a distributor in LA.
 
Where are you guys finding the food grade vinyl tubing?
It is the last piece missing!
 
So it's been an impossible feat for me to find SS 5/8" fender washer, considering I'd rather not only have the option of buying bulk online.

A fastener store in town carries SS 5/8" USS washers. They are 1.5" wide... should that be big enough to maintain a watertight seal on the inside?
 
Here you go. Your LHBS should have some as well.

McMaster-Carr

Holy Smokes that's a s^@% load of tubing!
Thanks arturo

Finished mine today, less the tubing. I'm just using the braided line with clamps till my tubing comes in.
Maiden voyage tomorrow. Thanks for the OP FlyGuy

Reno - I bought my SS washer at Home Depot. I had to buy a little package called Create A Bolt, it comes with 4 washers +lock washers and nuts. It was almost four bucks but better than running around...

Spludge
 
Here's a pic of the ball lock. It's in the description but you can see the gap between the SS flat/fender washers where i used the lock washer (not visible). The ball lock will spin on the axis and has a slight 'wobble' to it but I have no leaks whatsoever.

P1010341.JPG
 
My 10gal cooler MLT is working fine. No leaks. However, I would like to install the Brewmometer below to keep from removing the lid.
Anyone here with experience doing this?
Thanks.....
brewmometer-face.jpg
 
I know there is a "cooler thermometer adapter" available at Northern Brewer, but it is made for standard 1/8 stemmed thermometers. I have a Brewometer that came on my Boilermaker, and the probe is only about 2 inches long. The weldless version appears to have the same stem.

The issue you will have will be getting the stem deep enough into the cooler once it is installed. I know the sides on my cooler are about 1 1/2- 2 inches thick. The probe would only protrude about 1 inch into the cooler.

However if you still want to go that route, you could could get most of the same parts as for the spigot. You would need a longer threaded nipple, and pretty much the parts used for the weldless bulkhead but you would want to install it in reverse so the female threads are on the outside.

I notice that lower priced Thermometers have longer stems. Seems the Brewmometer is best suited for a thinner wall. I will check out the Northern Brewer kit as it seems I can get it and the Thermometer for about what the Brewmometer cost.

I brewed 2 AG batches and hit my temps just right. On the 3rd I was high. But then I realized my digital thermometer ($14.00) was acting up. So I wasnt sure where I was. It was then that I decided to pony up for the built in Thermometer.

Thanks for the tip!!
 
Inspecting my cooler before brewing today, I noticed a warped little area (about 1 inch) with a CRACK next to it in the bottom. This is terrible! I was just getting comfortable with my MLT and now this. I think this is from putting in water that was above 180 degrees. The plastic looks a bit warped and then there is a crack. Does anyone have any suggestions for fixing this or do I have to get a new MLT?
 
I usually put water in it when its at ~140 and then again at the correct temp. The extreme changes in temperature is what causes the warped area.
 
Hey, another person with a TPB quote in their sig!
You don't have to be all that worried about bacteria contaminants because whatever comes out the mlt is going to boil for an hour.
 
I thought I had heard from some John Palmer podcast that there were still beasties that could survive boil. Also there could be flavors and gunk if you had some fermenting mash living in the wall of the cooler...

I am thinking I need to use some type of tape, epoxy, silicon sealant, etc, I'm just not sure what will hold and will be food safe.
 
Just made my own rubbermaid MLT, thanks for everything. Some thoughts:

Total cost for me from Home Depot was around $80. I had a lot of trouble removing the inner tubing of the SS mesh, however, sliding it off like a caterpillar finally worked. I ended up using 1 SS fender washer inside and 2 SS fender washers and 3 flat washers outside to get a tight seal. No leaks whatsoever so i'm pretty happy, especially considering i have almost no DIY skills whatsoever. Up next, making my own immersion coil.
 
Question on tubing for inside of braid:

I got 3/8" x 1/4" poly tubing from ace. It is somewhat stiff and a milky white color. It was the only high temp tubing I saw, but I am not sure about food grade.

I also have some regular clear vinyl tubing, not sure on food grade or temp range.

Which of these should I use?
 
Just made my own rubbermaid MLT, thanks for everything. Some thoughts:

Total cost for me from Home Depot was around $80. I had a lot of trouble removing the inner tubing of the SS mesh, however, sliding it off like a caterpillar finally worked. I ended up using 1 SS fender washer inside and 2 SS fender washers and 3 flat washers outside to get a tight seal. No leaks whatsoever so i'm pretty happy, especially considering i have almost no DIY skills whatsoever. Up next, making my own immersion coil.

Did you verify the "SS mesh" is SS or is it the synthetic mesh they use that looks like SS? I'm pretty sure if it's not SS you'll get a stuck sparge. Just asking as you referenced Home Depot and I know that's what they carry in the 1/2" stuff whereas Lowe's carries the actual SS stuff.
 
Question on tubing for inside of braid:

I got 3/8" x 1/4" poly tubing from ace. It is somewhat stiff and a milky white color. It was the only high temp tubing I saw, but I am not sure about food grade.

I also have some regular clear vinyl tubing, not sure on food grade or temp range.

Which of these should I use?

As long as the braid is SS you don't need any tubing on the inside. FlyGuy only used it to help clamp on the ends whereas I just used tie-wraps to hold the braid on both ends and it works great.
 
As long as the braid is SS you don't need any tubing on the inside. FlyGuy only used it to help clamp on the ends whereas I just used tie-wraps to hold the braid on both ends and it works great.

Yep, it's stainless, thanks!
 
I just can't get the thing together without leaking. My problem is that the hole is off center of the recess in the front. It is low. Looks like datum plane (bottom) was off of the stop when drilled. As soon as I get enough compression it tilts up, thus down on the inside, letting leak through top side of o-ring. .
So now I filled the recess with silicone caulk flush to the rest of the front surface and will try again tomorrow after letting it cure some more.

BTW, I'm using 1/2" hardware from bargain fittings. That place kicks ass!
 
Just built this. The first time around, I had an impossible time getting the female barb adapter (Watts A-298) to fit onto the brass nipple (Watts A-786). In trying to hold the nipple in place, I ended up damaging it with the pipe wrench by denting it. So, I went back to Home Depot to buy a new one to try again, and also bought a strap wrench that you find in that area. The barb adapter fit MUCH better on the new nipple, even with the Teflon tape wrapped around it. So, if you have a hard time getting that part assembled, it might be a manufacturing defect!
 
Pretty sure I got it ok.
I filled the recess in front with silicone caulk, and replaced the o-ring inside with a square silicone washer I cut from some of that bakeware.
Filled it up and let it sit for two hours.
Just a bit damp on bottom of the locknut but not even enough for a drop to fall off.
I put a bit more caulk into the gap between lock-nut and washer.
I think it's good now.
 
Just bought my supplies today... will be building when I get home. I am going away for 9 weks, unable to brew, and I want this to be ready and waiting for me when I return!
 
Hey, my 5 gallon is looking nice.
Filled with hot (tap) water for leak test and temp test.
No leaks.
Didn't lose a single degree of temp in over an hour.
Siphons out all but one cup of liquid.

:rockin:
 
I just can't get the thing together without leaking. My problem is that the hole is off center of the recess in the front. It is low. Looks like datum plane (bottom) was off of the stop when drilled. As soon as I get enough compression it tilts up, thus down on the inside, letting leak through top side of o-ring. .
So now I filled the recess with silicone caulk flush to the rest of the front surface and will try again tomorrow after letting it cure some more.

BTW, I'm using 1/2" hardware from bargain fittings. That place kicks ass!

You said it! After reading about all the, uh, "fun" a lot of people in this thread had putting together a good combination of hardware, I just ordered mine from Bargain Fittings. Everything is 1/2", went right on the Rubbermaid / HD 10 gal. cooler according to directions, and it doesn't leak a drop.
 
Back
Top