BruControl build planning

Homebrew Talk - Beer, Wine, Mead, & Cider Brewing Discussion Forum

Help Support Homebrew Talk - Beer, Wine, Mead, & Cider Brewing Discussion Forum:

This site may earn a commission from merchant affiliate links, including eBay, Amazon, and others.

adman

Supporting Member
HBT Supporter
Joined
Jan 14, 2011
Messages
254
Reaction score
49
Location
Chicago
Hi HBT!

I'm in the planning stages of re-entering homebrewing after taking several years off. The last time I brewed I used a direct fired kettle combined with a plastic cooler mashtun with a 120v RIMS tube for temperature control/stepping. Initially I planned a relatively simple eBIAB controller using the PID I already had, but once I read about @BrunDog's automated system and BruControl I was hooked. Although an automated BIAB system may seem a bit silly, I plan to use scripting and motorized valves to eliminate moving hoses--one of my least favorite aspects of my previous brew setup, along with losing prime on the pump and, of course, cleaning. I hope that not disconnecting hoses will reduce/eliminate losing prime, and that I can automate at least some of the drudgery of cleaning.

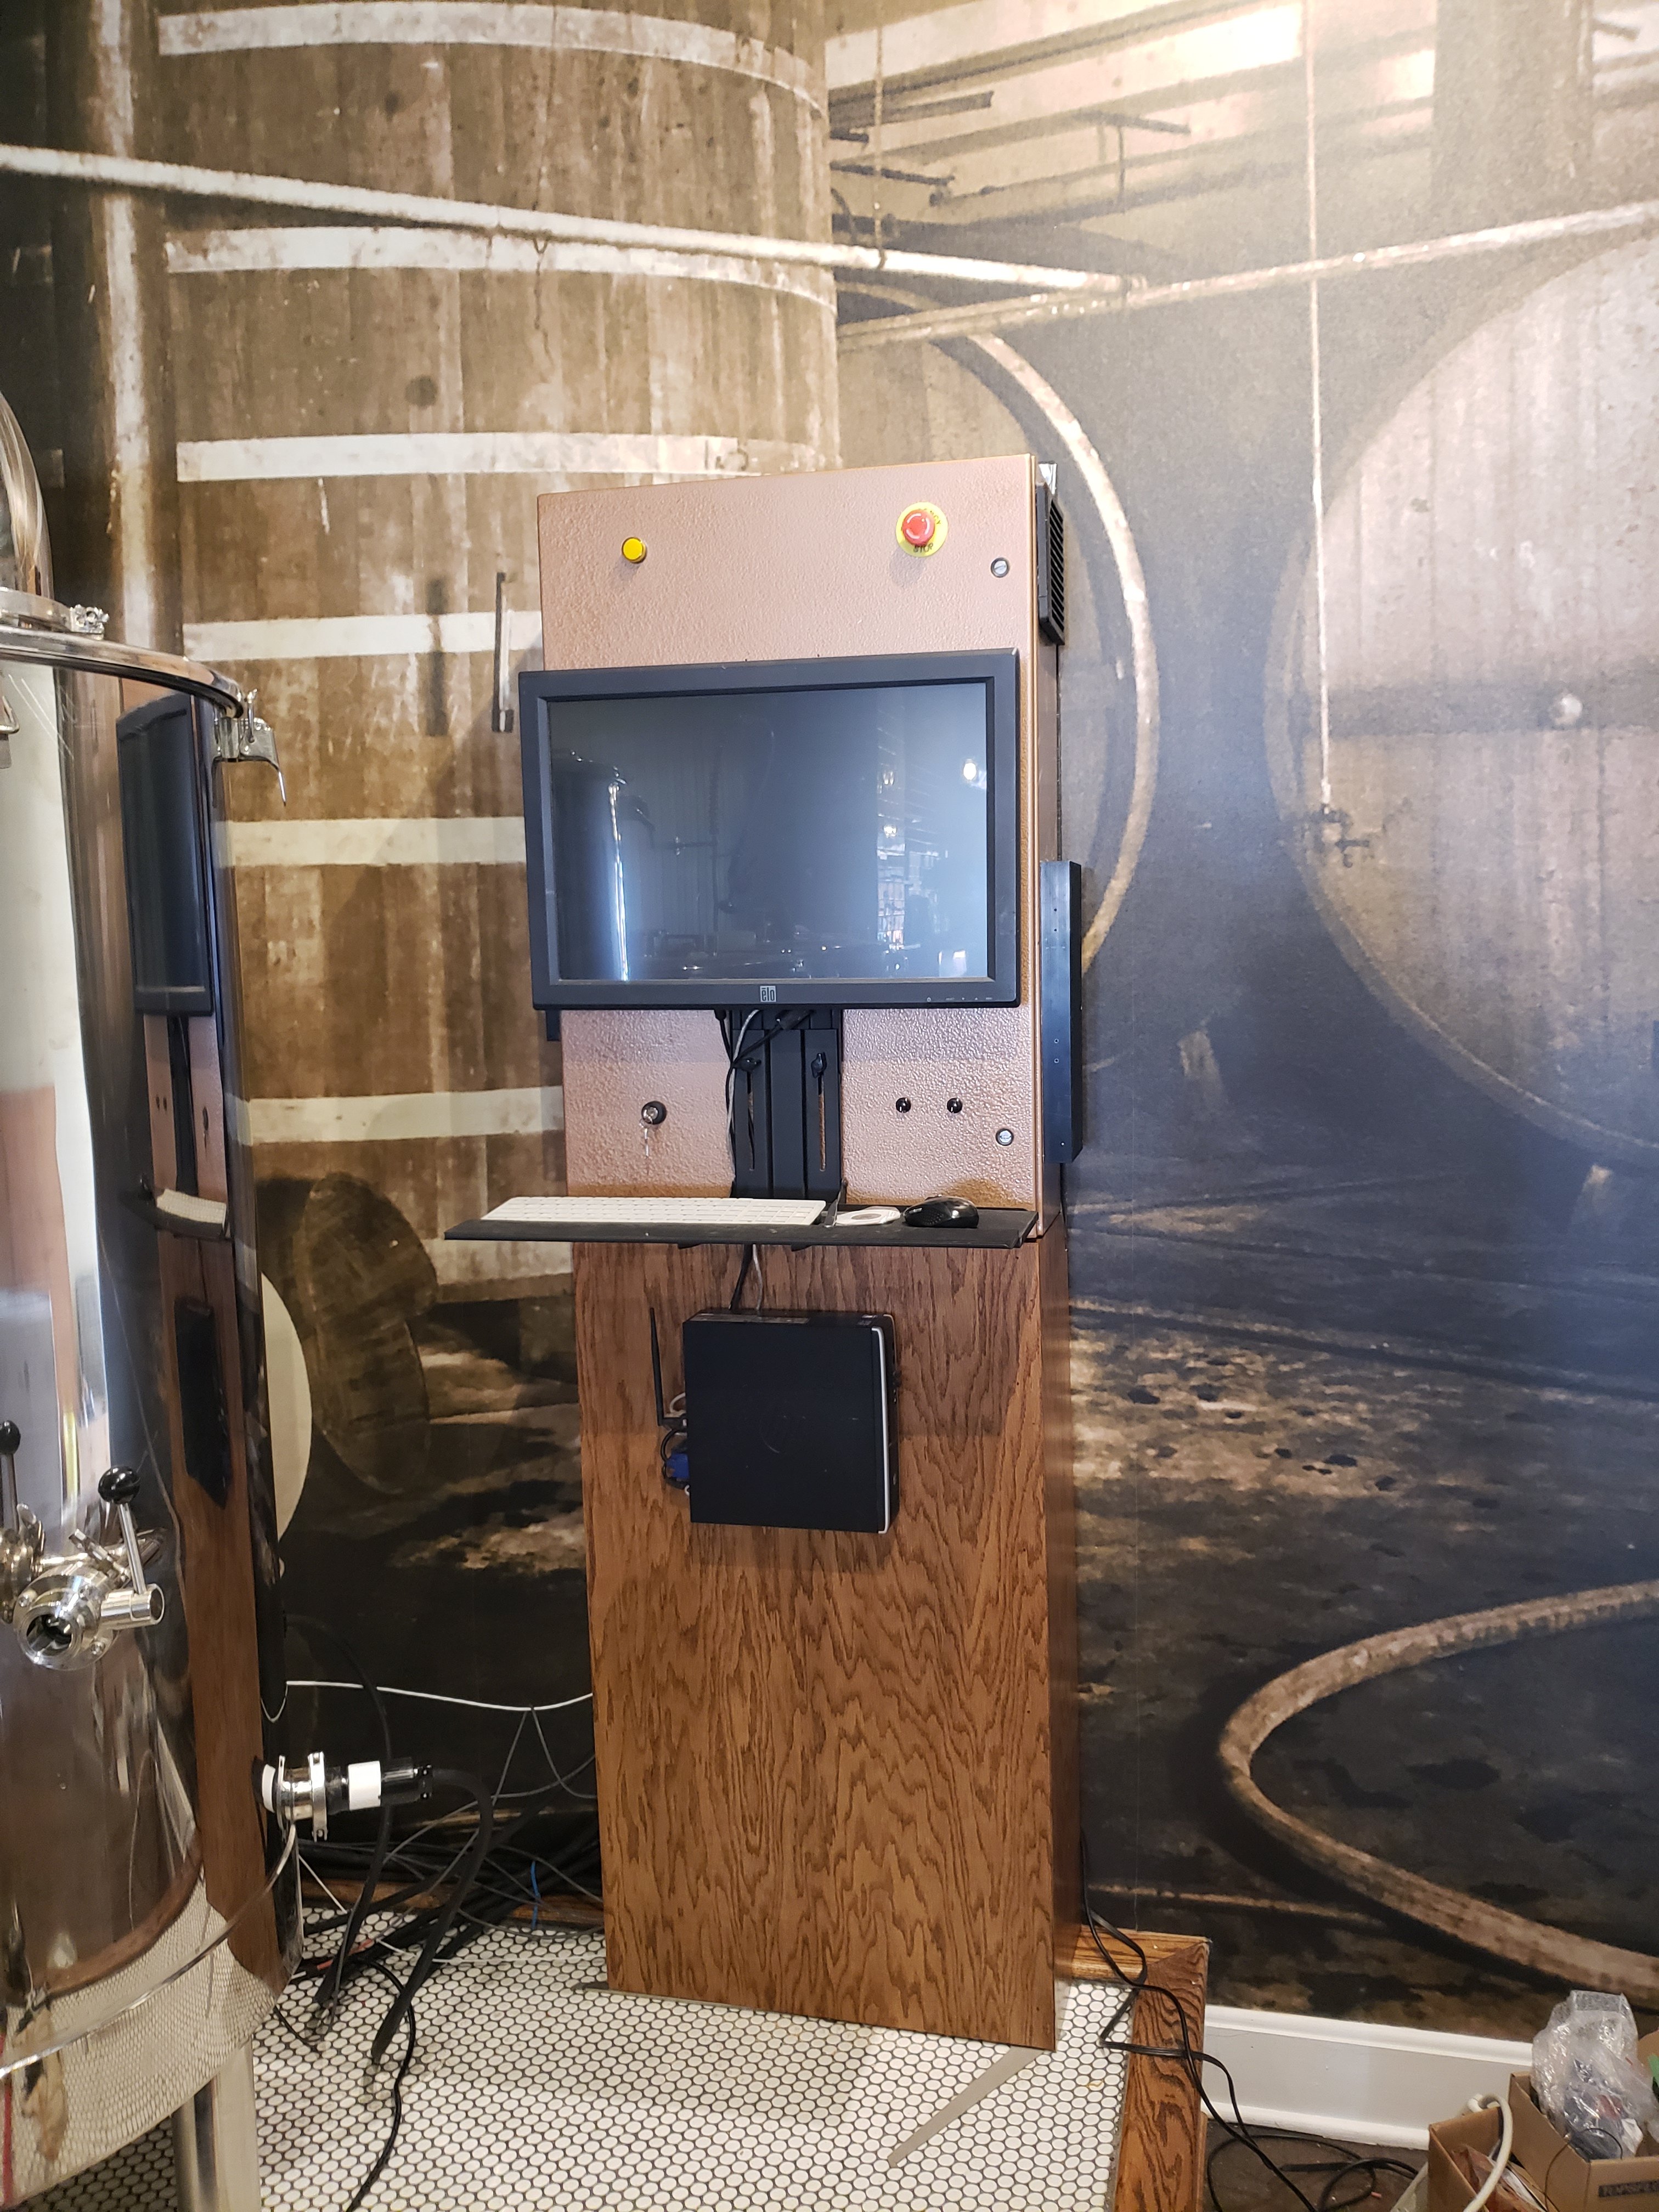
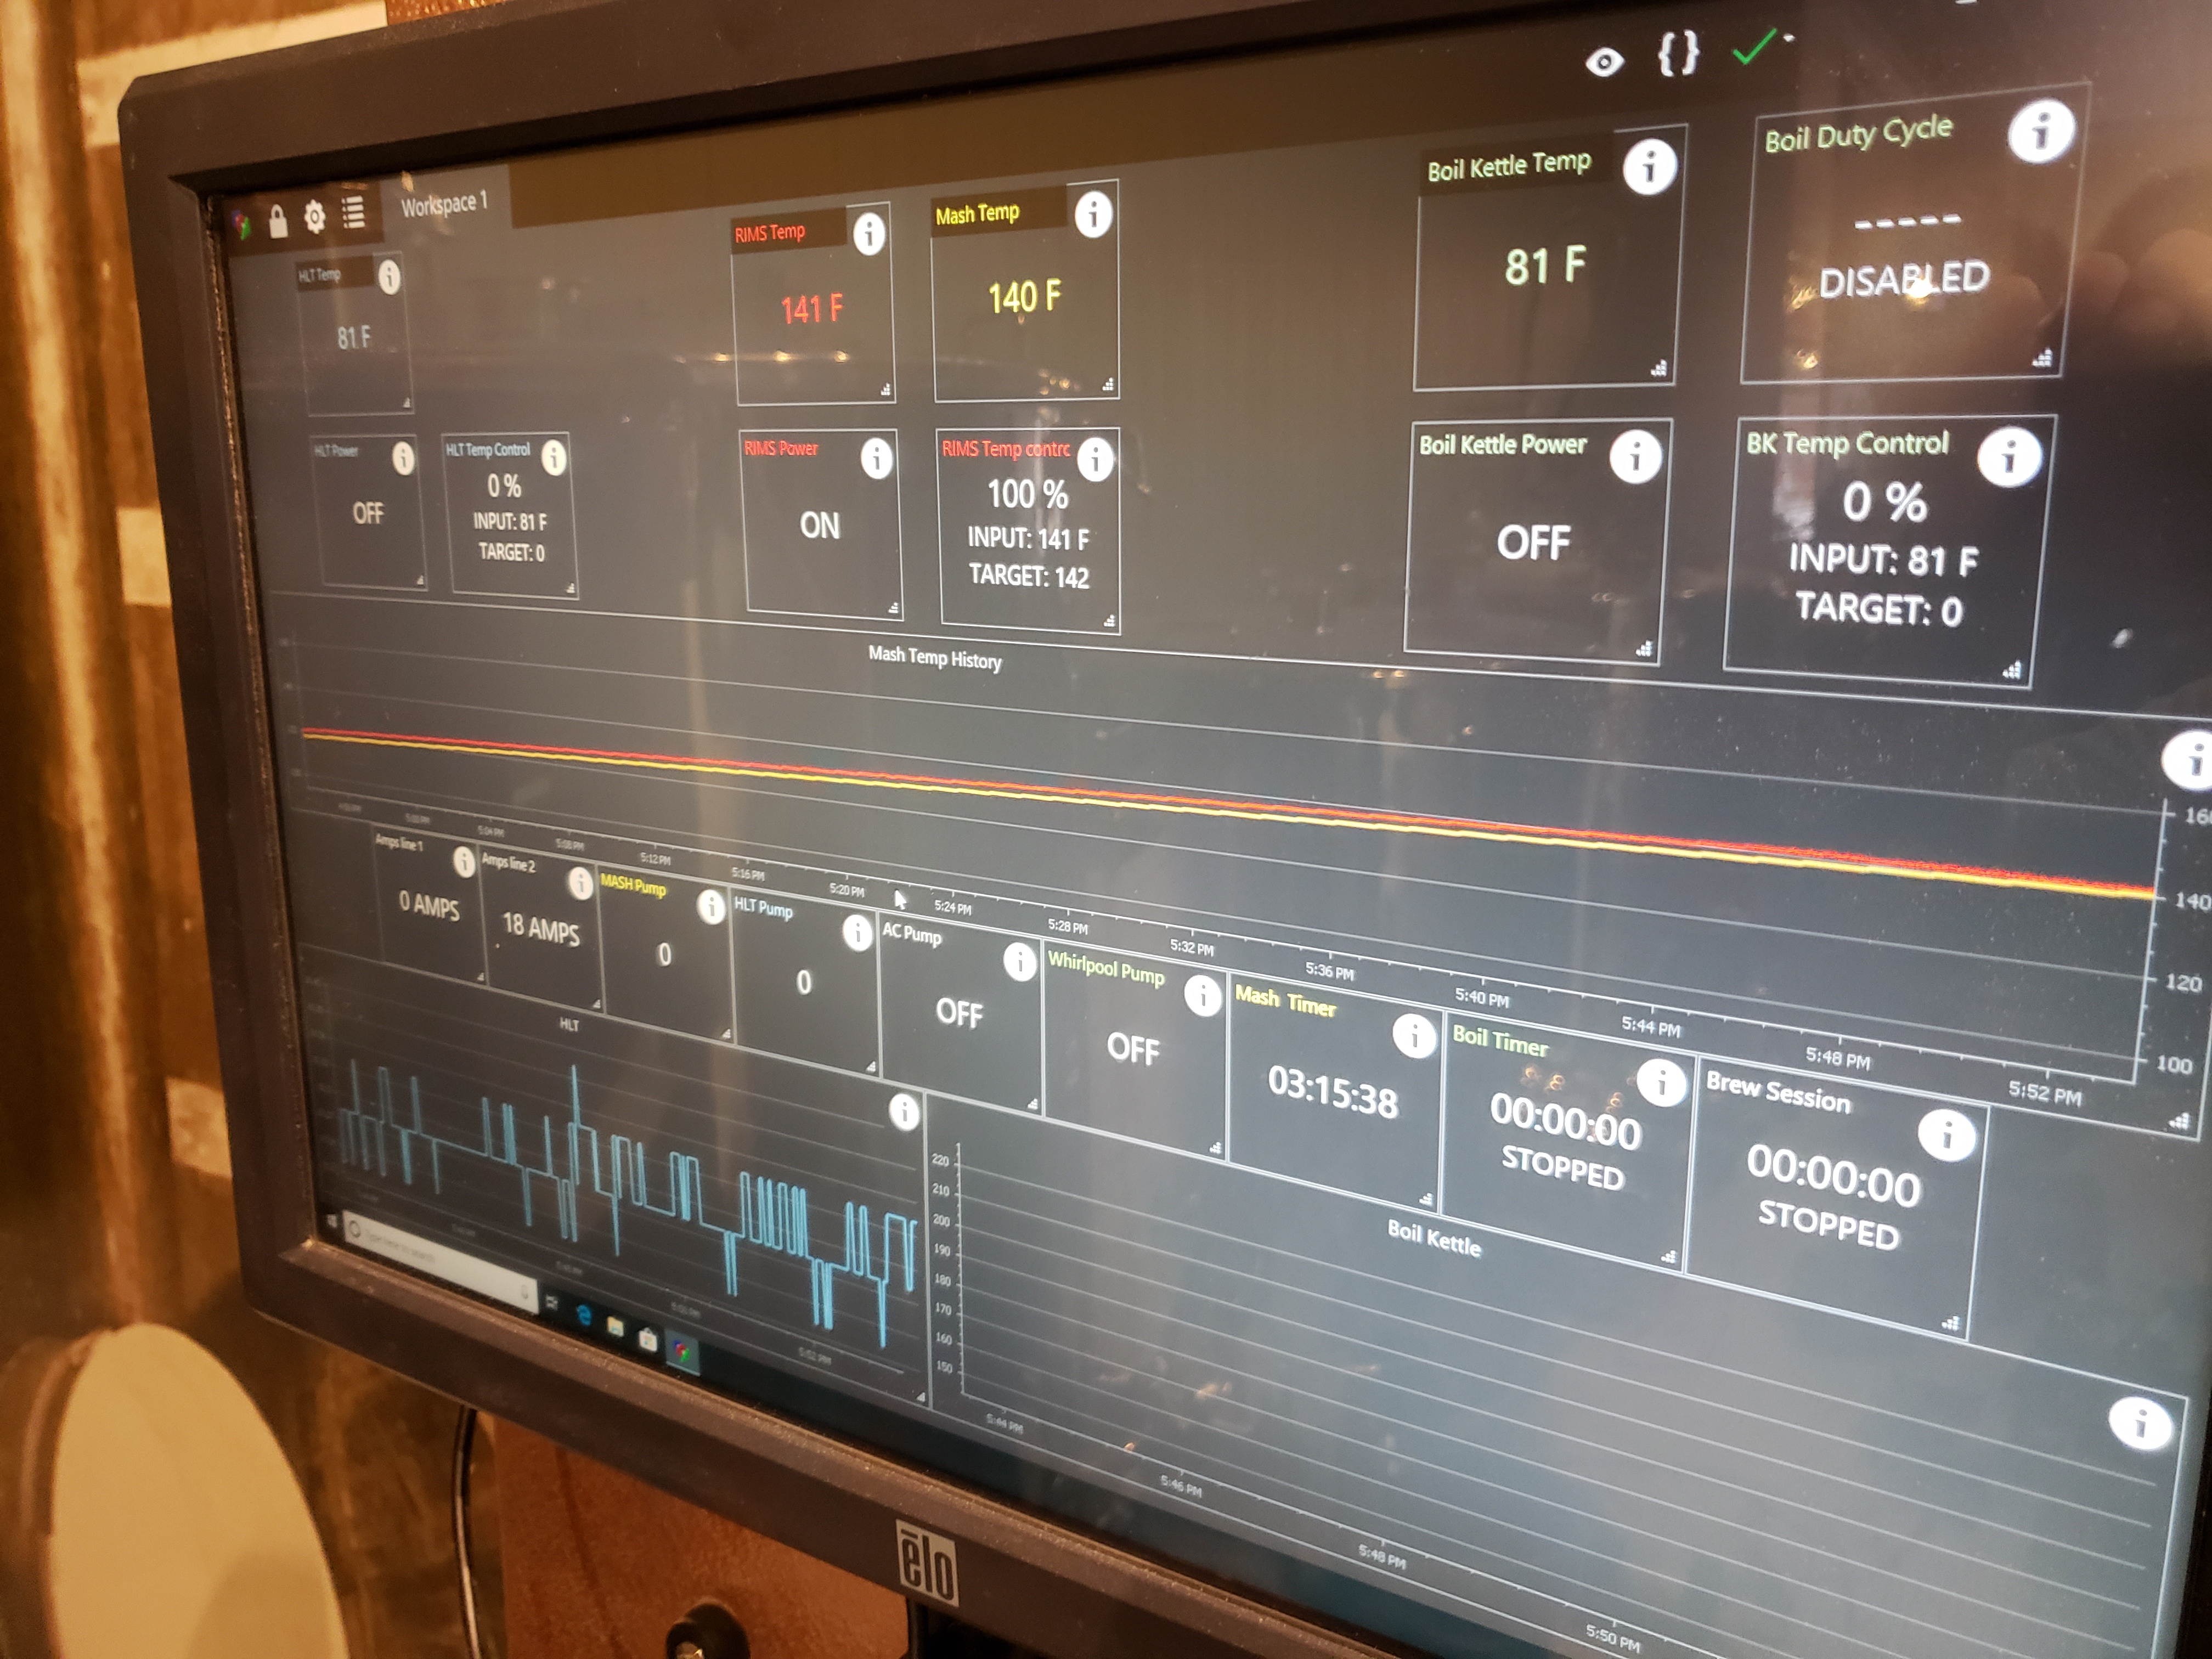
With that said, below are wiring/plumbing diagrams describing the system as planned so far. I've already posted my wiring over in the main BruControl thread, but I thought I'd start my own thread now that I've begun assembling parts. I did get lazy with diagraming the wiring for additional valves once I realized that I would potentially need so many. The valves/tubing in orange on the plumbing diagram are optional in case I want to underlet on-demand-heated strike water (should I decide to try some LODO methods). So those two three way valves would direct water from RIMS tube down to the kettle drain and in through the dip tube. Otherwise the three-way valves are hopefully self-explanatory: selecting between filtered water for strike/sparge and sending water to the chiller; selecting between fresh supply water and recirculating from the kettle; selecting between sending water/wort through the RIMS and into the chiller; and selecting between whirlpooling wort back to the kettle and sending chilled wort to the fermenter. I've begun ordering and have received most of the parts for the control panel, save for a few items that are making their way, ever so slowly from China. I need to decide on what kettle to get, after which I'll begin purchasing more of the parts for my plumbing.

Hopefully I'll continue to document this process, although I expect it to be very, very slow. Between the job and family I'll only have a few hours each week to devote to the project. Please let me know if you have any questions or comments on my planned build.

Thanks!

adman BIAB Plumbing v1.png adman BruControl Dual Element 50A v1.png
 
That's the plan, yes. Since I anticipate primarily making 5g batches, I should really be able to get that strike water up to temperature quickly if I use both the RIMS element and the kettle element simultaneously. There's no kill like overkill, right? :)
 
I would very much like to emulate your 2-vessel rig, BrunDog. The only limitation is space. I have limited space for my brewery, and my goal is to have my brewery, control panel, fermenter, and fermentation temp control all on this shelving unit. I may have to get the rack to determine whether I could put the fermenter and chiller on the bottom shelf and still comfortably brew with 2 vessels on the next shelf.

Agree that an extra ~$200 on another kettle is not a huge amount of money for the additional flexibility it would provide.
 
Also (and I think you may have answered this in the main BC thread), is there any reason that I can't put a pressure sensor and thermometer on a tee in the same kettle hole?
 
Also (and I think you may have answered this in the main BC thread), is there any reason that I can't put a pressure sensor and thermometer on a tee in the same kettle hole?

You can put a temp probe and a pressure sensor in the same hole, but if there is flow through it (as in recirculation), the pressure sensor will not read correctly while the pump is running as there will be some local vacuum created, which will cause the pressure to read low.
 
So in the main BruControl thread I indicated that the first enclosure I bought was probably too small for my purposes. So I bought this one from ebay and it arrived just now. Holy moly it is comically gigantic. I know that once I start putting components (and wires) in there it'll start to feel crowded pretty quickly. But whoa. It's big. And heavy. And I'm definitely NOT looking forward to drilling/cutting holes in the front/sides, which are made out of what appears to be military-spec armor plating.
 
That’s a little big for BIAB but will give you room for expansion, assuming you have room to put the enclosure in/around your brewery. As far as I am concerned, the main control enclosure should not serve as the user interface. Obviously BruControl aims to put all controls in digital format, but any basic dedicated controls like a power led, e-stop, key switch, etc. can be placed in a very small enclosure the user can easily access.
 
@BrunDog- I really like the concept of putting the user-facing elements in a smaller enclosure separate from the main enclosure. I went back and reviewed your build thread and I really like the pre-drilled plastic enclosure you used--so much that I bought one. My only concern is what wire to run to this separate enclosure. Would this 6 conductor cable from amazon be ok in your opinion, or should I just go all the way to a SOOW cable like this one?
 
That's nice cable. You don't need any significant size due to the very low current requirement, so you could have gone even 22 AWG. But this is perfectly good cable - will have a little more strength mechanically too.
 
Dry fitting the outlets in the gland plate. My hope is to have all of the holes except for the SSR heat sink on this panel.

Also, waiting on 8 more aviation connectors for the space on the left of the plate.

IMG_0889.jpg


Edit. Crap. Forgot the USB connector. Have to find a place for that as well. I think I can find some space over on the left along with the sensor/valve connectors.
 
Last edited:
I probably could/should have given myself another 1/4-1/2" between the 120v outlets and the sensors, since I have a bit more space over on the right where the 240v stuff is. I'll definitely make sure that the wiring of the left-most 120v outlet is nice and tidy.

-Adam
 
No real progress to speak of—I put the lights and switches in the user panel, but that was cheating since the holes were already cut. Speaking of that enclosure, @BrunDog, did you use any waterproofing beyond that which came in the box? It seems like water could conceivably sneak in past the gaskets on the key switch and e-stop because the holes in the enclosure have 4 extra little cutouts in them. I certainly don’t anticipate hosing this enclosure down, but I still would like for it to be relatively watertight.

IMG_9472.JPG


Edited to add a picture of the additional cutouts in the light/switch holes and how the E-Stop doesn't completely cover the holes. I think I'll just put some silicone in there to be safe.

IMG_4552.JPG
 
Last edited:
Some progress! Finally! Work and family just don't permit much time to work on this. Hmm... Not sure what that means as far as having time to brew once I'm done with this project, but one thing at a time...
Finally got all of the components laid out and mounted to the plate in the enclosure. Soon I can start wiring (yay)! And soldering (boo).
IMG_6386.JPG
 
Quick question for @BrunDog (or anyone else who knows): is there any reason to not use separate hot lines on the coils for the two element contactors? I.e. use L1 on the coil for the RIMS-element contactor and L2 on the coil for the BK-element contactor? These are 120v-coil DPST contactors, FYI.
 
I suppose it doesn’t matter. One reason not to: Often you will have an E-stop or power switch which would interrupt the contactors. Switching both L1 and L2 via that switch becomes a little harder, but with multi-pole switches it’s not impossible.
 
is there any reason to not use separate hot lines on the coils for the two element contactors?

None that I can think of. That said, why do you have the contactors there in the first place? Also, please make sure that the 1A fuses from the SSRs to the user console element pilot lights are installed close to the SSRs.
 
My e-stop will be wired to kill the main 60a dpst contactor, while maintaining DC power to the Mega/valves, etc. So no AC power should be going to anything except the DC power supply.
 
None that I can think of. That said, why do you have the contactors there in the first place? Also, please make sure that the 1A fuses from the SSRs to the user console element pilot lights are installed close to the SSRs.
@GParkins How far is too far? As currently laid out, I’d guess that there will need to be approximately 12-18 inches of wire between the SSRs and the fuses. I could also use 14 awg wire between the SSRs and the fuses instead of 20 awg if that provides sufficient safety margin. Otherwise, I'll need to get some inline fuse holders to place the 1A fuses closer to the SSR location.
[Edited]:Looks like that's too long. Found a different spot in the enclosure so that the fuses can be more like 6 inches from the SSR.

As far as why I have the contactors at all, I suppose it's (perhaps pointless) redundancy? I plan to have the contactors switched by BruControl via a relay board so that each element is completely disconnected until BruControl turns it on. So within each script that calls for heat I will turn on the relay that activates the contactor for that element, and then any actual control of the element is handled by the SSR.

Thanks for your help!
 
Last edited:
Unrelated to my latest question, is it possible for me to change the title of this thread? As I have gathered parts and planned this build, I have ultimately decided to go with a 2-vessel approach, similar to @BrunDog's. Thus, the eBIAB title is a bit misleading.
 
@GParkins How far is too far? As currently laid out, I’d guess that there will need to be approximately 12-18 inches of wire between the SSRs and the fuses. I could also use 14 awg wire between the SSRs and the fuses instead of 20 awg if that provides sufficient safety margin. Otherwise, I'll need to get some inline fuse holders to place the 1A fuses closer to the SSR location.
[Edited]:Looks like that's too long. Found a different spot in the enclosure so that the fuses can be more like 6 inches from the SSR.

As far as why I have the contactors at all, I suppose it's (perhaps pointless) redundancy? I plan to have the contactors switched by BruControl via a relay board so that each element is completely disconnected until BruControl turns it on. So within each script that calls for heat I will turn on the relay that activates the contactor for that element, and then any actual control of the element is handled by the SSR.

Thanks for your help!
My reason for doing this was to ensure the voltage as well as current is removed from the elements when off as well as both poles which is a possible safety concern with just switching current on one pole. also ssrs seem to always stick in the on position when they do fail..
 
@adman, within 7" from the source of power is the rule of thumb in my industry. In your case, the source of power for the light gauge wire for the pilot light is at the SSR terminal. The objective of overcurrent protection (fuses & breakers) is to protect the wire.

@augiedoggy and @adman, Damn good reason. I hadn't thought of that. I'm starting to think more and more about building a second enclosure for the heavy stuff. I may wind up adding more elements, so a 100A feed is not totally out of the question. 100A would definitely require a second (third, actually, if you count my ferm system) enclosure. I guess it's a good thing that my wife is egging me to go pro. No spending "discussions" yet.
I'm in the process of that now. As you can see in this brucontrol panel I have many Allen Bradley contactors in my 100a (120a capable) 3bbl setup with the ssrs mounted along the sides. I bought them used on Ebay and they are 4 pole so each one controls 2 elements. One has a set of NC contacts which open when its activated and turning on the rims so it disables one of the 4 5500w elements in my hlt to keep the amp draw down.
OP your likely going to want to either get DC coil contactor and use a diode or use and "Rc Snubber" across the ac coil to prevent electrical noise from messing with your arduino and causing spikes or resets. I as well as others had this issue.
 

Attachments

  • 20180822_173734.jpg
    20180822_173734.jpg
    1.9 MB · Views: 227
  • 20180822_173711.jpg
    20180822_173711.jpg
    1.7 MB · Views: 208
  • 20180817_175500.jpg
    20180817_175500.jpg
    3.5 MB · Views: 205
Last edited:
Thanks @BrunDog! That 6 awg wire was no fun at all to work with, especially since I’d wired everything else up first. But I got it all in there, even the long run of hot2 through the din mounted current meter.
 
I’m actually thinking of doing the same thing! I had the same cart so will likely use it to make things easier since I brew in the garage.
 

Latest posts

Back
Top