Brewery Build - Single Tier HERMS

Homebrew Talk - Beer, Wine, Mead, & Cider Brewing Discussion Forum

Help Support Homebrew Talk - Beer, Wine, Mead, & Cider Brewing Discussion Forum:

This site may earn a commission from merchant affiliate links, including eBay, Amazon, and others.
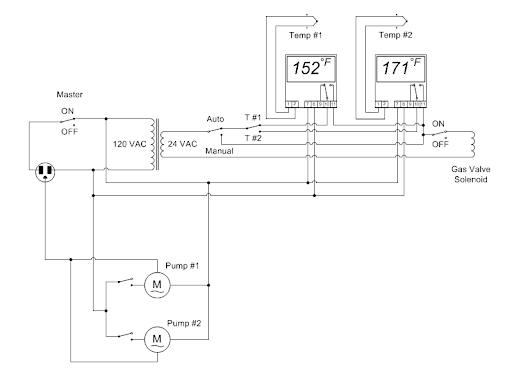
FWIW, I kept the coil out of the HLT and just recirc the HLT as the control through the convoluted CFC and the wort in the opposite direction. When it is time to cool, I just switch the valves, and start running water through the opposite direction. Since I'm recirculating the HLT liquor I don't need the use of a motor nor a paddle to keep temperatures even. Having the connections to the faucet are also great when filling and cleaning the system. I know a lot of folks choose to pump the wort through the coil in the HLT, I just chose a different route.


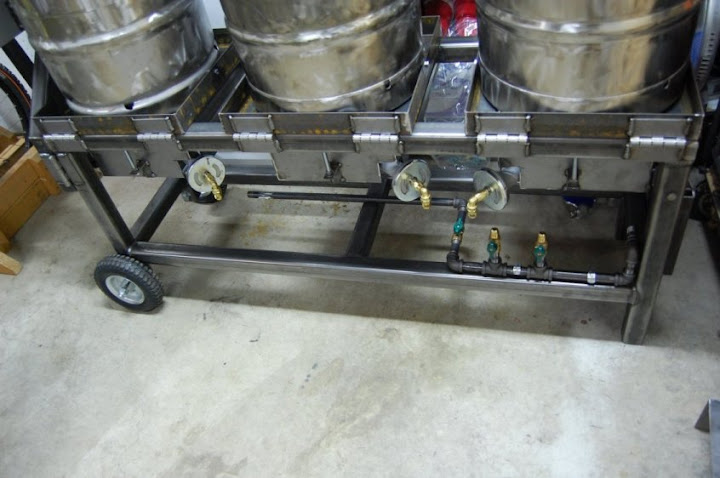
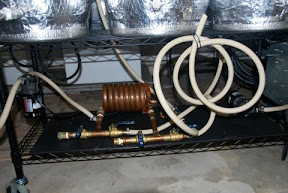
A shot of the pumps and heat/cool exchanger. The hose connections are also a great way for flushing the copper coil and filling up kettles for cleaning.
DSC_0281.JPG

DSC_0286.JPG


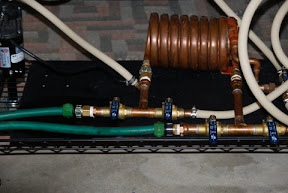
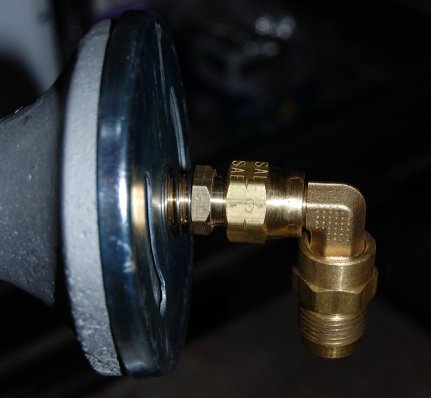
Regarding the thermoplastic, it's completely opaque so there's no watching the wort through the lines. I use polysulphone QD's and have been very pleased with the design.

I'm looking fwd to seeing your system built and brewing away! If my Dad and brother were here in the NJ, I'm sure I would have two committed brew buddies.
 
flananuts - Interesting design; I like it. Glad it's working out for you.

That's exactly what I'm working on is attaching the coil for both HERMS use and cooling. In your research what made you go with copper over stainless. I've read the heat conductivity property benefits of cooper but like the durability of stainless. Here's a great thread about this and a nice example of a stainless set up. https://www.homebrewtalk.com/f51/stainless-steel-copper-herms-coil-138139/#post1565417.

Looking for as much info as I can before I pull the trigger.


I'm not sure what the fittings are called that we found at the hardware store - but they are basically just compression fittings. We'll solder a little stub to the one end of the compression fitting and then a threaded 1/2" NPT so we can thread that into the side of the keg easily, then the other side of the compression fitting will be attached to the coil itself.

We opted for copper for a few reasons - 1) We really wanted to introduce copper to the brewing process in some way or another - obviously copper kettles would be slick but crazy expensive! The coil was a good bet. From what I've been reading a lot of the big microbreweries have copper somewhere in their process. 2) Copper is a heck of a lot cheaper and easier to work with. Copper fittings are readily available at any hardware store. 3) The heat conductivity properties you mention were also key - the more efficient we can make the system the better.

Because the copper in the HLT is really just in a bath of water - and the systems are conducive to a clean in place by running boiling water/cleaner through - I really doubt we'll have maintenance issues with the copper. Nor have I heard anyone on here complain about it's durability. Either will work - it's one of the dozens of questions and debates anyone tackling a project like this will encounter! Enjoy your build!
 
Looking good. I'm working on a similar single-tier HERMS build. I'm replacing the stir motor in my current HERMS rig with a whirlpool like setup in the HLT. Rather than stir the HLT, I'll use one of the march pumps to recirculate the water in the HLT in a whirlpool, eliminating the need for a stir motor. Since I already needed 2 march pumps to fly sparge single tier it seemed like a good way to simplify the design a bit.

Good luck! Subscribed.
 
Flananuts, I'm going to be starting a thread on it soon, in the next week or so. Right now it's mostly diagrams. I've got the HLT welded and quite a few of the fittings I'll need. I'll PM you a link when it's posted.
 
MPLUTODH1,

I live in the area and am looking at building a very similar system. Do you know if your welder would be interested?

Also, maybe I missed it but what was the size and gage of your tubing?

Keep up the good work.
 
MPLUTODH1,

I live in the area and am looking at building a very similar system. Do you know if your welder would be interested?

Also, maybe I missed it but what was the size and gage of your tubing?

Keep up the good work.

I can ask Wednesday when we pick up our frame. He's a friend of ours that does these types of projects on the side - has a family and full time daily job so I'm not sure how much availability he has but I can ask.

As far as tubing - it's 2" square for the frame itself - I'll have to check on the gauge we went with and get back to you.
 
I would recommend rotating the pump heads 180°. It can be a real pain to prime pumps with the input on the bottom, because of the loop formed at the bottom. Also, if you can raise your pumps higher, you will get higher flow rates through your march pumps, since they don't have to overcome as much pressure.

Just my 2 cents. Looking sweet.

We'll keep the pump priming thought in mind when we mount the pumps. As you'll notice from the drawing we've made our stand very "short" to accommodate easy viewing into the keggles - in turn there is only 14" between the cross beams - not sure we will have too much to worry about pressure wise but if we run into problems we can always move them up.
 
My HLT pump always primes with no problem, but my MLT pump needs a little love. So when I fill up the MLT with the initial strike water I force the air out pushing water into my coil and through the pump. It wasn't ideal but once the pump is primed, it never loses it.

I actually had to replace the silicone washer between the impeller and the polysulphone housing because I burned it up running the pump dry. It's amazing that a .30c part can cause the pump to come to a screeching halt!
 
Update 1/20/10

Updated build list with most recent parts, prices, etc. Picking up the brewstand tonight from the welder and will post photos.
 
Posted photos in the first post - got home a little while ago after making a trip out to our welders. He had the stand ready to go and welded on the hinges while we waited. Bolted on the wheels and handle, loaded it up in the truck and headed home. Set the kegs on just for looks - we'll bolt them to the trays in the coming days.

Making progress!
 
OMG, pluto...! Your brewstand is amazing!!!
I love the details you included: measurements, parts list, etc.
Beautiful work!
TY for the inspiration!
 
Update 2/06/10
Been sick the past few weeks so no headway had been made. But today spent some time this morning working on things. Got the keg tops cut off, jig worked out awesome. Also drilled and tapped the under side of the frame to mount our burner boxes. This week we'll drill the burner boxes, mount the burners and then mount the burner boxes/burners to the frame.

Picked up a step bit for drilling the holes for our couplings so hope to get those drilled next weekend.

Also picked up a 1/2" D Handle drill from Harbor Freight on sale, to use with the Monster Mill MM2 we picked up a few weeks back.

Dsc_0552.jpg


Dsc_0551.jpg


Dsc_0554.jpg


Dsc_0556.jpg


Dsc_0557.jpg


Dsc_0559.jpg


Dsc_0562.jpg
 
Not only a great price but a tall handle allowing for insulating the cover and leaving the handle exposed to lift off.
On the 12" or 10", what is the lids actual step diameter? Reason asking is can the keg be cut smaller than the posted lid size for a close fit?
Cut the kegs to match the lids is my thinking.

I'd have to measure - but ours was the advertised 12" lid and the hole was just under 12" - and it fits snug on one of our kegs, the other two we cut just a tad bigger apparently as they are a little looser but still fit nicely.
 
I'd have to measure - but ours was the advertised 12" lid and the hole was just under 12" - and it fits snug on one of our kegs, the other two we cut just a tad bigger apparently as they are a little looser but still fit nicely.

Thanks bro as i'll order a set of four for three 10" with plans of cutting the keg tops undersized after I measure the lids. I like slip fits for my next brewery build.
 
Update 2/22/10

Got some work done over the last few weeks. Picked up more of the parts we were still looking for.

Saturday we mounted the control panel box, drilled and bolted the keg skirts to the tippy trays, bent the copper into the HERMs coil, mounted the burners to the burner boxes and then brain stormed several other parts.

Have a few more packages on the way to finish up the gas plumbing and liquid plumbing. Have to drill the kegs this coming weekend hopefully and then they're off to Greenmonti to be welded.

Dsc_0571.jpg


Dsc_0572.jpg


Dsc_0574.jpg


Dsc_0575.jpg
 
How many feet of copper in your herms coil? What did you bend it around?

Just under 30'

We used a corny keg, 2 people and wrapped it that way, one person holding the coils tight to the keg and tight together, the other wrapping from the packaged coil to the corny. We then by hand separated the coils from each other a bit to allow fluid to contact the full coil.
 
All he would need is a long 1/4-20 bolt with a piece of rod stock as a Tee handle welded on, weld a nut on the back side of the leg to hold it closed. Add a tab on the arm and the back of the leg with a welded nut then use the same bolt to lock the panel in the open position.
 
All he would need is a long 1/4-20 bolt with a piece of rod stock as a Tee handle welded on, weld a nut on the back side of the leg to hold it closed. Add a tab on the arm and the back of the leg with a welded nut then use the same bolt to lock the panel in the open position.


That's an idea...

Honestly, we haven't even bothered - the arm and control panel weigh enough that they stay pretty stationary unless we're moving the whole brewery around.
 
Update 3/1/10

Brewed a honey nut brown this weekend for my buddies bachelor party so didn't get a lot done on the brewery.

Hardware to mount the burner boxes/burners showed up so they're bolted on now. Also tracked down 3 brass swivel nut elbows for the burners. Fitted the black pipe and gas plumbing, picked up a regulator and gas ball valves.

Dsc_0576.jpg


Dsc_0588.jpg


Dsc_0580.jpg
 
Work and other commitments have slowed progress - pretty much stuck to a few hours on the weekends here and there. We drilled the kegs last weekend and are hoping to get them off to Greenmonti this coming weekend. Also should have the pumps mounted this weekend - now we're going to mostly be focusing on electrical.

My buddies are all giving me hell for how long it's taken, I was optimistic that we'd be done months ago, but hey, good things come to those who wait right?
 
I agree, I'm patiently waiting to see the finished product. I am putting together a single tier herms in my head and love to see all the options before I start the build. Your build looks great so far. Excited to see it finished up!!
 
Kegs are in Greenmonti's hands to weld on the couplings; just about done with the electrical schematic and will post soon.
 
Kegs are in Greenmonti's hands to weld on the couplings; just about done with the electrical schematic and will post soon.

They are now done. I will see you tomorrow. Thank you for your buisness:mug:

A couple of pics to tease the crowd.
P1010135-2.jpg


These are your 1/4" couplings. I hope I got them low enough for you.
P1010136-1.jpg

P1010137-2.jpg
 

Latest posts

Back
Top