Brew Bucket by SS Brewing Technologies

Homebrew Talk - Beer, Wine, Mead, & Cider Brewing Discussion Forum

Help Support Homebrew Talk - Beer, Wine, Mead, & Cider Brewing Discussion Forum:

This site may earn a commission from merchant affiliate links, including eBay, Amazon, and others.
This may be in this massive thread somewhere but.... I have 25 inches height to work with in my fermentation freezer, and I know the height of the bucket is approximately 21 inches. I have been wondering if the 4 inches is going to give me enough room for the airlock, or if not, whether I'll be able to use a blow off tube without it kinking too much.

There are some real advantages to this bucket, one of which is the valve. In terms of taking samples during fermentation would I have to take it out of the fermentation and have it on a counter or something to get enough room to pull a sample? It seems to me that it might be difficult using the valve if the bucket is sitting in a freezer or on the floor.
 
24 inches on the nose

13in diameter ...bucket is 12 inch carboy is like 11.5

Put a standard bucket and glass carboy to it for comparisons

Disregard my last post about height with the airlock as I have found the answer.

Still curious though about taking samples and that I assume it must need to be elevated on a counter or something to easily access the valve.
 
The valve is very close to the ground level so depending on what you are trying to fill (and how much) it may be required to lift it to a counter and place the valve next to the edge. I can fill my graduated cylinder for a hydrometer reading with it in my fridge though.
 
Well, as some recommended to take apart and clean the valve I did just that. I'm not sure if there are different valves or not, but what I found is that these should not be taken apart.

First, to unscrew the barb part was very difficult. Not crazy difficult, but just had to do it carefully not to scratch it (used cloth to cushion the vice grips I used and a 12mm wrench). My thought, if it was meant to be taken apart and cleaned after each use then it would be much easier (and included in the instructions).

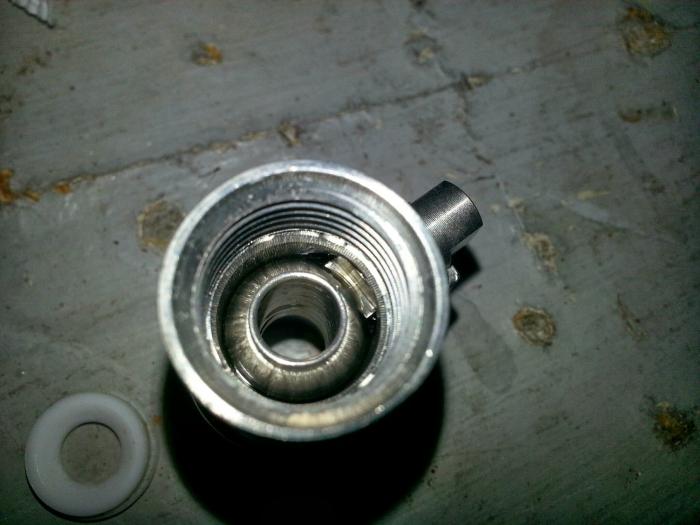
And then comes the white bushing. I thought I remember people saying that it is a flat washer and it should be removed. Well, I got mine out (once again difficult but doable) and as can be seen in the picture it is not a washer! It is the bushing that holds and forms the seal with the part of the valve that spins.

And lastly, the dirt (or old beer) that others may have thought was on the 'washer' appears to be oil. Not sure exactly what it is, but I think it is lubricant for the valve and is fully seperate from the stream of beer that will be going through the valve.


In short, I will never take my valve apart and will only give it a good soak/spray of pbw and starsan.

tmp_image2001516193.jpg


tmp_image-1415188880.jpg
 
The valve is very close to the ground level so depending on what you are trying to fill (and how much) it may be required to lift it to a counter and place the valve next to the edge. I can fill my graduated cylinder for a hydrometer reading with it in my fridge though.

Thanks!
 
Well, as some recommended to take apart and clean the valve I did just that. I'm not sure if there are different valves or not, but what I found is that these should not be taken apart.


First, to unscrew the barb part was very difficult. Not crazy difficult, but just had to do it carefully not to scratch it (used cloth to cushion the vice grips I used and a 12mm wrench). My thought, if it was meant to be taken apart and cleaned after each use then it would be much easier (and included in the instructions).


And then comes the white bushing. I thought I remember people saying that it is a flat washer and it should be removed. Well, I got mine out (once again difficult but doable) and as can be seen in the picture it is not a washer! It is the bushing that holds and forms the seal with the part of the valve that spins.


And lastly, the dirt (or old beer) that others may have thought was on the 'washer' appears to be oil. Not sure exactly what it is, but I think it is lubricant for the valve and is fully seperate from the stream of beer that will be going through the valve.


In short, I will never take my valve apart and will only give it a good soak/spray of pbw and starsan.


All valves are made to be taken apart. Also if there is any oil inside, it needs to be cleaned off. Check out this video.


Sent from my iPhone using Home Brew
 
Last edited by a moderator:
ImageUploadedByHome Brew1396814599.623793.jpgImageUploadedByHome Brew1396814610.048396.jpg

2 more just in primary, 2 lagering And 2 dry hopping. I've still yet to see the disadvantages posted by some about scratches, rusting? Or cleaning issues. This is the second or third use for some of these.


Sent from my iPhone using Home Brew
 
All valves are made to be taken apart. Also if there is any oil inside, it needs to be cleaned off. Check out this video.
http://m.youtube.com/watch?v=tRd6pPEU_ko


Sent from my iPhone using Home Brew


If you clean off all the oil what lubricates the valve? I don't see in the video where it says to clean off all the oil, just the excess.


Sent from my iPhone using Home Brew
 
I am finishing up my 5cf chest freezer fermentation chamber built. I currently have two "ale pales" and one 5 gallon better bottle.

I tend to only make one batch at a time, so I debating getting one of these and putting my ale pales and better bottle into storage.

I am looking for something to last a lifetime, is this the answer or are these more along the lines of an entry level product that you will only want to upgrade later??

I do not do any yeast harvesting, I am looking at this mostly for beer bling as well as easy of cleaning, ease of use, and ease of racking to a keg..
 
If you're not looking to harvest yeast ever, then this is pretty much the top and end of the line for you in terms of fermenters, aside from bigger-sized Spiedel fermenters, etc.

The next step up is really the conical fermenter, which SS Brew Tech also makes, called the Chronical. Pre-orders start Friday and it releases early May.
 
If you clean off all the oil what lubricates the valve? I don't see in the video where it says to clean off all the oil, just the excess.


Sent from my iPhone using Home Brew

Clean every drop of it off. Do it twice to make sure, you don't want any of that stuff in your beer.

The valve uses teflon seats that are self-lubricating, you don't need anything additional.

Well, as some recommended to take apart and clean the valve I did just that. I'm not sure if there are different valves or not, but what I found is that these should not be taken apart.

That the valve isn't easy to take apart just means it's a poor, although less expensive choice, for an application where it's ideal to take it apart and clean after every fermentation. That's the tradeoff when you get two-piece valves that aren't designed for frequent break-down. There are three-piece ball valves, like in that Blichmann video, that are designed for quick breakdown. The next step up would be encapsulated ball valve that use a special encapsulated seat minimizing the possibility of fluid remaining inside. Butterfly valves are best requiring no disassembly.

If you didn't clean the valve small amounts of that oil would be getting into whatever is flowing through the valve every time you open it.
 
I just ordered my brew bucket, looking forward to dropping it into my chest freezer/fermentation chamber!

Guess I have a couple of questions to go along with it. My chest freezer is metal lined, will this brew bucket distriibute the wight enough not to damage the thin metal floor or should I drop in say a piece of plexi-glass or something to help spread the weight?

Also I have the STC-1000 temp controller, what is the best way to run this with a brew bucket, just insulate/tape it to the side of the bucket?? I have seen several weedless thermo-well installs, is that a better route to go??

I have to just ask the same questions that have already been answered but there are almost 700 posts to sort though for info haha!
 
I have my STC1000 probe just taped to the outside of my bucket in my fridge, seems to be working well, the stainless conducts the temp well so I don't bother insulating, I do like the idea of the thermowell on the lid though as it still makes cleaning super easy and get the probe right into the wort. I wouldn't put it thru the sidewalls personally just because it makes cleaning slightly more of a PITA and ease of cleaning was the entire reason I fought this
 
Seems like it would work great in the lid it would make for easy removal/cleaning/sanitizing.. Not to mention dropping in the temp sensor once the bucket is down in the chest freezer..
 
To answer your question about the weight --- it's no issue.

I've gotten a handful of brews with the bucket in my chest freezer, and have had zero issues with any dents, etc, in the metal. If it makes you feel more comfortable, then go for it.

Otherwise, no need.
 
Anyone have issues with the gallon markings coming off over time? Think I saw mention of this in another thread and wondering if it is a common experience.

Also curious how many are using blow off tubes. I have 25 inches to work with in my fermentation freezer and the OP said it is 24 inches high with an airlock, so I have room but might want to use a blow off instead. Are you connecting your blow off to the airlock of just sticking it in the hole on the lid?

Think I am going to take the jump and buy one.

They claim that they are ETCHED on. But they sure don't seem to be, at least from what I can tell. Otherwise it'd be a rough surface, but it seems smooth. I wonder if they did electrical "etching".

However, no issues so far. I've only got 3 batches in it though.
 
They claim that they are ETCHED on. But they sure don't seem to be, at least from what I can tell. Otherwise it'd be a rough surface, but it seems smooth. I wonder if they did electrical "etching".

However, no issues so far. I've only got 3 batches in it though.

Thanks!
 
They claim that they are ETCHED on. But they sure don't seem to be, at least from what I can tell. Otherwise it'd be a rough surface, but it seems smooth. I wonder if they did electrical "etching".

However, no issues so far. I've only got 3 batches in it though.


I took a look at my bucket and it does look like an electrical etching process. I have seen this at work, and it is very durable. So I emailed SSbrewtech and they confirmed that it is an electrical etching process


Sent from my iPad using Home Brew
 
Just got this in my Email from SS Brewtech. Seems they have new and updated cleaning instructions

Brew Bucket Cleaning and Preparation Recommendations


Your brew bucket is been prepared with a highly polish finish. While this is the best for maintaining a sanitary surface, the finish can be damaged or dulled by aggressive chemical or abrasive cleaners. The following recommendations will ensure your bucket maintains optimum performance.


First time use -

Cleaning

Prior to your first time use, you should wash the brew bucket with warm soapy water and a soft cloth to remove any oil residue from the manufacturing process followed by a fresh water rinse.

Passivation

It’s a good idea to passivate your bucket with an acid based solution. Filling the bucket with StarSan or other acid sanitizing solution at the recommended strength and at a temperature of 70-80F for 20 minutes, followed by an air dry is all that is needed.

Sanitizing

We recommend you sanitize your bucket with StarSan or other acid based sanitizer per the recommended directions prior to use.


Cleaning after use –

Use a standard brewery caustic or PBW to remove the protein buildup from the inside of the bucket. Follow the directions for strength and temperature and let the cleaner do the work. If needed, a soft nylon brush can be used to remove heavy deposits. The Ball Valve and Lid Gasket should also be removed, disassembled and cleaned as well.


Never use -

Stainless Steel Scrubbing Pads, Scotch Bright pads - These will remove the protective oxide layer on the stainless and cause discoloring, and in some cases surface rust can form.

Chorine bleach, or Chorine based products - These will cause pitting of the stainless steel, which can not be repaired.


Passivate periodically -

To ensure the longest life for you stainless steel bucket, you should passivate it at least once a year or immediately after you may have done anything to scratch the surface


Sent from my iPad using Home Brew
 
Do you think the smaller surface area of the trub vs the carboys surface area is a default? Wouldnt the beer need more contact with the yeast as most of it is settled to the bottom and may not be doing anything? just a though. I like them, the thought just dawned on me.
 
Do you think the smaller surface area of the trub vs the carboys surface area is a default? Wouldnt the beer need more contact with the yeast as most of it is settled to the bottom and may not be doing anything? just a though. I like them, the thought just dawned on me.

Didn't know carboys had default settings... :cross:

I would say, given commercial brewers have been using conicals for decades, that if they don't have a problem, that you probably won't either.

http://science.howstuffworks.com/innovation/edible-innovations/beer4.htm
 
True that, sorry had a brain fart. Meant larger surface area under the beer... I could edit my stupidness but im just gona leave it out there.
 
I get my brew bucket tomorrow in the mail, I have already gotten my weldless thermowell. Planning ahead I thought I would ask. Looking back in the thread it appears that everyone has offset their thermowell to the outside of the bucket. I was planning on dropping my dead center, it seems it would give the most accurate temp.

Or am I missing the reason everyone keeps offsetting theirs from the center.. Actually thinking now the only reason I could think it the stacking option, but I do not ever plan on stacking, this will be my main primary as my fermentation chamber will only hold one.

Thanks!

The reason I offset mine was that the center of the lid is a low spot and if blowoff leaked on to the lid the blowoff might end up inside the thermowell. I do wish I had put it closer to the center though.

20140222_115225_zpsykoyofxt.jpg
 
Has anyone dared to tap a hole and add a bottom drain?


____________________________
Primary: Cider
Primary: Empty
 
I get my brew bucket tomorrow in the mail, I have already gotten my weldless thermowell. Planning ahead I thought I would ask. Looking back in the thread it appears that everyone has offset their thermowell to the outside of the bucket. I was planning on dropping my dead center, it seems it would give the most accurate temp.

Or am I missing the reason everyone keeps offsetting theirs from the center.. Actually thinking now the only reason I could think it the stacking option, but I do not ever plan on stacking, this will be my main primary as my fermentation chamber will only hold one.

Thanks!

The center is not going to be the most accurate. The volume of these do not lend themselves to large gradients in temperature from the outer surface to the center of the beer. And in the case that there is a large gradient you would be better off at point on the radius from the outside surface that gave you a reading that balances the differential from the outside surface to the center of the beer taking into account that the temperature change is non-linear. Additionally if your process is consistent the temperature reading is not as important as the ability to monitor and control temperature fluctuations. If your readings are high(say 2 degrees above actual temperature), compensate by setting your temp control 2 degrees lower. If your process is consistent, you will always be 2 degrees high.

In other words, its not really going to matter much where you put the thermowell in these buckets.
 
Mine is the one from Brewers Hardware, so it is a bolt on weldless fitting with two o-rings.. I don not see it leaking if I put it into the center, yours I can see since nothing is holding it in place.

Mine looks like this:
WLFM14TW6.jpg

http://www.brewershardware.com/12-Weldless-Thermowell-WLFTW12.html


That's the same one I have. I drilled the lid because I didn't want to mess up the fermentor and the thing is long enough to reach right down to the center of the wort. The quality of that thermowell is top notch


Sent from my iPhone using Home Brew
 
How have people been finding this in terms of dry hopping with pellets? Have always found racking from a bucket or carboy with loose pellet hops to be a pain in the a$$. In buckets have been using muslin bags so it is less trouble.

With the valve in the SS bucket is racking to a keg no problem with loose pellet hops when dry hopping, will it get clogged, should i use muslin bags or hop socks still (hoping not), is cold crashing required to drop the hops (not concerned about cold crashing to clear the beer)...?

My bucket shipped today! Looking forward to all of the advantages it will have over buckets and carboys.
 
I got my bucket, this thing looks awesome, small issue with mine, it was missing a rubber foot. I contacted Keg Outlet and they passed my message onto SS Brew Tech. Hopefully it comes soon, just with the one foot missing it really wobbles around. I should be drilling my hole in the lid this weekend for my thermowell.

Whats the word on the longer racking arm, is it a must? Or am I good with the shorter one?
 
I have found SS Brew Tech to be very responsive. I ordered the longer racking arm on Saturday and received it on Monday, from CA to TX.

After my first fermentation in the Brew Bucket, I felt the longer racking arm was necessary. The standard one didn't leave too much beer behind, but why waste any?
 
I dry-hopped my last beer by just throwing them in. They all settled out below the level of the valve with the arm.

Awesome thanks! Did you cold crash? I have never had much luck with pellet hops settling, but have yet to cold crash to see the difference. Just dried hop in my carboy last night and will be cold crashing it to try to drop the hops as best as possible.

Got the bucket today now and looking forward to the next batch. Particularly excited about no more autosiphon and being able to rack and take samples from the valve.
 
Back
Top