

I really, really like my Monster Mill 3+. It is a little heavy to carry around, though, and it feels unstable when sitting on a bucket with a heavy drill motor hanging off the side. I knew that I wanted to make a permanent mounting with a fixed drive for it. That meant that I had to select a suitable motor and platform. Here is how to go about motorizing your grain mill.
The Right Motor For Motorizing Your Grain Mill
The motor must have sufficient torque to keep the mill rollers operating smoothly under load. When motorizing your mill, you need to have it either operate at a relatively low rpm (200 rpm is about right) or have a reduction system added to achieve the correct rate. DC motors can be speed controlled but this adds complexity and reduces available torque. The effective speed of an AC motor can be reduced by sheaves and a belt, or by a gear reduction unit. I didn't want to get involved with fabricating a belt guard so I decided to go with a gear reduction unit.
The simplest thing would be to acquire a motor unit with gear reduction built in. American Ale Works offers just such a motor – and it has 15 ft-lbs of torque. I decided to go with that. NOTE: the mill requires that its shaft rotate clockwise, as observed when facing the end of the mill shaft. This means that the motor shaft must turn counterclockwise as observed when facing the motor shaft. The AAW motor can be wired for rotation in either direction. I rigged a mushroom-style stop switch to provide an emergency stop, though this isn't likely to be needed.
Selecting Your Base
The next step to motorizing my mill was to select a platform. I knew that it had to be sturdy. I wanted it to be large enough to also serve as a grain weighing station. I wanted it to be on wheels for maximum convenience. This is the stage of the project that took the longest. I first considered using a vintage Singer sewing machine stand. That lacked wheels, though, and it had the spindly legs characteristic of the period. I swapped that for the beefy rolling PC stand that I had been using as a table next to the copier. It took up less room in the office, and freed up the PC stand for this project. The PC stand was plenty strong and had wheels plus plenty of room for grain management. It was an open structure, though, and I didn't want grain debris or dust flying around. I decided to instead use a rolling steel cabinet that had been set aside during the office relocation. I wouldn't have purchased this for the purpose, but it was already here and was in the way. I recommend spending some extra time considering this issue, as once you have whacked a large hole in something you probably won't be able to change your mind and put it back to its original use.

My stand had come with a base plate, which made a fine template for locating the mill's mounting holes as well as the opening through which the milled grain was to fall. My trusty old sabre saw made the job of creating that latter opening surprisingly fast and easy. It went right through both the pressed wood top cover and the steel top plate of the cabinet I used. I am going to guess that whatever structure you select won't be any harder to cut. Drill the holes oversized, both to permit fine alignment of the mill and motor, and to permit adjustment of the mill's end gaps.
Mounting your Mill and Motor to the Base
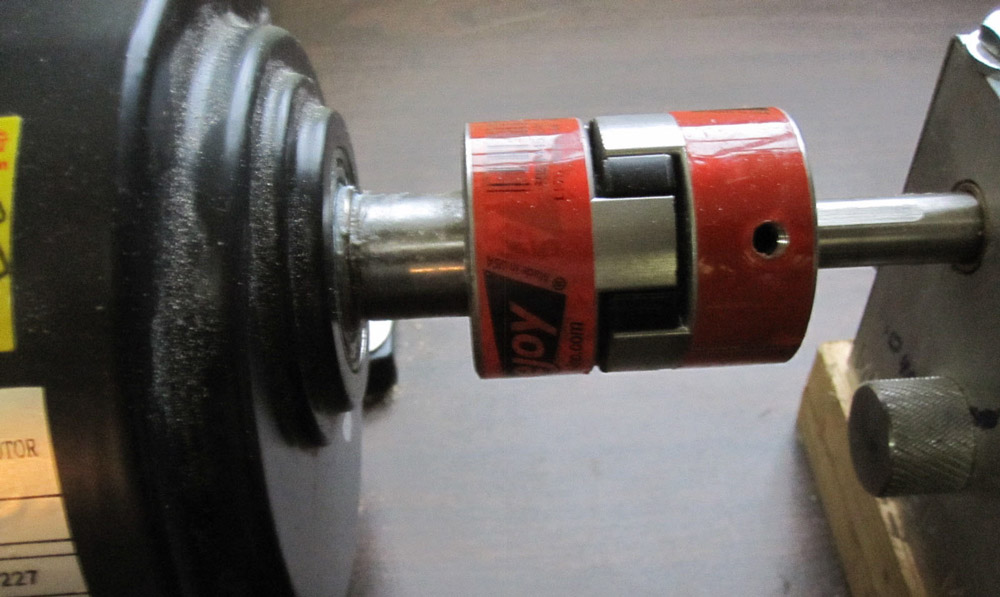
The most critical part of motorizing your mill is next. It will be necessary to mount the mill and motor in such a way that the shafts are nearly perfectly aligned. An unexpected benefit of the three roller mill is that the drive shaft is much higher than on a two roller mill, requiring correspondingly less elevation of the mill to achieve alignment. In my case, it was about 1 1/4”. I had some long strips of 5/8” thick wood left over from something. I cut them to length (a little longer than the mill's width) and glued two together for each end of the mill, then drilled oversized through holes for the mounting. I didn't measure the resulting error but you can see from the symmetry of the coupling after assembly that it must be pretty close. Even with the soft centered spider coupling I used (supplied by American Ale Works with the motor) any significant misalignment would surely cause bushing wear on both the mill and the motor. A square frame would have sealed the base to prevent debris and dust from escaping, but I chose instead to make the two sticks under the mill's end plates structural and to then to just glue in more sticks to close the side gaps.
Note that the spacing between the end plates of the mill is critical. If they are too far apart, there will be end play in the rollers and there will be a gap between each roller and the end plate. This gap will permit accumulation of debris and dust, which could jam the roller. Before tightening the mounting screws on both the hopper and the mill itself, make sure the end plates are located as far inward as they will go without any rubbing.
I ran about 8 pounds of grist through the mill as a first test. It took about 90 seconds, which seemed OK to me. I know the mill is running more slowly than when driven by the big drill. Flour was minimal and the crush looked fine (the gap is set to .045). All in all, I am very glad that I finally decided on motorizing my grain mill and getting this project completed. I am sure that it will be a big improvement in convenience.
http://www.johnrcrilly.com/grainmilltest.mp4
Last edited by a moderator:
