Automated HERMS system

Homebrew Talk - Beer, Wine, Mead, & Cider Brewing Discussion Forum

Help Support Homebrew Talk - Beer, Wine, Mead, & Cider Brewing Discussion Forum:

This site may earn a commission from merchant affiliate links, including eBay, Amazon, and others.
Blackheart and contributers
Great thread and lots of valuable info. I to am building a simular system except cooling with a plate chiller cooled with glycol.
Every question to my knowlage has been answered except controling flow during Sparging, will a proportion controled valve be used after pump #1 and #2. This would controle flow into MT and BK.
Also woundering what brand of valves are to be used
Thanks again for all the info
George
 
Flow control is done with PWM on the pumps in software. This will control the pump speed/flow rate.

Using valves mentioned earlier in the thread from the diesel place. SS 1/2". Waiting for him to get back to us with a decent supply of them.


So I read the other threads about control etc.... I always assumed that the auto systems using PID or Love controllers were adjusting the flame from low to high etc.... I really dont see any case of that happening.... What I see is the flame turning On full or Off. or maybe the user adjusting the final strength of the flame with a valve but the system choosing the on or off position to heat or not.

IF this is the case all we need is a pilot light safety valve an a second valve to turn on and off the flow to the burner.... OR one of the two 24v furnace valves I linked to on the previous page, as they have both things built into one. If someone can please answer my question it would really clear things up for me and I could go ahead and get some furness valves that have pilot lights built in.

Also, 24v, is that AC or DC? either way I need to convert from 120vac, but just wondering.


Blackheart,

My assumption is that they are full on and full off and the PID is only controlling how long they run. The metering valves that the eBay guy is talking about are the type that would throttle the valve open or closed depending on the output of the PID (WAY more expensive of a route).

Also, I would assume that the 24V is an AC for the furnace and if that's the case let me know because I think I have an extra transformer lying around that is 120VAC to 24VAC (I wouldn't mind shipping it to you).
 
I can't decide if I want to do a standing pilot or a spark ignition system. I think I am leanign toward a spark ignition system at this point because I am worried about the (albeit) small flame continually burning a small point on my mash and kettles. Maybe that is dumb, but it is a concern of mine.

I have a standing... it doesn't throw off anywhere near enough heat to do anything to a standing pot (unless it is empty and then you might have an issue). Any liquid in the pot at all is going to be enough to immediately disperse the 2 BTUS (or whatever it is) into nothing.

Just 2 cents
 
The fittings I'm using are Swagelok1/2" X 1/2" MPT. I use these for the kettle and pumps.
I use a intermittent pilot system but that is strictly for safety since my end goal is to brew from work via computer link. I do agree with Cape that a pilot will not provide any thermal transfer to the kettle and require 3 fewer valves. For sparge flow control I just use float and ball valve. The ball valves control the maximum flow to and from the mash tun during sparging and the float is a saftey shutoff for the pump in case of a stuck sparge or mis-adjusted sparge valve. It will take several brews of the same grain bill to figure out how open the sparge drain valve needs to be. Proportional valving would be sweet but beyond my means and would still need to be tailored to each different brew since some grains drain faster than others. The 24 V is AC and you will need a transfromer. IIRC you will need a 100VA transformer. This rating will allow 2 burners to light simultaneously and leave enough for surge protection or to light the third intermitently. Mine is mounted to the bottom of the trailer so its not easily accessible to check. It took a month of searching ebay to find one less than $75. The honeywell 8610u intermittent ignition control does control both the pilot and main valve for on/off control, a needle valve is needed to control the volume or output of the valves. You will need 1 ignition control, 2 solenoid valves, 2 needle valves and 1 pilot burner for each kettle. In addiotn you will need 1- 24VAC transfromer to power all 3 controls. The six solenoid valves need to be 24VAC because they are controlled by the ignition controllers which in turn will be controlled by your preferred brewing hardware. I hope this made sense. It seems my rig is a neverending work towards perfection that I will never accomplishbut every bit of tinkering does get me closer.
 
Almost all of the liquid side of things have been ordered! Just waiting for shipments to arrive. We are having a party to celebrate building the brewery and new system later this month (26th) and hope to have a good bit of parts etc on display for friends and family to see where we are headed.

Brian from DudaDiesel hooked us up by finding exactly 10x 12v 1/2" SS valves left, at about $40 each it was a great deal.

Going to order the SS tubing sometime soon. 50' for the coil + 6' for the remaining dip tubes etc.

Acidjazz54 - If you have an extra 120vac to 24vac transformer that would be amazing! Please let us know the details.

Going to draw up the gas side of things hopefully in a little bit and get that posted up here for you guys to take a look at. Also looking into SSR's I'm not sure what the amperage is on the 12v valves but I know the pump is only pulling 1.4A so many small SSR's should work to trigger that. Most likely we will try to put all the relays together on a PCB with nice terminal connections or something to interface the micro controller.

Beerthirty - we would also love to brew from work! (or at least get some water boiling ahead of time) We picked up those Swaglok fittings on ebay for a decent price. Not sure about the whole gas setup yet. Going to have to draw it out before we know for sure what we are missing. Looks like we are going with a standing pilot for now though.
 
Time for me to share a poorly drawn diagram of what I imagine the gas side of things might look like.... Prepare to not be amazed!

gas.png


So from what I understand, I believe we have a 1" gas valve coming out of the wall. We would put some kind of QD on this with a flexible hose to connect to the brewing system. On the brewing side of things basically the gas splits off into two burners, each with a hurricane burner and matching NG valve. Gas flow is controlled to each burner individually via a VR8200A 2132 1/2" gas valve with a standing pilot. This means that the gas goes into the valve and the valve shuts off unless the pilot is lit and the thermocouple is being continually heated by the pilot. The pilot is fed off of the same valve via a 1/4" tube and compression fitting. There is a separate spark/ignition system to spark the pilot to light it manually. Once the pilot is lit the valve will then accept commands for a 'call for heat' and a second valve inside will open or close allowing gas to flow into the burner.

The valve is controlled with the micro controller with 24vac via a SSR relay. This setup uses only 1 24v furnace valve per burner to control the pilot safety shutoff and to control the gas going to the burner.

Am I missing something here or is this about all we need to do?
 
Make sure you install a gas valve on the house pipe, dont depend on a QD seal to keep it from leaking. I'm not familiar with the valve but shouldn't the ignitor wires be going to it also?

Not sure if there is a picture floating around or not of the garage but basically the NG comes in the back left corner with a manual valve on it. Right now it's capped off with a threaded plug. 3 feet away is a fire/CO2/combustable gas detector that plugs into the wall. So hopefully we wont be having any major leaks.

Not sure where the ignitor wires go. I am pretty sure they are a separate system? maybe not? On the spark system the go to the controller box I believe which tells them to spark when the gas is turned on. Missing all of the accessories to make this work, only ordered the valves so far. Still need thermocouple/pilot/spark.

Also, have to figure out how/where to mount the pilot to the burner and how to support the burner. I have seen some people support burners using only the pipe connection which supplies the gas. Not sure if this is enough to hold up the burner or not.
 
Make sure you get the right ignitor for the valve. On some setups(like mine) the ignitor, pilot orifice and the thermocouple are one piece, called the pilot burner. After ignition the ignitor lead becomes the thermocouple lead. kladue was very helpful in choosing the right parts.
It appears from the pictures that the hurricane burner has 4 mounting bosses on the sides of the burner. For burner shields I used a cornie and was able to get three sheilds out of it that made the burners very windproof, if your burner will fit inside one. Leaking cornies can be had cheap to free from some LHBSs
 
Brian from DudaDiesel hooked us up by finding exactly 10x 12v 1/2" SS valves left, at about $40 each it was a great deal.


Acidjazz54 - If you have an extra 120vac to 24vac transformer that would be amazing! Please let us know the details.

I'm glad that the Diesel thing worked out for you guys. I just ordered two of them myself and told our test lab manager at work about them and he's planning on ordering 4 of the 1" valves.

I checked and I do have that transformer. It's like an Uber transformer that can take either 120 or 240 in and give you either 12 or 24VAC out. It has a Transformer rating of 40VA which is about 1.5A at 24VAC as far as I can figure it (anyone step in and correct me if i'm wrong). PM me where to send it and I'll get it out as soon as I can.
 
Had a little bit of time today so I drew up the electric side of things. Here is a basic outline of how the inputs/outputs of the system are electrically connected and what voltages are needed. Hopefully most/all of these parts will be contained in one waterproof container or separate relay/power and cpu boxes.

wiring.png


The 10 liquid valves are 12vdc and would be triggered by a 5v->12v SSRelay. The 2 gas valves are 24vac and need the transformer to power them. They would use a 5v->120vac SSR (I assume this is ok?) I still need to find the amps on them so we get the right SSR. The pumps will also use a 5v->12v SSR to send 120vac. Also, these will be connected to PWM pins so that the speed of the pumps can be controlled.

Also shown in the temp sensors. We got some nice SS thermowells with the DS18B20 temp sensors we needed from Brewers Hardware which are beautifully made with hi-temp wiring coming out of them and a modified compression fitting to attach to the kettles. The short one is going inline somewhere in the coil path to measure temps when things are circulating out of the coil. Most likely mounted in a T connector.
 
I looked into some standing pilot stuff today... here is what I found:

1) HONEYWELL VR8200A2124 24Vac Dual Standing Pilot Gas Valve : $61.99 : VR8200A2124 HONEYWELL GAS VALVE VR8200A 2124 - eBay (item 110078108353 end time Sep-27-09 05:57:49 PDT)
2) 1/4" OD Aluminum Pilot Tubing : $10.00 : Local Hardware
3) Pilot bracket assembly : $16.16 : Honeywell Q314A6094 B Bracket, .018 Orifice, 1/4" Ftg, L-Tip, w/ith Extra .010 Orifice, Unassembled

I think this should be the right stuff, and was the cheapest I could find.
 
We bought the gas valves on ebay a few days ago, that model so it should be correct. I am sure we can pick up the pilot tubing like you said locally. Need the pilot assembly and thermowell still. Not sure if the pilot assembly needs a combo thermowell/spark or just a thermowell. That seems like a good price for the pilot though. Thanks for finding that link! Not sure if I am using the right word though, the thermowell being the metal bulb that connects to the safety valve portion of the valve to tell it the pilot has been lit. Cant seem to find it on the sight you sent but I might be using the wrong term. If you know what it is I need that works with that valve and pilot that would be great so we can place an order asap! Thanks again for the links.
 
The item in question is a thermocouple, they can be found at hardware stores or the big box building supply stores. Threads and sizes are pretty much universal, so honeywell, robertshaw, white rodgers interchange. Their purpose is to generate a small current flow in the electromagnet safety shut off valve when flame is heating last 1/2" of the element.
 
We ended up buying two of these valves. Same model, not bad price of $55. Does not come with the thermocouple. Also just placed an order at McMaster for 50' of SS tubing linked earlier + 6' for all of the dip tubes etc. That takes care of the liquid side of things, minus the actual tubing/TC tubing connectors. The checklist is looking pretty green now.

We still need to place an order at NorthernBrewer for the burners and a few other things. Holding off on that until we know all the other stuff we might want from them as well that we are missing. But besides the burners the rest of the gas system is really just pipe and fittings which can be picked up at a hardware store locally.

The last part is the electrical. We need to double check the ratings on everything and then start buying SSR's for all of the valves/motors etc. Also looking into what type of connectors/connections and wiring to use to connect everything up. Our thermowells have really nice thick heat resistant wiring coming off of them. We might try to use something like that. Maybe some automotive waterproof type connectors so that we can easily swap out or remove components to clean.

Going to try to do a number of things today. Working on finishing up the kegerator, also going to see if we can find someone or something to cut a nice hole in the top of the kegs to start their transformation into kettles!
 
Boerderij - Once I get started with a project its hard to not want to do everything TODAY. (You should see what I did to my car) The only way we are ever going to get around to finishing this is to stick with it until its done. It also helps that we had a budget that has so far been able to take care of the cost of everything. As fast as we are moving along, the last 5% of parts etc we need to finish this will most likely take forever.

We are using one of the "arduino" chips. Right now we have both the Arduino Mega and the Sanguino. Was leaning towards the Sanguino due to the through hole design would be easy to make a custom board (like brew troller did) I will have to double check but I believe the Mega has more I/O and more memory, but, is surface mount. Meaning a custom board would be harder to produce for us. Right now we have a NIC that easily interfaces with the Mega so we are using that for development. Hopefully, just as soon as we can wire the system up we will be able to do basic things like read temp sensors from a web interface and turn on and off valves.

Stopped home during lunch to find 4 packages waiting for me. 2 of them were the swagelok fittings (strait, 90) the others were the gas valves(came pretty fast!) and the three SS false bottoms. Going to put up some pictures later when I am home and can unbox everything.
 
Just grabbed the specs off the respective sites for each. (Mega, Sanguino)

Sanguino
atmega644P core
32 total general purpose I/O pins (some are multipurpose)
8 analog pins
6 PWM pins
64K flash memory
4K RAM
2K EEPROM
16 MHz Clock Speed

Arduino Mega
ATmega1280
Digital I/O Pins 54 (of which 14 provide PWM output)
Analog Input Pins 16
Flash Memory 128 KB of which 4 KB used by bootloader
8 KB SRAM
4 KB EEPROM
16 MHz Clock Speed

It looks like (besides the surface mount part) the Arduino Mega is a clear winner having double the memory in all aspects and nearly double the ports. As the crew at brewtroller have proved, the sanguino is clearly up to the task of brewing. For now we are sticking with development on the Mega as it is the easiest right now. Either way, these dev boards will most likely be used as networked temperature sensors for other aspects of the brewery, like fermentation etc.
 
Lots of parts are in, everything but the MoreBeer order for all the nuts and bolts has arrived. The valves arrived yesterday, they are looking pretty sweet. Going to take a picture of everything together at some point. Busy moving things around and what not in the brewery so we dont really want to lay everything out thats still packed up. Pretty excited about the stainless steel false bottoms made by someone on ebay linked to earlier. They are sweet, pretty thick, and only $25! half price of everyone else!

In other news I think we have found a welder/machinist who can weld us a stand together from some scrap steel warehouse storage system beams. Hopefully adding the tippy dump system as well as a few other cool features. He will also be cutting the holes in the top of the kegs for us! Time to take back that grinder we just bought.... But the best part? It is possible to complete these things BEFORE our opening party in two weeks! This means we can have a nearly operational system to display to everyone!

Pretty excited about progress recently. Just placed an order with Northern Brewer for the Hurricane burners, valves, and a few other odds and ends. Going to revise the sketchup model to include the dump system and get moving on making the frame and cutting the kegs asap!
 
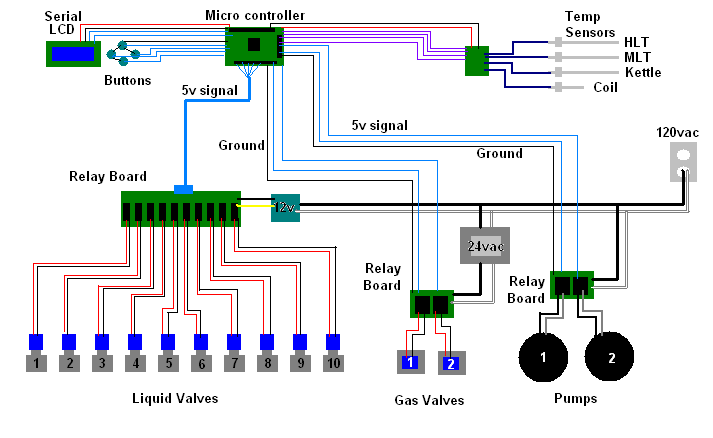
The date of the opening party is getting closer and we keep ordering more parts and more packages keep showing up. Lets take a look at some of the things that have been delivered so far...

parts.jpg


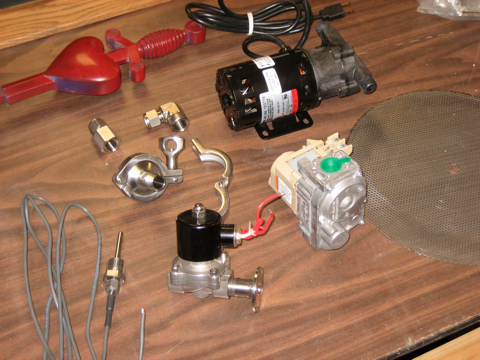
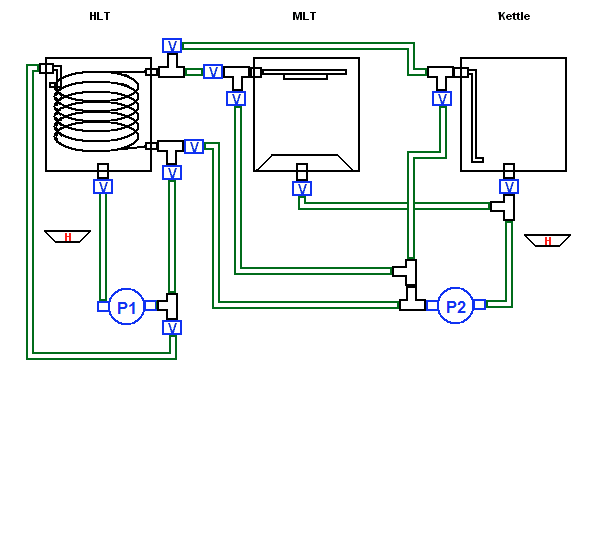
On the far left we have the digital temp sensor inside a 4" SS thermowell with a 1" compression fitting to attach it. We have 10" ones for the kettles and this 4" one for the mail recirculating path and cooled wort out. Its pretty cool, fully adjustable length and well made.

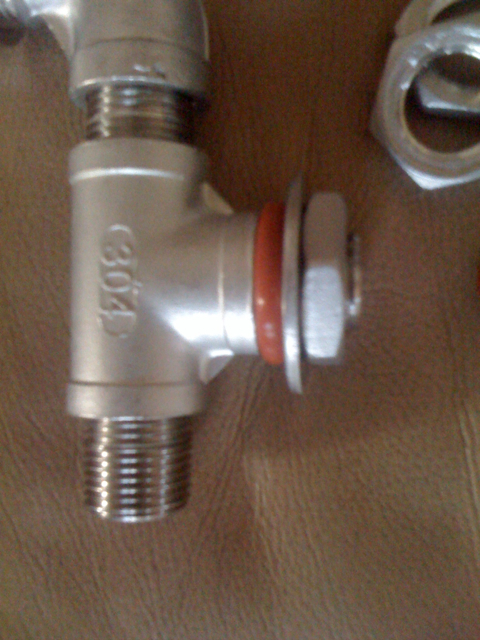
Up at the top, next to our prototype tap handle, we have two of the Swagelok 1/2" fittings, one strait, one 90, as recommended earlier in this thread. These things are serious quality and solid.

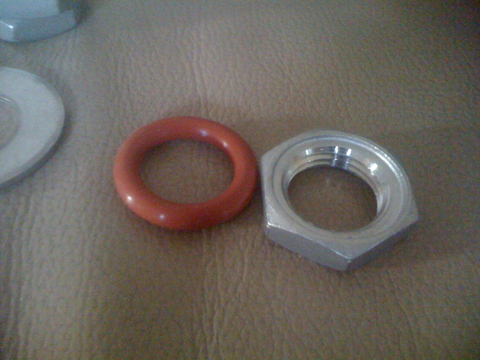
Under those are the 1.5" tri-clover clamps, so far we only have the 1/2" NPT threaded side, waiting on the barbed side of things to be made for us.

Below that is a solenoid valve from DudaDiesel.com He managed to get us the 10 valves we needed and is now out of stock. These are 2 way valves with a nicer than normal seal on them so they should be able to resist liquid flowing past them, as our design requires.

The big cylinder at the top you will recognize as the march pump, we got in on the group buy and really made out saving $60 on the two pumps we needed.

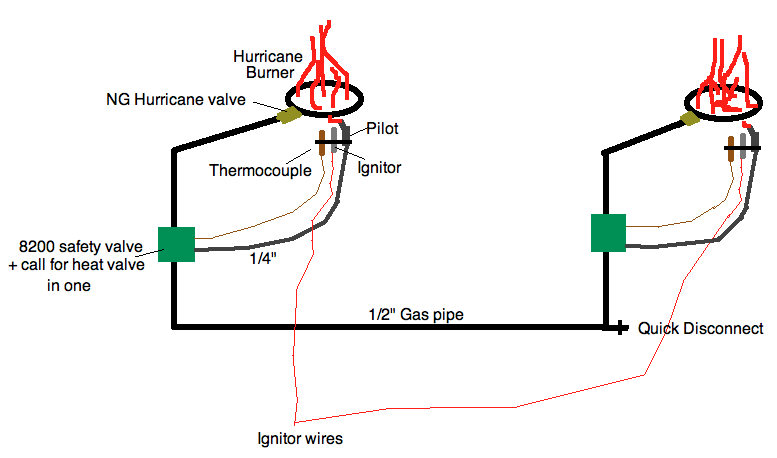
And the weird looking thing at the bottom right is the gas furnace valve we will be using to control the burners.

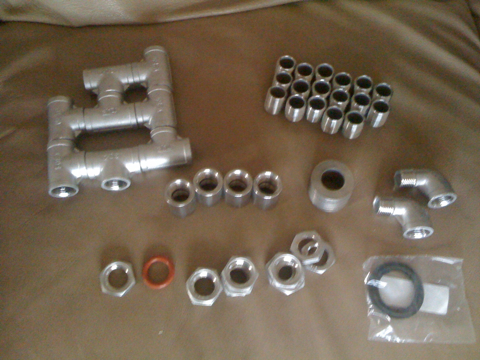
Our more beer order should be arriving tonight with all the rest of the nuts and bolts we need to assemble everything together. We are hoping to dry fit and test a few things but without the kegs preped there is not a whole lot we can do. We have someone who can cut them up for us. Now it is just a matter of making that happen. Not shown in the picture is the 1/2" SS tubing from McMaster. That came in about 24hours after ordering. Awesome.

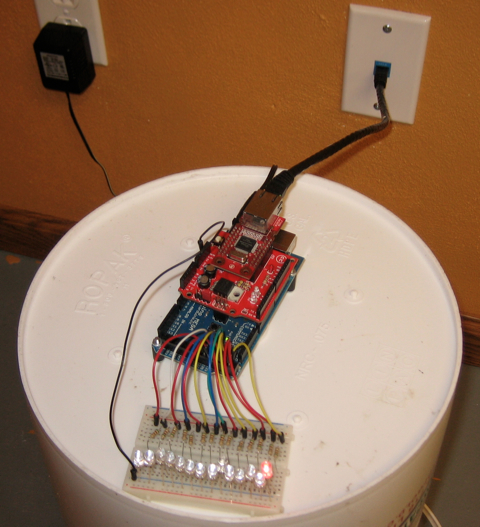
Not having to do construction has giving us some free time to work on the controller that will be doing most of the brewing for us. Here is a picture of the demo setup in the brewery.

arduinotest.jpg


Its basically an Arduino MEGA with a NKC ethernet board plugged into it. These are all demo/proto boards which allow us to test things much quicker. A final design would include everything we need in a custom configuration making it permanent but easy to swap out components. In this example the board is connected only to power and ethernet. When powered on it connects to the network, establishes an IP and waits to serve web page requests. By sending a POST or GET command from any web browser on the LAN we can control the arduino. We are testing with LED's which will then be swapped for relays and valves etc. Here is a link to a quick 2min youtube video demoing the network functionality.

[ame="http://www.youtube.com/watch?v=MH_rK-NbEYo"]Demo[/ame]

Hopefully tonight we will get some more work done cleaning up things. We also plan on shooting what will be a presentation/podcast shown at the party in less than two weeks. Its going to be busy but there will be lots of exciting things coming up shortly!

PS - Anyone know how to coil SS tubing? I thought I saw an article on the forums here about using a lathe?
 
I noticed you mentioned "banjo" burners being ordered from Northern Brewer. Did you mean "Hurricane" burners? They look the same but have different porting. I don't believe the furnace valves we have been discussing can support the higher pressure that drives the banjo burners...
 
I noticed you mentioned "banjo" burners being ordered from Northern Brewer. Did you mean "Hurricane" burners? They look the same but have different porting. I don't believe the furnace valves we have been discussing can support the higher pressure that drives the banjo burners...

With all the talk of everyone using Banjo burners... I must have use the wrong word. we are definitely using the Hurricane burners for Natural Gas.
 
Our More beer order finally arrived! Here is a picture of most of the hardware that we will be using in our system. MMMMM Stainless Steel....

ssparts.jpg


After playing around with all the different connectors etc. We ran into a little bit of trouble that I kinda expected. I had called up MoreBeer prior to placing this order and asked them if the parts were all compatible. Specifically, if the O-ring would work with the Lock nut. Well as you can see from the picture here the O-ring does not fit inside the groove but instead is much larger. This is preventing the nut from moving far enough to expose adequate amount of thread inside the keg so that we can attach the appropriate female fittings.

fitting.jpg

nutwasher.jpg


So with this in mind, does anyone have a suggestion as to what to do next? Do we configure the fitting in some different combination (like dont use the nut all together?) or do we get different O-Rings? (if so which specific ones) Or do we get longer Threaded Pipe Nipples that are 1.5" instead of 1"?

On a happier note, finally picked up some clamps and Gorilla Glue. That stuff is crazy by the way and apparently reacts with air and foams up to really get in all the cracks. Here are some pictures of the kegerator being reenforced with some wood blocks. Tonight I plan on fitting in the taps!

k1.jpg

k2.jpg
 
If you go to lowes, in the plumping section they have a full range of usable o-rings and a size chart you can compare to the nut. In my store they have some sizes of silicone rings but I have seen other stores that only have regular rubber.

In any case, the o-rings are in PLUMPING and not in the "PARTS" section.
 
Almost finished with an animated version of our system drawing.... Just need to add text explaining the steps... but it sure is fun to look at...

brewmation.gif
 
Yeah, I need to work on it but I got all of the basic slides up and made it look decent. All I did was take a picture in Paint of the empty system, and then color in for each step, some 57 pictures later I have a sequence of images that look animated. Drop those into photoshop as different layers of the same image and then make an animation where each layer = a frame. Its going to take a bit longer to write up all the steps and pause it so it looks good but I thought I would share it now...

The burners and other parts are coming today from NB which is exciting because as soon as they get here I can drop them off along with the kegs to get everything welded up! Going to use 2" square iron with a slightly less complicated design than before. Very close to the brutus 10, but not stainless. Should be slightly wider though to accommodate all of the connections being made on the sides of the kettles. Going to have the sketchup model up here asap.

Ordered the Honeywell Q314A6094 as recommended. A quick ebay search etc for that part number will yield the exact same picture as the link shows. In-fact, our invoice shows the same part number too! The package we received today from simplyplumbing however, does not contain the part pictured above. Instead we received two of these....

wrongpart.jpg


They look like actual burners, defiantly not pilot burners. Regardless, they are not the item shown in the picture, though I have no idea what item they are. Havent been able to get ahold of the company yet. So far the only order that has been messed up.

*Edit* Just got ahold of the company. Using the internets I was able to send them the url of the image while I was on the phone with them. Thankfully they're powers of observation led them to the conclusion that I was in-fact sent the wrong part. They said they would grab two more, and check them before they sent them out this time. Also they are sending a shipping label to get the wrong ones back. They are also in NY so I expect it should not take too long to get the parts in. Finally come customer service!
 
Done fixing the model of the brew stand. Here is the updated stand with some of the metal removed as it will only need to hold one size kettle. Also I added the tippy dump system using L brackets welded to hinges. On to the pictures.

stand1.jpg

stand2.jpg

stand3.jpg


Suggestions?
 
Honestly, you can probably remove both center supports unless you just like the way they look. This thing could hold 4 elephants at this point. I would ditch the center supports (horizontal and vertical) completely.

There is nothing wrong with how you have it now, but you could save some cash and fab time.

Where and how are you mounting pumps and burners?
 
One thing I have noticed with many builds, there is a lot of unused storage space in the bottom section of the frame. How about moving the bottom horizontals down and making a shelf?

Just a thought.
 

Latest posts

Back
Top