Attaching wood collar to keezer

Homebrew Talk - Beer, Wine, Mead, & Cider Brewing Discussion Forum

Help Support Homebrew Talk - Beer, Wine, Mead, & Cider Brewing Discussion Forum:

This site may earn a commission from merchant affiliate links, including eBay, Amazon, and others.

msa8967

mickaweapon
HBT Supporter
Joined
May 13, 2009
Messages
2,894
Reaction score
113
Location
North Liberty, Iowa
Anyone have some advise on which adhesive is the best (or worst) to use when attaching my wood collar to the top of my chest freezer for making a keezer? Any advice on things to either look out for and not to do would also be great to hear.

Thanks,

mick
 
I used rope type weatherstripping caulk like this:

http://www.hardwareandtools.com/M-D-Building-Products-71522-Rope-Caulk-30-Feet-Gray-3439247.html

It's sticky, conforms to the surface well, easy to cut to desired width/length and best of all it's easy to remove. The weight of the lid and collar is plenty sufficient to keep the collar in place with no need for screws, brackets, glue, adhesives or messy silicone caulk. It's also dirt cheap. You can get it at any hardware or big box store.
 
I created a collar with sides that friction fit around the sides of the freezer. That way no adhesive was needed and the freezer can be restored to being a freezer very easily.
 
I used "Liquid nails" project adhesive. I have found by working in the construction industry that the name fits the product....
 
I just used standard GE caulk. I haven't had any problems and while I'm sure the stuff everyone else mentioned is better, I think you could get away with whatever you have laying around. All in all, it likely doesn't need to be too strong
 
100% silicone caulk is a good adhesive that can later be scraped off if necessary. Liquid nails? Not a chance to remove. Being realistic though, it's worth more as a kegger than a freezer. Reversing it is like asking a butterfly to change back to a caterpillar.
 
I'd like to see how you did this. Any pictures?

I don't have any pictures right now but could take some later if you want them. I basically used 2x4s attached to 1x6 or 1x8, can't remember. The 2x4s are on the inside and the 1x6 are on the outside and flush at the top. The outside boards slip over the outside of the freezer while the shorter inside boards sit on top. It worked really well.

And while the unit might be worth more as a kegerator than a freezer, it's nice to be able to go back to it being a freezer in a couple minutes. Like if I decided instead of a 6 tap kegerator I wanted an 8 tap, I could reuse all the connections on the bigger freezer, and the old one could be used as a freezer.
 
I'd recommend using no adhesive and going with a dual hinge setup instead. Very convenient and allows you to easily restore it to a normal chest freezer if you ever wanted to.
 
I used "Liquid nails" project adhesive. I have found by working in the construction industry that the name fits the product....

Hammy, I'm assuming your "....." at the end of your statement means that Liquid Nails isn't all that its talked up to be.

So, Liquid Nails or something else (silicone?) for bonding a keezer collar TO the lid?
 
Hammy, I'm assuming your "....." at the end of your statement means that Liquid Nails isn't all that its talked up to be.

So, Liquid Nails or something else (silicone?) for bonding a keezer collar TO the lid?

I'm in the process of making mine have have GE Silicone for the purpose of binding the collar to the lid. My thought is, if I attach the hinge to the collar and fix the lid to the collar, all the pressure will be on the collar, not the joint between the collar and the freezer.

Final parts coming in next week. Will update my thread with results.
 
weathejx - exactly what I was thinking, not really a load bearing bond at the lid; its kinda just sitting there.

In another post, Hammy pointed out that a handle on the collar would totally eliminate any load on the lid/collar bond.

I'm using Silicone adhesive to attach the lid to the collar; its different then the silicone sealant (in the standard caulking tubes, which really isn't an adhesive, just a sealant). Regardless, I'm sure the standard caulking type stuff will do the job.

This is the silicone I got:
http://www.dap.com/product_details.aspx?BrandID=67&SubcatID=27

Was under $4, and should be just the right amount for my collar.
 
Hammy, I'm assuming your "....." at the end of your statement means that Liquid Nails isn't all that its talked up to be.

So, Liquid Nails or something else (silicone?) for bonding a keezer collar TO the lid?

No, actually it is all it's cracked up to be and a bag of chips!!! lol
 
Just out of curiosity, why are you bonding the collar to the lid? That seems silly and more complicated. Why don't you make a collar that sits on the freezer, and hinge the lid on the collar? Then you're not lifting the entire collar, faucets and all, every time you open the lid, adding unnecessary stress to the hinges. I built mine similar to King Brian's and it's much more simple and practical.
 
I attached my collar to the lid because the shanks don't get in the way and you don't half to pick the cornies up as high. My collar is 10" so it's a big deal.
 
I used adhesive bathroom caulk, but in hindsight it was not that great a choice. Looks hard to remove. My first vote would be for weatherstripping caulk. Although I haven't tried it, I believe it is the best material for ease of use and functionality.

I passed on liquid nails. Too much holding power if you want to change your collar or something.
 
Tito - Like Hammy said, it just depends on your collar needs and how much time you like to put into projects. Another benefit = when you lift up the lid, all of your beer lines and taps are out of the way, as you usually attach this stuff to the lid in this type of build.

I have no need for this chest freezer beside my brewing = fun project

Dgonza - The Adhesive silicone sealant (link posted above, for building small aquariums) is really easy to remove if you need to, but has a decent bonding strength. The silicone drys into a continuous strip that removes much similar to a weatherstrip, but without the sticky residue left behind. This stuff is NOT caulking, but rather an adhesive sealant. The best of both worlds, brought to you via chemistry :fro:
 
I didn't use any adhesive either. I made my collar so it had a lip that sat on the inside of the freezers lip. The collar can't slide off. I used a foam seal as a gasket between the wood collar and freezer lip. If my freezer dies I can revert it back to it's original state in 5 minutes. just un-screw the hinges, lift off the collar, and re-screw hinges. all keezer hardware is mounted to the collar.
 
Grimm - did you buy a new freezer? Is the easy convert back to freezer just in case you need it to be repaired by the factory?

Just for ***** and giggles, do you have any pics of no-glue collars anyone?
 
yes mine was a brand new freezer, I didn't want to void the warranty while turning it into a keezer which is why i went this route.

IMG_2225-480x360.jpg


The 2x10 sits on top of the actual freezer, the wire basket is hanging on the inner lip that sits on the inside of the freezer. This holds the collar in place.

IMG_2231-480x360.jpg


Here you can barely see the foam seal i used as the gasket between the 2x10 and the freezer lid. The adhesive side is against the collar so it lifts off cleanly.


Another view.
IMG_2226-360x480.jpg
 
Grimm - Looks great man. Where did you get the digi temp display?? I can't really tell how dig the keezer is, but can you only fit 2 kegs in there? Is there room for lagering?

Oh yeah, and nice PBR in the keezer.

I got my freezer of CL, so I decided to do the whole attached collar project. Its just about finished. I'll post pics of the build soon, although I don't have any taps just yet.

What are your preferences of taps? Are those Perlicks? SS, chrome plated? Beer line nipple attached to shank or screw-on?
 
Thanks, I've never been much of a handy man but i do try.

The temp controller is the Love Ts2

It's a 7cu GE Freezer. I can fit 3 corny's on the floor, and probably another on the hump but the hump is taken up by the c02 currently. But i'm thinking of moving that out of the keezer so I can fit another keg on the hump. I converted a corny to a fermentation vessel and have been using that to ferment/lager in. it's a much smaller foot print then a carboy.

I got the whole keg set up from Keg connections. They are screw on bar taps, nothing fancy. I should have upgraded to the perlicks at the time of purchase, but wasn't thinking. But I do plan on upgrading the faucets to perlicks down the road.
 
Grimm you can fit four on the floor and one on the hump. IIRC, I was able to fit my 10# tank inside even with 5 kegs.

As for connecting the lid... I used silicon and it holds fine. As long as I use the handle I don't see it going anywhere. As heavy as my collar + hardware + lid is if I grabbed the lid directly and tried to lift it I would probably rip it off though, lol.

FinalPlumbing.JPG

AllButTheDripPan.JPG
 
That is very well possible tom, I only had 3 corny's when i built mine and never tried with anymore.

Tom can you share some info on your blower, how it's powered, and if it does a good job of keeping a constant temp. My keezer temp varies from top to bottom.
 
I have that same 7CF freezer, and I am able to fit 4 ball locks on the bottom level, and pin locks I have to go 3 on the bottom and 1 on the shelf. My Co2 is outside the box so thats not an issue.
 
That is very well possible tom, I only had 3 corny's when i built mine and never tried with anymore.

Tom can you share some info on your blower, how it's powered, and if it does a good job of keeping a constant temp. My keezer temp varies from top to bottom.

It is a marine bilge blower... I just got it off Amazon cause I'm lazy but if you live near water a local marine shop probably has one. It is rated at 12v but I have it on an adjustable AC adapter... also off Amazon. I ran it for weeks in my office off an old 5v adapter and could've stayed with that but wanted variable power for testing and didn't have one handy so bought that one.

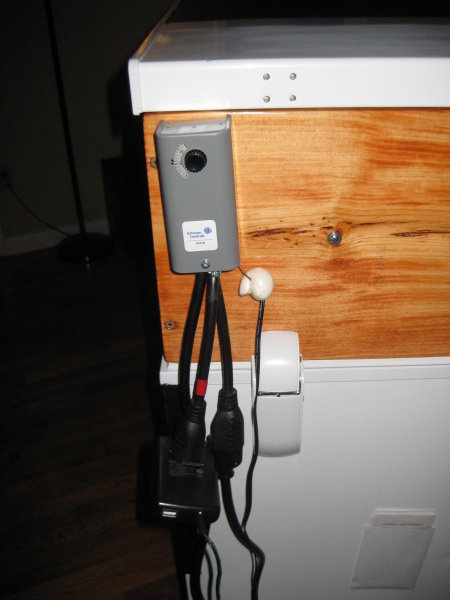
JohnsonA19AAT.JPG


At 12v it sounds and blows like a freaking leaf blower, lol. At a much lower voltage it pushes plenty of air to keep the temps stable. For normal usage I leave it at around 5v (the adapter actually pushes 4.5v but close enough).

The only problem I run into, and this is nit picking, is the kegs are packed so tight the spaces between them don't circulate and stay much colder. This can lead to some icing and moisture build up. To get around that I'm lifting the kegs off the bottom about two inches with some old wire shelving. This will allow for better circulation.

The upside of this inline blower is if it still isn't enough I can run a marine hose to the bottom from the blower and send the warm air straight to the bottom which will create a killer circulation pattern. As it is though it pushes the air down to the bottom but between the hump and how tightly packed they are I don't think it is circulating as well as it should be.

Really though I tend to over do stuff like this, lol. The difference between having the blower and not is huge. I was collecting water like mad before and now there is almost none. The compressor runs a lot less and the temp stays more stable now too.
 
Last edited by a moderator:
As long as I use the handle I don't see it going anywhere. As heavy as my collar + hardware + lid is if I grabbed the lid directly and tried to lift it I would probably rip it off though, lol.

Doh! A handle, on the collar, that's so simple it's brilliant! :fro:

I was wondering about how to lift the collar and lid without using the shanks. I'll be adding that to my build when I get to it. Thanks, TomSD :mug:
 
Doh! A handle, on the collar, that's so simple it's brilliant! :fro:

I was wondering about how to lift the collar and lid without using the shanks. I'll be adding that to my build when I get to it. Thanks, TomSD :mug:

I got one that looks like a mini-towel rack. I figure it won't be so obviously a handle when I throw a beer towel over it. :p
 

Latest posts

Back
Top