12x12x6 BCS-460 Control panel is a tight fit

Homebrew Talk - Beer, Wine, Mead, & Cider Brewing Discussion Forum

Help Support Homebrew Talk - Beer, Wine, Mead, & Cider Brewing Discussion Forum:

This site may earn a commission from merchant affiliate links, including eBay, Amazon, and others.

Bsquared

Supporting Member
HBT Supporter
Joined
Oct 8, 2006
Messages
1,816
Reaction score
73
Location
San Diego
I've started slowly building my control panel using a NEMA 12x12x6 steel box. the plan is to have a 4 wire dryer out let provide the main power, from a 4 wire 30A 250VAC GFI protected cord. For now I will be using propane for the boil, but eventually I want to run all electric. The control panel will for now just be running the 5K watt heating element in the HLT, and the two pumps.

As of right now I have laid it all out and it will all fit, but its going to be tight. I have started cutting the box for the receptacles, and have marked the positions for the switched. so more pictures to follow. Library - 1627.jpg

Library - 1623.jpg

Library - 1620.jpg
 
Your doing a great job so far, nice color blue you chose there. I'm tackling cutting out all the holes and squares on my box very soon, so keep them pics coming!

Good luck with the rest of your build,

John
 
It came that color blue, and the steel is really thick. My neighbor who built a control panel from Kal book, said it is thicker than the box he cut. I'm glad I'm not cutting any squares for PID's. Hopefully I'll do some more on it soon. I'm at home on Paternity leave watching my 5 month old, I thought Id have lots of time to work on the brewery, but boy was I wrong. I swear I heard my wife say she was going to let me do what I wanted on the weekends, I guess she meant I can do what I want from her Honey-do list on the weekends.
 
It came that color blue, and the steel is really thick. My neighbor who built a control panel from Kal book, said it is thicker than the box he cut. I'm glad I'm not cutting any squares for PID's. Hopefully I'll do some more on it soon. I'm at home on Paternity leave watching my 5 month old, I thought Id have lots of time to work on the brewery, but boy was I wrong. I swear I heard my wife say she was going to let me do what I wanted on the weekends, I guess she meant I can do what I want from her Honey-do list on the weekends.

Been there before, I have three boys but they are all grown now. I remember those days! That's ok your a good father and that's the most important job you will ever have. Congrats on your new born! You'll find time here and there to work on your brewery. As for the honeydew list, I still am finding ways to dodge that after 25 years of marriage. One thing I have learned is when she's happy I'm happy!

Good Luck!

John
 
Thanks Jcav, It's really rewarding work...being a father that is.

So I got a few free hrs in the week to work on this, I have been debating the placement of the BCS and Wireless router 12v wallworts, because they take up a lot of dead space. I like the idea of keeping them inside to box, so I worked out this configuration with the BCS and the power supply mounted on the door.

Next I am not using a conventional heat sink, what I have is a 2.5x.75 in aluminum rectangular tube with 5 SSR's mounted on one side with a fan on the other.

Maybe tomorrow Ill get to do some more work.

Last 12 Months - 885.jpg

Last 12 Months - 886.jpg

Last 12 Months - 888.jpg

Last 12 Months - 889.jpg
 
Okay after a bit more thought and arrangement I think I have most everything mounted inside the box, the next step will be to wire it up. I'm definitely wishing I went for a slightly bigger box, this is going to work but there is little wiggle room.

I ended up taping screw threads on to the sides of the box and am going to mount my hot and neutral buses there. I put three switches on the door that will be for turning the power on.The first is the keyed switch that will turn on my wireless router,next will be the green switch the will turn on the BCS460, and finally the red switch will power on the main relay. This way if I want to work or program the BCS I don't have to power the whole system up.

I put a selector to toggle between HLT and BK 240 outlets, and amber indicator lights near the switch and will have two 240vac pilot lights connected directly to the receptacles to indicate when they are energized.

And finally I mounted 4 1/4"RCA jacks on the door to work as disconnects for the thermocouplers.

Hopefully I'll get to do some wiring this weekend, and maybe power it up next week.:tank:

Library - 1647.jpg

Library - 1648.jpg

Library - 1650.jpg

Library - 1651.jpg
 
Great Job! with the box so far. Wish you could have seen the look on my face when I seen that your box was Blue because I am just getting ready to build a control box myself and decided that I would paint it with "New Holland" blue as in the farm tractor color. Now that I have seen your box, I will definately go with the blue. If you haven't decided what color to make your switch labels yet, I have found that Yellow looks great with that color blue. Please keep up with the pics because I have no idea how to wire these things. I will post my pics when I get started. (Probably a month or so away)
 
PJ on this forum is the wiring diagram master, I really would have no idea how to do wire a control box with out the input from PJ and the awesome web site set up by kal, Theelectiricbrewery.com. Search his posts, I'm sure you can find a wiring diagram of his that will fit your needs.

Its coming together nicely, and I'm excited to wire it up, I have it mostly mapped out so there will not be a lot of wire clutter. I want to keep the wires nice and tight.

I found this box on ebay, ti was all ready painted blue, as for colors for the labeling, now that you mentioned it. I will be using Orange. Orange and blue the colors from the gulf Porsche racing team from the 80's.
 
PJ on this forum is the wiring diagram master, I really would have no idea how to do wire a control box with out the input from PJ and the awesome web site set up by kal, Theelectiricbrewery.com. Search his posts, I'm sure you can find a wiring diagram of his that will fit your needs.
Wow. :eek: You honor me. Thanks. If you or Brew52 needs a custom diagram, just let me know and I'll do my best to help. I've drawn a few after all.

P-J

Its coming together nicely, and I'm excited to wire it up, I have it mostly mapped out so there will not be a lot of wire clutter. I want to keep the wires nice and tight.

I found this box on ebay, ti was all ready painted blue, as for colors for the labeling, now that you mentioned it. I will be using Orange. Orange and blue the colors from the gulf Porsche racing team from the 80's.
 
I used female spade connectors on the AC adapter for the BCS. That would free up alot of space in your box.

What kind of wireless router are you using? That is the only thing I haven't completed. Plugging the laptop in via cat 5 cable is annoying.

Linc
 
Spade connectors, thats a good idea. I've got it all mounted now but if I run in to space issues when wiring it up I'll consider it.

I got a Linksys WRT310N router i got on woot for $10, it was easy to set up. I followed the instructions on the ECC web page. If you have a wireless network in your house already I'd recommend just getting a wireless bridge. The router I have can't connect to the existing network...::lame::
 
Got some more pictures. We did a garage sale Saturday so I had some time before our CHUG meeting to do some wiring. I think I'm going to go through and heat shrink the connector terminals of the wires still. Its coming together nicely. slowly but surly...

Library - 1673.jpg

Library - 1672.jpg

Library - 1671.jpg
 
Thanks for refering PJ to me for wiring. I will definately be looking for some help when I recieve the rest of my switches and PID next month. I will post a pic of my panel layout soon and also a pic of the RIMS Tube I have been working on (found a great sanitary welder!). Thanks again. Cheers!
 
The wiring has been a challenge, but after a couple tries with a few connection routes, I have all the major components hooked and all tests out well with the multimeter, no shorts or loose connections. I still have to solder the connections on to the 1/4'RCA jacks for the temp probes and wire the SSR grounds to the BCS, but that should not take too long.
Last Roll - 12.jpg

Last Roll - 10.jpg

Last Roll - 08.jpg

Last Roll - 07.jpg

Last Roll - 05.jpg
 
Nice job on the box and I like your Brewery as well. Where did you end up buying your recepticles from that are in the bottom of your box? The cheapest I found was $48.00 at Amazon. Thanks.
 
I'm not sure what purpose the christmas lights serve...

Are you actually a pub that serves the beer that you brew?
 
Christmas lights help with the mash, everyone who's anyone mashes with christmas lights...The sign was found in an ally behind my old apartment.

Brew52, I got them on ebay from a place called fruit ridge supply, they have very reasonable prices and are good with shipping.
http://stores.ebay.com/Fruit-Ridge-Tools-LLC

If they don't have what you are looking listed for shoot them an email.They most likely will have it.
 
I have the spa panel ready to be mounted and wired into the main service. Almost ready to go, but I think I'm going to put up some ply-wood over a spot where the romex from the service comes through the wall.

Library - 1778.jpg
Library - 1776.jpg
 
Thanks for the ebay link for the recepticles. I will check it out. Your box turned out great. I just ordered my control panel labels from a this site: http://www.engravedlabel.com they have 1/2" x 2" labels with double sided tape black with white letters and beveled edges for $1.68 each.
 
Baby steps...baby steps. So for anyone paying attention, here is a little update. If you look at this first image you may notice where there is a big bundle of romex (sp?) coming out of the wall of the garage and going up in to the rafters...directly behind where I am planning on brewing...I thought this might be a bad idea.

So after a little work, I decided to put up so particle board to cover it up. I also mounted and wired up the spa panel today, works great and reads 240 on the multimeter.

Still on the to do list:
Mount the panel
re-leak test the HLT
Mount the pumps
Test fire the system.
Last Roll - 06.jpg

Last Roll - 35.jpg

Last Roll - 30.jpg
 
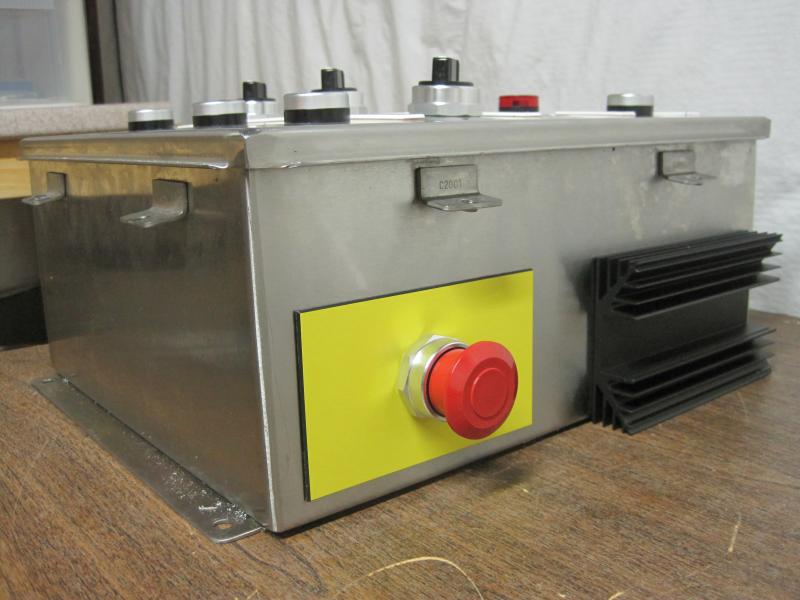
Here is a very preliminary layout of my control panel. My system will be what I call a Hybrid (RIMS/BIAB) that's why I do not have a HLT label I do not plan to sparge. I plan to paint the box black. My original plan was for a gray plastic box painted blue, but a friend of mine found me this stainless box that was "used" and had a slightly warped front panel. I covered the pre-drilled holes with the E-Stop and the Heat Sink. Note: The E-Stop and heat sink are not yet mounted in this picture. I will follow up as I go along. As you said before "Baby Steps" and Cash, Cash, and more Cash. Cheers!

IMG_2726.jpg


IMG_2728.jpg
 
Nice! You sure you want to paint it? That Stainless steel looks awful nice just the way it is!

I just got all the components for my E-stop yesterday, the button is going to force me to move some stuff around but not much. Just the two wall worts that power the BCS and the Router. After that I should be able to get some time and fire it up. Hopefully I'll be back brewing by Dec.
 
Thanks. I probably will just paint the face panel black and leave the rest stainless. I did a picture on the computer with the panel black and it looks real nice! I didn't have any room left on my front panel for my E-Stop either so that's why it's on the side, that and also to cover 3 pre-drilled holes that someone else put in the box before I got it. I have my square holes cut now for the PID's and Timer and I'm waiting for my 30A/240V flanged inlet to arrive so I can cut that hole as well. I will post an updated pic when I get the rest of my holes cut. Cheers!
 
I should say this again...12x12x6 is a tight fit.

I re positioned my wall worts, and wired up my E-stop a-la P-J. And the rechecked all the switches and plugs with the multimeter.

Next will be to rig a cat-5 plug and a 12v plug for the router/bridge.

Then power!

image-1218403204.jpg


image-2336004042.jpg
 
Here is a Hoffman A1614-CH (16" x 14")

1st pic was original, not too bad

file.php


2nd pic is now redoing to have Circuit breakers on all outputs, 3rd L6-20 and more relays. I used Visio to help spatial relationships and layout things the 2nd time... still have to put in BCS and a few things.. it will be tight for a 16x14 panel..
file.php
 
Nice work, mine is looking more and more like a cluster f#¢k after looking at yours.

What are you using for your wireless connection? I assume thats what the antenna looking thing is. And did you find a clean way to mount a Cat5 receptacle out of your panel?
 
VERY nice work so far!
I haven't seen a j-box inside a control panel before. Why do you have one?
If you could please, post a schematic so that I can better understand what's going on here.
 
VERY nice work so far!
I haven't seen a j-box inside a control panel before. Why do you have one?
If you could please, post a schematic so that I can better understand what's going on here.

Not sure if you are talking about my panel, but the junction box I have in there is to supply 120VAC power to my two 12v wall worts, one for the BSC460 and the other is for the router. There is most likely a much better way to do this, but this is the way I built my last three control boxes, so I used it again.

I more or less used a schematic from P-J that he did for some one else, and form kal's electric brewery site.

As for RJ45 through panel mount jack, I just bought this Nuetrik jack
 
Nice work, mine is looking more and more like a cluster f#¢k after looking at yours.

What are you using for your wireless connection? I assume thats what the antenna looking thing is. And did you find a clean way to mount a Cat5 receptacle out of your panel?

the 2nd and 3rd time you tear it all apart and put it all back together it starts looking better, LOL

It is a Microsoft MN-740 Xbox broadband wireless adapter.. I cut a cat5 cable, stuck it through a deburred hole and re-crimped a RJ45 on.. Another small hole had the power wire a couple of 1x2 velcro strips hold it in place and very happy with it... holes are placed so they go straight into the device from the hole(at a 90 degree angle), and somewhat hold it in place.. optionally, I guess I could use one of those plastic power cord grommets that kind of splits into a C and a little filler piece... if I needed to be waterproof, would have to mount inside and extend antenna out through a bulkhead fitting... I am more worried about condensation getting in panel, so airtight is not required 100%
 
How easy is that Microsoft MN-740 to hook up? They are some for fairly cheap on eBay right now. I have a router, but am thinking of installing new firmware so I can use it as a bridge. But I might just end up bricking it.
 
It's looking good. I like the E-Stop. I'm still waiting for my 30A flanged inlet to arrive so I can finish cutting my holes into the bottom. I have a 12x14x6 box so I'm sure that I will feel your pain when I finally get to the wiring job. My control panel will be mounted directly to my brew stand so I plan to use "Liquid Tight" connectors and conduit from Lowe's/Home Cheapo for all of my outgoing wires: pumps, heat elements, RTD probes, etc.
 
How easy is that Microsoft MN-740 to hook up? They are some for fairly cheap on eBay right now. I have a router, but am thinking of installing new firmware so I can use it as a bridge. But I might just end up bricking it.

Not too bad, not plug and play, but then again, nothing will auto-detect your SSID.., not sure if you *have to* have an xbox, but that is the easiest way to set the SSID.. FYI - only does WEP unless you do the one-way, no turning back 'upgrade firmware to the D-Link version'

I mainly went to to it for the form factor and price..
 
It's looking good. I like the E-Stop. I'm still waiting for my 30A flanged inlet to arrive so I can finish cutting my holes into the bottom. I have a 12x14x6 box so I'm sure that I will feel your pain when I finally get to the wiring job. My control panel will be mounted directly to my brew stand so I plan to use "Liquid Tight" connectors and conduit from Lowe's/Home Cheapo for all of my outgoing wires: pumps, heat elements, RTD probes, etc.

I mounted my flanged inlet a couple inches from the side of the box, then cursed myself a few weeks later for not having room for a 3rd L6-20R receptacle.. when I re-did the panel, I cut the new, overlapping hole, and welded the half-moon piece back in the old hole, then ground down and painted with grey primer... measure 3x and cut once ;-)


you won't have that problem with hard wired connections and liquitite, I wanted to be able to have this mobile..
 
I just got a job at an electrical distrubutor, and wanting one of these panels is driving me crazy. Im steady searching for goodies to add to my setup. Clearwater, if you could send me a bill of material for your panel setup from main power to outlets you'd be doing me a huge favor. I recognize all the part for what they are, but spec'd items would be sweet.
 
If you want a exact list of someone's panel, go to Kal's site http://www.theelectricbrewery.com/control-panel-part-1?page=2


I see no reason to duplicate the huge effort he went through in creating that extensive list.. (that and I am afraid to see what I have in my setup)

I will say that I used cords with 14-50P on the end that plugs into the wall and CS6364 on the other end ($$$$$$ - I got 2 20' cables with both connectors for less than 1 CS6364 at costs at grainger) and panel inlet is CS6375

I used L6-20R for my elements, (I have 4500W elements, some may whine I am too close to 20A or may go over 20A with a 5500W or the 6.5KW spa heater element, but works fine for ME).. complete cords with 12GA wire (again, 12GA works fine for ME) can be had on ebay *cheap* search: L6-20 12AWG

I used regular duplex(5-15) for my pumps, but will switch to duplex locking soon( L5-15 ).
 
+1 to the post above. I used the same twist locs that Kal used. Instead of cutting off the plugs on my pumps I made a "converter cable" with regular plugs on one end and twist lock L5-15 on the other. Kinda defys the point of having twist locks, but I keep the "regular cable junction" secured. That way I can make my pumps portable and use them on others system. My box was 20x20x8 and I had problems getting all the connectors on it and everything inside. My design was similar to Kal's except I've got a RIMs with 3 elements, 2 pumps, 1 aux 120v and 3 Temp Probes. I'm using a BCS460 instead of PIDs. I also added internal breakers to my box and used modular 50amp power blocks. I got all my enclosure recepticles off ebay for cheap. I basically got a buy 1 get 2 free deal.
 
I was able to source all my twist locks from one source, Fruitridge supply on ebay they had really good prices,and that saved me on shipping. All my components and lights came for the most part from a local source Willy's electronics.

I got the last finishing touches installed this weekend, moved the Junction box that powers the BCS and router. Installed the through panel Ethernet connection and a 12VDC plug for the router that will sit outside the control panel. I'm going to go through the connections one more time, and make sure there are no loose connections or shorts. then Ill power it up. hopefully I'l get to do a wet run next weekend, and a brew thanksgiving weekend.


IMG_1096.jpg

IMG_1094.jpg
 
Here is my completed 16x14 panel starting a brew session..

I had to take the mounting ears off the BCS and hold it in with 2 1"x4" strips of velcro it was that tight.. brew session of a Hefeweizen went perfect...

 
Last edited by a moderator:
Bsquared, where did you get the ethernet pass through? Looks similar to the one I got at Tycoelectronics. I'm looking for a new one, mine broke after 3 months of use.
 
Back
Top