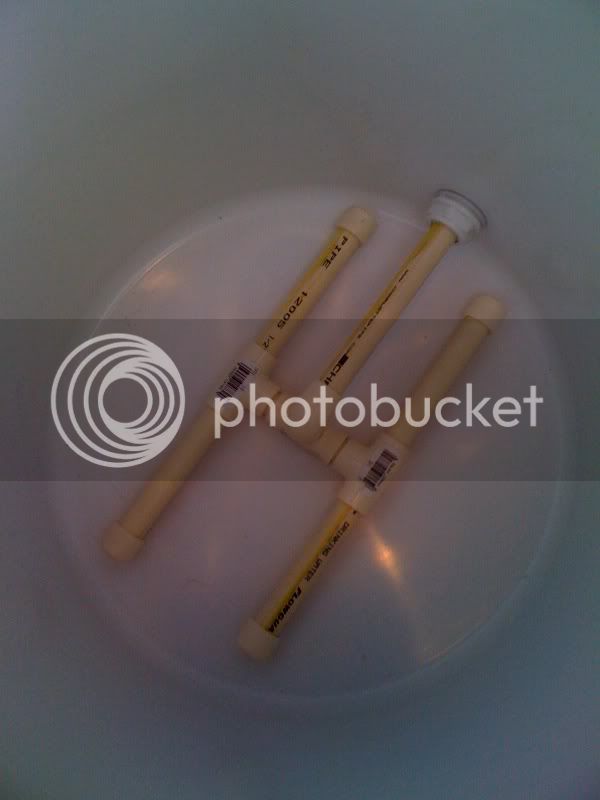
So you built your MLT huh? . .

Homebrew Talk - Beer, Wine, Mead, & Cider Brewing Discussion Forum

Help Support Homebrew Talk - Beer, Wine, Mead, & Cider Brewing Discussion Forum:

This site may earn a commission from merchant affiliate links, including eBay, Amazon, and others.

GLoBaLReBeL

Well-Known Member
Joined
Jul 9, 2009
Messages
192
Reaction score
0
Location
Mission Viejo,CA
For all you people who built your MLT out of the Rubbermaid 10 Gallon cylinder from HD and what not. . . when you built the pickup line from the SS braided hose . . did you keep the inner tube or did you replace it with food grade tubing? I ask because I just finished building my MLT and I used the 1/2 water heater supply line, and didn't know if the tube inside of the line would be ok. I'm guessing it shouldn't have any issue at all seeing as its for a water heater and should be able to handle the high temps, but will it be safe to use? Will it give any off flavors?
 
pull that inner tube out. grab it with a pair of pliers and do the "chinese torture" routine on it to wiggle it out.
If you want, some people replace that plastic tube w/ a couple of stainless steel springs to make sure that the supply line does not compact while sparging.
 
I removed the tubing and put a stainless steel spring through it to keep it from getting banged up.
 
Definitely remove the tubing, otherwise the stainless mesh will not be able to act as a filter. I did not replace the tubing with any form of support, and haven't had an issue with stuck sparges or anything.

Be sure that you indeed have stainless steel meshing on there, and that it isn't the silver/shiny plastic that looks like stainless. There is a term that it should say on the label, that I can't exactly recall. Something like "Floodproof" or something.
 
Ok everyone, sounds good to me. I'll be doing that right away. I did cut holes in the inner tube to allow for liquid to flow through, but if everyone is just saying to use a spring and clamps . . I'm all for it! I just hope it fits tight enough around the copper nipple inside the MLT.
 
Definitely remove the tubing, otherwise the stainless mesh will not be able to act as a filter. I did not replace the tubing with any form of support, and haven't had an issue with stuck sparges or anything.

Be sure that you indeed have stainless steel meshing on there, and that it isn't the silver/shiny plastic that looks like stainless. There is a term that it should say on the label, that I can't exactly recall. Something like "Floodproof" or something.

It is DEF SS because when I was cutting the line it was sparking line crazy! Plus, I made sure when getting it, that it said SS on it.
 
I removed it and stuck in a piece of copper pipe that i cut a bunch of sections out of. Works great, absolutely no chance of it collapsing.
 
I am with Gritsak. I had a stuck sparge on a batch that had a heavier than usual grain bill and I ended up having to transfer the entire MLT to another one I have, clean out the SS braid, replace the grain, STILL stuck sparge, repeated and finally was able to sparge (ended up being a great brew even with all of that!).

I took a piece of spare 1/2" copper pipe and sliced it up a bunch of times and inserted into the SS braid. Never a problem since. Even with 10 gallon grain bills.
 
For me...I had a spare piece laying around and it only took a few minutes. Building an entire manifold out of pipe would take a bit of time and experience in soldering (and more $$). Plus I like the SS braid over the pipe to act as a double filter.
 
I have been using the braid that looks like stainless but is actually a sort of fiber

Never had a stuck sparge, but am replacing it soon just in case
 
For me...I had a spare piece laying around and it only took a few minutes. Building an entire manifold out of pipe would take a bit of time and experience in soldering (and more $$). Plus I like the SS braid over the pipe to act as a double filter.

I used cpvc and did not glue it. entire thing cost about 5 bucks. Did my first all grain on Sunday, didn't hit my numbers, but the MLT and manifold worked great. I didn't measure my water accurate, and overestimated boil off.

mlt23.jpg
 
I took a piece of spare 1/2" copper pipe and sliced it up a bunch of times and inserted into the SS braid. Never a problem since. Even with 10 gallon grain bills.

If you did this, what is the point of putting the stainless over it? Yo esentially made a small copper manifold then put mesh over it. My putting anything solid inside the braid, (copper pipe, tubing, ect) you are effectively limiting the filtering surface to that of where the whole happen to be and thus INCREASING your chance at a stuck sparge. I've done several 5 and 10G batches with an empty braid with 0 stuck sparges. If anything with using a SS braid, just do the spring route or you are actually decreasing your filtering ability.
 
Dave258...that is cool looking. You should never get a stuck sparge with that one!

Love these forums. There are always so many ways to tackle a problem!
 
I removed the tubing and put a stainless steel spring through it to keep it from getting banged up.

In my ten gallon cooler, I just removed the hose completely, then attached a brass part to the open end of the braid via a clamp to weigh the braid down so it doesn't float.

However, in my 70 quart Xtreme cooler, the braid was getting really banged up and would also float because of the length. I inserted a long SS spring into the braid and now that thing is indestructible!
 
Well, for all it's worth... by the time I was done with the copper pipe it was basically the same as a spring. I cut the heck out of it but left enough for support of the braid.
 
I used 3/4" copper pipe to make a small manifold. I've had one stuck sparge, but I think it was due to my slot position (on the side rather than on the bottom) and a VERY heavy grain bill. I'll be moving from a 5g igloo cooler to a 10g soon for this very reason.

I didn't solder it together or anything; it slips together and comes apart for easy cleaning.

19132_1338524829276_1415793501_950758_3381160_n.jpg
 
BTW, to remove the 'inner tube', grab the tube with some needlenose, then PUSH the braid off. DO NOT PULL...doesn't work. if you gently push it, it'll slide off in a half second.
 
I removed it and stuck in a piece of copper pipe that i cut a bunch of sections out of. Works great, absolutely no chance of it collapsing.

I did this also. My braided hose reaches across the whole width of my cooler. I bought a length of refrigerator ice maker pipe (1/4"). Used a grinder to grind really large holes along one side (the bottom) of the copper pipe. I bent the pipe so it rises to the level of the drain port, and installed it inside the braided hose. My first run with this setup I got 84% efficiency, a 12% jump from the hose alone which I found was collapsing.

If you went that far, why not just build a manifold out of pipe?

Much less work, similar results!

If you did this, what is the point of putting the stainless over it? Yo esentially made a small copper manifold then put mesh over it. My putting anything solid inside the braid, (copper pipe, tubing, ect) you are effectively limiting the filtering surface to that of where the whole happen to be and thus INCREASING your chance at a stuck sparge. I've done several 5 and 10G batches with an empty braid with 0 stuck sparges. If anything with using a SS braid, just do the spring route or you are actually decreasing your filtering ability.

Think of a well opened up copper pipe inside of a mesh hose as a combo of the two approaches. I found my mesh hose was collapsing and thought of this solution myself, others obviously did also. My holes on the bottom of the pipe are so large that there is more hole than pipe on the bottom half of my copper pipe. You might be correct if someone was simply cutting slots in a pipe with a hacksaw.
 
I'll be doing this all tonight and will report back with results. Hopefully I don't have to go out and buy a new nipple since I won't be using the inner tube to connect the line to the brass nipple inside the MLT. Is there a size the tube shouldn't be smaller than? I bought a 12" line, and after cutting the edges off, it turned into a 9" line, and now after I fold the end up and crimp it, it will probably be a 7.5" line. is this ok?
 
I think 7.5" is probably enough, but if you are remaking the thing with a skeleton support system you might as well just make it longer and go all the way across the cooler. They only cost a few bucks at Lowes.

Just make sure to zip tie or SS clamp the braid on the barb adapter tight so it doesn't fall off when stirring the mash!
 
Ya, I'm thinking I might just leave a tiny bit of the tubing in (around .25 inch) at the end so that I have something to clamp down on. If I use just the SS then I think it will be an issue. But we'll see. I'll try first without the inner tube, but if it doesn't work I'll just throw in a tiny section and do the rest the same.
 
Why not just use a 1" SS braided tube from a water heater supply line. That's what I did and it does not collapse.

+1 to thsi as well. This thing WILL NOT COLLAPSE from grain weight in a 10 gallon cooler.


Also, the easiest way to get the inside hose out was to cut both ends off with a Dremel. Then take a pair of needle nose to hold the inner tube. Take an adjustable wrench to loosely fit on the outside part of the inner tube and use that to push off the braid. Takes me about 4 minutes to cut, 5 seconds to get the braid removed.
 
After reading Palmer's fundamentals, here's how I built mine out of CPVC. Cost about 5 bucks.

Of special note:

1). The slots are cut into the bottom side of all four "legs".

2). I routed the outlet to the center of the collection manifold to get as uniform collection as possible (eg: wort has to travel the same distance from all 4 collection tubes).

3). I used a 90 deg. elbow into a tee to put the collection manifold on the very bottom of the cooler to eliminate deadspace. (I had to trim both the elbow and the tee to get the right dimension). I'm hoping it'll siphon clear to the bottom... and get out all the goodies.

4). I didn't even buy a valve, I just used the pushbutton dispenser that was already on the cooler. The 1/2" CPVC fit into it perfectly... and a 3/8" hose fits into the discharge of it to enable the siphoning effect.

I didn't glue any of it... so I can disassemble for cleaning and drying.

photo-23.jpg


Gonna try it tomorrow morning for the first time. Wish me luck!
 
Are you going to hold the button down the whole time you are draining the wort into the boil kettle or do you have a clamp of some type to hold it down for you? I think that the button will get faily warm/hot with 150+ degree liquid flowing through it. You might want to do a test run tonight with just water to see how it works before risking $$$ on a batch of wort. Just my $0.02. Nice design on the manifold though!
 
I'm going to rig a clamp on it to hold the button. I have no idea how long it will take to drain but, I'm pretty sure it will be a lot longer than I want to hold that button. :)
 
I actually just soaked it in warm soapy water and BAM, it slid right out :)

That'swhatshesaid!

Anyone using plastic zip-ties instead of hose clamps? I saw a follow-up to FlyGuy's post where the screws on the hose clamps were rusting. I used a 3/4" (I think) water heater supply line. Definitely not a full inch. The inner tube came out really easily after I used a hacksaw to cut off the fittings. I then zip-tied it onto a 1/2inch hose barb with two ties. I then used one zip tie to gather up the end. I think it's tight enough nothing's going to come through. Though I'm thinking of dropping a stainless steel ball bearing or a marble into the end and putting another zip tie behind it to "lock" it into the end and weigh it down.
 
I made mine using FlyGuy's instructions, but did use a plastic zip-tie to secure it to the brass fitting. It worked for a few batches but then fell off. I didn't have any all stainless steel hose clamps so I decided to use a regular hose clamp instead (the band is stainless but the screw is not). I have used it now for 4 batches and I cannot notice any discoloration or pitting of any kind. I know I have read a bunch of threads on not using those, but so far I can't taste anything wrong with the brews I have made nor have I seen any issues at all with the actual clamp. I might start swaping it out every 5-10 batches just to be sure, but they are cheaper than ordering the full SS clamps off the internet and paying for shipping.

I certainly like the strength of the hose clamp! I never fear aggressively stirring the mash and knocking it off on accident.
 
I am getting ready to make my first all grain batch in the next couple of weeks and the only thing I haven't decided on is using the SS water supply line to drain or building a simple PVC manifold to do it

I am sure everyone has their own opinion on which one is better but I figured I would ask which one works better.

If I use the PVC is it better to drill hole or cut slits into them?

thanks
 
I'm wishing now that I would have gone with the PVC pipes because those would acutally allow for my of the wort to be collected. Since my hose just sits in the MLT, I'm sure that the amount left behind will be greater then the PVC setup.

I haven't tried mine yet, so I will let you all know when I finally do my first AG batch. I'm thinking its going to be the end of next week.
 
photo-23.jpg


Gonna try it tomorrow morning for the first time. Wish me luck!

Well, she's bubbling in the fermentor. Got 85.6% efficiency as per Beersmith. (1.055 OG vs. an estimated 1.048 at 75%). I did cheat a little, I poured my top off water through the grain bed at 130 deg. Not sure if that was smart or not... but, that's what I did because, having never done it before, I was afraid I'd have an efficiency of 60%.

The MLT worked great but I still need to modify my discharge pushbutton clamp some. I ended up using my thumb this time.
 
If I use the PVC is it better to drill hole or cut slits into them?

thanks

I'm wishing now that I would have gone with the PVC pipes because those would acutally allow for my of the wort to be collected. Since my hose just sits in the MLT, I'm sure that the amount left behind will be greater then the PVC setup.

I haven't tried mine yet, so I will let you all know when I finally do my first AG batch. I'm thinking its going to be the end of next week.

Just remember, if you decide to go plastic, Use CPVC, not PVC. PVC is not rated for the temps needed. CPVC is. It's the yellow-ish kind.
 
Back
Top