Figured as much. Need to size the wire to current necessary to trip the breaker. I already have extra fuse holders. Would some 30amp slow blows do the trick?
You could use fuses... but probably not slow-blow. Those are meant for electric motors and compressors.... things that have a high current draw when they are first turned on, but then settle down to a normal current level. Fast blow is probably the better choice.
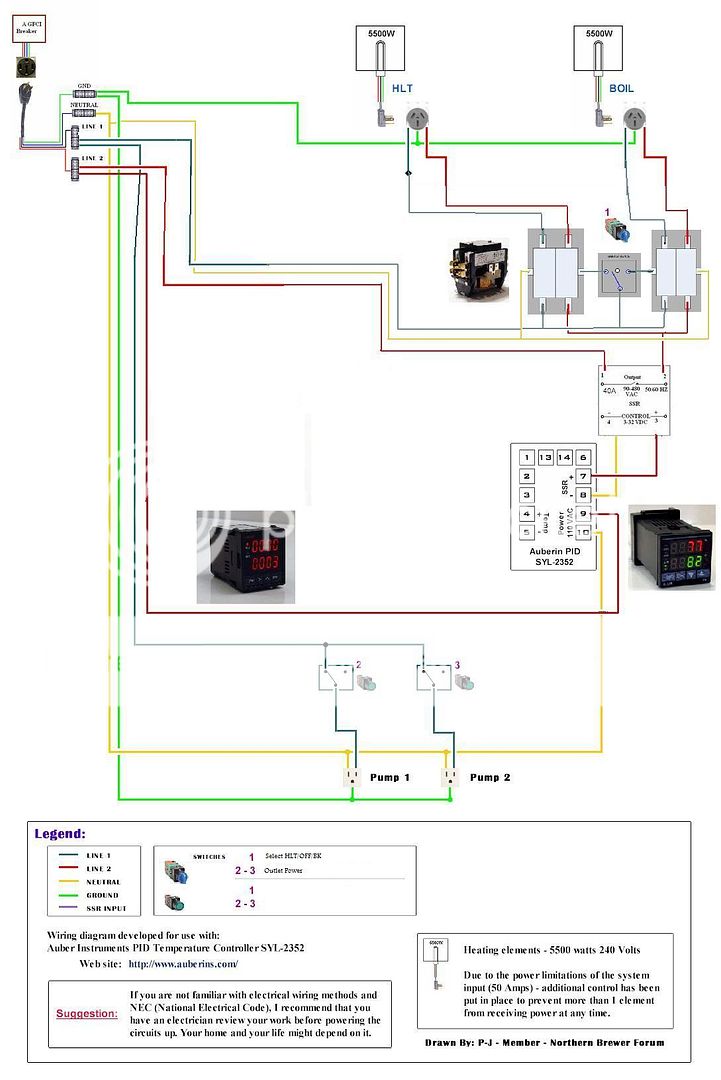
But, I honestly would use mini breakers. You can get panel mount breakers at mouser.com or ones that mount to a DIN rail. If they trip, you can reset them instead of having to buy and replace a fuse.
Where would I neck it down?
Main cable comes in and hits power distribution block, and then immediately connects to the smaller breakers or fuses before going on to other components.
Walker, did you still need that light from Mouser? I am going to copy your DIN rail mounting and will be ordering within a few weeks. Any suggestions on what I need? I just followed the 5 or 6 items you linked.
Nope. Ohio-Ed already hooked me up for the switch that I needed.
What exactly you need as far as modular power distribution depends on how many things you want to end up connecting to that block.
I used 2 modules per incoming line. This allows me to connect the incoming power cable to the distribution block and branch that line out to three other wires.
Layout on mine looks like this when assembled on the rail
(color coded below for aid in understand as neutral, hot, hot, ground):
[ END-STOP]
[ MODULE ]
[ MODULE ]
[PARTITION]
[ MODULE ]
[ MODULE ]
[PARTITION]
[ MODULE ]
[ MODULE ]
[PARTITION]
[ MODULE ]
[ MODULE ]
[END-PLATE]
[ END-STOP]
Adjacent modules of the same color are bridged together with a small piece of the jumper bar that I linked to in that other post. (I bought a jumper that was 10-units long and cut it into a bunch of 2-unit chunks to bridge the modules together.)
If you need to branch more than 3 wires out from the incoming wire, you can just add another module in the right place and use a 3-unit piece of the jumper bar. Expand as much as you want. I like the flexibility of being able to go in later and just add another module if I need it.
The modules are cheap (like $0.60 or something?), so I ordered a few extra ones so that I could expand later if I needed to.