How to build a control panel (part 1)

Homebrew Talk - Beer, Wine, Mead, & Cider Brewing Discussion Forum

Help Support Homebrew Talk - Beer, Wine, Mead, & Cider Brewing Discussion Forum:

This site may earn a commission from merchant affiliate links, including eBay, Amazon, and others.
With your technique for your system don't you heat up 20 gallons at once in the hlt and transfer what you need to the mlt? Then you use the water in the HLT to keep a constant temp in the mlt, then sparge?

Doing 10 gallon batches in 15 gallon pot would force me to use two pots to heat up sparge and strike water because I usually need 20 gallons of water for 10 gallon batches.

Since the MLT on the electric brewery system does not have an electric element, I would be forced to heat up 20 gallons of water in the BK and the HLT.

So, I would need to heat up in strike water in the bk and transfer it to the mlt. At the same time I would need to heat up water for the sparge and for keeping the mash temp constant while recirculating.

As kal explained above, the way I accomplish this is to first add all my strike water to the MLT and fill up my HLT at the same time. Then, when both are full, I turn on my pumps and turn on the HLT element to let it start heating up the entire system. Once its up to temp I add my grain and get started.
I do this every time I brew and it works very well. There's definitely plenty of water in the HLT for sparging after doing it this way.
 
I have 15 gallon commercial kettles (other than my 25 gallon BK) and I can probably do a 1.070 beer, max, before I have to get creative, at 80% efficiency. You guys are all talking water, but my constraint is the grain bed itself.
You are absolutely right ... the mash tun size can limit the amount of beer made too if the gravity's high. This is why I went with 20 gallon kettles all around - it allows me to make 10 gallons of kegged product regardless of gravity. I tested this a year or so ago by making 10 gallons of 12% ABV barley wine. Had almost 40 lbs of grain in the mash tun - it was full to just a few inches from the top!

Kal
 
On another note, a question about the autotune process. When I go to do it, what should I set my target value to? Should it be 30-40 degrees above the actual temp or should be 2-3 degrees above the actual temp?
Actual temp. See the manual that came with the PID. Or don't do the auto-tune. It's not really needed. The PID will learn over time by itself.

Kal
 
Again, as Kal said, I've learned this on my system also. I just set my temp to the temp I want to mash at (usually 152-154) and let the system heat up to that temp.
Once the system is hot and stablized I add my grain and let it start working. It usually takes a few minutes for the temps of the mash to come up to the rest of the system, but its usually quite quick and I can start my mash timer immediately after the HERMS pump is back on.

This system really makes the brew day easy as far as mashing goes. You just set your temps, dough in and you're done (with the mash that is).
 
How did that barley wine come out? Barley wine is my absolute favorite type of beer

Came out great! It's still aging. I kegged it July 2010 and figure it could use a good year or more to age.

Just tried some and yup... it's aging nicely. ;)

Kal
 
Well, i figured out what all my problems were, made sure everything was reading the correct temps and i got from 58 degrees to 105 degrees in 35 minutes. I think thats pretty good for a 1500 watt element. My system is rims but ****, to save propane i may run the hlt water through the rims tube as well. Wake up in the morning, get it going and set the alarm. I can hear the alarm from anywhere in the house.
 
*** I NEED FEEDBACK! ***

Hi guys,

I've had a lot of people ask me how to modify this control panel to allow for larger 1 bbl (31 gallon) brews. Below are my thoughts - let me know what you think!

My main concern is that I'm recommending 50A parts and wiring. We're pretty close to that 50A limit since the panel with 11000W of heating elements plus ~1A of pumps and lights will draw 46.8A. Should I recommend 60A parts and wiring? Some 60A parts are easy to find. Locking receptacles however are not!

Once this is all figured out, I'll create an 'ADDENDUM' to my instructions with updated pictures for those who want to go big...


There appear to be very few changes. It's really just taking all of the 30A devices (and wiring) to 50A and adding one extra element in both the Boil Kettle and Hot Liquor tank.

For 1 barrel, I’d recommend two 5500W elements (not one) in both the Boil Kettle and Hot Liquor Tank. So 4 elements total. That's the major difference. That would give you the power and heating speed you’d need to boil vigorously and offer fast heat (ramp) times. I've never boiled 31+ gallons myself personally but from all I've read and the brewers I've talked to who have, 9000-11000W is what you want for 1 barrel (31 gallons).

Some say that two 4500W elements (9000W total) is enough but I'd suggest two 5500W elements (11000W total) for some added headroom and because the different in cost is negligible. The idea is to provide twice as much power to either kettle where only the boil kettle or hot liquor tank are enabled at once, similar to the current design. This does *not* allow the boil kettle and hot liquor tank to be run at the same time to shave off an hour or so during brew day when you want to brew back to back batches. That is not the intent here. You'll need to wait until the boil is over and you're chilling before starting the heat in the hot liquor tank for the second batch. True back to back batches where both kettles are energized would require twice the power again which would require 100A just for the brewery. That's a whole different realm of power requirements.

One thing to keep in mind is that the price of some of these things goes up considerably as soon as you go above 30A. Unless you *really* want to brew more than 20 gallons at once, stick with my 30 amp design.

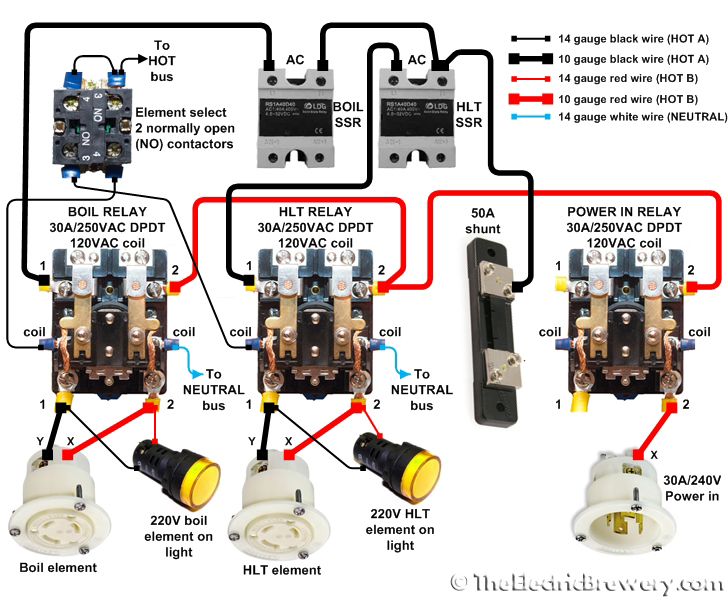
The power side of the current 30A setup (controls one 5500W element at a time) looks like this:

elements.jpg


Here's how to convert this to 50A to allow for 31+ gallon brews:

  • Replace the two 40A SSRs with 80A units. 11000W at 240V is 45.8 amps so the standard 40A one isn’t big enough. The next step up from 40A with SSRs is typically 80A.
  • The 3 digit blue LED digital panel amp meter with 50A shunt with is large enough. No need for the next step up (usually a 100A shunt).
  • Add two extra NEMA L6-30 (250VAC/30A) twist lock electrical female receptacles to the bottom of the enclosure for the two extra elements. The extra outlets would be wired in parallel (not series) with existing ones to give the same 240V drop across each element. Each receptacle would pull 5500W of power for a total of 11000W per kettle. I like the idea of just doubling up elements and keeping how they’re connected to the kettle and control panel exactly the same as it would be easier and also cheaper, you simply have two 10 ga cords going to each kettle instead of one. The other option is to upgrade the element receptacles and plugs to 50A versions and fatter 6 ga wire which goes into one outlet box on the kettle to power one element and then splits off with 10 ga wire (still wired in parallel) into a second outlet box to power the other element. This is likely messier, harder wiring, more connection points around the kettle. Also requires more of a redesign with different wiring of course, something that isn’t documented on my site. If we stick with what’s already documented it’s dead simple as people can just follow existing instructions. You just do 4 elements instead of 2.
  • A bigger enclosure is needed instead of the 16x16x8 one due to the 2 extra element receptacles. There's no room left on the bottom. The 16x16x12 (deeper) one may be big enough, otherwise a 20x16x8 or 20x20x8 could be used.
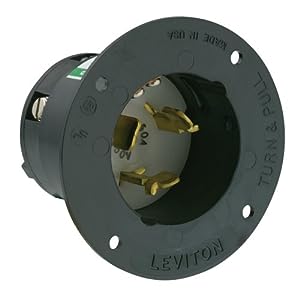
  • Replace the L14-30 (240V/30A) power input receptacle in the control panel with a 50 Amp, 125/250 Volt AC, Locking Grounded California-Style receptacle such as this one:

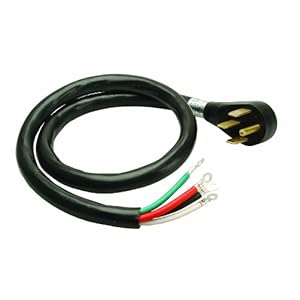
  • The power cord for the control panel would be a standard 50A 4-conductor stove power cord such as this one:
    .
    It's a 4 conductor for 2 HOTS, 1 NEUTRAL, and GROUND, single phase. The two HOTs are 6 ga while the NEUTRAL and GROUND are slightly smaller 8 ga which is fine since they do not carry the brunt of the load. This cord has a NEMA 14-50R plug on the end. To the other end we need to attach a 50 Amp 125/250 Volt AC Locking Grounded California-Style connector such as this to connect to the control panel:

  • Replace the three double pole 30A/250VAC relays with double pole 50A/250VAC contactors (you can't typically find relays this large).
  • Replace all of the 10 ga T90/THWN/THHN wire in the control panel with larger 6 ga T90/THWN/THHN wire to allow for the larger current draw. There's actually not that much wire here. Only 8 feet of black (HOT1), 4 feet of red (HOT2), and 11 feet of GROUND. Some may argue that 8 ga for the GROUND would be fine too.
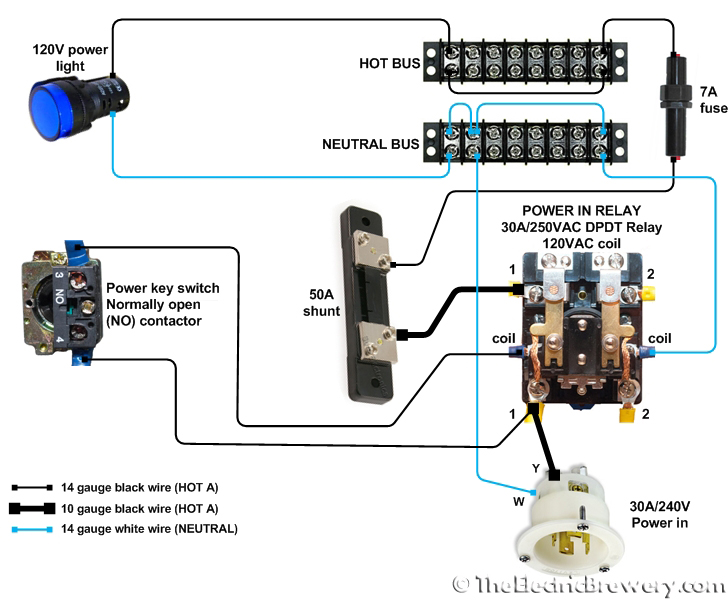
Not included are the 240V/50A stove outlet needed ont the wall that the power cord plugs in to. This outlet should be wired with 6 ga wire to the breaker panel and protected with a 60 amp dual pole GFI breaker. We use a 60A breaker (not 50A) so as to only load the circuit to 80%. Some may say that 50A would also be fine too.

Nothing else changes from what I can see since the rest of the control panel is all 120V and straight forward. All the switches and how the panel operates would remain identical. You just now have twice as much power in each kettle, allowing easy brewing for up to 1 barrel of beer (31 gallons) and possibly more.

I'm not sure what the upper limit here is in terms of what 11000W of power can adequately boil as there's very little information available on the subject and I've never tried it myself. Given that some people are successfully brewing 1bbl with only 9000W, I'm thinking that 11000W should be adequate for up to possibly 1.5 bbl (?). If anyone has any experience with this let us know. That's a lot of beer. ;)

Kal
 
Well, i figured out what all my problems were, made sure everything was reading the correct temps and i got from 58 degrees to 105 degrees in 35 minutes. I think thats pretty good for a 1500 watt element. My system is rims but ****, to save propane i may run the hlt water through the rims tube as well. Wake up in the morning, get it going and set the alarm. I can hear the alarm from anywhere in the house.

Great idea, Dave. I think I may try this next time as well. It would also help keep the element nice and clean over time.
 
Thats true, I didn't think about it.

What kinda ramp are you getting?


I haven't gone balls out, as it kinda scares me at half throttle, but it takes about 45 minutes in my HLT to go from 55ish to 170. My BK goes from 150 to boil in about 30 minutes.

To change the temp in my MLT using the RIMS tube (1500w), I'm looking at about 1 degree/minute.
 
So the HLT and BK are direct fired correct? how many gallons is your figures based on?
 
Kal I noticed that you don't use any fuses or breakers inside your control panel. I've seen lots of other wiring diagrams with these elements included. Are the breakers and fuses used to prevent damage to the components in the control panel? Is there a reason you didn't use this kind of protection within your panel?

Thanks for all the information, and I loved you interview on the BN.
I do use one 7 amp fuse to protect the 14 ga (15amp) wiring (where it is required):

power.jpg


You may fuse every component if you like of course, and have seen many people do this. I just feel it's overkill and not needed and have never seen it done like that on every component in commercial/industrial panels.

Kal
 
Kal,

So you don't have a fuse on any of your elements? I wired a 7amp fuse in my control panel just like yours. I did purchase a 15 amp fuse for my element but have not installed it yet because I don't know if I really need it or not?
 
Kal,

So you don't have a fuse on any of your elements? I wired a 7amp fuse in my control panel just like yours. I did purchase a 15 amp fuse for my element but have not installed it yet because I don't know if I really need it or not?
No, no fuse on any of the elements. The elements are about the last thing that I'd fuse since they're not sensitive electronics.

I'm not sure what element you're using but the 5500W ones I use draw 22.9 amps. The 15 amp fuse you mention would only work if you had a ~3000W element (assuming 240V).

Kal

He got the idea from me. We are both using 1500W elements for a RIMS setup. I put the 15 amp fuse in to allow for the use of lighter guage wire than my 20 amp supply would call for.
 
He got the idea from me. We are both using 1500W elements for a RIMS setup. I put the 15 amp fuse in to allow for the use of lighter guage wire than my 20 amp supply would call for.
That makes sense! That's the same reason I use a fuse: To protect the smaller wire.

Kal
 
Hey Kal, Can you think of any reason why I'm having problems with my yellow heating element lights buring out on me? I've gone through 2 of these now. They work fine initially, but by the end of the brew day they burn out? Do you think I should just try a light from a different manufacturer?
 
Hey Kal, Can you think of any reason why I'm having problems with my yellow heating element lights buring out on me? I've gone through 2 of these now. They work fine initially, but by the end of the brew day they burn out? Do you think I should just try a light from a different manufacturer?

If you wired up your panel as per my instructions, make sure you're using a 220V-240V light and not a 120V light. Look at the markings on the light itself, not the order link where you ordered to make sure you (a) ordered the right one, and (b) you were sent the right one.

Other than that I have no idea. It could be any number of issues from defective parts, to incorrect wiring, to just plain bad luck with defective components.

Kal
 
Thanks for answering that Kal. I think it may have something to do with the constant flickering on and off from the PID cycling the heating element on or off to maintain temps. I perhaps need to make some adjustments to the PID to make it do that less often?
Another question about the boil. If you run the PID in manual mode and set it to like 85% like you suggest on your site it seems to cause the boil to stop and start a lot. Its full blast, hard boil when its on, then it stops boiling completely momentarily while its off.
I did a test 5 gal water boil yesterday on my system and this is what it seemed to do. Is that typical for this sort of set up and something I should just get used to?
 
Thanks for answering that Kal. I think it may have something to do with the constant flickering on and off from the PID cycling the heating element on or off to maintain temps. I perhaps need to make some adjustments to the PID to make it do that less often?
Nope. I wouldn't change a thing in that respect. These LED pilot lights could be left to blink on and off and they'd run for years I suspect.

Another question about the boil. If you run the PID in manual mode and set it to like 85% like you suggest on your site it seems to cause the boil to stop and start a lot. Its full blast, hard boil when its on, then it stops boiling completely momentarily while its off.

I did a test 5 gal water boil yesterday on my system and this is what it seemed to do. Is that typical for this sort of set up and something I should just get used to?
85% doesn't really start/stop for me. If it does for you, run it at 90% or 95% or even 100%. All depends on how much wort you're boiling and how fast heat is escaping so every setup will be slightly different in that respect.

I did a batch at 100% power a few months ago and the boil off was the same. (14 gallon pre-boil).

It may also be that with 14 gallons there's more mass that retains the heat better so there's less of this 'on' 'off' action. I'm not sure.

Kal
 
It may also be that with 14 gallons there's more mass that retains the heat better so there's less of this 'on' 'off' action. I'm not sure.

Kal

That's what I'm thinking. I only had 5 gallons of plain water in there and the boil was definitely very vigorous. I'm sure when I do a full 7 gallons or even a full 12 gallons (for 5 or 10 gallon batches) it will be a little more stable.

I can't wait to try this system out for my first indoor boil next weekend! I'm so excited that I won't have to deal with wind blowing my flame around or having to worry about rain, etc, etc. Plus, the best part is I won't have to lug a full pot of wort outside for the boil like I've been doing up until now. :ban:

I'm using a penrose kettle for my BK. Built pretty much as your blichmann's except I had a 1/2 coupler welded on for the heating element. I also added a temp probe according to your instructions. Those greenlee punches do an amazing job. I was very impressed with how clean the hole was.
 
"Another question about the boil. If you run the PID in manual mode and set it to like 85% like you suggest on your site it seems to cause the boil to stop and start a lot. Its full blast, hard boil when its on, then it stops boiling completely momentarily while its off. "

You need to shorten the cycle time on the PID. With my omega pid, I need to keep the cycle time at 1 second to keep from having a "pulsatile" boil.
 
Thanks, I'll try that. I'm guessing my cycle time must be somewhere close to like 20 secs or so, because at 85% it stays on for like 15 secs then goes off for 2 or 3 secs? Thanks for the advice, I'll try that.
 
Set your cycle time for 2 seconds (t=2) and see how that works for you. At that setting the element would be on for 1.7 seconds and off for 0.3 seconds when set @ 85%.
IMHO 20 seconds is way to long for what you are doing.
 
Yup. 20 second cycle is way too long. The default on the ones I use are 2 seconds for SSR output (what we use for electric elements) or 20 seconds for relay output.

Kal
 
He got the idea from me. We are both using 1500W elements for a RIMS setup. I put the 15 amp fuse in to allow for the use of lighter guage wire than my 20 amp supply would call for.

Joe,

Thanks for reminding me, I completely forgot about it. My brain is almost burnt up from this build but I have had so much fun.
 
Joe,

Thanks for reminding me, I completely forgot about it. My brain is almost burnt up from this build but I have had so much fun.

You know what's funny; I have never seen the amperage spike above 13.5 amps, so I could have gotten away with a 15 amp circuit. That said, it has enabled me to plug my exhaust fan into the same circuit. It pulls about 2.5 amps or so.
 
You know what's funny; I have never seen the amperage spike above 13.5 amps, so I could have gotten away with a 15 amp circuit. That said, it has enabled me to plug my exhaust fan into the same circuit. It pulls about 2.5 amps or so.

Joe, that's funny is right.

I went through the trouble of running a new line and installing a 20 amp breaker. Well, one day I was running tests with my 1500 watt element and both pumps on and all along I had it in the wrong outlet which was a 15amp circuit with a lot of other things on it. Not once did the breaker blow.

Point is, I never had to waste my time and money installing a 20 amp breaker.
 
I found these and was wondering if they would work for the power input for the control panel. Leviton L19-30 Locking Flanged Inlet 30A 277/480V 3ØY. I know you said that going bigger is fine and these are 30 amp and 277/480 with 4 wires. I am just not sure about the 3 phase thing. It is $19.
 
I found these and was wondering if they would work for the power input for the control panel. Leviton L19-30 Locking Flanged Inlet 30A 277/480V 3ØY. I know you said that going bigger is fine and these are 30 amp and 277/480 with 4 wires. I am just not sure about the 3 phase thing. It is $19.
It'll work fine. It's rated for 3 phase voltages which are higher than what I use so no issues. You don't *have* to use that plug with 3 phase.

Kal
 
Kal: Any update on if you are going to offer a pre-milled version of you control box for sale? Needing to mill the box is stopping me from buying a kit and price is stopping me from buying a completed unit.
 
Brewmorebeers, where are you located in ohio? I milled the holes in my box, I may be able to help you.
 
First, let me join the chorus of thanks for the fantastic write-up. I believe that I learned enough from it to build a control panel of my own, albeit a more modest one.

One of our brew club members built the panel to your specs, and I cannot wait to see it.

I am planning to scale your design down for my single-vessel, BIAB brewing style. Considering that I will be dropping quite a few internal components, I am wondering whether you think I could fit it into a 12 x 12 x 6 box. Lowe's has this for a very reasonable price.

For front-panel controls I would have:
- PID
- Timer
- Power switch
- Pump switch
- Temp alarm switch
- Timer alarm switch
- Timer reset switch
- Power light
- Pump light
- Element light
- Alarm buzzer/light

On the top of the box I would have:
- 40A heat sink

On the bottom of the box I would have:
- Power in receptacle
- Element out receptacle
- Pump out receptacle
- XLR receptacle

For internal components I would have:
- PID
- Timer
- Fuse
- Hot bus
- Neutral bus
- Power relay
- Element relay
- SSR

I think it will fit in the 12 x 12 x 6 box, but my only concern is whether the depth is adequate. I suspect there is enough surface area to spread the components out so that nothing is really back to back depth-wise. Any thoughts on that, or whether I am missing anything absolutely critical for a one element system? Thanks again.
 
I think some posted that a 6 in depth is uber snug with the lids, but doable. You will have to make sure nothing is behind them
 
I would recommend drawing a layout of the front panel and inside backplate to see if they'll all fit.

6" may work but it depends on the depths of the individual items and they may be slightly different than the ones I used.

Personally I think it would be a nightmare to work in a box like that. I wouldn't do it myself.

Kal
 
Could be very tight Jeffmeh.

Mine has:
PID
Master Switch, Pump Switch, Heater Switch
Heater Reset Momentary ON
Two 120V outlets
SSR
Contactor Relay to control Heater Reset latching

It's in a 12" x 8" x 5" plastic tupperware container, (stop laughing at me!), and it's decently tight, in spite of the fact that I have very few switches....

Your design will probably work, but you'll have to be VERY good with wiring....wiring is where all the room gets taken up.

Here's mine:
https://www.homebrewtalk.com/f170/tips-tricks-tidy-safe-control-box-252580/

Check Post 9 for how mine looks now. Check Post 8 to see how nostalgia crammed a LOT of stuff into a box that looks like yours, (12"x12").
 
I would recommend drawing a layout of the front panel and inside backplate to see if they'll all fit.

6" may work but it depends on the depths of the individual items and they may be slightly different than the ones I used.

Personally I think it would be a nightmare to work in a box like that. I wouldn't do it myself.

Kal

Sound advice, thanks. The front panel would work with no problem, and I may even consolidate by using illuminated switches for both power and pump. I could easily put that on an 8 x 12 face.

It's tough to tell for the back plate, as I am uncertain of the component measurements (my apologies if I missed that on your site). I'm really only putting two relays and the buses on the back plate, before wiring. Do you have rough dimensions of the relays? Also, from the pictures, it looks like you lose about 1 1/2" around the perimeter, so your back plate is about 13" x 13". Is that about right? The box you have also comes in 12 x 12 x 8, so I would not have to worry about the depth if I used that, and I cannot imagine not having enough space in there for my "stripped down" rip-off of your design.

Thanks again for your help.
 
Back
Top