
artbrau
Well-Known Member
I'll spare you the long build thread since I'm just standing on the shoulders of giants here. There is some great keezer porn here and my project is pretty modest. I'll just share a couple things I came across.
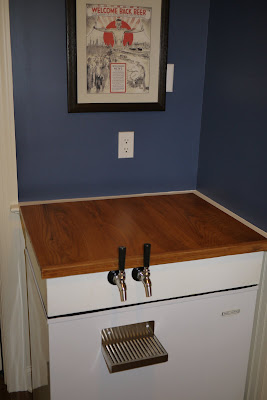
I liked the idea of getting the taps and hoses out of the way when switching kegs so i decided to attach the collar to the lid but struggled with how to attach it. I decided to just make a new top. I have a bunch of leftover oak flooring so I slapped it together, stained it and gave it 6 coats of polyurethane. It looks very nice. I used satin finish but next time I will use glossy, I think. It would have been real simple if I had more big clamps. The jury rig clamps I made were a pain. Lesson One: Buy more clamps.
I used pine for the collar itself. I mitered the corners to 45 deg. but I don't know why I bothered. My plan was always to paint it so exposed grain would not have been a big deal. As it was I couldn't get the edges to line up just right and stay clamped so did a lot of sanding to cover up the sloppy joinery. I make no pretense of woodworking skillz. I spent far too much time wrestling with this stage. Lesson Two: Don't get fancy when you don't need to.
I painted the collar with exterior latex. I had to sand down the brush marks.
I used a foam brush for the polyurethane and should have used that for the paint.
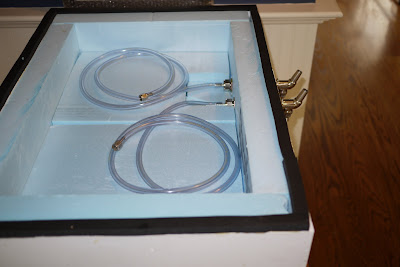
I used leftover rigid foam from my walk-in to insulate the lid. That stuff works really well.
The weight of the collar does strain the hinge a bit. I won't be casually flinging it open.
Now I needed to attached the drip tray and the gas manifold. I couldn't anchor the manifold in the weak foam of the collar but I would have liked to. Like all keezer builders I was terrified of hitting a coil when drilling into the sides. I turned the temp. on the keezer down and watched where frost formed to identify the "safe zone." You can see the frost line in the picture below.
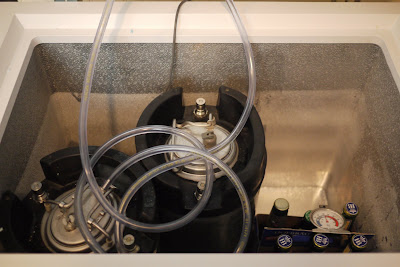
So know I know where I can drill. You get what you pay for and this is an el-cheapo freezer. The interior lining is barely thicker than heavy duty aluminum foil ("Holiday" brand from Lowe's). I pushed the drill bit and it popped through before I even started the drill. It is holding for now but I will have to think of a better solution. The drip tray is anchored pretty well.
A tower is impractical with a chest freezer but the front-side taps have issues. They are dangerously easy to knock open sliding something around on the top and I have small children who I've already threatened with death if they touch them. If anybody has some good handle lock solutions I'd like to hear them.
Finally, the 4.5 in. long (7 in. wide) drip tray is a bit short for the Perlicks which extend 3.5 in. The tray catches the drips fine but the stream will arc out beyond.
SWMBO is thrilled that she can "just get a beer" now.
I liked the idea of getting the taps and hoses out of the way when switching kegs so i decided to attach the collar to the lid but struggled with how to attach it. I decided to just make a new top. I have a bunch of leftover oak flooring so I slapped it together, stained it and gave it 6 coats of polyurethane. It looks very nice. I used satin finish but next time I will use glossy, I think. It would have been real simple if I had more big clamps. The jury rig clamps I made were a pain. Lesson One: Buy more clamps.
I used pine for the collar itself. I mitered the corners to 45 deg. but I don't know why I bothered. My plan was always to paint it so exposed grain would not have been a big deal. As it was I couldn't get the edges to line up just right and stay clamped so did a lot of sanding to cover up the sloppy joinery. I make no pretense of woodworking skillz. I spent far too much time wrestling with this stage. Lesson Two: Don't get fancy when you don't need to.
I painted the collar with exterior latex. I had to sand down the brush marks.
I used a foam brush for the polyurethane and should have used that for the paint.
I used leftover rigid foam from my walk-in to insulate the lid. That stuff works really well.
The weight of the collar does strain the hinge a bit. I won't be casually flinging it open.
Now I needed to attached the drip tray and the gas manifold. I couldn't anchor the manifold in the weak foam of the collar but I would have liked to. Like all keezer builders I was terrified of hitting a coil when drilling into the sides. I turned the temp. on the keezer down and watched where frost formed to identify the "safe zone." You can see the frost line in the picture below.
So know I know where I can drill. You get what you pay for and this is an el-cheapo freezer. The interior lining is barely thicker than heavy duty aluminum foil ("Holiday" brand from Lowe's). I pushed the drill bit and it popped through before I even started the drill. It is holding for now but I will have to think of a better solution. The drip tray is anchored pretty well.
A tower is impractical with a chest freezer but the front-side taps have issues. They are dangerously easy to knock open sliding something around on the top and I have small children who I've already threatened with death if they touch them. If anybody has some good handle lock solutions I'd like to hear them.
Finally, the 4.5 in. long (7 in. wide) drip tray is a bit short for the Perlicks which extend 3.5 in. The tray catches the drips fine but the stream will arc out beyond.
SWMBO is thrilled that she can "just get a beer" now.
")

