Planning on first build that will allow upgrades.

Homebrew Talk - Beer, Wine, Mead, & Cider Brewing Discussion Forum

Help Support Homebrew Talk - Beer, Wine, Mead, & Cider Brewing Discussion Forum:

This site may earn a commission from merchant affiliate links, including eBay, Amazon, and others.

celtic_dude

Well-Known Member
Joined
Nov 22, 2006
Messages
156
Reaction score
6
Location
Blue Bell
Hey. So recently I have been doing a lot of research on the whole electric brewing movement and I have to say that I want to do that :ban: I have been a homebrewer for over 8 years and have been doing all grain batches for the last 3 years. But I have to say that I am getting tired of standing out in the cold or rain or snow while brewing on a sat/sun morning. Well recently I had to redo my basement due to mold and have and official unfinished side that I can do whatever I want with according to my wife :). So I would like to create an area where I can do my brewing indoors. Thankfully I was able to create my bar on the other side that has a double custom kegarator/fermentation chamber under the bar top.

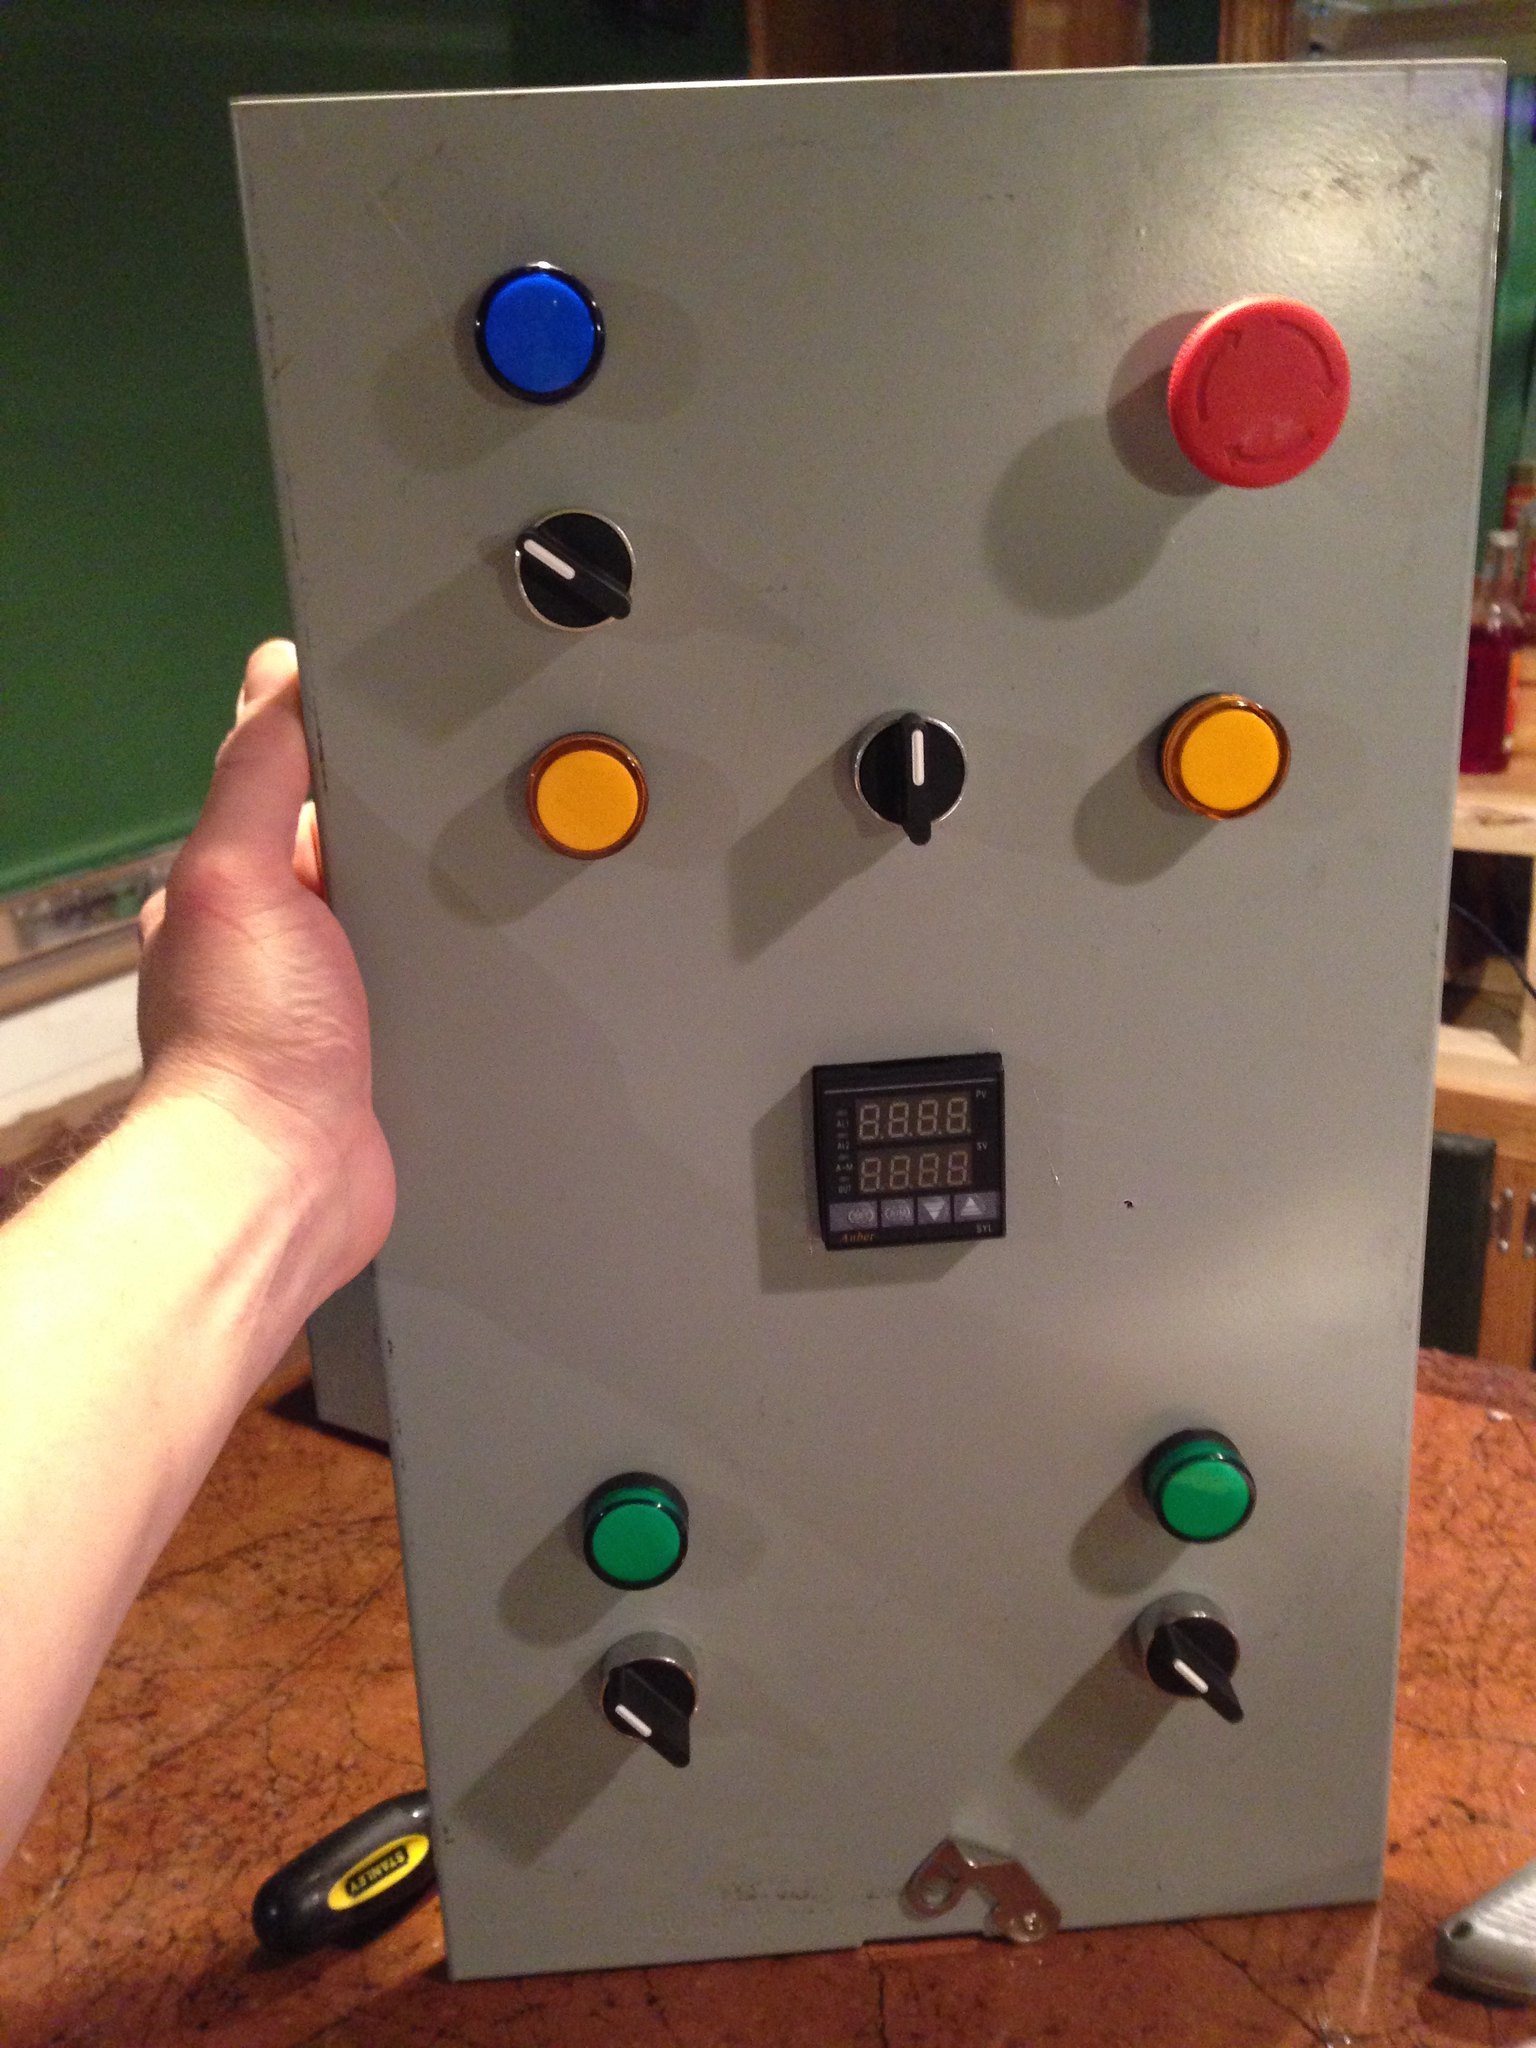
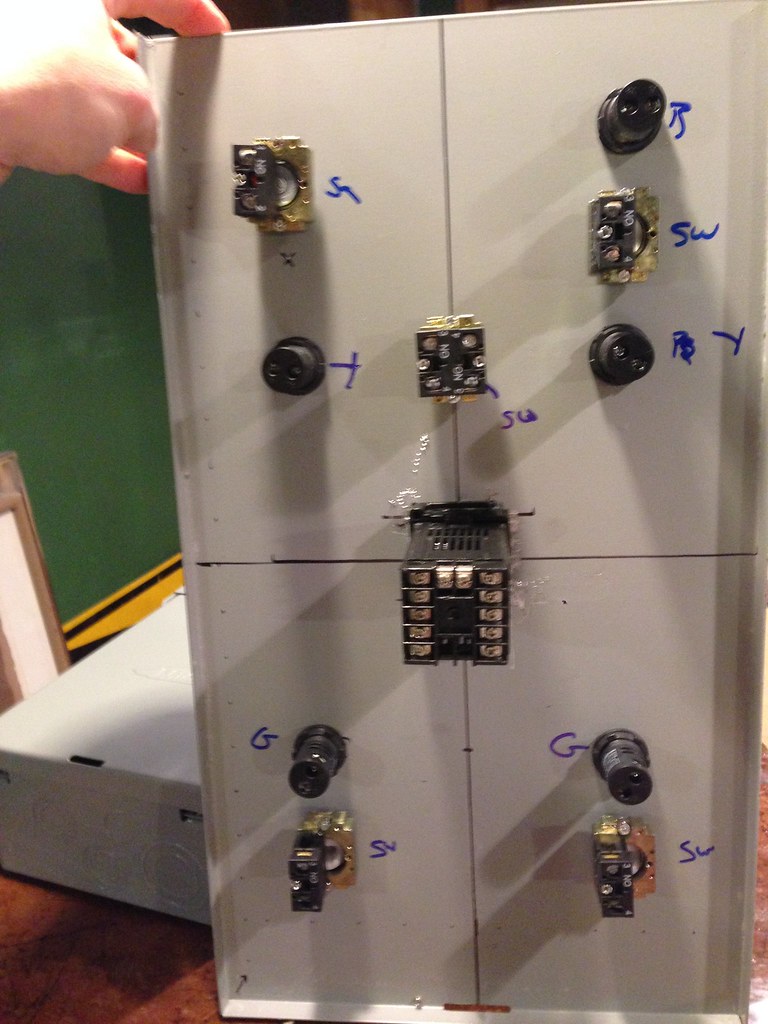
So I was thinking about designing my control box first. I feel that I can see myself wanting to have room to upgrade in the future and think that going bigger with the box to start is a good idea. I only have one boil kettle(8 gallon mega pot and 10g rubbermaid mlt) and dont' want to mess with them just yet so I think I will pick up a bigger kettle to work with that will allow 10gallon batches in the future and go Biab to start. But I want to have the flexibility to maybe go for a full herms system down the line. Anyone else ever do this? Was looking at the http://www.ebrewsupply.com/ebrew-kits/bcs-2-element-2-pumps-30a-kit-85.html kit or maybe piecing together my own.

Budget wise, I have about $500 to start with to make a control panel and one e-kettle (220v 5500w). Is that doable? My brother is going to run the 220v from the panel for me.

I feel like I have been reading through the http://www.theelectricbrewery.com site everyday but still a little confused. I would love to go as advanced as they are one day but want to start small but don't want to waste money on things that will not be used farther down. I want to plan for the big picture but make it functional sooner and smaller and add to as time goes by.

Thanks for your time and look forward to hearing back from you!
 
So, unfortunately I think you're going to have to start small for $500.

To set yourself up for future expansion, you'll want to run 6/4 so that you can handle a 50 amp service. Not sure how far your run is but I spent almost $200 in 6/4 alone.

Also, aside from the larger kettles and wire, you're going to need:
- a NEMA enclosure ($100)
- a spa panel or GFCI breaker ($100+)
- BCS-460 ($200)
- PID, SSR, other components, wiring ($100+)
- Heating Element, some sort of element housing, etc ($50-150)
- ventilation ($100+)

All said and done, you'll be looking at almost $1000-1500 with the kettle added in. A lot of folks may spend twice that.

Personally, if I were on a limited budget, I'd get the 220V 50amp run done, get your larger kettle, and go with a simple DIY controller like this:

http://www.stilldragon.com/diy-controller.html

That should be able to get you to your $500 budget and allow you to expand easily in the future with minimal loss in not-so-useful equipment.
 
I disagree - I think a 30 Amp service is fine. With 30 Amps you can run your mash tun, hot liquor tank or brew kettle with plenty of power to spare to run things like recirculation pumps & electric valves.
 
I disagree - I think a 30 Amp service is fine. With 30 Amps you can run your mash tun, hot liquor tank or brew kettle with plenty of power to spare to run things like recirculation pumps & electric valves.

Correct, as long as you run no more than one 5500w element at a time.
 
Not disagreeing with you guys at all. However, since the OP doesn't really seem to know what he will need for his future HERMS system, running a 50A service leaves him with the most flexibility in the future.
 
I have no problems running a 50amp service to my space. Cant hurt. And the run is 8-10' from the box so not to worried about wire costs.

I am thinking about maxing out the control panel to start. That way I can pick and choose what I plug into it. Thus allowing me to upgrade the brewing equip.over time. I did pick up a 16gallon Bayou classic today for about $120 and plan on using that as my initial electric boil kettle and continue to use my 10gal rubbermaid cooler for my mlt and my 8gallon megapot for the new hlt. And then eventually upgrade these 2 to the same Bayou classic pots.

How are these pumps? Thanks for the great reply. I think that I will plan to go big on the control panel to start. That way I will have the flexibility with what brew pots that I am using.

Today I got a great deal on a brewpot. 16 gallon Bayou Classic with 1/2" ball valve for around $120. I figure I will use this pot to drill and install my first element and use as the initial boil kettle. Should be good enough for 10gallon batches. And I will continue to use my current setup till the new boil kettle is ready with the control panel. At that point I will transfer my current setup to the electric system. (8gallon megapot and 10gallon rubbermaid cooler) for my Hlt and Mlt. But will most likely pick up 2 more Bayou classic pots.

Is it possible to remove a heating element from a pot and put into a new pot?

Is the 2 PID 30a 2 element Kit from Electric Brewing Supply a good starting point for the control panel? Or am I better off piecing myself to keep the costs down?

Is it possible to remove a heating element from a pot and put into a new pot?

Is the 2 PID 30a 2 element Kit from Electric Brewing Supply a good starting point for the control panel? Or am I better off piecing myself to keep the costs down?

And how are these pumps? http://greatbreweh.com/Beer_Pump.html

Thanks
 
Is it possible to remove a heating element from a pot and put into a new pot?


Thanks

I would consider getting one of these kits to install the element in your pot.

http://www.brewhardware.com/rimsherms-parts-93/176-elementparts

It may cost a bit more up front but if you switch pots you can always just get a block-off plate for the triclover port and continue using the old kettle while moving the element to a new kettle by simply adding a new port.
 
TNugent said:
I would consider getting one of these kits to install the element in your pot. http://www.brewhardware.com/rimsherms-parts-93/176-elementparts It may cost a bit more up front but if you switch pots you can always just get a block-off plate for the triclover port and continue using the old kettle while moving the element to a new kettle by simply adding a new port.

I agree. That's the way to go if you're going to go weldless.

Rather than go with the kit from eBrewSupply, I found it was cheaper to piece together one of PJ's diagrams... something like this:


image-1294338796.jpg

I just didn't wire up as many 120V receptacles.

I don't know anything about the pumps you listed. I have two of the new steelhead pumps from NB (pretty sure they're just rebranded chugger pumps) and have had good luck with them so far. Others may weigh in on those pumps though.
 
Not disagreeing with you guys at all. However, since the OP doesn't really seem to know what he will need for his future HERMS system, running a 50A service leaves him with the most flexibility in the future.

I'm just thinking of the cost. I once thought I would need a 50 Amp feed and my brother in-law, who helped me run power said "You won't need it, and it's going to cost you twice as much plus the heavier wire is harder to run". He was right.
 
So after the info given I have been working on my plans for my electric brewing setup. I am going Medium in size but with room to allow upgrades. I am going to go with a Single Tier Herms setup with a 5500v element in the Hlt and the BK. I am going to incorporate my current equipment to start which will be a 8 gallon Megapot-HLT, 10gallon Rubbermaid-MLT, and 16gallon Bayou Cooker_BK. I am not sure if I will be running 30amp or 50amp just yet. My brother(eletrician) is coming this weekend to let me know my options on that one. I also have 2 pumps showing up next week.

This weekend, I am starting with the plumbing, and will be drilling my kettles and connecting weldless fittings with cam-lock disconnects to all. I am also hoping to find some of this discount copper from Home Depot to get started on the Herms coil.

I am pricing out the electrical stuff now. To start I am going with PJ's suggestion of this setup:

Auberin-wiring1-a4-5500w-30a-e-stop-8b.jpg


But I am planning on getting a big enough enclosure in case I wanted to add some more automatic stuff or other fluffers :fro:

I was wondering about a temp sensor though. If I am going to start out with one to run my hlt with, would it be better to install in the kettle itself or in the outlet somewhere? Thinking about the Herms setup.

Will post pics once they are ready :)
 
Check out my eHerms build. Maybe there are some ideas that will help you. Good luck and let me know if you have any questions. It was the best purchase I have ever made and makes brewing so much easier.
 
Got some cools tiffin the last few days! Getting excited for my build.


From brew hardware.com
image-4277971943.jpg


From ebrewsupply.com


image-3251960637.jpg


image-2828384269.jpg

I was very happy with both companies. Fast shipping and great packaging.

Now waiting on my Auberins order for my temp probe and pid.
 
really nice approach so far! You're going to love building and using this thing.
 
So as I was looking for enclosures, I started to think about other ideas I could use and remembered that I have a bunch of good computer cases left over from previous builds and thought maybe I could use one of them. I am guessing I would need to seal it to keep moisture out. Any thoughts?
 
Tonight I finally got the base built. It was based off of the electric brewery base. Only change is the top. I took my original bar top that didn't turn out so well and used that. Will post pictures in the next day or so. Right now my basement is upside down moving thngs and reorganizing to get ready for my build. I am off the week between Christmas and New Years and I am hoping t get a lot done then. Be ready for the pictures :).
 
Got my enclosure today. It is 20"x11"x6". So nice and big. Also has a back plate and ground strip. I am going to have to configure a hinge of some sort though. This is one that the front cover comes off with a single locking latch.

So I did a quick drawing on google sketchup for the location of everything that will also allow room to grow.

controlpanel.jpg

Hoping to get to Harbor freight this weekend to get some tools to punch the holes. :ban:
 
Celtic, thanks for posting on my thread about making the decision on what system to run. This is looking good and thanks for posting it. Keep the updates coming as id like to see how this turns out.

Are you just running 1 PID to control the HLT temp? will you then just do a constant resirc?
 
Yeah to start I am only using the 1 pid with a constant recirc to keep the temps constant. And then when it is time to boil, i will turn the switch for the boil kettle and run in manual mode.
 
Was that a kit from ebrew supply or did you piece that together? I have finally decided on a setup and it will be identical to this. I really like the diagram from P-J. Thanks again for your help. Have you made any more progress?

Sent from my Nexus 7 using Home Brew mobile app
 
Sorry to be taking so long since my last update. Have twin 5 month old boys at home so time and funds have really been low. :drunk:

Thankfully we have gotten used to taking care of the boys and our 5 year old so I have finally been able to start working on my control panel again. Along with my electric build, I have also been redoing my entire basement due to mold issues(demolition to the concrete walls and building 5 rooms instead of just one)

So last night I was able to drill out my front panel and test fit my pieces before painting the entire box.


I got a nice size enclosure so that I will have room to upgrade if I ever wanted to.

Hopefully will have back together tonight if the painting is done :)
 
It is for now. Glad to have the extra room to allow for another PID and maybe a timer in the future. :mug:
 
Nice work! I am planning a build just like this but I have a question for anyone who might know. Could you do the exact same build with a 50A service with an upgrade to the appropriate components and only run one 5500w element at a time safely? I want to allow expansion to be able to brew at least 1BBL at a time with 2 elements in my Kettle and HLT from the beginning so im not wasting money. I already have the 50A service so that is not an issue.

Anyway, Celtic, awesome build, I really enjoy it!
you could easily do this... although you do want to upgrade to a bigger ssr and contactor or add a second ssr, and either use a 4 pole relay/contractor, 2 contactors.
I would look for a 50a or higher ssr to use with a 50a 2 pole contactor... The option with 2 ssrs will allow you to use them independently although I'm not sure if youd want to.
 
Got my SSR and heatsink together. Also picked up my receptacles last night.
ImageUploadedByHome Brew1394199069.054874.jpgImageUploadedByHome Brew1394199080.601081.jpg


Sent from my iPhone using Home Brew
 
Based on my experience with every heat sink I've ever done, you spent the next 20 min trying to get thermal paste off your fingers. . .or is that just me?

Panel looks great thus far!

Sent from my SGH-I747M using Home Brew mobile app
 
Based on my experience with every heat sink I've ever done, you spent the next 20 min trying to get thermal paste off your fingers. . .or is that just me?

Panel looks great thus far!

Sent from my SGH-I747M using Home Brew mobile app

I think I still have some left on my fingers this morning! :fro:
 
Same reason I get covered in silicon when I'm caulking a shower. . . I'm just not that clean. . . Set the tube down, accidentally drop a screwdriver on it, squirt a little out, grab tube from the wrong end while not paying attention, try to wipe what you just smeared all over your hands on the heat sink. . . The comedy just follows. . .

Sent from my SGH-I747M using Home Brew mobile app
 
Wiring up the beast.

ImageUploadedByHome Brew1394267764.943719.jpg
ImageUploadedByHome Brew1394267776.725383.jpg
ImageUploadedByHome Brew1394267790.140991.jpg

Decided to order another PID so I can monitor the mash tun and also another contactor to use for the power on and off for the whole panel. Should be in on Wednesday. Now it is 400 am and I have to goto bed. Hopefully will have the rest wires up tomorrow untilthe other parts come in. And also hoping to tidy up the wires as well.


Sent from my iPhone using Home Brew
 
So I'll ask again, how's your $500 budget looking?

Sent from my SGH-I747M using Home Brew mobile app


Ha!

When I first started everything I wanted it all right away and cheap. In all reality a project like this takes time and planning. So I purchased items over time to spread out the cost. I still plan on upgrading as time goes by.


Sent from my iPhone using Home Brew
 
So I got a lot of wiring done tonight! So excited! Wish I could plug it in at this stage and see how I am doing but I will wait till I am all done. I have to order one more contactor tomorrow. Decided to use 3. One for the power switch and one each for the elements. I was first planning on only using them for the elements but decided to upgrade to a full power switch. Also waiting on my 2nd PID which I plan on using to monitor my temp of my MLT. It won't control anything but thought it would be a nice extra to make sure I am hitting my temps! It is a cheap fleabag one so we will see.

The last 2 pictures is the starting of my spa panel. I am adding 2 plugs to the bottom. One for the Control Panel and one for my dryer. I am going to add a 2nd breaker to turn the dryer socket on and off. Then on brew day I can turn off the dryer and turn on the power running to the panel. Can't wait till I am all done and have my first brew day!

ImageUploadedByHome Brew1394425969.074355.jpgImageUploadedByHome Brew1394425977.238623.jpgImageUploadedByHome Brew1394425986.100242.jpgImageUploadedByHome Brew1394425993.765131.jpgImageUploadedByHome Brew1394426020.919743.jpgImageUploadedByHome Brew1394426031.304790.jpg


Sent from my iPhone using Home Brew
 
Back
Top