Motorized Grain Mills: Time to show them off!

Homebrew Talk - Beer, Wine, Mead, & Cider Brewing Discussion Forum

Help Support Homebrew Talk - Beer, Wine, Mead, & Cider Brewing Discussion Forum:

This site may earn a commission from merchant affiliate links, including eBay, Amazon, and others.
You may get by with starting the mill and then slowly at first pouring grain into it. Once it gets going 1/3 hp is plenty. Overcoming that starting resistance of grain in between the rollers is the issue. Also if you stop mid grind you may have to empty the mill to start again (this is what happened to me with a large drill - the 7 amp size - and an MM3-2.0 mill)...
 
I posted the last OSHA mill picture, it has a 1/3rd horse power blower motor. The shivs are 1.5" to 12". The rpm is 1750. It has the power to start and stop with the hopper full. I will say I do stop and let it cool if I'm milling more than one 55lb sack
 
It was going to cost 100 bucks to get it switched with the 1 hp one (the 1/3hp was purchased on sale for $100), so I'll give it a shot and report back. Worst case I'll start it with an empty hopper, not the end of the world.
 
It was going to cost 100 bucks to get it switched with the 1 hp one (the 1/3hp was purchased on sale for $100), so I'll give it a shot and report back. Worst case I'll start it with an empty hopper, not the end of the world.
You could always go with a larger sheave. Getting your ratio to 12:1 or more will give you a slower speed, but more starting power. Take a little longer to grind, but on a homebrew scale, not important.
 
Finished mine - kind of - today. It's been a long haul, lately, and after taking apart my last mill, I'm kicking myself. That thing was rock solid, and this one shakes like Steve the monkey on gummy bears. Still, it works. There's another version already in the planning, but this will do until I can really buckle down and get some work done. (Unfinished top, because things didn't work out as I hoped.)

11656890376
 
IMG_3617.jpg


IMG_3619.jpg


So Im finally getting things together...lol I just completed my mill last week, and it murders grain. I regapped it, and hope to tell tomorrow if I gain any efficiency, or if I just suck :)
 
What is your current efficiency? let us know what it is after re-gapping.

Im still uncertain.... I went from an 0.026 gap, to 0.038, and the worst compaction yet in the MT. The first batch I did I had the same mash eff. of 62%. The second batch I had 67% by doing a hybrid fly sparge. However, On my second batch, I ended up with the same SG as the first. Two identical batches of doppelbock. 1st 1.055 into the boil kettle, two hour boil, 12.2g, 1.083 into ferm. Second, 1.060 (which was what I calc'd recipe at) into BK, two hour boil, 12g, 1.083 into ferm.

What the heck???

Im lost at why I cant improve my mash eff with any conceivable attempt.
 
ImageUploadedByHome Brew1389064852.877539.jpg

I used a garage pushcart from HF, a Champion juice motor from flea mrkt for $7, a 12" pulley from grainger, etc but works great. Sorry for the quality, just used pic from phone. I don't have reverse but used a board with door hinges to mount the motor - the weight allowed for rocks that go thru. Mounted the motor w/ bolts & wing nuts to adjust tension as needed.

Cheers,
KY Dan
LAGERS/FOSSILS
 
The efficiency gain from malt conditioning is negligible (also known as not worth the added effort). It does have some other benefits (as listed in the referenced article), though.
 
Couple of posts in this thread really helped me with inspiration, so I figured I'd return the favor. That's a lovejoy (spider) coupling into a 90° drill adapter which puts the center of mass close enough to the mill opening that a single bucket can hold the setup. That motor is the 107.5 rpm/30 inlb model. I tested a cardboard restrictor plate first, but it wasn't necessary. I drilled a 1" hole in the corner (covered by lid) so I can hang the whole setup from a bicycle hook into a ceiling joist. wiring diagram

Photo Jan 19, 10 57 23 AM.jpg
 
So after many many years of wanting to do this my grain mill is finally done. When I was planning this out I was going to use walnut and I was going to make something that actually looked more like a piece of furniture. The more I drew out the plans I realized it was probably kind of a waste of time and money for something that will ultimately get tucked in a corner where I would only see it a few times a year.

So instead I used all materials that I had left over around the shop and this entire project ended up costing me nothing other than the motor (and the mill I bought 10 years ago).

1-61978.jpg


Construction is pretty much all MDF. My main goal here was to have something very functional. I spent a lot of time designing this thing and had a ball doing it. I wired up a fwd/reverse switch, as well as an on/off switch. I tucked the switches away so they were easy to reach but would never get bumped into and broken off. I then hard wired a plug to it and made a cord reel so the cord would be kept neat and out of the way when not in use. I put a removable cover over the wiring so I could get at it if it was ever necessary.

2-61979.jpg


Mounting the mill was the hardest part. I built a spacer to go under the mill so I could get the motor/mill alignment just right. The grain dumps into a removable 7.5 gallon Rubbermaid bin. The clearance is very tight to keep the dust level down.

3-61980.jpg


Last thing I did was make a bigger hopper for the grain. It holds about 3 gallons of grain which I believe is roughly 15 lbs. I didn't want the hopper to be massive and don't mind having to fill it once while crushing if doing a 10 gallon batch. I used all the internals out of the old hopper to limit the grain flow to what the mill was designed for. Just for fun I built a lid for the hopper to keep stuff out of it when not in use. You can't see it in the pictures but I notched the bottom of the hopper out so that the weight actually rests on the metal part of the mill and not just on the screws. Its extremely sturdy.

4-61981.jpg


I'm really happy with the way this turned out and can't wait to crush some grain in it. Last week before I had this done I crushed 25 lbs of grain using a make shift setup with the motor and mill. It was incredibly quiet and had all the power in the world. If anyone has question let me know. And just in case you are curious I used a festool domino cutter for the joinery on this thing so you can basically park a truck on top of it.

5-61982.jpg


6-61983.jpg
 
Finished mineImageUploadedByHome Brew1391154560.005996.jpg

Thanks to calebstringer for his late night advice! While I was freaking out over the gear reducer output shaft


Sent from my iPhone using Home Brew
 
There are just beefy washers under the motor and there was a shelf inside the cabinet I removed so the bucket would fit, it matches the rest of the cabinet and I cut a square out of it and put that and a couple of washers under the gear reducer


Sent from my iPhone using Home Brew
 
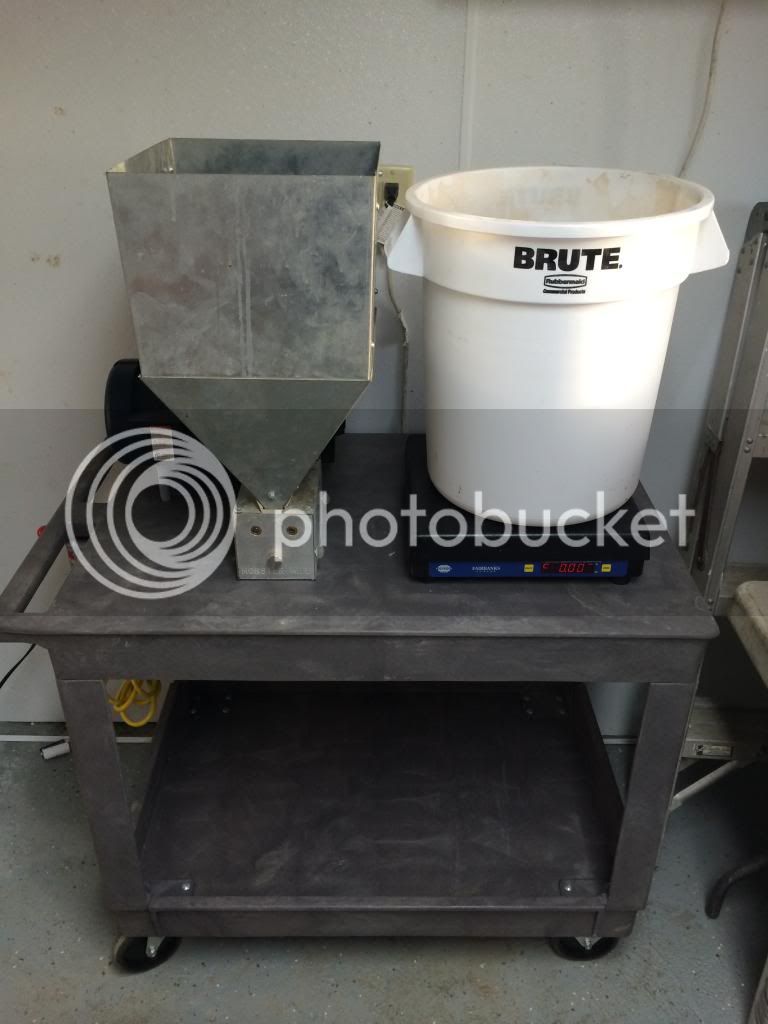
Not quite finished yet, but here's mine. Debating on paint or Formica (have both leftover from other projects) to finish it off.
It's the latest mill from Millars, 7" stainless rollers and ball bearings. Very nice unit. The motor is the one people snapped from from surplus supply for $8.95, and the table is an old steel printer table I've had lurking around for years. Best use I found for it yet!
I opted to mount the motor under the table and use the sprocket with a chain drive. The speed of the sprocket is 110 rpm, and I was able to get a smaller sprocket for the mill so it runs just under 145 rpm. With this arrangement there is measurable downward force on the mill shaft, where the ball bearings are superior, but I will be adding a pillowblock bearing at the sprocket to support it better, and a cover over the sprocket.
The space under the bucket is to store my scale, and the space under the motor fits the hopper. There is a round guide on the underside of the top to guide and capture the bucket with a slight friction fit so it stays put, and almost no dust escapes. Also missing is the cover over the motor assembly which has a double throw switch for Fwd-Off-Rev. The top is hinged on the back for 'storage' and to create a flat surface for the scale when I'm weighing out grains.

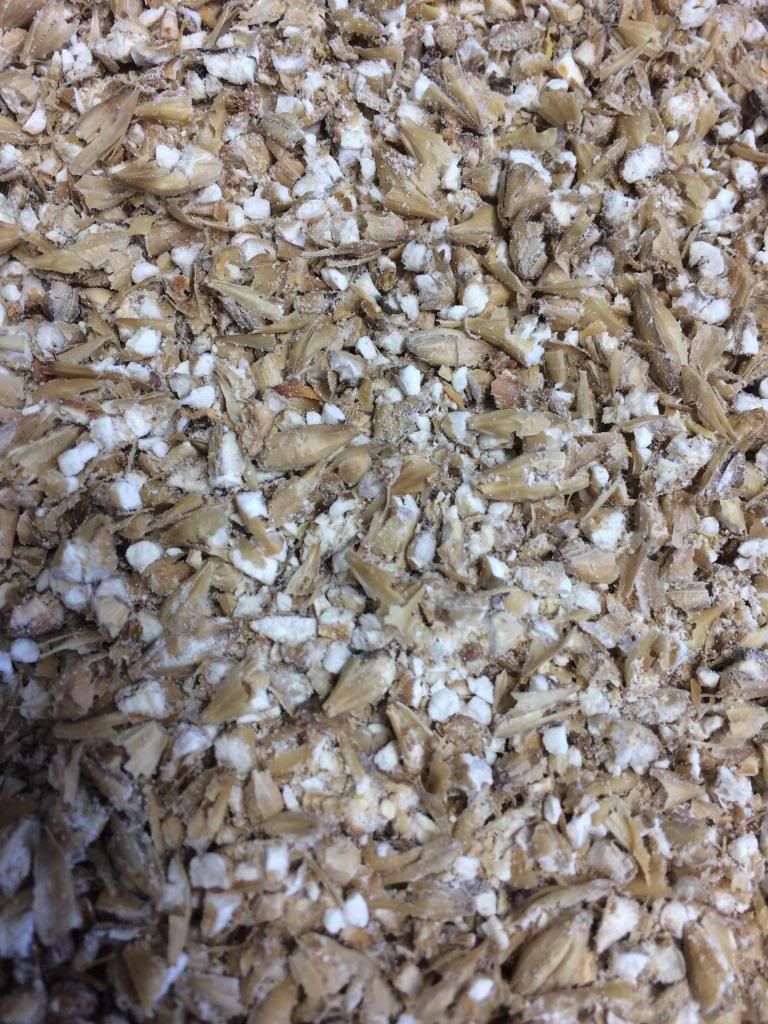
I've only used it once so far, and that was with pre-milled grain, but it powered through it no problem for that doubled milled BIAB brew. No more pre-milled grain for me!!

Some others using this same motor were concerned about overheating the motor, but it was cold to the touch after 12 lbs of pre-milled grain. I'll be keeping my eye (hand?) on it once I start running unmilled grain through it.

Project cost:
Mill - $164 (with shipping)
Motor - $20 (with shipping)
Sprocket & chain - $20
Switch - $15
Plywood - $13
Buckets - $8
Scale - $0 (part of a business lot purchase that was a steal for what I got)
Total: $240
Value: Priceless!

mill1.jpg


mill3.jpg
 
The e-stop works, but it's more cosmetic than anything else. But it could be a good thing. If both my hands are being sucked into the mill, I can hit the e-stop with my knee. :cross:

Get creative and use the E-stop to revers motor direction to be useful.

Cheers,
ClaudiusB
 
Finally got to use the mill today and it worked awesome. I learned two things. #1 I had to remove the mesh screen because for some reason it restricted the flow too much. #2 If I put the lid for the bin under the bin while it is operating it creates a perfect seal with zero dust. Our furnace is running in the basement which is really what is making all the noise. The mill itself is extremely quiet.

[ame="http://youtu.be/6mspmaecFhE"]http://youtu.be/6mspmaecFhE[/ame]

[ame="http://youtu.be/U4vQBMb0Glc"]http://youtu.be/U4vQBMb0Glc[/ame]
 
Quick question on these, I have a barley crusher mill and bought the harbor freight low speed drill. The mill sits lower than my drill, meaning when they are connected and on my table, I need to angle the drill downwards and the bit is not flush. Is that a problem for long term use? The first pic shows them not attached and the drill sitting normally, lifting up the mill. ImageUploadedByHome Brew1391953493.500797.jpg
The second pic shows them attached and the mill slightly angled down.
ImageUploadedByHome Brew1391953776.574973.jpg

Thanks in advance.


Sent from my iPad using Home Brew
 
You need to shim the mill up so they are level. You will destroy your mill doing this and my guess is you will destroy it very very quickly. You need to get them aligned.
 
The chuck of the drill when tightened will align the shaft of the mill perfectly with the drill. Are you really need to do the is shim the mill or drill to the point where everything is nice and level when you secure the mill/drill to the table. Those drills have enough torque to bend that mill shaft in a heartbeat. I'm begging you not to run that thing like that. Where are you located?
 
+ 1 for kiblerjd

My brewing bud had a similar set up to yours millsbrew, and sheared the mill shaft cleanly.

Those motors are pretty tough, and have a jerky start up torque.

He solved the problem by having a correct spacer under the mill to raise it to the correct height and using a lovejoy coupler for the shaft.

I think there are other builds here that show a similar config.

lovejoy.jpg
 
The chuck of the drill when tightened will align the shaft of the mill perfectly with the drill. Are you really need to do the is shim the mill or drill to the point where everything is nice and level when you secure the mill/drill to the table. Those drills have enough torque to bend that mill shaft in a heartbeat. I'm begging you not to run that thing like that. Where are you located?
+ 1 on shimming the mill. You can see post #462 of this thread and see how kiblerjd shimmed his mill. Hope this helps, Castermmt
 
Thx for the quick replies guys. I put the board that came with the mill under it and used the rubber feet to raise the drill. They line up perfectly now. Just needed extra long bolts to hold it all together.

Thanks again everyone.


Sent from my iPad using Home Brew
 
I bought a motorized crankenstien 3d grain mill set-up which utilizes a 10:1 pulley set-up. I want to switch it over to a worm drive gear reducer and I am not sure which gear drive reducer I would want.

The motor is a Worldwide Electric GP Motor T12-18-56CB

1/2 HP
1800 RPM
115/208-230V
56C Frame
Without Overload

Would this gear reducer be sufficent? The Motor has a 5/8th shaft but the mill has a 1/2 shaft.

http://www.ebay.com/itm/HUB-CITY-10-1-GEAR-REDUCER-MODEL-214-0220-61220-214-STYLE-C-5-8-IN-7-8-OUT-/171251635345?pt=LH_DefaultDomain_0&hash=item27df649491#ht_994wt_1106

Thanks in advance. :mug:

Ya that looks fine. All it says is C style....doesnt confirm its a 56C, so you will be taking a risk with that. Otherwise, it looks good
 
Back
Top