ebay aquarium temp controller build

Homebrew Talk - Beer, Wine, Mead, & Cider Brewing Discussion Forum

Help Support Homebrew Talk - Beer, Wine, Mead, & Cider Brewing Discussion Forum:

This site may earn a commission from merchant affiliate links, including eBay, Amazon, and others.
403Brewer said:
Is the main readout on the STC1000 showing current temperature? Or target temperature? I would like to get one just as a temperature monitor for now and then use it for temperature control down the road...is this possible? I know there are temp monitors for a bit cheaper

It shows current temp
 
What is the diameter of the stock probe? I'm sure its in here but couldn't find it searching 370 pages...does anyone put it inside a thermowell in the fermenter?
 
I'm still loving the STC-1000 build but do radio shack even sell the 8x6x3 box that the OP used? I was in several different stores this week checking out the clearance items and never saw one that size.
 
Yes, Radio Shack still sells the 8x6x3 project box. If the local store doesn't have one in stock, you can find it on their web site.
 
Assuming one sterilized the probe could it not be directly in the wort during fermentation for the most accurate reading?

My STC is in the mailbox today, will be using it to control a full-size fridge for use as an FC, no need for heat anytime soon, the fridge will be in my house which NEVER gets below 60 degrees.

Unrelated directly to this thread; i'm hoping I can use the ref side for fermenting and the freezer side for a keezer. Time will tell if I can adjust the ref side to 60-65 and have the freez side be around 35 or not.
 
Assuming one sterilized the probe could it not be directly in the wort during fermentation for the most accurate reading?

Yup! But the question then is how to add a good seal to your air lock. I suppose if you use a blowoff tube instead of an airlock you could feed the probe through that and dangle it in the fermenting beer. Don't know if the CO2 coming to the surface would lift the probe to the surface, but i'm sure if you submerged the probe far enough into the wort it'll be fine.

OR you could just get a thermowell and not worry about any of the above...
 
barrooze said:
Yup! But the question then is how to add a good seal to your air lock. I suppose if you use a blowoff tube instead of an airlock you could feed the probe through that and dangle it in the fermenting beer. Don't know if the CO2 coming to the surface would lift the probe to the surface, but i'm sure if you submerged the probe far enough into the wort it'll be fine. OR you could just get a thermowell and not worry about any of the above...

Does this well fit the STC-1000's probe?
 
Yup! But the question then is how to add a good seal to your air lock. I suppose if you use a blowoff tube instead of an airlock you could feed the probe through that and dangle it in the fermenting beer. Don't know if the CO2 coming to the surface would lift the probe to the surface, but i'm sure if you submerged the probe far enough into the wort it'll be fine.

OR you could just get a thermowell and not worry about any of the above...

I read somewhere that the probe and wire insulation will dissolve in alcohol. They are not food grade silicone. So direct immersion for extended time would not be advisable.

I see 3 solutions:
  1. Thermowell with existing probe or a replacement one. It maybe hard to get the probe to the bottom of the well. It is 1/4" on the widest diameter, but not very slick. A push wire maybe needed.
  2. Encase the probe and wire in a silicone hose and and seal the ends. Not sure if that impedes on the temp. readout. Also it needs to be weighted down.
  3. Use a replacement silicone or metal probe. Typically the seal or crimp between the metal tube and the silicone wire is the weak spot.
 
Does this well fit the STC-1000's probe?

I have no idea. I don't use a thermowell as i find i get adequate readings by taping the probe to the side of my carboy/better bottle and then taping insulation around that to ensure i'm only measuring the temp of the fermentation. I'm sure there are threads discussing which thermowells fit the STC probe if you search for them. :) Good luck!
 
Assuming one sterilized the probe could it not be directly in the wort during fermentation for the most accurate reading?

I'm going to put in my vote for *not* doing this, and here's why:

By dropping the sensor into the beer, you're basically plugging the controller into something with a fairly large thermal inertia; the fridge/freezer will be dropping the temperature of the air, waiting for the beer to catch up. The problem is that it takes a heck of a lot of energy to drop the beer temp, as opposed to the air temp.

So, by the time the beer temp hits your setting, your air temp will be *much* lower than that, and it will continue to "carry-over cool" your beer, many degrees lower than you intended.

I lost several batches of beer, this way, as the over cooling slowed the yeast down so much that it dropped out and went to sleep before it finished. My beers were green apple sour-bombs, due to the fact that the yeast never finished converting the acetaldehyde to ethanol, before they dropped out.

Tape your controller to the side of your fermenter; cover it with a chunk of insulation or styrofoam, and your fridge/freezer will cool the beer in shorter "steps" and ensure you don't way undershoot your target temp.
 
A couple weeks ago I accidentally froze a couple bottles of beer while cold-crashing a brew.

I won't make that mistake again.
 
I'm going to put in my vote for *not* doing this, and here's why:

By dropping the sensor into the beer, you're basically plugging the controller into something with a fairly large thermal inertia; the fridge/freezer will be dropping the temperature of the air, waiting for the beer to catch up. The problem is that it takes a heck of a lot of energy to drop the beer temp, as opposed to the air temp.

So, by the time the beer temp hits your setting, your air temp will be *much* lower than that, and it will continue to "carry-over cool" your beer, many degrees lower than you intended.

I lost several batches of beer, this way, as the over cooling slowed the yeast down so much that it dropped out and went to sleep before it finished. My beers were green apple sour-bombs, due to the fact that the yeast never finished converting the acetaldehyde to ethanol, before they dropped out.

Tape your controller to the side of your fermenter; cover it with a chunk of insulation or styrofoam, and your fridge/freezer will cool the beer in shorter "steps" and ensure you don't way undershoot your target temp.

According to my personal experience, thermal mass is good. I have a mini fridge set up for a 5 gal carboy; for a heater I use a 60 watt ceramic heating element. When I tried laying the STC-1000's probe loose or taping it to the side of the fridge, I kept overshooting the temperature: the compressor would shut off when it was supposed to, but the temp would keep dropping until the heater came on. Then the heater would shut off when it was supposed to, but the temp would keep climbing until the compressor came on....

I tried dropping the probe into a tea kettle of water. That slowed the cycling down, but didn't stop it. Now I have the probe taped directly to my full carboy, with a piece of double foil-faced bubble wrap insulation taped over it. Everything works fine - because the probe is reading the temp of the carboy's contents, instead of the air. And as you pointed out, that much mass reacts a lot slower...

My differential is set at .5 degrees C. After the compressor or the heater shuts down, the carboy temp normally only overshoots by .1 degree C. before it steadies out. I tested the setup with the carboy totall full of water, so I could stick a cooking thermometer in it for comparision. My digital thermometer and the STC-1000 reads were less than a degree F apart.

Of course I used a very small fridge, so there's less heated or cooled air to keep working after the compressor or heater shuts off. You can see my setup here:

https://www.homebrewtalk.com/f11/collecting-toys-get-started-435024/

I have a batch of saison in it right now, and the temperatures are holding steady.
 
RonRock said:
I am sure this has been asked earlier in the thread, but is there a similar unit that reads in Fahrenheit?

Yes, but all of the ones that read in F are single stage. If you want dual stage, you'll need the C model.
 
I am sure this has been asked earlier in the thread, but is there a similar unit that reads in Fahrenheit?

Yes, its made by "LOVE" and its about $60 if I recall. its been a few years since I did any looking into controllers. so for the price of 1 LOVE controller I can have 3 STC-1000's I'll take the C readings.

-=Jason=-
 
Thanks guys, I have built and sold a couple of these. They work great, and the price can't be beat! I've been out of the game for a while so I was hoping that someone had found one that worked in *F. I'll look into the Love Controller, but the price difference will likely cause me to stay with the STC and look at the chart. Guess I'm cheaper than lazy.

I do need a dual controller.
 
The fahrenheit controllers are available, but they only control cool or heat, not both at the same time like the STC1000.
Another negative of the fahrenheit model that I use is the readout is in integer degrees, no tenths of a degree.
They can be found on ebay, example
http://www.ebay.com/itm/Digital-Temperature-Controller-Thermostat-Aquarium-F-/171144426512?pt=LH_DefaultDomain_2&hash=item27d900b410
or
http://www.ebay.com/itm/Digital-Temperature-Control-Controller-Thermostat-110V-58-194-Delay-w-Sensor-/171120859630?pt=LH_DefaultDomain_0&hash=item27d79919ee

I use one on my fermentation chamber in my garage. CH54 Single Stage Controller Even in mid-winter, the 9watt, constant ON, evaporator fan has provided enough heat for ale fermentation. I designed a simple toggle circuit to select the heat circuit in my chamber but have never had to implement it.

For me, the fahrenheit readout trumps all the negatives. I just got tired of converting using the handy-dandy chart posted next to the controller. Old dog, new tricks, I guess.
 
I am missing some basic concept here. Was hoping you guys can help.

I tried it using an old plug-receptacle and doing it like the diagram on page 1 but it would not turn on either circuit, although I heard the relay in the STC click and the heat or cool light would flash. I think I got confused by the breaking of the tab part but am not sure.

So I decided to try using female extension cords instead, no tab to worry about but am having the same issue. I did a diagram of my plan to assist, so far the lamps are not connected, I'll worry about them once it is working. Can you look at this and see where I went wrong?

uhzs.jpg

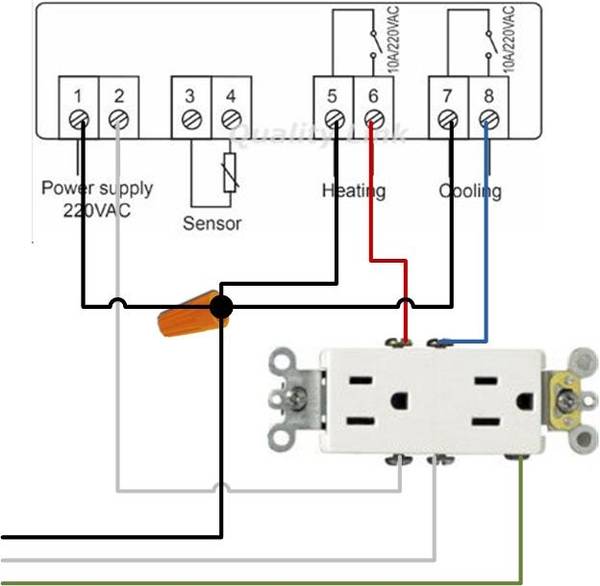
Your wiring is nothing like any of the diagrams posted in this thread. Terminal sets 5/6 and 7/8 are simply switches, they don't supply power to the outlets. You need to run your neutrals from the incoming line to terminal 2 and to the outlet or outlets. The way your diagram is set up, the outlet/s is/are getting hot wires to both sides, and no neutrals. The incoming hot should only be split 3 ways, to terminals 1, 5, and 7 in your diagram. Hopefully you didn't fry your controller with it wired this way. Take a look at this for wiring with a single outlet-

STC-1000_outlet_wiring.jpg


Or this one for wiring with two outlets-

stc-1000-wiring-diagram.jpg
 
I am missing some basic concept here. Was hoping you guys can help.

I tried it using an old plug-receptacle and doing it like the diagram on page 1 but it would not turn on either circuit, although I heard the relay in the STC click and the heat or cool light would flash. I think I got confused by the breaking of the tab part but am not sure.

So I decided to try using female extension cords instead, no tab to worry about but am having the same issue. I did a diagram of my plan to assist, so far the lamps are not connected, I'll worry about them once it is working. Can you look at this and see where I went wrong?

uhzs.jpg

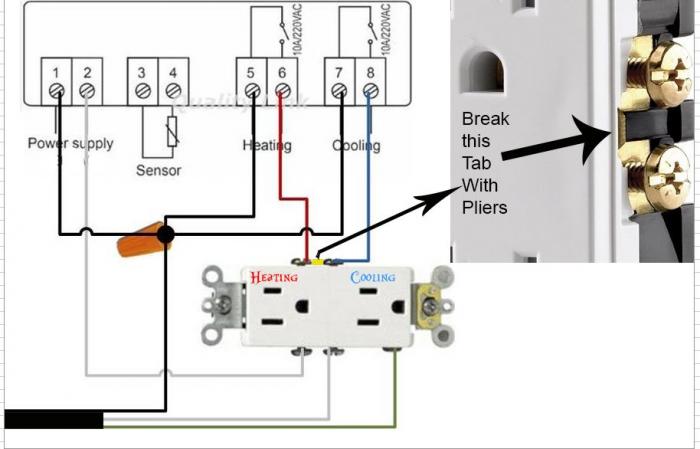
you have your wiring all wrong.

here check out my Diagram in this link:https://docs.google.com/spreadsheet...0teFdneEhyUWlJbHEya1lGU3c&usp=drive_web#gid=0

Capture.jpg
 
I am missing some basic concept here. Was hoping you guys can help.

I tried it using an old plug-receptacle and doing it like the diagram on page 1 but it would not turn on either circuit, although I heard the relay in the STC click and the heat or cool light would flash. I think I got confused by the breaking of the tab part but am not sure.

So I decided to try using female extension cords instead, no tab to worry about but am having the same issue. I did a diagram of my plan to assist, so far the lamps are not connected, I'll worry about them once it is working. Can you look at this and see where I went wrong?

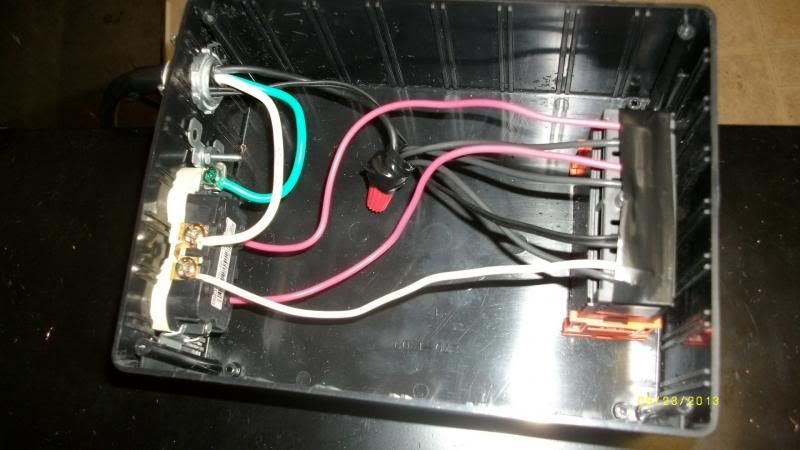
I'm not sure whether this will help, but here's a photo of my wiring; some readers may relate better to seeing the actual wires instead of a schematic. Power to the unit itself is at the bottom of the pic. Te probe is above it, then comes the heating and cooling switches.

The hot (black) wire from the power cord is wire-nutted to three pigtails: one for unit power; one for the heating switch, and one for the cooling switch.

The neutral (white) wire from the power cord runs to the duplex outlet, as does a neutral leg for the unit power. That means the unit itself has power at all times.

A return (red) leg runs from each switch to the hot side of a plug on the duplex, and the tab is broken on that side. When a heating or cooling switch closes, power feeds through it from a black wire, and on to its respective outlet through a red wire. Since the power cord's neutral is hardwired to the outlets, that completes the circuit.

Hope that helps, instead of just confusing things more....


add: I forgot to mention that the power cord's ground wire is also connected to the outlet.
 
you have your wiring all wrong.

I am completely willing to accept that, in fact I know it is since it doesn't work. Rather than diagrams showing how to use the plug can you say what is wrong with mine and how to make it work with the cords instead of a plug?

I think I see what I did wrong though, does this fix it?

brcl.jpg
 
I am completely willing to accept that, in fact I know it is since it doesn't work. Rather than diagrams showing how to use the plug can you say what is wrong with mine and how to make it work with the cords instead of a plug?

I think I see what I did wrong though, does this fix it?

brcl.jpg

That should work.

And FWIW if the cooling light is blinking like it was earlier, that means that the compressor delay is on. I think the default setting is either 3 or 5 min. Basically the cooling relay activation will be delayed when the unit is just turned on, or when the it's been on recently. This protects the compressor from short cycling, but can sometimes cause people to think the unit doesn't work because they don't realize they need to wait for the delay before it will come on. This is only on the cooling side though, the heat side should come on immediately.
 
Thanks JuanMoore, I'll hook it up tonight and report back. Also good info on the blinking/delay setting. I have mine on 10 minutes (max) since it is on a 20 year old 26cf fridge/freezer. I'll report back in case anyone wants to try cords instead of plugs.

Long term I am hoping I can use the fridge side for ale fermentation at 60-65F, and the freezer side (side by side unit) as a kegerator, if I can get the cold-air adjusted all the way to the freezer side and it gets cold enough that is.
 
I am completely willing to accept that, in fact I know it is since it doesn't work. Rather than diagrams showing how to use the plug can you say what is wrong with mine and how to make it work with the cords instead of a plug?

I think I see what I did wrong though, does this fix it?

brcl.jpg

that looks great, you still can add those LEDS if you wish to your current setup.

-=Jason=-
 
When I hooked it all up nothing worked...then I just wired the STC1000 in direct it works fine so I think I screwed my plug when I broke the tabs off...is there any reason this should happen or is there anything I need do? There was a bit of a crunch when breaking the tabs so maybe I killed the plug. I'm 99% sure I had it wired in correct...nothing was plugged into the plugs if that matters

EDIT: Realized I broke tabs on BOTH sides of plug, I'm guessing that is my issue
 
403Brewer said:
When I hooked it all up nothing worked...then I just wired the STC1000 in direct it works fine so I think I screwed my plug when I broke the tabs off...is there any reason this should happen or is there anything I need do? There was a bit of a crunch when breaking the tabs so maybe I killed the plug. I'm 99% sure I had it wired in correct...nothing was plugged into the plugs if that matters EDIT: Realized I broke tabs on BOTH sides of plug, I'm guessing that is my issue

Yep, only need to break the tab on the hot side. You can make a jumper to connect the neutral sides of the plug.
 
So I have been sifting through the 360 pages of posts on this build and haven't been able to find if I am able to get the exact same temp controller used on Amazon.com. Anyone have the product number or anything to identify if I am getting the right one from Amazon? Unfortunately my ferment freezer is in our carport and winter (In North Carolina) is quickly approaching. Thanks in advance for the help.

Does this one work?
http://www.amazon.com/dp/B0084Y8HJK/?tag=skimlinks_replacement-20
 
Last edited by a moderator:
I'm going to have to do this to run a fan/heat pad in my mini SOF. Then when I have more space, I'll just upgrade to a fridge and keep the controller!
 
I got 2 of these 2 months ago. They were $18.00 at the time, and free shipping with a $25.00+ order total.

STC-1000

A search for "STC-1000" on Amazon should bring you numerous options. Beware, some may add shipping or be sent from overseas.
 
Last edited by a moderator:
that looks great, you still can add those LEDS if you wish to your current setup.

Confirmed working, thanks for the help guys!

I added the lamps back in on the drawing, have not connected them yet since the STC is in use right now, but the revised diagram is below. My question is the combined lead (black line), should it go to port 2 as shown or port 1?

So far I am finding that the temperature is too low. The STC turns on the fridge when it hits the number I set and the fridge cools so fast that even after it shuts off the temp keeps lowering. I am saving some electricity bill but need to tweak the settings/thresholds/window a bit. I wanted a temp between 60-65 but when it kicks in at 65 it keeps getting down to around 55-56 before the temperature slowly starts going back up. Any good threads about the settings?

oafn.jpg
 
Back
Top