Steel Compression Spring

Homebrew Talk - Beer, Wine, Mead, & Cider Brewing Discussion Forum

Help Support Homebrew Talk - Beer, Wine, Mead, & Cider Brewing Discussion Forum:

This site may earn a commission from merchant affiliate links, including eBay, Amazon, and others.

fusa

Senior Member
Joined
Feb 18, 2010
Messages
392
Reaction score
55
Location
Blacksburg
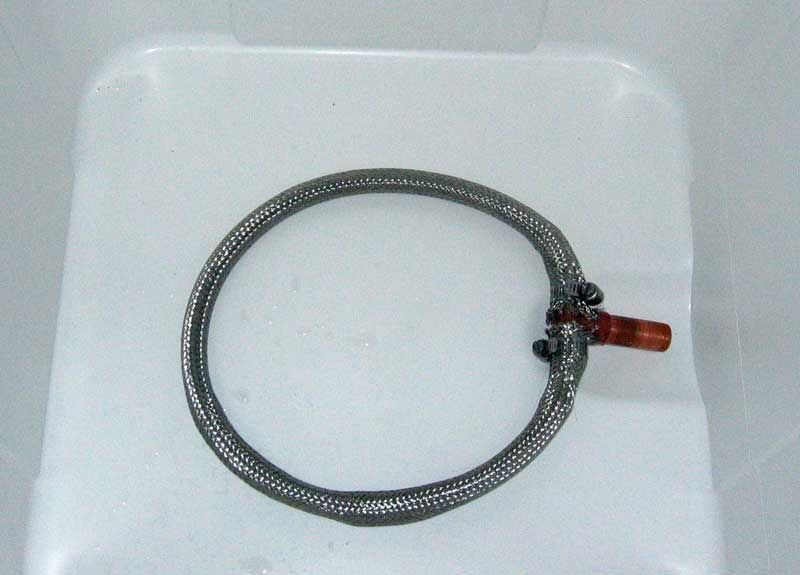
I bought a compression spring to insert into the steel mesh in my MLT cooler. I forgot to check if it was stainless steel. Could this be a problem? Would it be possible to use something like rustoleum to protect it from rusting?
 
If it's not stainless it will rust, and cause rust on your braid. Do not paint it. Just get a Stainless spring, or get stainless wire and roll your own spring around a sharpie.
 
I have 75 feet of galvanized steel wire. Would that be ok for making the spring? Or should I look for stainless steel only? I haven't had much luck finding 30 in of stainless steel spring. The best I could find was 20". I have the braid in a loop so both ends connect to the ball valve.
 
Get a hold of a couple lengths of 1/16" SS Tig filler rod of 36" long wrap it tighter than your screens ID as it will have some spring back and grow in diameter. Curl the ends tighter and inwards to prevent poking thru your screen, stretch to your needed length, install and forget about it. No collapsed screen or corrosion worries. A cheap fast and simple fix.
 
I was keeping away from mentioning copper as put away wet with the low Ph green likes top grow inside the screen. Yes a easy and simple fix even 14 ga would be plenty stiff to hold the screen from collapsing under the grain.
 
I haven't had much luck finding stainless steel wire, plenty of galvanized, and some copper and brass. I was about to buy the copper, but was also afraid of it turning green. I checked Lowes, Home Depot and True Value Hardware, but none had stainless steel wire.
Not sure about using the filler rod. My braid is about 30 inches long so I would need to connect several rods to get a spring long enough. Not sure if the spring would stay in shape trying to put it inside the braid.
 
Coil the end of the filler rod to a closed loop, two sections with this closed loop or circle will not screw into each other. Hell even if need be use lead free solder to jump the end to make a complete circle after it's formed without any spring back and gap.
 
the ph of wort will keep the green away,, ever seen a green immersion cooler??

use a short piece of rod and just keep moving the coil down until you meet your length.. I just wound the ends tight to keep from snagging the braid
my braid is about 30" long also,, you can form a curve also to keep it on the side of your pot
 
the ph of wort will keep the green away,, ever seen a green immersion cooler??
Yeah, mine was green until I soaked it in vinegar recently. It was in storage for several years so had plenty of time to oxidize.

I'm thinking of just buying two 20" stainless steel springs, and do as BrewBeemer said, just solder them together.
 
Yeah, mine was green until I soaked it in vinegar recently. It was in storage for several years so had plenty of time to oxidize.

I'm thinking of just buying two 20" stainless steel springs, and do as BrewBeemer said, just solder them together.

I was being nice mentioning just soldering or silver soldering the ends of each length of filler rod making sealed end circles so the two springs will not thread into each other. Even pre coiled with a 3/4" overlap then soldering the coils parallel would allow for your long spring. Bend the coiled rod to any shape you want. Being nice above as I would of Tig butt welded the two filler rods together making the joint as strong as the base filler vs soldering.
Hell i'm giving away too many of my wacky ideas this from staying up long nights with this bad back. A few members have a couple more of my wild ideas that I went and spilled the beans on. One must be crafty with secrets and ideas besides how to acquire parts cheap to afford this crazy hobby.
 
What about some SS Mig wire wrapped around stock then pulled to the length and gap spacing between coils to your liking? I would use the lathe with the back gear, a starter hole then go at it, a two person job with leather gloves.

I bet that 36" long spring can be pulled to 48" to forum a complete loop inside a keggle.

Ben: OT here; I still enjoy my Bronica GS1 6x7, AE2 meter head, speed grip only one 100mm lens. So sad they didn't go digital plus I didn't collect more lenses.
 
jfulton
part # 9662K22 is 36" long, 1/2" diameter, 9662K26, 5/8" diameter, these are .062 gage wire, if you want thicker 9662K28 is 5/8" .092 x 36" and 9662K24 is 1/2" x .063 x 36"
Take another look, their site can be a little overwhelming but amazing.
Carl
I used to have a Bronica 645 but now shoot mostly with a Canon and a Fuji GX680III.
 
The description lists those item's material as steel, not stainless steel, so thought they were not stainless.
 
McMaster does appear to only have up to 20" in stock. You're making a loop like the one I did here, right? Why not just use two springs and link the ends?

braid_done.jpg


-Joe
 
Yeah thats what I'm planning on doing. Just hated wasting more $ on parts that I couldn't use (also have 5' of 3/8" copper tubing that the hardware guy told me was 1/2") and wanted to make sure what I bought next would be a good choice. Not sure why 20" seems to be the max for stainless steel springs.
But good news is after I purchase those 2 springs, will finally be done with my lauter tun. Just 4 spots to solder on my sparge arm, then to buy the brew pots.

BTW nostalgia nice idea on folding the ends of the braid over, was wondering what to do about the frayed ends.
 
I would think that you could run some PEX or poly tubing inside the mesh to keep it from collapsing. It wouldn't even need to be perforated or slotted so long as there was some clearance between the mesh and the tubing. Has anyone tried anything like that? Might be a cheaper and easier way to go.

Whaddya think BB?
 
jfulton
part # 9662K22 is 36" long, 1/2" diameter, 9662K26, 5/8" diameter, these are .062 gage wire, if you want thicker 9662K28 is 5/8" .092 x 36" and 9662K24 is 1/2" x .063 x 36"
Take another look, their site can be a little overwhelming but amazing.
Carl
I used to have a Bronica 645 but now shoot mostly with a Canon and a Fuji GX680III.

Years ago on a trip purchased a brand new the GS1, w/AE2 light meter w/speed grip and 100mm standard lens thru US customs cost me $1,259 to enter the USA after taxes. The pisser was lenes for $860 to $1,200 each and I didn't buy 3 more lens for this GS1. Sad as I like to not crop when printing off sq format. Hell 120 film's hard to get these days. I refuse to go digital, old school with a Omega B-22 w/120 lenses as well a my 5x7" color enlarger. Old school color back in 1970 with Kodak.
FUJI JMO the best color film of true color around.
 
Brewbeemer:
Alas for me professionally digital is everything. Personally I have not shot film in 4 years, with the exception of some 4x5 polaroid through my view camera. Camera shows are a good place to find that glass you are looking for.
jfulton: Sorry I had selected stainless earlier in my mcmaster search field and did not realize I had wandered out. 30" seems pretty long to me but I don't know what you're putting it in. Longer is not necessarily better with the braid technique. My 10g cooler has a loop that's maybe a 9" circle, in this pic it was too long and I ended up shortening it.
IMG_3210.JPG
 
I was wondering if an "X" at the discharge to the drain as well a "Tee" at the halfway part of the loop would help with making this section also out of meshed screen with spring inside for mor added area? This or have a larger outside circle with a smaller inner circle connected together, just another idea for more exposed surface area. All in all looks looks good plus stays inflated.
 
This is what I've completed so far, just need to insert the springs and solder the circle part of the sparge arm.

dsc00444xu.jpg


dsc00443x.jpg


dsc00447h.jpg
 
Back
Top