• Please visit and share your knowledge at our sister communities:
  • If you have not, please join our official Homebrewing Facebook Group!

    Homebrewing Facebook Group

What are your tips for keeping costs down

Homebrew Talk

Help Support Homebrew Talk:

This site may earn a commission from merchant affiliate links, including eBay, Amazon, and others.
Best tip I can offer is to read. Read forums like this, or the other fine caches of homebrew enthusiasts.
Read magazines, blog posts. Listen to Podcasts or live streams for ideas.

I started out relatively recently (2020) and didn't have a bunch of hardware to steer my path. So I read. Either go the pot/propane burner/stand route, or go electric AIO.

Biting the bullet initially and spending $400 on an Anvil Foundry gave me pause, but I did *ALOT* of reading and days of pondering with items sitting in shopping carts unpurchased, so that helped make jump easier.

Now that I have a system that works well for me, I find myself returning to the forums for ideas on fermentation, different ways to complete a process. It's always a learning experience.
I got an Anvil6.5 also,the choice was easy. After reading about all the different systems,one came up for sale. Glad I got the 6.5,I use just under 8 lbs of grains and put between 5-6 gal in the fv .I also have a keggle but haven’t used it yet, it’s heavy and more work. The Anvil works good and a 5-6 hr brew day works for me.Check out Hops andGnarly on you tube season 1&2, he does great stuff with an anvil.
 
Beating the high cost of CO2!
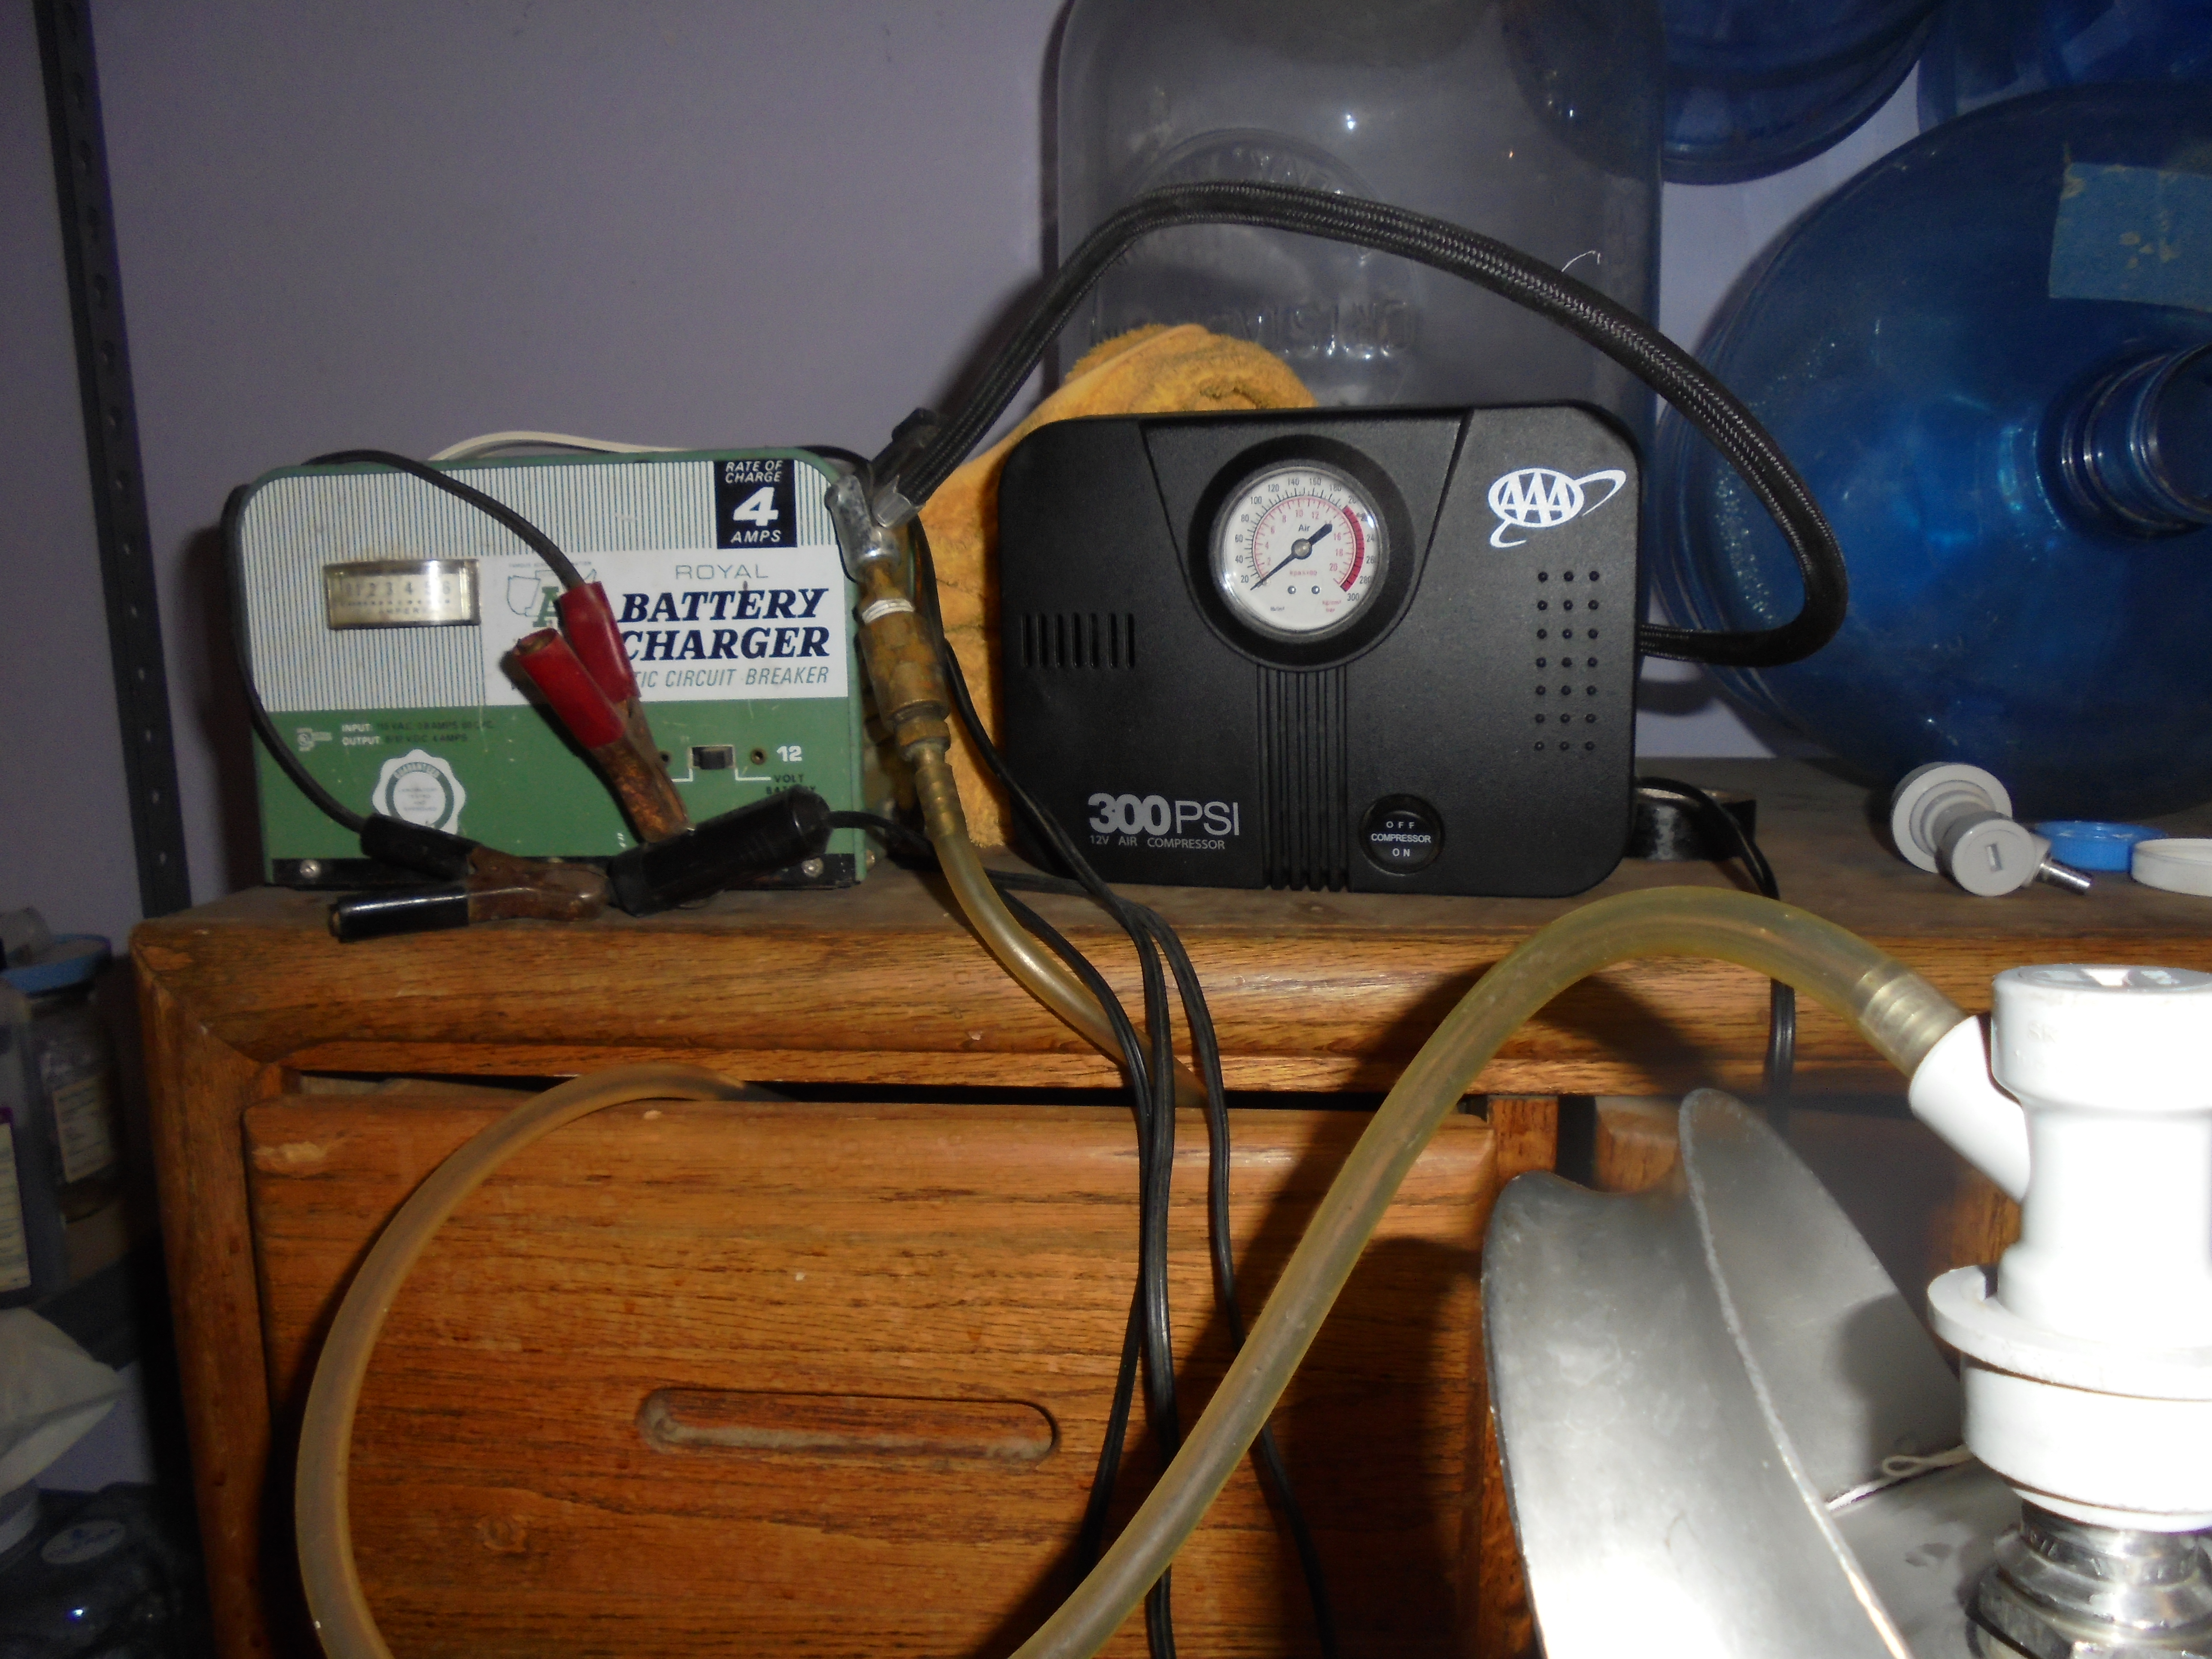
Any car owner probably has these two items somewhere in their possession: a battery charger and a tire air compressor. Make a trip to Home Depot and purchase a hose barb and a short length of vinyl tubing. Assemble the parts and use the air we breathe to pressure your kegs.
I know! I can hear you thru the wires; DO NOT USE TO CARBONATE.
DSC01307.JPG


I use this method to:
  1. Force cleaning solution thru beer lines, filters, herms coil etc.
  2. Seat keg lids under high pressure
  3. Checking keg posts for leaks before racking
  4. Soak kegs under pressure with PBW after forcing solution thru the pickup tube and in/out posts.
  5. Force water then sanitizer thru anything that comes into contact with wort/beer.
Cut my CO2 usage in half!
 
Beating the high cost of CO2!
Any car owner probably has these two items somewhere in their possession: a battery charger and a tire air compressor. Make a trip to Home Depot and purchase a hose barb and a short length of vinyl tubing. Assemble the parts and use the air we breathe to pressure your kegs.
I know! I can hear you thru the wires; DO NOT USE TO CARBONATE.
View attachment 807015

I use this method to:
  1. Force cleaning solution thru beer lines, filters, herms coil etc.
  2. Seat keg lids under high pressure
  3. Checking keg posts for leaks before racking
  4. Soak kegs under pressure with PBW after forcing solution thru the pickup tube and in/out posts.
  5. Force water then sanitizer thru anything that comes into contact with wort/beer.
Cut my CO2 usage in half!
How do you filter out the airborne bacteria and beer destroying oxygen? I use my compressor for lots of tasks but never in contact with beer.
 
How do you filter out the airborne bacteria and beer destroying oxygen? I use my compressor for lots of tasks but never in contact with beer.

I took it to mean, for all of those situations where you need pressure to "push" fluid in/out of kegs on non-brew days.

Each point mentioned was cleaning or prep related. I've considered similar with an inexpensive amazon air compressor.

I agree tho, would never use air near wort. Only with a HEPA filter attached to an oxygenation wand prior to yeast pitch. For that I'd opt for a low-pressure aquarium pump.
 
I got an Anvil6.5 also,the choice was easy. After reading about all the different systems,one came up for sale. Glad I got the 6.5,I use just under 8 lbs of grains and put between 5-6 gal in the fv .I also have a keggle but haven’t used it yet, it’s heavy and more work. The Anvil works good and a 5-6 hr brew day works for me.Check out Hops andGnarly on you tube season 1&2, he does great stuff with an anvil.
I went for the 6.5 also. The 120/240 option was the cinch for me, and I've already made an adapter cable for my dryer outlet, so no alteration to the unit.

I also chose to go with MIAB out of the gate with a 5 gallon round cooler and a brew bag.

This way, I can mash in a cheap cooler, while I use my Anvil to heat sparge water. Pull first runnings into a food-safe bucket and drain kettle into cooler for the batch sparge.

While I give the 2nd runnings 20-30 mins to do their thing in the cooler, I start heating up the 1st runnings. I need no 2nd heat source this way, which works well for me.

I "saved money" by choosing the smaller 6.5 anvil and using a cooler for mashing. I can still do 5gal (max) batches, which was my goal.

The batch sparge process as originally described by Denny Conn always seemed like a good idea, and the cooler was the easiest (and least expensive) way to play with this process.
 
My best tip for brewing frugally: contentment.

Don't fall for all of the shiny conical ads when a plastic bucket will do just fine. Don't get envious of all the guys posting photos of their automated recirculating systems when your propane turkey fryer is still making tasty beer.

Yes I need to remind myself of this too.
Amen

Reflecting on my first foray into a BIAB. While I have upgraded almost everything since then, when funds would permit, my stove, a pot, a bag, a bucket, and some bottles was all I needed to brew some very good beer.

My 2.5 gal batch ingredients run me about $25- $30 which yields about 20 pints and lasts me a month. Given that a 6-pack of craft beer will sell for $10 - $15 (local prices) , I don't think twice about the cost of ingredients. There is no reason, other than self indulgence, that one should not be able fit one's homebrewing with their commercial beer budget.


PS. Don't be convinced that you just brew 5 gallons. That is a standard, I think, was based on the availability of 5 gallon soda kegs for the homebrew market. Since then equipment is readily available to the home brewer for different batch sizes to accommodate specific needs. For me 2.5 gallons made a lot more sense given I don't drink 6 or 12 packs anymore, I have limited space and I like to brew different styles and mix up recipes so smaller batches fit in better with my lifestyle. In other words, I am not spending money on brewing more beer than I want in any given batch.
 
Last edited:
propane is the most expensive way to boil! i use my NG stove to brew! ;) :mug:

(sure, it's a bit messy, but i'm single!)
I
I took it to mean, for all of those situations where you need pressure to "push" fluid in/out of kegs on non-brew days.

Each point mentioned was cleaning or prep related. I've considered similar with an inexpensive amazon air compressor.

I agree tho, would never use air near wort. Only with a HEPA filter attached to an oxygenation wand prior to yeast pitch. For that I'd opt for a low-pressure aquarium pump.
I see that now. I didn't know people used CO2 for those tasks.
 
I got an Anvil6.5 also,the choice was easy. After reading about all the different systems,one came up for sale. Glad I got the 6.5,I use just under 8 lbs of grains and put between 5-6 gal in the fv .I also have a keggle but haven’t used it yet, it’s heavy and more work. The Anvil works good and a 5-6 hr brew day works for me.Check out Hops andGnarly on you tube season 1&2, he does great stuff with an anvil.

I too brew with an Anvil Foundry 6.5. IMO, the Anvil is not something to keep costs down for the home brewer. IMO it's a piece of equipment that makes brew day easier and provides good mash temp control. I love my Anvil, and it's made my brew day exponentially more enjoyable, but it is a $350 expense that replaces a burner and pot.


If one is deciding on purchasing a foundry but isn't ready to spend the $$$ on an electrician to install a 220v outlet, 120v is perfectly fine for small batches (like the 2.5 gal I brew). I have a 220v dryer plug and made the DIY cord but since it's in my basement, I opt to plug into a 110v in the convenience of my kitchen. 110v will produce a vigorous boil and get to mash temp by the time I have finished weighing out and crushing the grain.
 
I make beer in the apartment, in the bathroom, in the bathtub, electric BIAB in a pot in which I installed the heating element myself. The air conditioner dries the evaporation at the boil. I buy all the ingredients ready for brewing (not bulk) and mostly don't reuse yeast with unfiltered tap water (fortunately, my tap water is good enough for beer). I No Chill, mostly because it's too much dirty work for me for little benefit. Ferment in a cheap plastic bucket without temperature regulation, but use cheaper dry yeasts adapted to a certain time of year (US-05 in winter, Saison and Kveik in summer). The beer is carbonated in the same commercial beer glass bottles that I have been using since first brew.
My beer costs me twice as much as cheap commercial lagers, and at least four times cheaper than better quality beers. In addition, this is a hobby that completely fulfills me and does not take up a lot of time. I always have good and healthy beer (without commercial additives and preservatives) for myself and friends without constant trips to the store for beer (I live on the 4th floor, so I means a lot).
I see absolutely no advantage in buying beer for my house.
 
save on CO2 consumption: purge kegs with fermentation CO2 and naturally carbonate by transferring with 1-2% residual extract and yeast in suspension.

save on yeast purchases: brew batches in runs, harvesting and using the same yeast over the series

save on grain: buy in bulk splitting batches with others to share the savings.

save on heat cost: use electricity vs propane.

save on equipment: BIAB, no sparge, no chill

save on water purchases: cobble together an RO filter system

save on water additions: use only gypsum and CaCl.

save on acid to adjust pH: hold off adding grains that screw with pH. Add them to hot steep for 30 min once main mash is complete.

save on hops: don’t brew NEIPA
I have to comment on the water suggestions. I have a RODI system for my reef tank so I have a good understanding of water chemistry and the advantages of making water from 0 TDS water, and the capability for making 5 gals in an hour with the turn of a spigot.

Here's my suggestion. If your water in drinkable, before investing in a filtration system, get a copy of your local municipality's water report. They tend to be updated regularly. If your water isn't hard, likely you can use your tap water with needing minimal additives. I created a local water profile in brewfather (most brewing software will have the same functionality) using the water report midpoints, and then the software will automatically calculate the additions to match the target water profile.

As for cost of epsom salt, calcium chloride, lactic acid, m, gypsum, my software rarely has me adding more the 2 ml or g of any one additives (double for 5 gal batches). I can't imagine these costs have any material affect one brewing budgets.

a piece of equipment that will save in the long run, a vacuum sealer (I replaced an old one with an inkbird model during one of their sales here and I find it performs very well). Items that are sold in quantities that aren't exactly what I need are specialty grains and hops which I can then vacuum seal and extend their life until I need them. Also, I use the sealer for my day to day food storage extending freezer and fridge life thus cutting down on my food bill.
 
As for cost of epsom salt, calcium chloride, lactic acid, m, gypsum, my software rarely has me adding more the 2 ml or g of any one additives (double for 5 gal batches). I can't imagine these costs have any material affect one brewing budgets.
Indeed, those costs are minimal.
If you're brewing often, buy a pound of each, not the silly 2 oz jars.* Then store those in plastic jars with well sealing screw lids, such as peanut butter, mayo jars, etc.
* Smaller 2-4 oz jars are actually quite handy in the brew room or brew box, so refill them from a larger container.

I discovered that adding 4 layers of plastic wrap (a square piece folded over twice) over the top of the jar, before screwing the lid on, creates an excellent seal.

Especially Epsom salt at your local drug store is/was 69 cents for a pound carton.
You want to be really frugal, Quick Joe (or generics) is 100% Calcium Chloride. Comes in 10# and 50# bags.
A 5, 10 or 50 pound bag of Gypsum at your hardware store is 100% gypsum, for only a few bucks. Some are even food quality, if that's important to you. The gypsum is also of the lower hydrate version, so you need less weight, and such a bag will last even longer...

Another "big saver" is buying Lactic Acid (88%) instead of the crazy overpriced 4-8 oz bottles with 10% Phosphoric Acid.
If you use much more acid, buy a pint or gallon of 85% Phosphoric acid from Duda Diesel, and split with some club members.
Then reduce some to a more manageable 10% working solution.
 
@NSMikeD while tap is certainly cheaper, admittedly, I have ulterior motives for using RO vs starting with tap.

I have very specific reasons to brew the way I do: Dr C Bamforth discusses metal ions, bottom-filling of vessels, using deaerated water for slurries, limit transfers, etc. as less important but additional steps that can be taken to reduce oxidation. I also incorporate information I received from Joe Formanek concerning a combination of oxygen reduction and ion removal as what he termed in his note “the best case scenario”. AJ DeLange and G Strong recommend CaCl and/or gypsum to build water from RO or distilled. J Palmer and G Strong discuss hot steep of dark grains. (Dark grains screw with mash pH therefore drive unwanted salt additions)

So, I remove nearly everything via RO filtration, deaerated it with bread yeast and table sugar, and add back only what I want (CaCl and/or gypsum) along with Brewtan B (heavy metal chelator) and Ascorbic Acid (antioxidant). The Ca reacts with grain husks to release phytic acid so, in combination with the AA and mashing only the grains that require it, my mash pH hits 5.2-5.4 with ease. I hold grains that don’t require mashing until the main mash (30 min 145°F for β-amylase + 45 min 158°F for α-amylase) is complete, then add them for a 30 min Vorlauf/Hot Steep/Lauter rest (167°F). I don’t sparge.

IOW, having my own RO filter is cheaper than buying distilled or RO water. I also don’t need a box full of salts to build water and I don’t need an irrelevant water report because I have TDS meters.
 
Last edited:
@NSMikeD while tap is certainly cheaper, admittedly, I have ulterior motives for using RO vs starting with tap.

I have very specific reasons to brew the way I do: Dr C Bamforth discusses metal ions, bottom-filling of vessels, using deaerated water for slurries, limit transfers, etc. as less important but additional steps that can be taken to reduce oxidation. I also incorporate information I received from Joe Formanek concerning a combination of oxygen reduction and ion removal as what he termed in his note “the best case scenario”. AJ DeLange and G Strong recommend CaCl and/or gypsum to build water from RO or distilled. J Palmer and G Strong discuss hot steep of dark grains. (Dark grains screw with mash pH therefore drive unwanted salt additions)

So, I remove nearly everything via RO filtration, deaerated it with bread yeast and table sugar, and add back only what I want (CaCl and/or gypsum) along with Brewtan B (heavy metal chelator) and Ascorbic Acid (antioxidant). The Ca reacts with grain husks to release phytic acid so, in combination with the AA and mashing only the grains that require it, my mash pH hits 5.2-5.4 with ease. I hold grains that don’t require mashing until the main mash (30 min 140°F for β-amylase + 45 min 158°F for α-amylase) is complete, then add them for a 30 min Vorlauf/Hot Steep/Lauter rest (167°F). I don’t sparge.

IOW, having my own RO filter is cheaper than buying distilled or RO water. I also don’t need a box full of salts to build water and I don’t need an irrelevant water report because I have TDS meters.

no doubt but this thread is in the beginner brewing forum. My post was for the average noobie who may question using tap and wondering if they need to invest in an unnecessary filtration system or buying water when their tap may very well supply a profile a good base. Available water reports and most brewing software (including the one on this site) can enable the average brewer a simple way to determine if their tap can be used to make very good beer with a few grams or mls of additions.

PS. I do appreciate your post as the topic is one that interests me. I am an eBIAB brewer doing single step full volume mash, otherwise I can see myself taking the water chemistry and mashing to another level.
When I started simple, our water is pretty hard, so I only filtered for Chlorine and let the water be itself. As long as it was a dark beer or a Burton-style pale, it worked great. Otherwise, it wouldn't always hit style, but it was always beer. Now it's RO and mineral additions. Not simple, not cheap, but a real nice step up.
 
Back
Top