• Please visit and share your knowledge at our sister communities:
  • If you have not, please join our official Homebrewing Facebook Group!

    Homebrewing Facebook Group

Well, Finally... years later, after purchasing LODO tanks I have my brewcart finished and brewery underway

Homebrew Talk

Help Support Homebrew Talk:

This site may earn a commission from merchant affiliate links, including eBay, Amazon, and others.

N9BOW

Supporting Member
HBT Supporter
Joined
Jun 11, 2011
Messages
70
Reaction score
39
Location
Bull Shoals
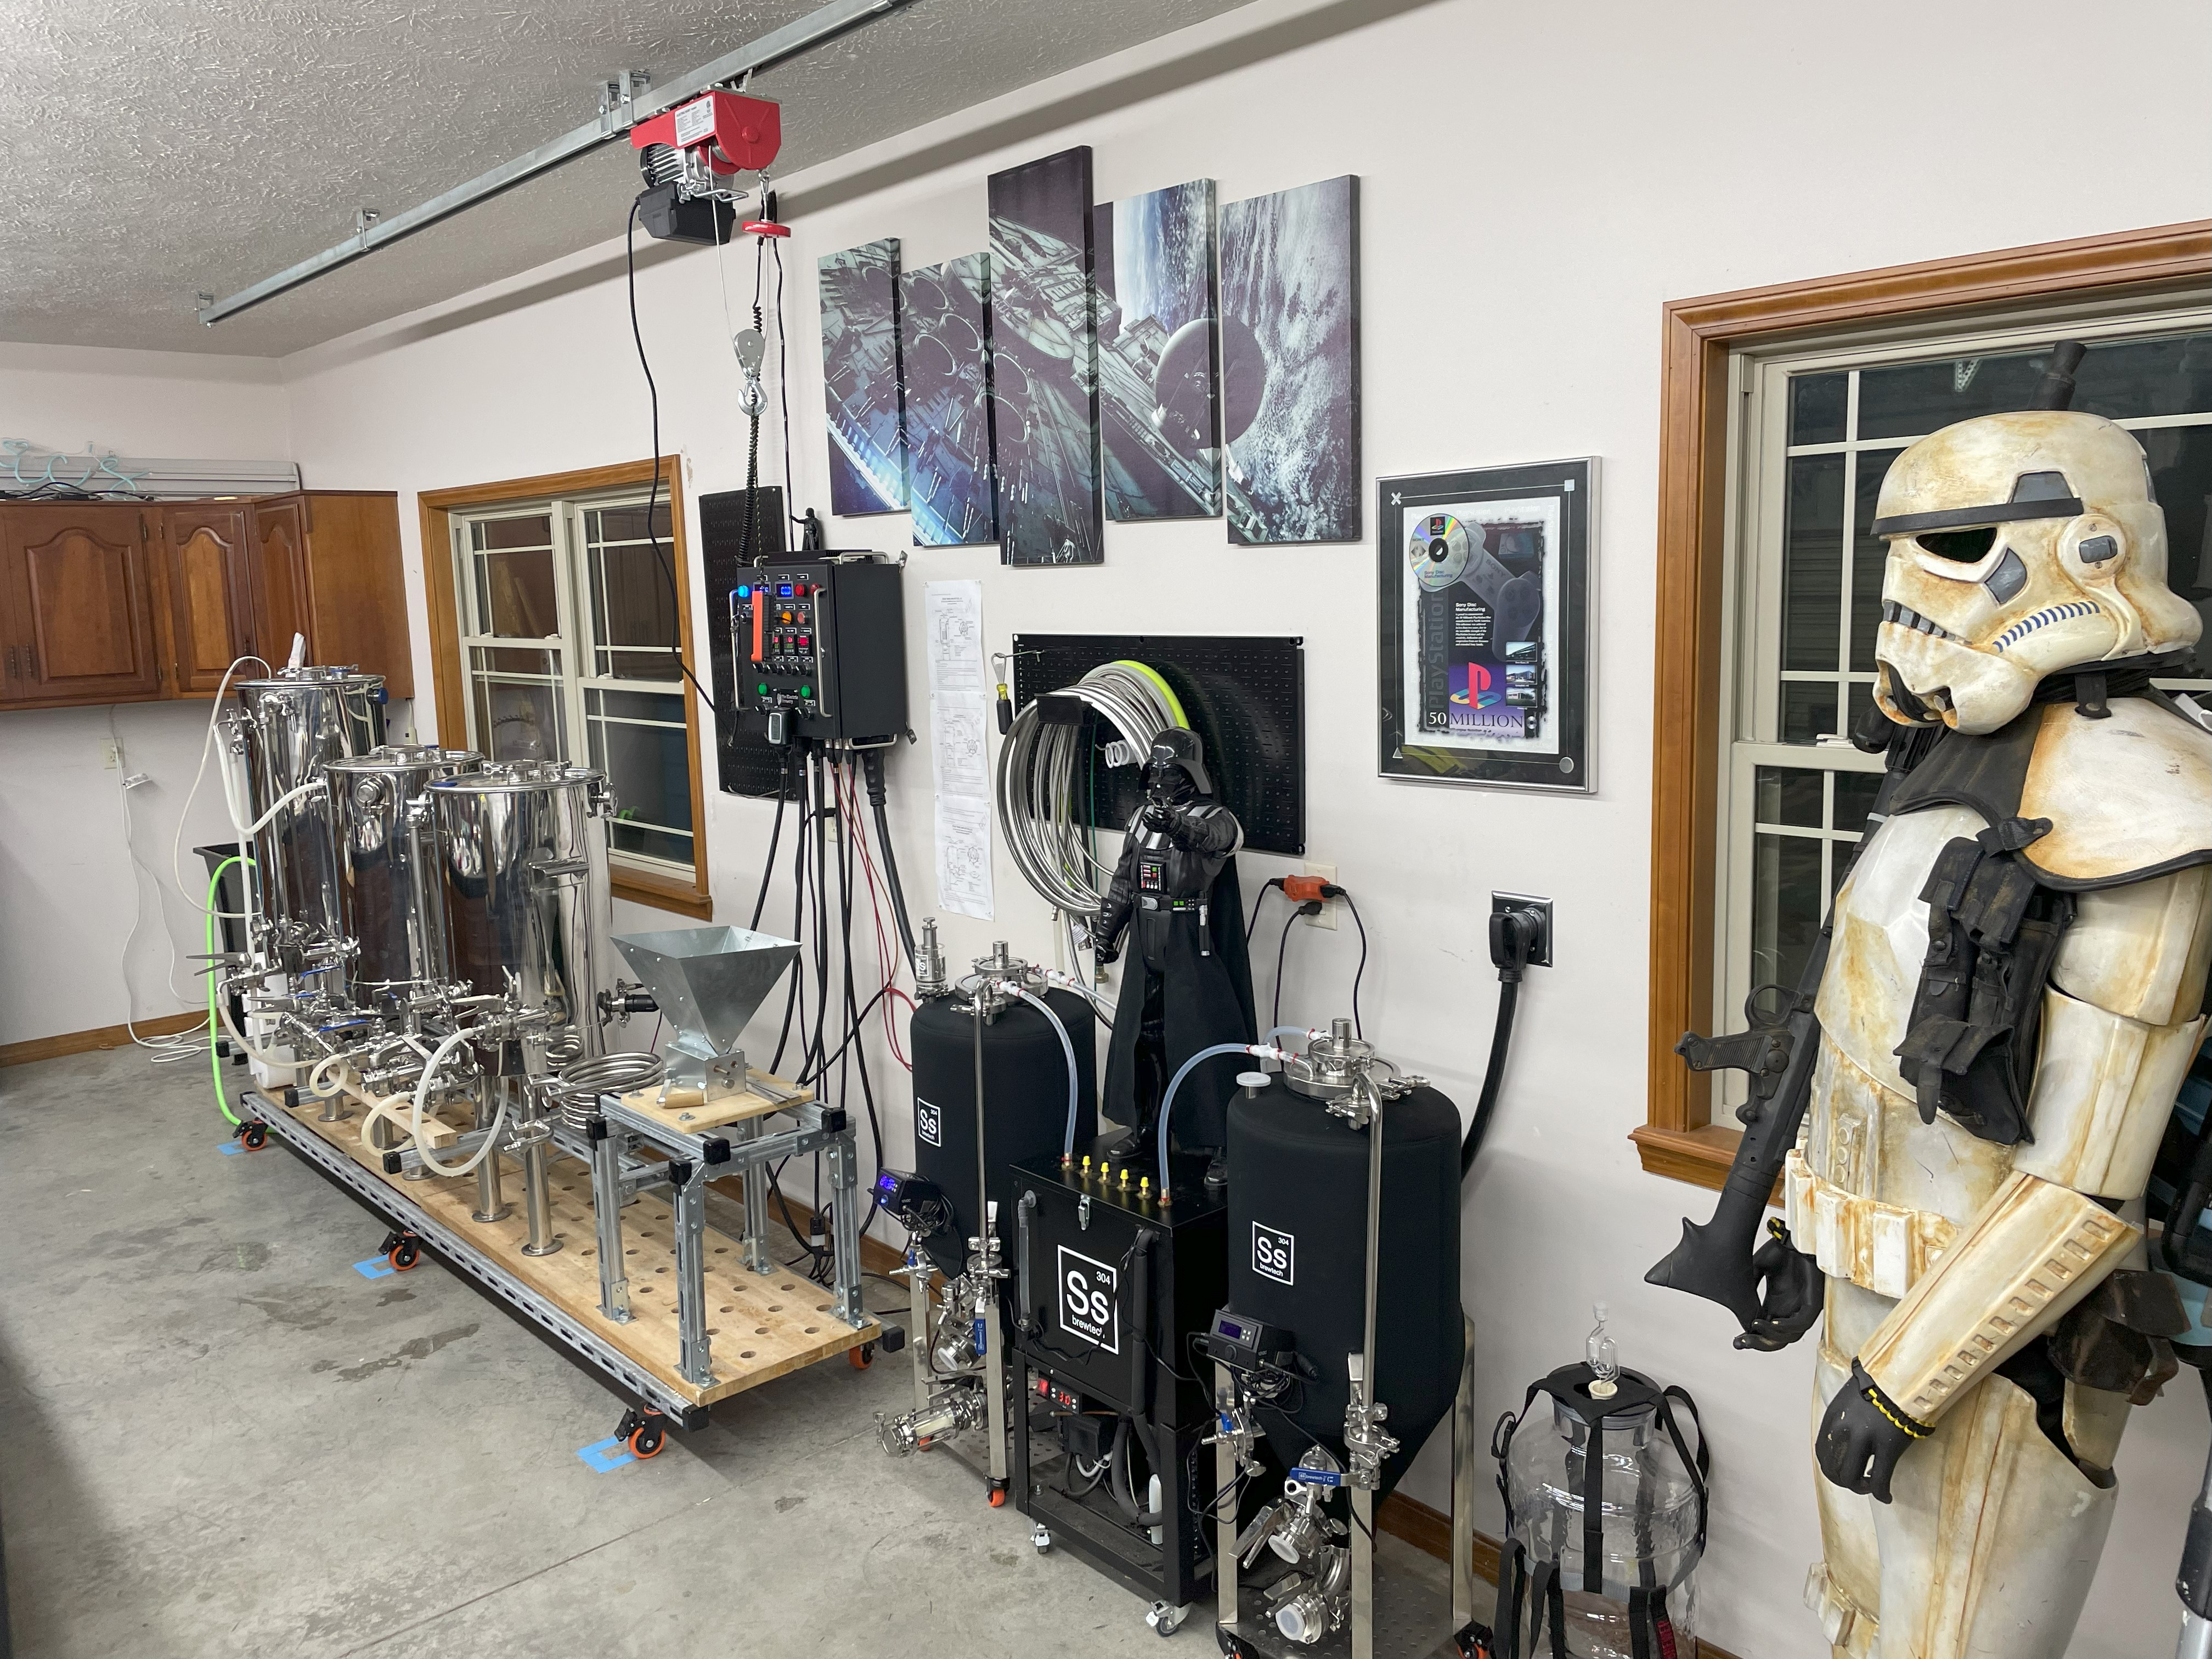
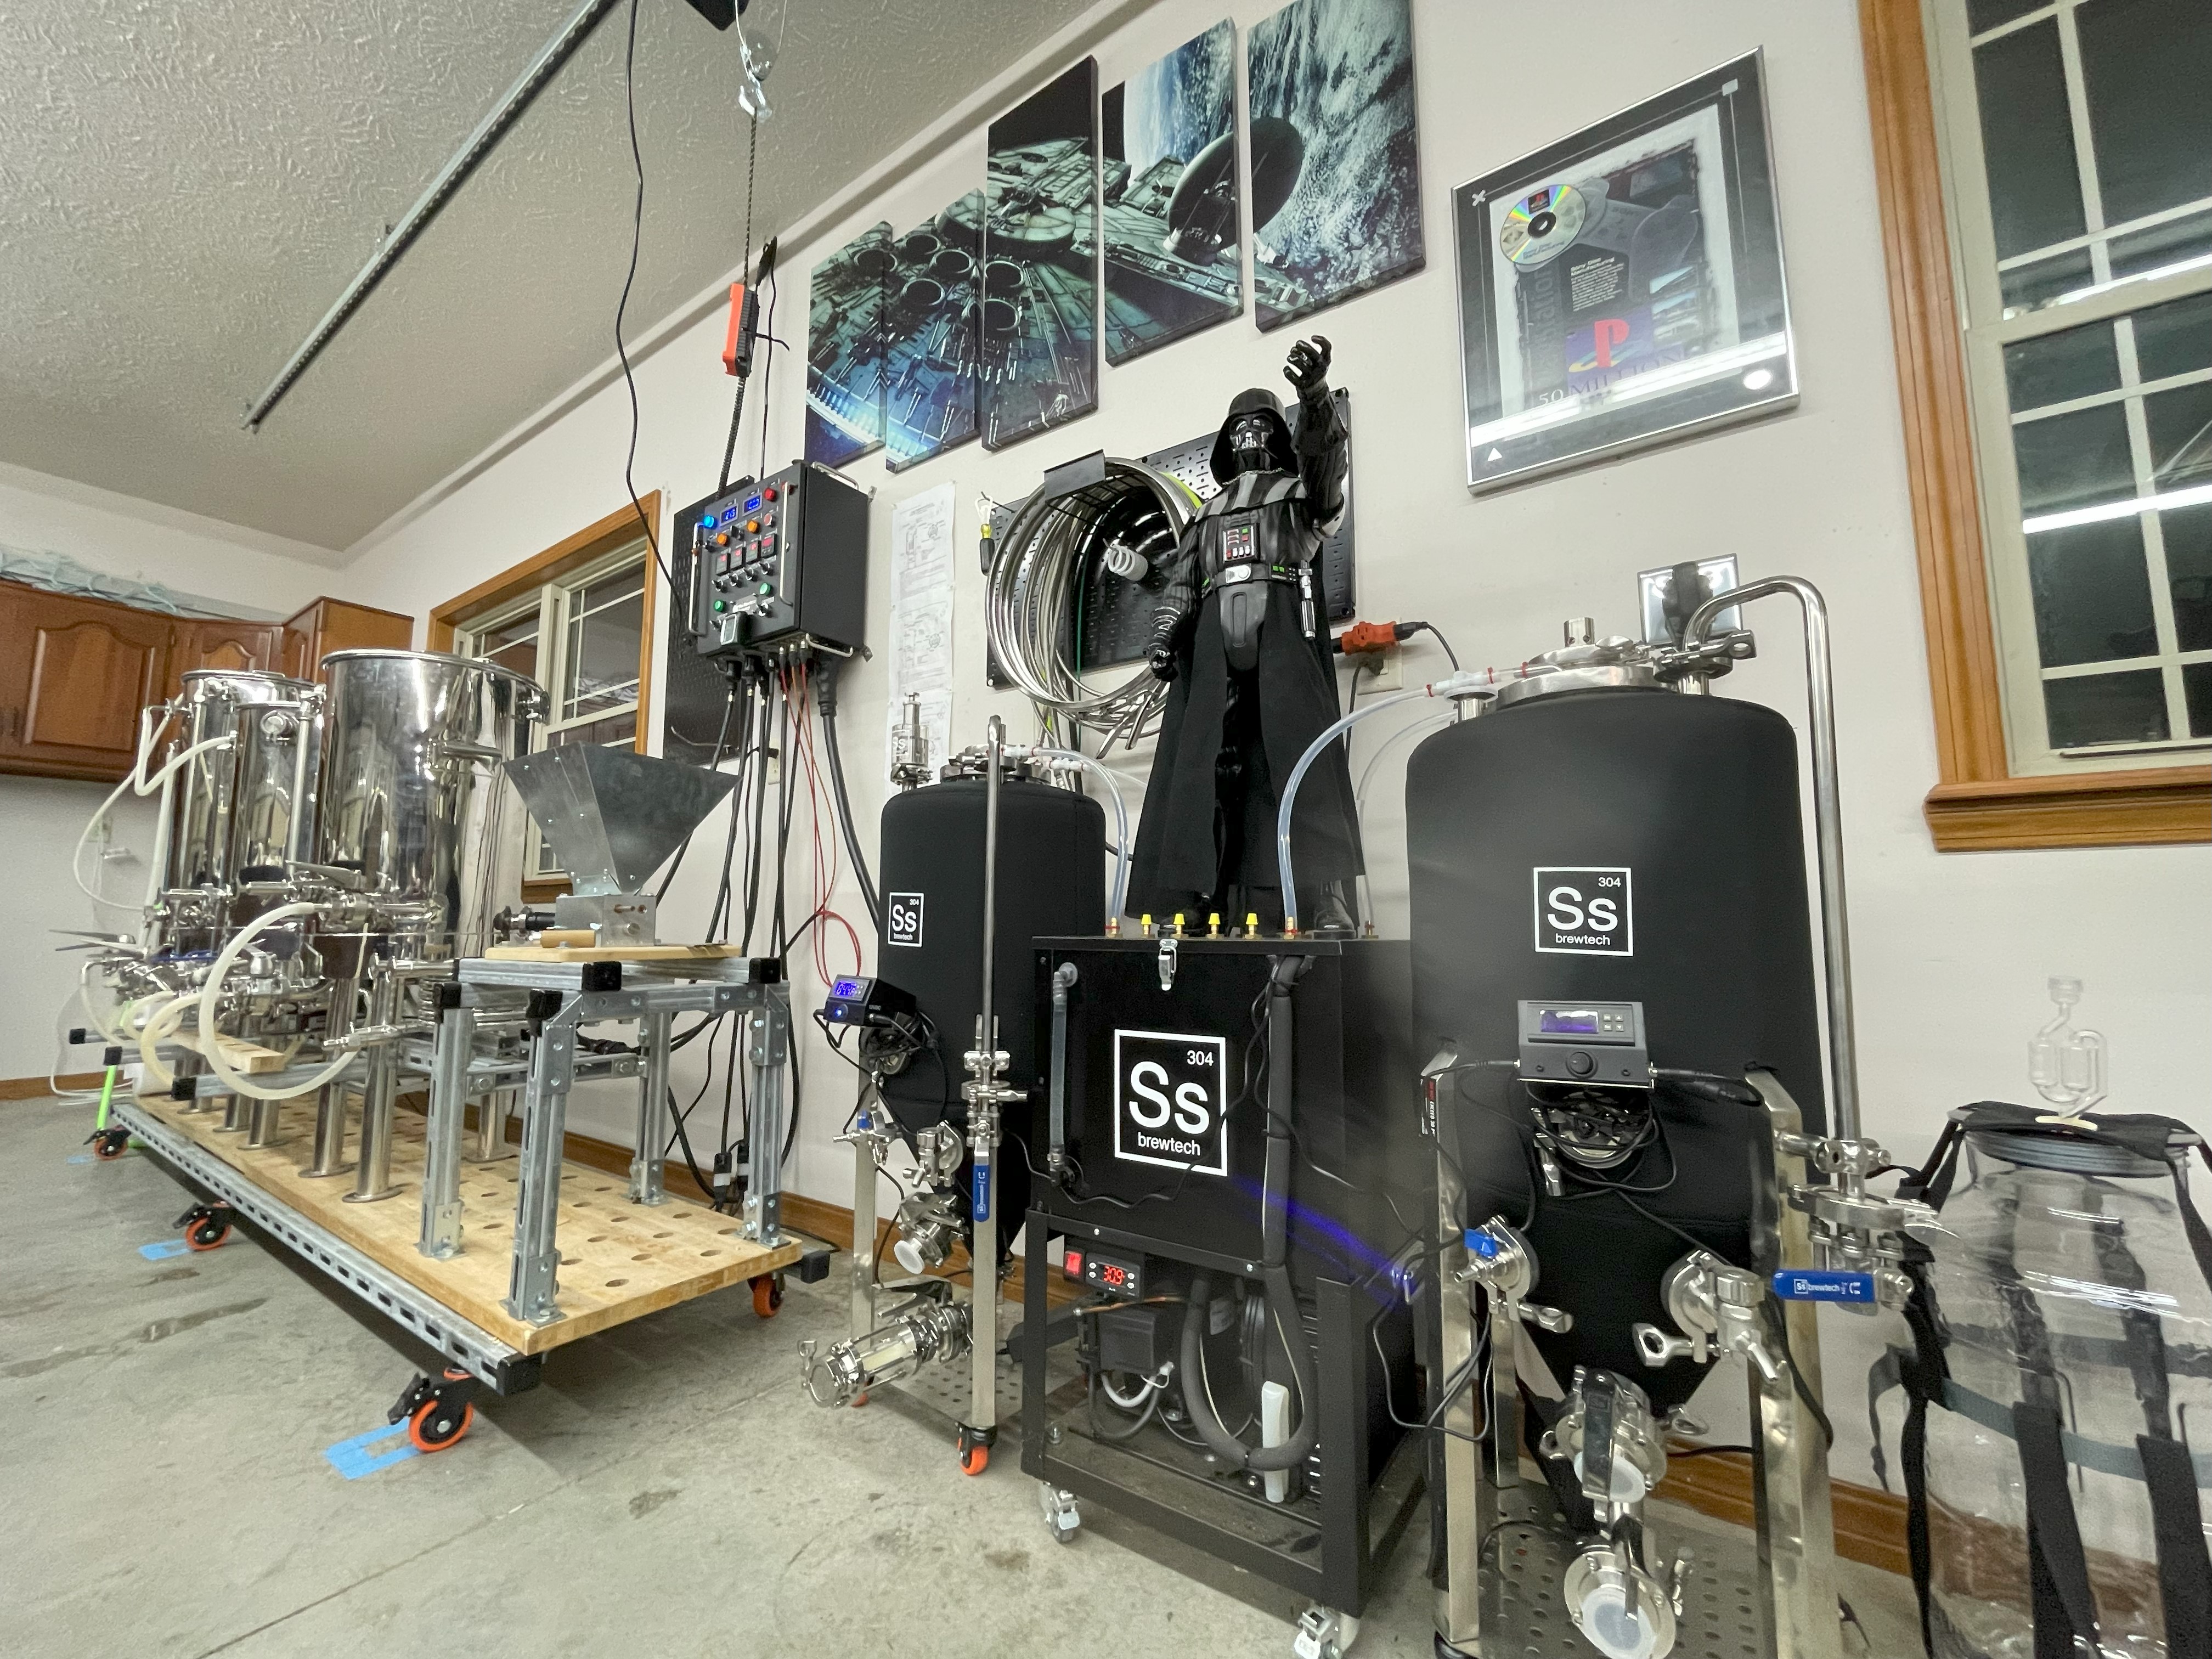
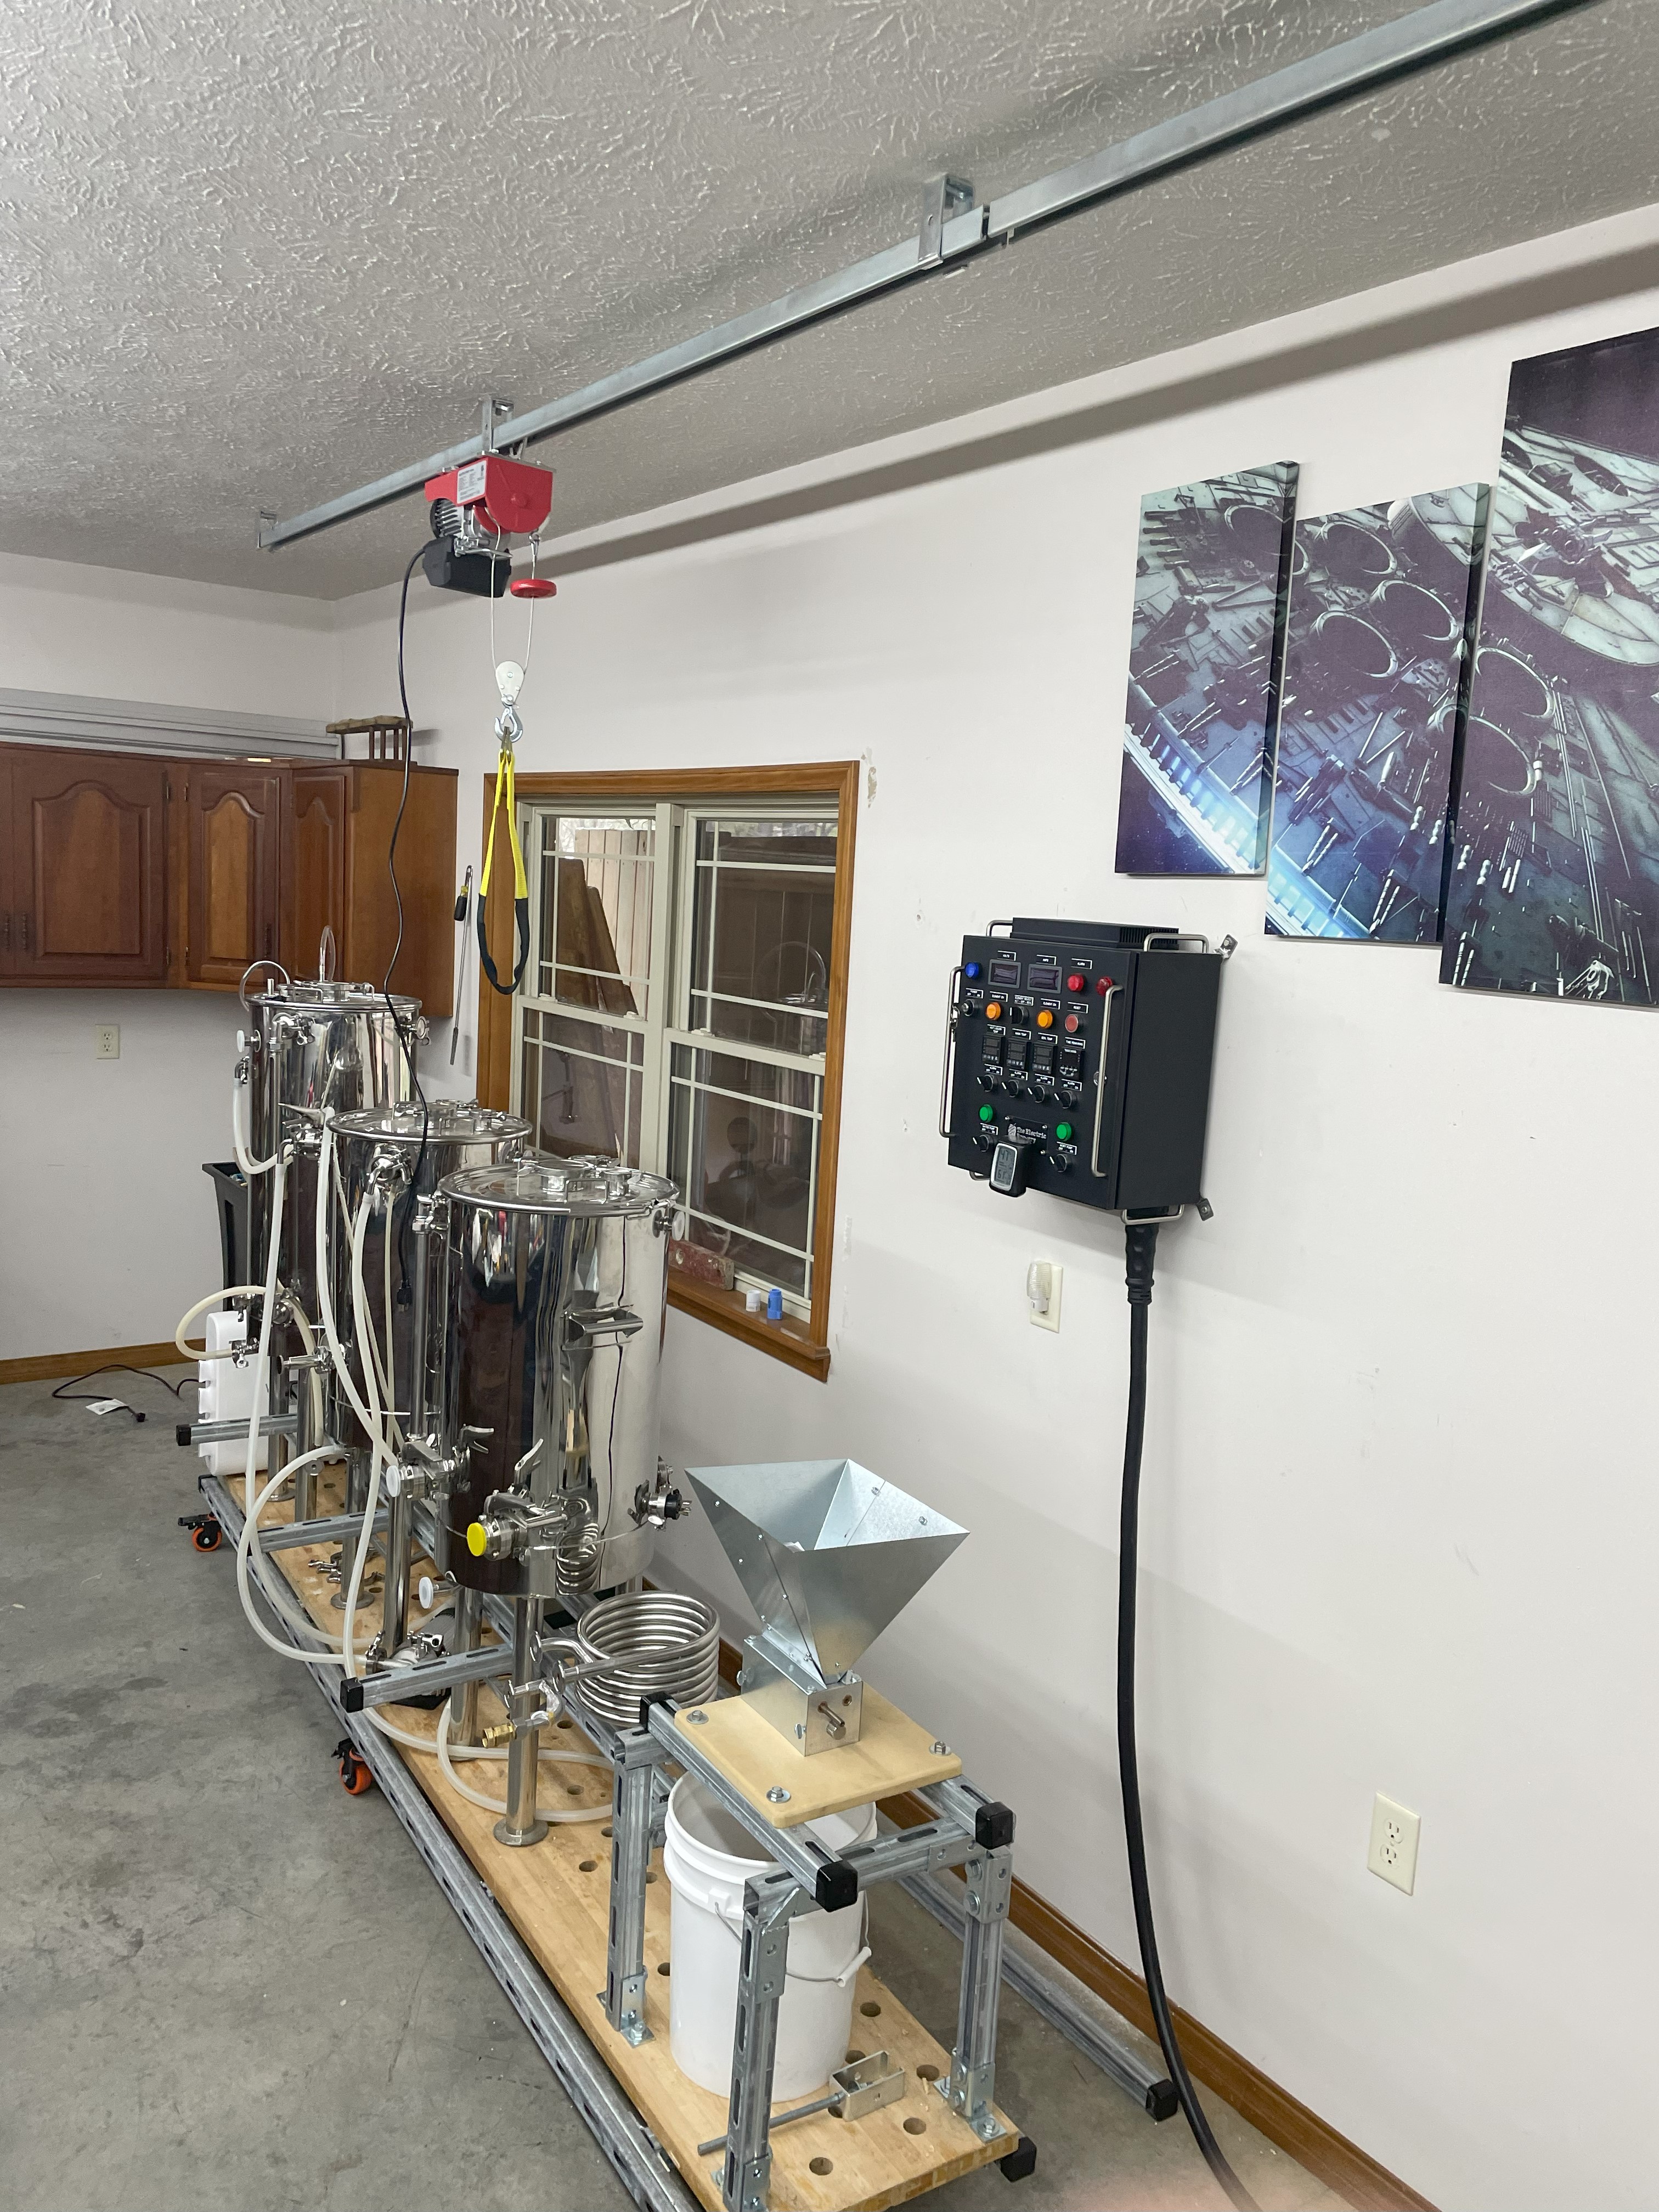
Its been a long 7 year with lifes curve balls but I think my universe has settled down enough to have actually got my ability to brew back in play with the Bryan Rabe develped LODO tanks I purchased in 2018 from Stout Tanks and Kettles.

The brew stand is home made with Hilti Unistruts. the cart will hopefully one day get hard plumbed, but in the mean time its using silone tubing. The stand is ready to hold a gutter to catch any liquid that get spilled, we put in a sink with under counter sump. Im running the water hose in through the window with a quick connect coupler to pex. The Waterdrop 800 GPD Tankless RO System with UV Sterilizing Light will be used to fill the HLT. Im hoping to be able to underlet the into the bottom tangential port so there is less splashing, but the little RO facet may not be able to do it.

I still have to figure out how to set up the CO2 purge ports and anyadditional equipment, leak tests both water and gas. waiting on my Clamps and gaskets :p and here soon, get a fisrt run under my belt (mow the dam lawn lager clone for my wife). I have two SS brewtech fermentors, a 3/8 glycol chiller for cold crashing and serving beer. picked up a torpedo keg....

Any suggestion on my remainin setup stuff or any been there done that advise with LODO brewing Id be much appreciative.. Thanks in advance
Brew setup.jpg
brewcart2.jpg
cantina.jpg
 

Attachments

  • brewcart.jpg
    brewcart.jpg
    2.5 MB
Last edited:
Agreed! and they keep getting shorter ;P
I'll update picks once I get my 5/8 tc barbed elbows, I should move the tanks closer.. And will when we start the hard plumbing
 
Great setup, sometimes these things take a while to come to fruition but worth the wait.Nice touch with the "Sentry Droid " standing guard on the end ;)
 
Update.
Ran a first trial run leak test and then a mash the other day.

Before I do my first beer run I wanted to run a mash for reflux still.

So far so good. Everything worked great, with a (minor?) hiccup at the end during cleanup.. The power from the control panel to my wort pump stopped working, pump is fine.. need to trouble shoot the panel and see why thats not getting power to the pump.

All-in-all I am pleased with the cart and setup. Just need some minor tweaking add some things here and replace some things there... eventually I'll get hard lines plummed, but this will work nicely for a while... need to get my gutter installed for liquid the eventiually will spill..

May the Brew be with You!
 

Attachments

  • 2025-03-31_20-02-34_967.jpeg
    2025-03-31_20-02-34_967.jpeg
    2.8 MB
  • 2025-03-31_20-02-56_845.jpeg
    2025-03-31_20-02-56_845.jpeg
    2.4 MB
Update.
Ran a first trial run leak test and then a mash the other day.

Before I do my first beer run I wanted to run a mash for reflux still.

So far so good. Everything worked great, with a (minor?) hiccup at the end during cleanup.. The power from the control panel to my wort pump stopped working, pump is fine.. need to trouble shoot the panel and see why thats not getting power to the pump.

All-in-all I am pleased with the cart and setup. Just need some minor tweaking add some things here and replace some things there... eventually I'll get hard lines plummed, but this will work nicely for a while... need to get my gutter installed for liquid the eventiually will spill..

May the Brew be with You!
Sweet!!! Love the glint of Stainless Steel in the morning sun.
 
Happy to see another low oxygen brewer get off the ground. If you end up not hard plumbing everything I would move to Tygon tubing instead of the silicon.

What amount of sulfites are you using? (if any).
 
Happy to see another low oxygen brewer get off the ground. If you end up not hard plumbing everything I would move to Tygon tubing instead of the silicon.

What amount of sulfites are you using? (if any).
Thanks for the Tip, Ill check them out. I have a couple friends who build custom stainless boat rails and such... I would love to hear pro and cons for hard plumbed.. I just want no mess and efficient cleanup.

I have not used any sulfites yet. I am about to brew the "Mow The Dam Lawn" clone for my wife. I will likely use some metabisulfate in the mash. I still need to get the mashing process figured out with these stout tanks. The whole brew in bag in new to me, lid closed Im wondering how do you ensure the mash is not stuck or doughballs... I am underletting so that should help but Ill have to do some more reading on how others do this.
Hard plumbing is not that important. What is more important is having low oxygen ingress if you run a recirculation or slow lauter where the liquid is in the tubing for long periods of time. Silicon has horrible oxygen statistics. Tygon has excellent oxygen barrier properties. With the size of system you have, I think the hard tubing would limit your options. True hard plumbing would be welded to the connections, (to the pot or at least tri-clamp) not SS tube with a nipple etc... What if you wanted to move anything? You would be stuck!

I am not that familiar with the Stout setup Bryan advised on. The use of a BIAB bag is not in the traditional way. It is more just to hold the grain over the false bottom. You probably will not be lifting the bag out until all of the liquid is lautered away. Bring the liquid in from below and drain it out from below.

How is your cold side setup? Are you fermenter gas purging your kegs and doing closed transfers? That is the first area to address when brewing low oxygen.
 
I know this is Homebrewtalk but I have to know more about that Stormtrooper off to the side.
well ok.........FWIW
I am TD11516 (Ish) Mos Eisles Police Department 501st costuming group.. Bad Guys Doing Good.
TD is the special designation for Sandtroopers (TK's are your every day Stormtroopers all nice and shiney clean), my call sign is actually my serial number for the suit.

The suit is a replica made from the Look Sir Droids Sandtrooper from the New Hope episode, (same trooper that says These arent the droids your looking for Move along). RS Propmasters bought the movie prop for like 10k and the vacuum molded the suit. they will taylor make the suit to fit.
To get MEPD status (its a real thing for us nerfherders) you have to go through a whole review process to get MEPD approved (meaning movie accurate) you can go one step further in the obsessive category and get your SWAT designation (you have to match an exact trooper from the movie) Ive been trooping in the suit since 2014. The helmet is an Anthony Forrest Signed limited edition 87 out of 100 made. He is the designer of the Helmet for the movie. Eventually I will make a sandperson, and some Jawas for the man cave.. but that comes later.. Im enjoying the new Cantina :p
And yes He stands guard of the Cantina and Imperial Brewery
 
Hard plumbing is not that important. What is more important is having low oxygen ingress if you run a recirculation or slow lauter where the liquid is in the tubing for long periods of time. Silicon has horrible oxygen statistics. Tygon has excellent oxygen barrier properties. With the size of system you have, I think the hard tubing would limit your options. True hard plumbing would be welded to the connections, (to the pot or at least tri-clamp) not SS tube with a nipple etc... What if you wanted to move anything? You would be stuck!

I am not that familiar with the Stout setup Bryan advised on. The use of a BIAB bag is not in the traditional way. It is more just to hold the grain over the false bottom. You probably will not be lifting the bag out until all of the liquid is lautered away. Bring the liquid in from below and drain it out from below.

How is your cold side setup? Are you fermenter gas purging your kegs and doing closed transfers? That is the first area to address when brewing low oxygen.
Thanks, I will check out those hoses for sure as I am not 100% committed to hard lines. I built the cart to be moved with the 6 casters so that in theory, the whole assembly including plumbing can be rolled anywhere in the garage or even on a trailer.

I will be doing co2 purge and closed transfer. I have not gotten those bits yet.. watching marketplace for local buys.

The bag I have is great and heavy duty but it does not sit off the false bottom and actually impeded the wort pump flow. I need to either twist the hanger straps or get a shorter bag. We just did a trial run on some corn mash for the still and we had the top off, So I was able to lift the bag when it impeded the flow. Ill have to get that sorted out by the time I brew the first beer.

Talk to me about lautering in a closed system, are you using a sparge arm. I figured I was gonna have to get that $ourced too.
 
About lautering... First you would need to decide if you are doing a full volume mash or a sparge. I do a full volume mash because it is easier and best for low oxygen. You put all the dry grain in your mash tun, underlet all of the strike water, let it sit capped and lauter it off when you have met your gravity goals. Start your boil. Easy. A sparge is not that much more difficult but you need to get the sparge water through the cap without much disturbance.

A sparge arm would be a big no no. That would introduce a lot of oxygen. The sparge would need to be hooked up to your floating mash cap and gently add water above the grain bed "underwater".

Not sure why your grain bag is not sitting on the false bottom? I only use the bag to lift the dry grain in and lift the spent grain out. Other than that it is sort of invisible. I do not know the design of the mash tun. Maybe some photos would help.
 
@Bassman2003 thanks again for all the input...
The grain bag I had was way too big and the mesh was way too fine causing some issues. I order a perfectly fitting bag that just sits right at the false bottom. My issue with the pump was due to the valves/weight hanging off each side of those pumps... need to sort that out, I thought my three way valves instead of T's andf butterfly valves was lighter,.... and they are, but still a lot hannging off those pumps, causing the head to deflect a little binding the magnetic impeller cup.. not good. Im replacing the lever handles (which impart all the torque when actuating) with 6" round hose bib type hand wheel to change the flow direction depending on strike, recirc, mashout etc.

I now have the cold side about finished for dry hopping and CO2 purge, also picked up the Tygon tubing, still need to swap that out. Hope to have the first brew day May the 4th with my clone... might have to wear the Sandtrooper armor and make a youtube video for fun on what sandies do on their day off :)
 
I just wrapped up my first brew on the 20-gal Stout Tanks setup with a HERMS system and wanted to share the highlights from this past Saturday! Brewed "Mow the Damn Lawn," a 5-gal American Lager (OG 1.041, FG 1.009, 4.2% ABV, 12 IBU, 3 SRM), aiming for a clean, crisp profile with LODO techniques.
Brew Day (May 17): I had enough malt for 10 gallon but the delay for initially planned brew day, May the 4th and issues with the first shipment of yeast and time in the fridge for the second batch of yeast temp not optimal) I decided to go smaller batch. Just in case it was a bust on the ferment.

first lager.jpg

  • Setup: 50-amp Electric Brewery panel, Stout Tanks, Ss Brewtech 14-gal Unitank, and 3/8 HP glycol chiller. CO2 purge Fermenter only this go round may do purges for the MHT and HLT at some other time. IDK weight that option, underletting, and sodium metabisulfite (0.5 g for 15 ppm).
  • Mash: Mashed 2466g 2-Row Pale Malt at 145°F (120 min), 158°F (10 min), 168°F (5 min) in a Brew Bag.
  • Boil: Started with 6.5 gal (pre-boil gravity 1.045, target 1.033), boiled reached at 12:30 PM added rice solids. Had a little foam boil over from Im guessing the rice solids. First hop (12 g Hallertau) at 1:37 PM, second (14 g) at 1:57 PM, boil ended at 2:30 PM.

  • Cooling: Transferred to Unitank (Big Swing and a miss here), thinking the Glycol would chill down the wort quickly. I should have used the CFC on the brew stand.. Oh well.. chalk that up to Ill do it better next time :), cooled from 189°F to 52°F using the built-in coil and glycol chiller—took ~3 hours due to pump flow issues and chiller shutdown (overheat protection - FTSS buil in delays..thats been adjusted to not wait so long).
Fermentation (May 17–18):
  • Pitched WLP840 at 52°F, rocked gently for 90 seconds ( dont have oxygen filled up in the tank yet to add via carb stone), purged with 25 liters CO2. Fermentation kicked off in 30 minutes, very active out the blow-off tube. Currently fermenting at 53°F, will spund at 0.2 bar on May 22 when 70% complete on the ferment until May 24, then lager at 32°F (1 bar, ~15 PSI) for 42 days.
Takeaways: First brew had hiccups (cooling delays, boil-over, didnt lable my element plugs and dry fired an element...doh), but the setup worked very well for my first run, employing LODO techniques will take some dialing in as I figure out this whole process and equipment as Im brewing. Fermentation is healthy. Post-boil gravity hit 1.041 on the nose!.

Cheers to HBT for all the inspiration!
Glad to be back brewing
May the Brew be with you!

first lager Imperial Brewery.jpg


🍺
 
Last edited:
Thanks for sharing. I would be happy to help you refine your low oxygen practices. One question: How did your pre-boil foam/hot break look? Was it pure white with little to no gunk? That is the main sign of how you did in the mash.

Since you are starting out, I would go higher with the SMB so you can experience a true low oxygen wort. Like 50ppm. This can always be lowered once you tighten up your system and process. Also, no need to CO2 purge your fermenter. It is better to CO2 purge your mash tun once the grain is inside before the underlet.
 
I had all eyes on the tanks with lids just set on them this go round. I need to get past the desire to peek :p and trust the setup..
also not sure how you manage a sparge or do you bother with a closed tun? I did a small 1 gallon sparge and I am sure that adds oxygen as I raised the bag with the hoist and ran a quick sparge over the bag while pumping the wort to the BK , also when drainign the bag, the lid needs to come off. I know I was pretty much winging it so I certainly need to tighten up the process. cant wait to taste the beer.
 
The sparge needs to go through your mash cap. Also, you do not want to do anything with the bag until all of your wort has been lautered away. It is really not a BIAB setup, you are just using the bag to hold the grain.

1st step - do you have a mash cap?
 
If it was a low oxygen designed system, it should have one made for the mash tun. I remember Bryan working with them and he would have insisted on a mash cap as it is very important. But I do not see one on their website.

Check out my short video on mash caps. They are more difficult to find for larger diameter pots. You need about 1-2" of vertical edge to make sure it stays afloat. Baking pans, pizza pans and some pot lids can be worked with.

 
Last edited:
If it was a low oxygen designed system, it should have one made for the mash tun. I remember Bryan working with them and he would have insisted on a mash cap as it is very important. But I do not see one on their website.

Check out my short video on mash caps. They are more difficult to find for larger diameter pots. You need about 1-2" of vertical edge to make sure it stays afloat. Baking pans, pizza pans and some pot lids can be worked with.


I ordered this one: perfect fit, slide between the Purge and Herms ports and the bag hooks.
https://www.amazon.com/dp/B06XYF397N?ref=ppx_yo2ov_dt_b_fed_asin_title

along with some knobs to mount on the inside to drop in and out easier..
https://www.amazon.com/dp/B0C1YSTFPK?ref=ppx_yo2ov_dt_b_fed_asin_title&th=1

I just need to dill and mount the barbed fitting in the center and I should be ready for the next batch

Thanks for the tips.
 
Back
Top