• Please visit and share your knowledge at our sister communities:
  • If you have not, please join our official Homebrewing Facebook Group!

    Homebrewing Facebook Group

WAORGANY Brewing e-HERMS Brewery Build

Homebrew Talk

Help Support Homebrew Talk:

This site may earn a commission from merchant affiliate links, including eBay, Amazon, and others.
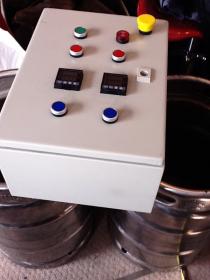
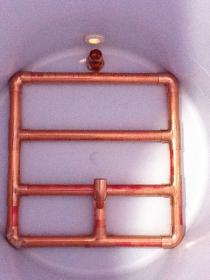
Well I made a bit of progress today as the first real lake effect snow hit is today. Have everything on hand or ordered for the build except for the stand still debating wood or metal? Built the manifold for MT today out of 1/2" copper pipe and fittings, will complete the line out to ss ball lock once I have those parts.


image-3842350105.jpg


image-1937380543.jpg


image-2223397424.jpg


image-3487473555.jpg


View attachment 1


View attachment 1


image-3340548162.jpg


image-3984140121.jpg

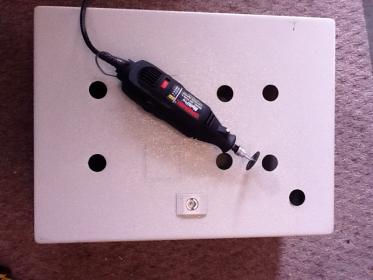
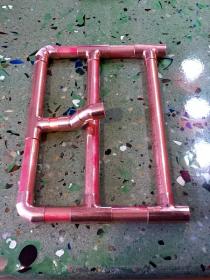
I just have all the fittings push fitted without any solder. I used a Rotozip for all the cuts and slots. Nice and tight fits well into the MT. Each long leg are @8" and the end one with the tee heading out is 7.5" to accommodate for the space of the tee.
 

Attachments

  • image-1525038010.jpg
    image-1525038010.jpg
    15.1 KB
  • image-2143120685.jpg
    image-2143120685.jpg
    8.5 KB
stamandster said:
Did you buy a full 8' section of copper pipe? This is exactly how i need to get mind done. How much water is left over in the MLT?

I bought 10' which was way too much probably could do it with less than half that, I will have to measure what's left. 10' was only $12 and some change at Lowes. I haven't used it yet so not sure how much will be left in the bottom. I will post that when I do.
 
I see your MLT is the same as mine, how do you plan on having the heated wort enter the MLT? I was thinking of installing a fitting in the lid with a length of silicon hose long enough to lay on the top of the mash.
 
WAORGANY said:
I bought 10' which was way too much probably could do it with less than half that, I will have to measure what's left. 10' was only $12 and some change at Lowes. I haven't used it yet so not sure how much will be left in the bottom. I will post that when I do.

I measured what was left and I have just over 68" remaining after I built it. Added a short straight section to the bulk head drain when I got my ball valves, and a small section of silicon tubing will add two hose clamps to this at some point if needed will post a pic soon. So the bottom line was that I built this with @4.33' of 1/2" copper tubing plus the tees and elbows! Just remember measure twice and cut once straight and clean and you should be ok.

Brian, do you need the extra copper for your build? Let me know!
 
Begin2Brew said:
I see your MLT is the same as mine, how do you plan on having the heated wort enter the MLT? I was thinking of installing a fitting in the lid with a length of silicon hose long enough to lay on the top of the mash.

Yeah either that or just a loose tub dropping in and the top just resting on it? I think I will brew with it a few times to tweak those things.
 
WAORGANY said:
I measured what was left and I have just over 68" remaining after I built it. Added a short straight section to the bulk head drain when I got my ball valves, and a small section of silicon tubing will add two hose clamps to this at some point if needed will post a pic soon. So the bottom line was that I built this with @4.33' of 1/2" copper tubing plus the tees and elbows! Just remember measure twice and cut once straight and clean and you should be ok.

Brian, do you need the extra copper for your build? Let me know!

As promised here are a few more pics.

image-3564338219.jpg


image-4206742086.jpg
 
stamandster said:
Did you buy a full 8' section of copper pipe? This is exactly how i need to get mind done. How much water is left over in the MLT?

Well I didn't hook it to pump but just using gravity and draining it while sitting level on the counter into the sink left behind just short of 2 quarts of water, I think hooked up to the pump it should draw it down much further.
 
Brian, do you need the extra copper for your build? Let me know!

I may need some. Not anytime soon though I just had to get some work done on my wife's car and it set me back a bit. I am currently looking to build a smaller electric brewery:mad:
 
I may need some. Not anytime soon though I just had to get some work done on my wife's car and it set me back a bit. I am currently looking to build a smaller electric brewery:mad:

I think that I will have some extra DIN rails as well...I think I ordered way too much LOL.

Will keep yous posted. Need to get the tops cut out re-cut soon, are you around this weekend?
 
I am around this weekend. I might be brewing too, it depends if Brewmasters warehouse gets my stuff here in time.
 
I am around this weekend. I might be brewing too, it depends if Brewmasters warehouse gets my stuff here in time.

Sounds good, maybe I can come over and give you a hand and we can cut these kegs..ready to get rolling and start building, See a few more things I need to get heading this way...getting closer. I will shoot ya an email or give you a call later on in the week.
 
Bill,

I just saw this on another thread this might be the way to go???

Might not be a bad option. I think the stuff is moveable so you can set it to dump just on top of the grain. The other part I have been thinking of is I would want to open the lid to look inside. I am still trying to figure out how to punch a hole in the side up at the top.
 
Might not be a bad option. I think the stuff is moveable so you can set it to dump just on top of the grain. The other part I have been thinking of is I would want to open the lid to look inside. I am still trying to figure out how to punch a hole in the side up at the top.

Yeah I might just use a spade bit I am sure that it would drill through pretty easy not sure how thick it is will find out soon enough I guess, maybe someone who has used this or drilled through the lid on one of these already will chime in. Yes it is flexibile and it can adjust to lay on top of the grain bed.
 
Got my electrical control box today great deal off eBay $59.95 free shipping for a 16x12x8 need to get a few more parts figure out the best layout, cut holes, insert items and start wiring!!!

image-2984638947.jpg


image-1076621414.jpg


image-3911023751.jpg


image-3323205073.jpg


image-350956490.jpg
 
Tiber_Brew said:
Looks like you're off to a great start! I will be following your build thread.

BTW, thanks for the shout out!

TB

Yeah man no worries glad to be getting things moving in the right direction! Thanks for the help, I am sure I will have some more questions for you again soon, ha ha.
 
Well I think I have my layout planned and figured out for the front and inside of the control box. What do you think? I used a sheet of cardboard cut down the same size of the front door of the panel 11.5" x15.5" I have attached a few pictures. Still need some blocks and fuses for the inside and then I think I can cut the holes in the panel and start wiring!

image-1354814988.jpg


image-4123904713.jpg


image-307789789.jpg


image-729517454.jpg


image-2740684527.jpg


image-4261628975.jpg
 
Well been busy today trying to knock out a few things on the punch list for my build!

First I recut my first keg HLT and then cut the BK will punch the holes once I get my HERMS coil made and one more ball valve I recently decided I wanted to add to the HLT.

image-1710738856.jpg


image-554566525.jpg


image-2629833314.jpg
 
Then I did some work on my control panel.


image-2387051443.jpg

I had to change the layout due to my original PID power switch was behind the door ground.


image-548724619.jpg

Drilling 1/2" hole for Green Lee punch


image-3561054022.jpg

First hole


image-4152351667.jpg

Green Lee punch in action this makes the holes go in way too easy


image-3183819266.jpg

One down a few more to go


image-944995876.jpg

All the holes punched


image-2000433226.jpg

The test fit, front and back
 

Attachments

  • image-4070950722.jpg
    image-4070950722.jpg
    14.5 KB
Next was to cut the holes for the PIDs


image-306090644.jpg

I figured the Dremel tool was the best way to cut these

image-2485902183.jpg

I was right until it died!


image-807158523.jpg

I ended up finishing it with a Rotozip ( works but not the best) and finished with a flat hand file


image-807158523.jpg

Glad to be a few mores steps closer!
 

Attachments

  • image-3596512507.jpg
    image-3596512507.jpg
    14.5 KB
  • image-1553220730.jpg
    image-1553220730.jpg
    9.8 KB
  • image-770949873.jpg
    image-770949873.jpg
    17 KB
Back
Top