• Please visit and share your knowledge at our sister communities:
  • If you have not, please join our official Homebrewing Facebook Group!

    Homebrewing Facebook Group

Updated Rubbermaid 10 Gallon MLT w/ copper manifold build

Homebrew Talk

Help Support Homebrew Talk:

This site may earn a commission from merchant affiliate links, including eBay, Amazon, and others.
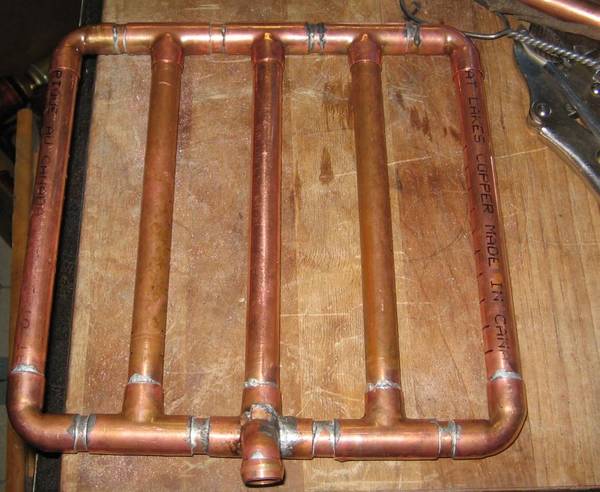
I just used a copper piece with 1/2" female side and a 1/2" normal side that connects to the manifold. I would imagine you could find something similar with a 3/8" female side.

I got all my parts at Lowes if that helps

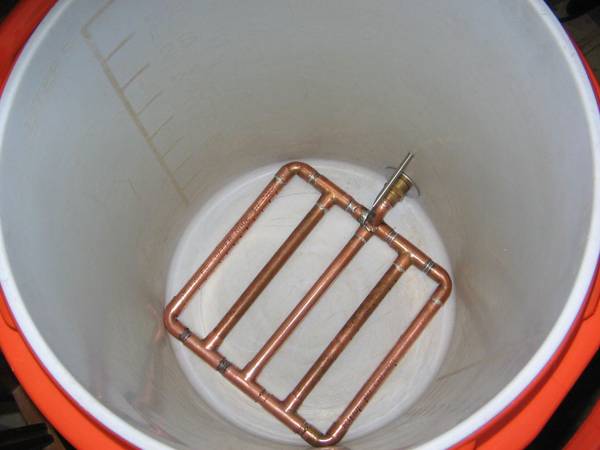
That part I figured out - what I can't get is a watertight seal around where the manifold exits the cooler. The rubber washer that came with the cooler just isn't working. It looks like yours is out of steel on your build - what did you use?
 
I have used the cheap and easy stainless hose design for a couple of years and decided to upgrade. I tend to fly sparge and was noticing some channeling and also wanted to keep everything 1/2". After looking at the previously mentioned how to brew article and this page I came up with this;

Mash_Manifold.jpg


I liked the idea of having the output closest to spigot but wasnt sure how to do it. I created a odd cross fitting with 1/2" tee and 1/2" street elbow. I drilled a hole in the tee and choped the street elbow to mate with it and soldered it together. It pressed fit tightly to a 5/8" female compression fitting. Here it is installed in the Rubbermaid;

Mash_Manifold_Installed.jpg


Cheers;
BeerCanuck
 
I leave the piece that fits the thread on and I have just enough room to slide in the copper tube when I set the manifold in the MLT. I am not soldering anything in my manifold because it holds together pretty well due to the snug fit and I made all the tubing pieces similar lengths so that when I do take it apart, I don't have to worry about finding the correct parts for each section.

I'm trying to do copper all the way to the spigot as well but am having trouble figuring out how to connect a 1/2" copper tube to the 1/2" brass nipple I have going through the side of my cooler. I'm not having any luck finding the correct parts and the guys at the local Lowes are bigger idiots that me. Can you tell me how you pieced yours together from the copper tube to the spigot?
 
I'm trying to do copper all the way to the spigot as well but am having trouble figuring out how to connect a 1/2" copper tube to the 1/2" brass nipple I have going through the side of my cooler. I'm not having any luck finding the correct parts and the guys at the local Lowes are bigger idiots that me. Can you tell me how you pieced yours together from the copper tube to the spigot?

Why do you have a brass nipple on the inside of your MLT?

Maybe I am misunderstanding you but if you look at the picture of mine below, I pieced it together with:
(4) 90 degree
(5) T's
(1) 45 degree
(1) female threaded piece on one end to fit onto my 1/2" male bulkhead

Let me know if you need more details and I can get those to you.

20120104222310166.jpg
 
Haha, you are understanding me ok. I'm just that bad at plumbing.. My problem is I don't know how to make the transition from the copper tubing to the ball valve. I got the brass nipple idea from the OP (sorry for the mild thread jacking!) but now that i look back I don't see it on his build. I see you have the female on the end of your manifold which is something I could definitly do (lowes part # 22627??), but what are you using for the male bulkhead to get outside the cooler to the ball valve? That is my missing link right now. I'm a terrible plumber so thank you for all your help!!

Edit: a little more research helped me figure it out. I'm just missing that female adapter. I'll hit the hardware store first thing in the morning.
 
Just completed my first batch with this manifold which is my first all-grain batch period. I got 79% mash efficiency.
 
Why do you have a brass nipple on the inside of your MLT?

Maybe I am misunderstanding you but if you look at the picture of mine below, I pieced it together with:
(4) 90 degree
(5) T's
(1) 45 degree
(1) female threaded piece on one end to fit onto my 1/2" male bulkhead

Let me know if you need more details and I can get those to you.

20120104222310166.jpg


Where did you find the bulkhead? It would be great if you could post more info on that part of the build.
 
Wingy said:
Where did you find the bulkhead? It would be great if you could post more info on that part of the build.

I was able to complete mine. The "bulkhead" I have is the 1/2" x 1.5" brass pipe nipple that goes through the side of the cooler to the 1/2"ball valve. A #15 o-ring fits perfectly on the nipple.
 
I took apart my bulkhead and notated the various components;

bulkhead_notated.JPG


Cheers;
BeerCanuck

Thanks! The local Home Depot is pretty terrible, so I had to order them. Hopefully this is the last bit of stuff I need... then it's off to make beer!
 
I took apart my bulkhead and notated the various components;

bulkhead_notated.JPG


Cheers;
BeerCanuck

This ended up working great! The only change I would make is that if you're using a 1/2" diameter nipple the ID of the washer needs to be 13/16". My MLT is finally done with 2/3 of a cup of dead space, so I'm ready to brew with it this weekend. Thanks all for the help!
 
I have had a chance to run 2 brew sessions through the updated manifold. For the most part I am happy with how it has worked out. The press fit is nice when cleaning and the dead space is less than a pint on mine and the flow is more than adequate.

The first time I tested the new manifold I did get a stuck mash. I noticed that all the water was stuck on top of the mash so I gently broke up the first ~3/4" of fine layer crust on top with my mash spoon. Starting from the center and working my way out the vacuum broke and the wort began flowing again allowing me to carry on and make preboil volume.

The last time I brewed I noticed that there was some channeling on the edges of the mash tun. This wasn't major since I was close to my expected original preboil volume and gravity. In the future I plan to preskim the crust off the top and directing the HLT input more toward the center of the mash bed.

Cheers;
BeerCanuck

Why do you think you got a stuck sparge?
 
Why do you think you got a stuck sparge?

I believe the main reason that my mash got stuck or channeling occurs is due to the fine floating mash sediment that settles on top of a mash bed causing a vacuum / channeling at edges. I have not heard anyone else really elaborate on this but this is my experience and simple resolution.

Cheers;
BeerCanuck

I am worried now because I have a recently built copper manifold I have not used yet and wonder if I will get a stuck sparge. I did not have any issues with a stainless braid so I hope I didn't waste time for nothing.
 
I am worried now because I have a recently built copper manifold I have not used yet and wonder if I will get a stuck sparge. I did not have any issues with a stainless braid so I hope I didn't waste time for nothing.


I wouldn't worry barhoc..the manifold should allow for more uniform drainage. I was using the cheap and simple stainless hose for a few years and ran into a few stuck sparges with it as well. The easy way to resolve clear sparge water stuck on top of a mash bed with no wort flowing at output is breaking the vacuum / crust. The channeling I addressed with this better manifold design and potentially better HLT delivery to the center of the mash bed.

RDWHAHB
BeerCanuck
 
Got mine finished last night. Thanks for the ideas. It is a 2 gallon cooler for mini-mashs. I used nylon washers that I drilled out and the cooler had a rubber washer that I left in there because it makes a perfect internal seal. Let me know what you think.


ForumRunner_20120128_094715.jpg


ForumRunner_20120128_094736.jpg


ForumRunner_20120128_094747.jpg


ForumRunner_20120128_094810.jpg
 
polo_check: do you have any of your measurements for the cut lengths? I have all material to make this and it sure would save some time!
 
I hate to bring up an old thread but I feel like I get a good amount of stuck sparges with my copper mainifold, does anyone else get these as well? I get some even when doing a thin mash and not using wheat. I condition my malt to help avoid stuck sparges but it doesn't seem to help.

Maybe I am getting things backwards but I thought a thin mash would help to avoid stuck sparges, it seems to make things worse for me.

Has anyone tried wrapping the copper pipes in stainless mesh as an extra defense?

Its getting annoying so i need to figure something better out, your help is appreciated.

Are you crushing your own grain? Its possible your over crushing and getting too much flour and other bits that are good at causing stuck sparges.
 
Are you crushing your own grain? Its possible your over crushing and getting too much flour and other bits that are good at causing stuck sparges.

Yes, I crush my own grain but it is not too fine since there are usually some whole grains still showing up after going through the mill. It just doesn't seem like there is any way I am crushing too fine, even with conditioning the malt with water before milling.

Does anyone with a copper manifold like this get stuck sparges?
 
I am looking to build the same manifold. What are the dimensions of this manifold?

I have used the cheap and easy stainless hose design for a couple of years and decided to upgrade. I tend to fly sparge and was noticing some channeling and also wanted to keep everything 1/2". After looking at the previously mentioned how to brew article and this page I came up with this;

Mash_Manifold.jpg


I liked the idea of having the output closest to spigot but wasnt sure how to do it. I created a odd cross fitting with 1/2" tee and 1/2" street elbow. I drilled a hole in the tee and choped the street elbow to mate with it and soldered it together. It pressed fit tightly to a 5/8" female compression fitting. Here it is installed in the Rubbermaid;

Mash_Manifold_Installed.jpg


Cheers;
BeerCanuck
 
Back
Top