I’ve posted this in a few thread and I get quite a bit of messages regarding my process of doing this so I figured I would create a thread on the process. This is by far the cheapest closed fermenting/ transferring system.
So what you will be doing is modifying a fermonter’s solid lid and fitting it with both liquid and gas keg posts and a floating dip tube.Here is the easiest/cheapest way to go;
1) 7 Gallon Fermonster with spigots (makes hydro samples easy) with solid cap $33.99
FerMonster Carboy With Spigot - 7 gal. | MoreBeer
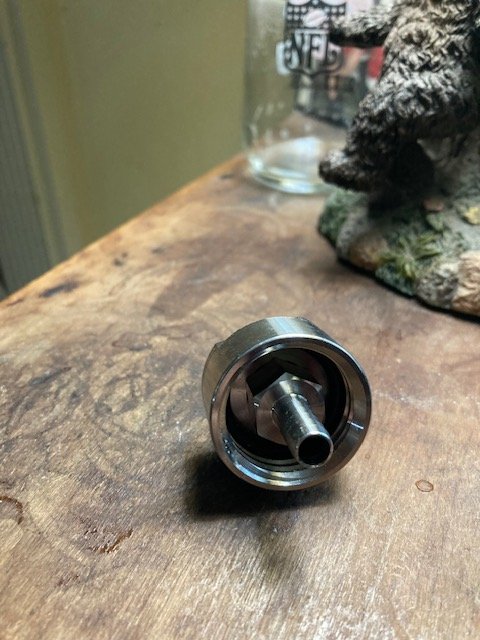
2) Fermontisourus pressure kit $29.99 - you’re buying this to take the parts, the liquid and gas posts and the floating dip tube to use for your solid lid.
Fermentasaurus Pressure Kit | MoreBeer
Optional pressure kit for the Fermentasaurus Concial Fermenter allows you to ferment under pressure, carbonate, and serve all in one vessel!
www.morebeer.com
3) 7/16” or 1/2” drill bit so you can drill out the solid cap for the posts. Make sure you measure so that have them far enough a part so both ball lock fittings can go on at the same time but close enough when you maintain the stability of the lid. $2.
7/16" HSS Black Oxide Jobber Length Drill Bit, Qualtech
7/16" HSS Black Oxide Jobber Length Drill Bit, Qualtech. Find this item and other cutting tools on DrillsandCutters.com.
drillsandcutters.com
4) then you just needs some hose, clamps, and balllock fittings for your transfer lines.
all together you’re looking at just below $70 for a fermenter with closed transfer and pressure dryhoping capabilities. It’s also light weight and incredibly easy and quick to clean
Benefits of doing this verses fermenting in the keg;
1) You will yield a full 5 gallons of trub free beer from each of your recipes helping you become more consistent
2) You now can use all your kegs for serving purposes.
3)You can see fermentation take place which for me is almost as good as watching a fire lol


")


![Craft A Brew - Safale BE-256 Yeast - Fermentis - Belgian Ale Dry Yeast - For Belgian & Strong Ales - Ingredients for Home Brewing - Beer Making Supplies - [3 Pack]](https://m.media-amazon.com/images/I/51bcKEwQmWL._SL500_.jpg)