Through the wall 4 tap keezer

Homebrew Talk - Beer, Wine, Mead, & Cider Brewing Discussion Forum

Help Support Homebrew Talk - Beer, Wine, Mead, & Cider Brewing Discussion Forum:

This site may earn a commission from merchant affiliate links, including eBay, Amazon, and others.

suprat78

Active Member
Joined
Apr 6, 2008
Messages
44
Reaction score
1
Location
NKY
After reading hundreds of keezer builds and several that specifically targeted running taps and lines through the wall I finally planned and built a keezer. I found a few threads/posts on this site and I was able to make a few adaptations to fit my build!

Start of the keezer build!

I went with 1x6 pine (siliconed onto the freezer) and insulated the inside. It's a kelvinator 20cuft freezer that is actually bigger than I need but it was given to me for free. I drilled two holes in the side of the collar for the PVC piping (beer lines and fan to circulate air). The hinges on the freezer needed to be redrilled to match the new mounting holes (one point attached to the collar the other to the existing holes on the freezer). I have 4 cornys pushing beer through 12ft Bev seal ultra 3/16 lines. I read every thread on these lines as I struggled through several inches trying to get them on the ball lock and tail pipe fittings :). Quick hint, use a flaring tool, some Pam spray, and heat both the lines and the flaring tool up to stretch the ends of the lines. I typically had the end of the line in boiling water while at the same time using a heat gun to heat the flaring tool.

image.jpg
 
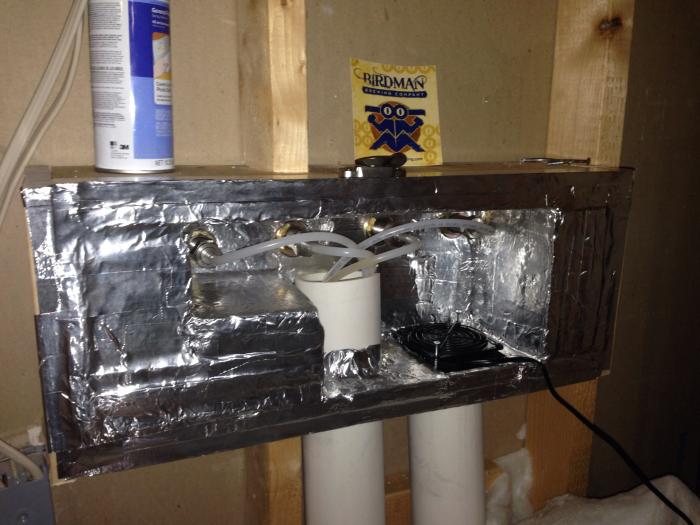
I had to cut through a stud in the wall to get the box/taps to fit in the location I wanted. I used 3M adhesive spray to attach the insulation to the collar and wood in the box. One slight mistake was attaching the shanks to the insulation instead of the wall. The taps are firm but not 100% tight due to the insulation and it's give. All seams have been sealed with aluminum tape and I tried to minimize the open area in the box by adding insulation. I am using a computer fan that runs all the time to pull airflow into the taps. Back view of the taps

image.jpg
 
I went with poplar and created the fron front dispensing area. I scored the 5x15 drip tray and built the poplar holder around to match the area around the perlicks. I finished it off with some nice backsplash and purchased the black board contact paper and framed that in to give it a finished look.

The 525ss have been great but I have read some horror stories here. I may look into attaching a drain to the drip tray and route back through the wall to prevent any accidental issues.

Finished dispensing side with the perlicks:

image.jpg
 
Very nice work! That'd look great pretty much anywhere!

If the faucet wobble gets to you it'd only take a few minutes to back the shank mounting nuts and washers off enough to slip an Exacto knife around the shank and cut away enough insulation to run the washers and nut tight to the wood. You could always repack around the shank with insulation.

As for the Perls, I've been running a six pack of the 525SS model for a few years and they've been truly trouble free. They can require initial tuning out of the box (I had one of the six need bonnet-tweaking when I first set them up), and imo a slight film of keg lube on the two bonnet O-rings when you first mount a Perl is a really good idea.

And the other O-ring in the spout is apparently prone to "setting" given enough time, so replacing that may need to be a periodic maintenance operation (which honestly wouldn't be a big deal if true - IF Perlick didn't have a $25 minimum order, dammit!) I haven't had this problem show up yet, but it may sometime in the future.

But with all that, I'd buy them again, unless something better was available. I'm not seeing that yet - the only real competitor has its issues, too - but Perlick will be coming out with a new forward-sealing series sometime in the future, perhaps as early as this Spring. Should be interesting to see what they change...

Cheers!
 
^^^^^^^
Thanks for the feedback on the taps and setup! I have thought about tightening the tap wobble in the manner you describe however its the far left tap that I added a lot of insulation in close proximity that I am unable to get my hand in to tighten sufficiently!

Glad to hear about the 525ss! So far so good but it figures within 30 days of my order the 630ss come out!
 
Back
Top