• Please visit and share your knowledge at our sister communities:
  • If you have not, please join our official Homebrewing Facebook Group!

    Homebrewing Facebook Group

The Panther Piss Project: A Description of How I Learned to Make Clear Fizzy Yellow Swill in Fourteen Days

Homebrew Talk

Help Support Homebrew Talk:

This site may earn a commission from merchant affiliate links, including eBay, Amazon, and others.

Bramling Cross

Supporting Member
HBT Supporter
Joined
Apr 5, 2020
Messages
2,301
Reaction score
13,044
Location
DC is the 51st State
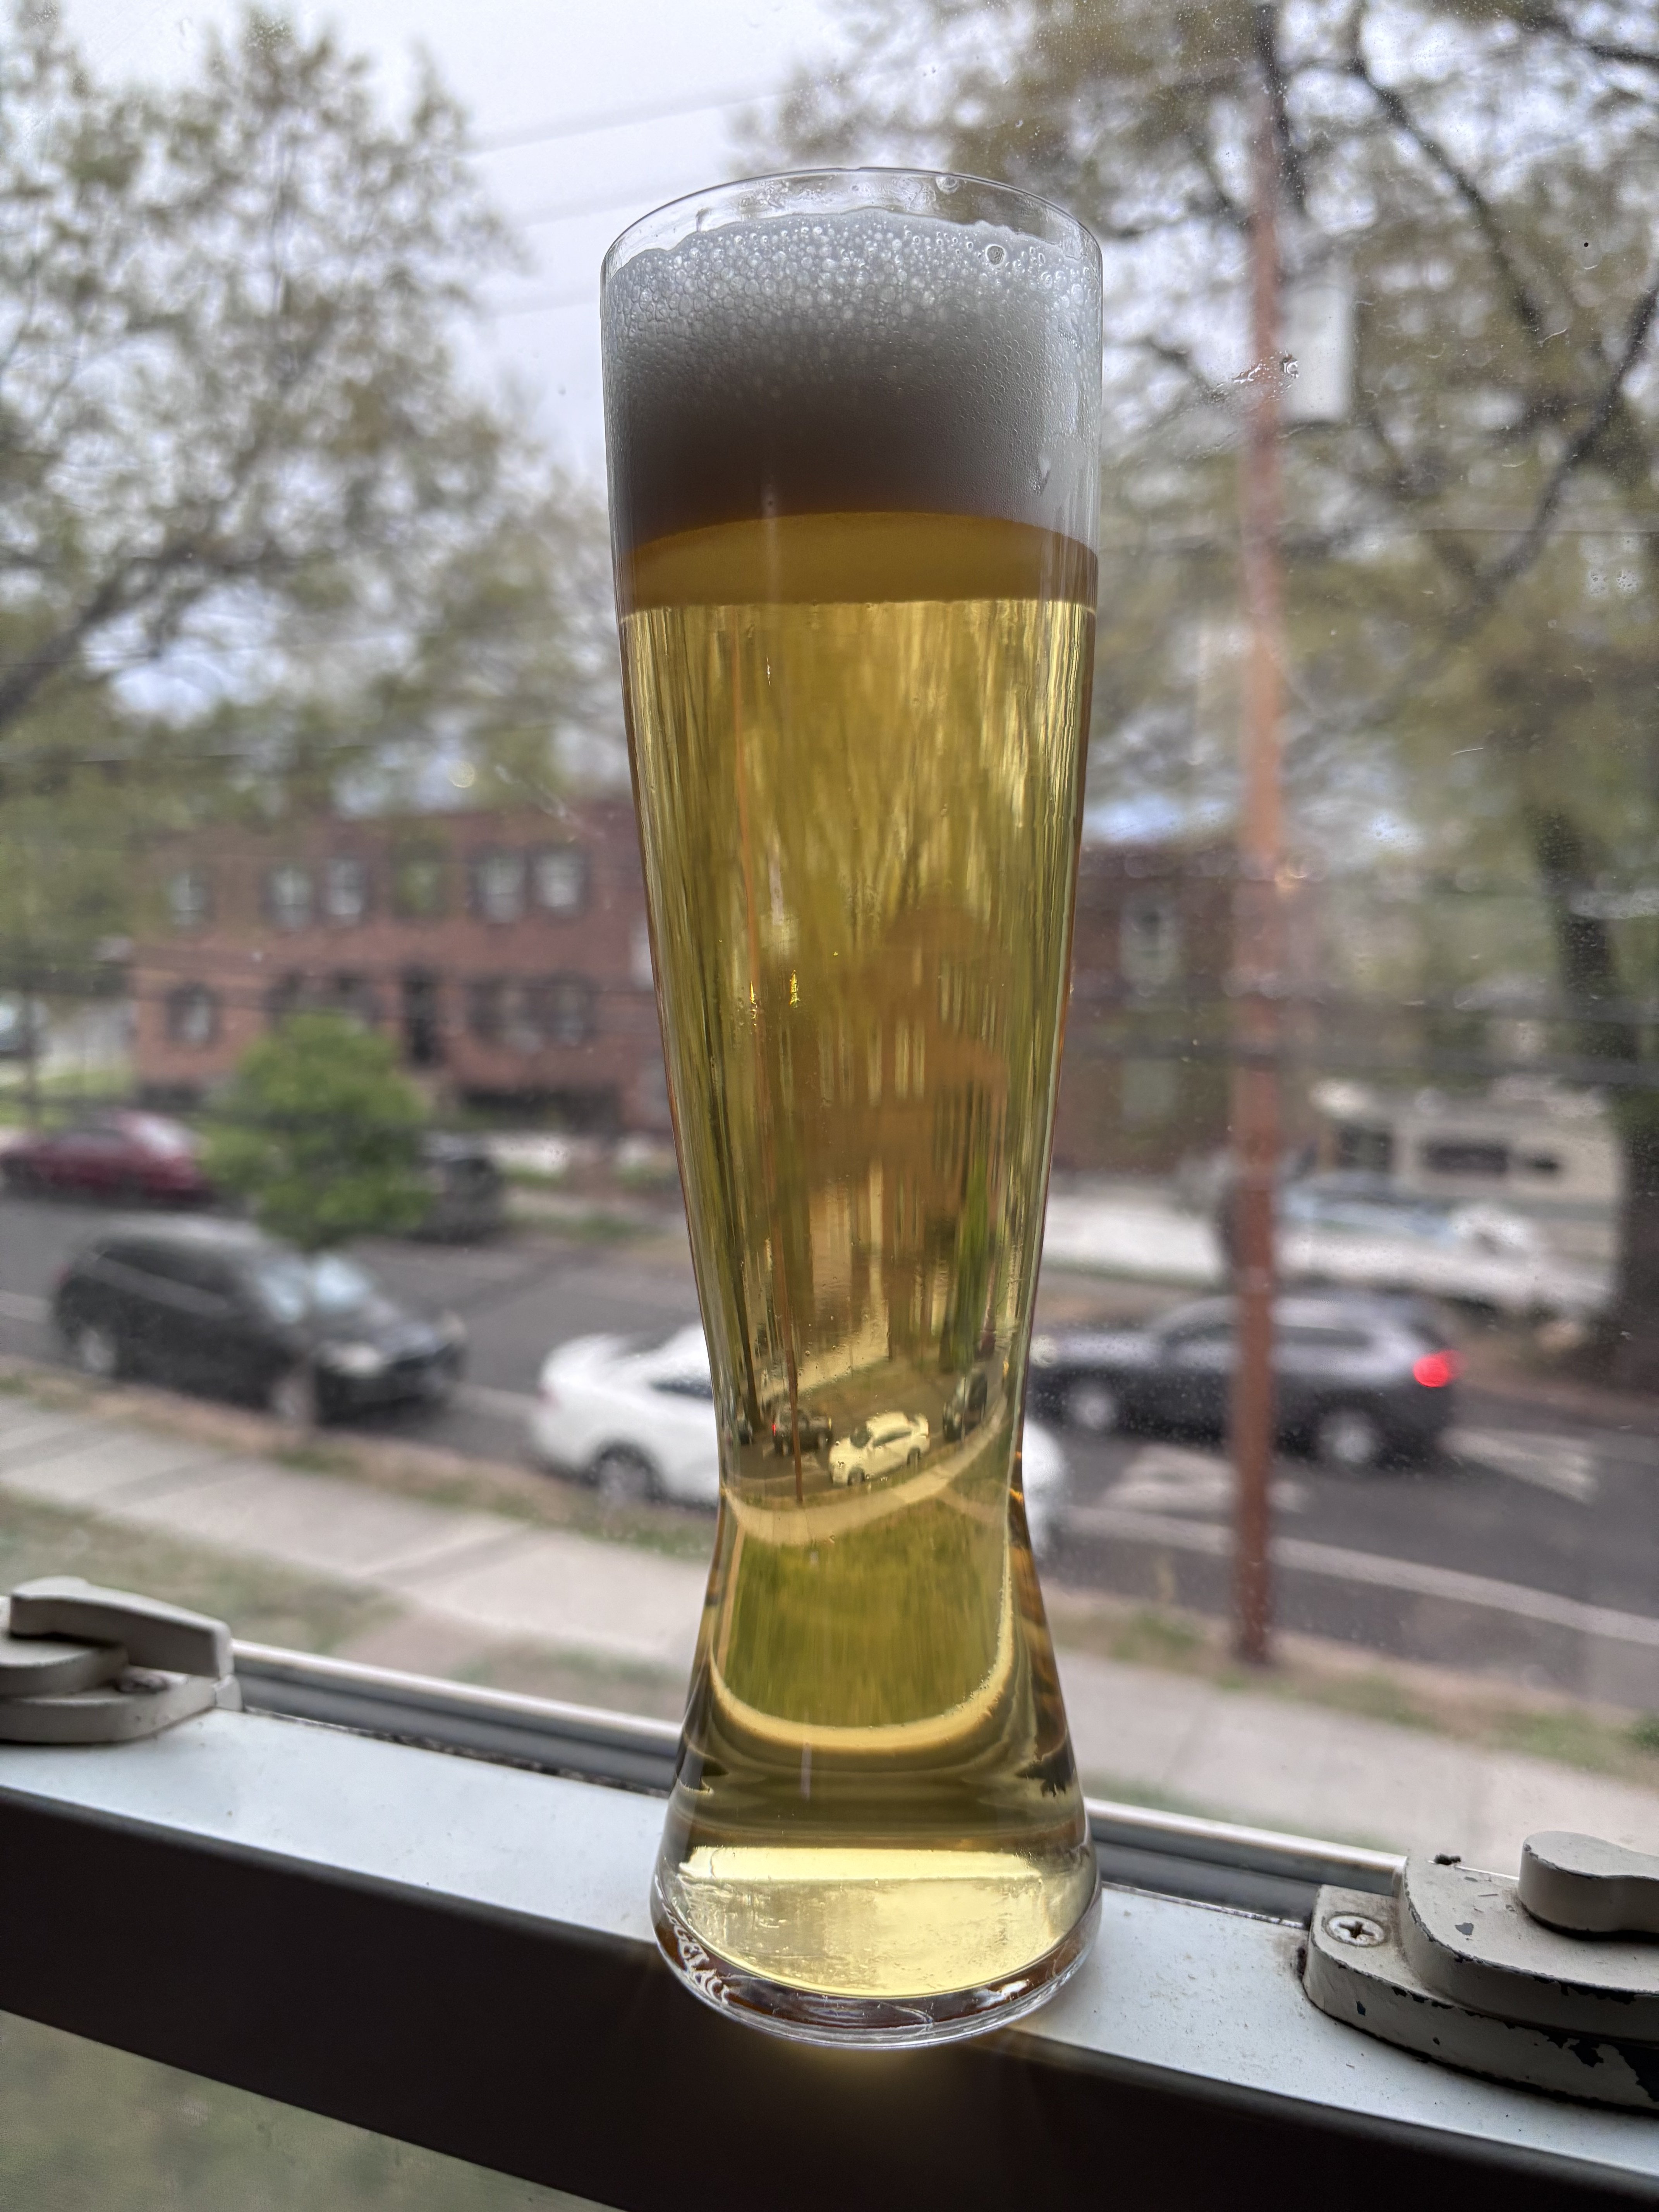
IMG_5202.jpeg

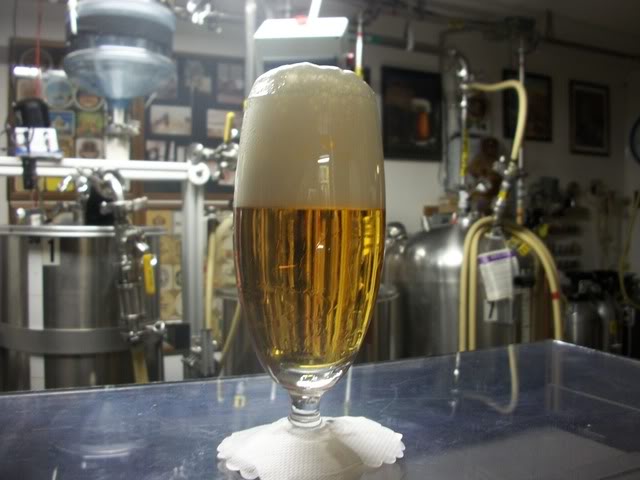
Twelve days ago this was grain…

I've been asked more than a few times about my COVID Panther Piss Project and what I'm doing to produce clear N.American premium lagers in about fourteen days. I've never been secretive about what I'm up to, there are remarks and descriptions scattered all over the site and across many private messages. Nevertheless, I've always been a bit reluctant to formally write up my findings and process because my techniques and processes evolved steadily over the roughly 4.5 years during which the project was in active development.

I decided about a year ago that I didn't have much room left for improvement for the Panther Piss Project, so I let it go into hibernation while I went back to brewing UK ales. I deserved a break after having 3-4 kegs of Panther Piss on draft for 4+ years!

I recently brewed a new batch of Panther Piss and one of our site mods suggested that I should write up the process. I thought about it and decided, “Yeah, why not?” Now is a good time. I haven't worked on it in a year, so things are no longer developing and I recently brewed it and demonstrated that it still works. So why not?

At its core, this isn't a recipe. Rather, it is a process. There are no silver bullets in home brewing. If you use the recipe without following the process you're not going to succeed. The process is what makes the results possible, not the recipe! I cannot stress that enough. It's just a boring 20% corn/10% rice fizzy yellow swill. The recipe has no attributes that will encourage clear lager in fourteen days. This is all about the process.

To make this process work, you're going to need a calibrated, accurate, and fast working pH meter. I suggest the Apera pH60, it's the finest brewing pH meter that I've ever used—and I've used many. You'll also need accurate and reliable fermentation temperature control and a reliable anti-suck back rig for your fermenter to avoid oxygen ingress during the crash. A keg equipped with a floating dip tube is a must, as is some comfort with with LOw Dissolved Oxygen (LODO) techniques.

Some words about LODO

Prior to posting this write up I ran a draft past a number of HBT readers, each with a reputation as an excellent brewer. Almost all of them suggested that I should offer some explanation about why I'm using LODO techniques and how I'm applying them. Fearing that this post might devolve into a discussion about the merits of LODO, I was hoping to avoid doing that. Nevertheless, I'd be a fool to ignore suggestions from such talented brewers.

So, here's how I'll handle this. First,I'll provide my reasoning for turning to LODO techniques during the course of the Panther Piss Project. Next, I want to avoid going into the nuts and bolts of how to use LODO techniques. The first draft of this write up ended up spanning ten pages and 6,000 words. Publishing that on HBT simply isn't practicable. Here are two (1, 2) excellent links from The **************** that do a great job describing the goal and techniques of LODO. Also, check out HBT's own LODO sub-section. That should get you going.

The Rationale: I didn't start the Panther Piss Project with LODO. Instead, I turned to LODO to address a couple problems that emerged during the project. The goal of the project was to make a better fizzy yellow swill than BudMillerCoors and do it within their production time frame. Although my recipe cheats a bit by raising the OG into premium N. American territory and uses some fancy Continental malt; with 30% of the grist given over to adjuncts and an additional 27% occupied by domestic 6-row malt, that leaves a paltry 35% of the grist available to provide substantive malt flavor. LODO's hot-side oxygen mitigation techniques, as I found out, excel at preserving malt flavor and getting it to where it matters most, your glass. Also, fizzy yellow swill is murderously light in color. If any oxygen sneaks in during your packaging process you'll see it in your finished beer's darkened color, hence the need for closed transfer techniques while packaging. Further, the closed transfer technique also preserves the freshness of the beer's flavor when packaged. LODO played an important part in the success of this project because it helped to get the beer tasting great and looking right throughout its time in the serving keg.


The LODO Techniques I Employ. Due to the format of this forum, I'm most concerned with brevity. Feel free to ask for clarification below. Note that I'm not running a full LODO brewery. Proper LODO brewers will identify areas where the Panther Piss Project diverges from proper LODO techniques. I'm employing LODO in this context to achieve the project's two fold objective: 1) Good fizzy yellow swill in 2) Fourteen days. I freely admit that I'm doing it wrong, perhaps even doing LODO a disservice. Again, this should not be taken as a primer on the correct way to do LODO brewing--I'm not the guy for that! I'm not making the ideal Helles here, instead I'm blasting out fizzy yellow swill on a very tight timeframe.
  1. I employ Yeast Oxygen Scavenging (YOS). This greatly reduces the amount of oxygen in your strike and sparge liquors. To do this, you simply build your brewing liquor the night before brew day, adding your Campden, salts, acid charges, and 1g/gallon of cheap bread yeast and 1g/gallon of table sugar to your strike and sparge volumes. Overnight, the yeast will absorb the available oxygen in your strike water as they prepare to go after that sugar. The next morning you simply fire up your brewery as normal. There are other ways of doing this, but this is how I do it.
  2. I employ caps on all my vessels. Caps are cheap and simple, they're just a lid that floats on top of any liquor or wort prior to boiling. My initial caps were Reflectix insulation (I had a spare roll laying around, okay?). I've since moved on to using closed cell foam caps that I've cut out of a cheap yoga mat, much better!
  3. I underlet my mashes and I employ a subsurface manifold to sparge my mash.
  4. I employ a mixture of three sacrificial antioxidants in both the mash and the boil. This mixture of antioxidants, dubbed the "trifecta blend" or just "trifecta," react more readily with oxygen than your malt, so they clear up any remaining oxygen that evaded the YOS charge or was introduced during the strike. Here's a link to @cmac62's antioxidant recipe [or see the content of that post, below -Mod].*
  5. Finally, I package all my beers via the pressure transfer method which greatly reduces the amount of oxygen ingress suffered during packaging. I also treat my keg with 1/4 tsp of ascorbic acid (vitamin C) to sop up any oxygen that managed to squeak its way into the keg during the transfer. If the closed transfer is performed correctly, the ascorbic acid likely isn't necessary, but it's cheap and convenient insurance.
  6. The proper LODO method suggests krausening is the ideal carbonation method, but the Panther Piss Project has a hard deadline to make, so I force carbonate and also rely on the lager's already partially carbonated state due to its brief stay in the fermenter and its cold, CO2-retaining temperature.
* [Inserted for clarity -Mod] For completion, here's the content of @cmac62's post on the "antioxidant trifecta:"
For the last few brews I have been adding some K-Meta to the boil as part of the K-Meta, Ascorbic Acid and BTB as a trifecta to help reduce the oxidative effects. I have been getting a sulfur smell (ie. rotten eggs). There is no flavor, but the smell is off-putting to say the least. Is this due to the K-Meta (too much or not at the right time)?

On to the Panther Piss Process

Here is the process, in as stripped down a format as I can manage. I've been through several drafts of this post (some stretching out to ten pages) so I've opted to prioritize brevity over clarity. Don't be bashful about asking questions, I'll answer them as best I can.

Here's the process that I use to make Panther Piss:
  1. Set up a normal LODO brewing session the night before by building your water with campden, salts, acid additions, and YOS charges in the appropriate vessels. Target a mash pH of pH 5.4 and over-acidify your sparge water to target a pre-boil entire runnings pH of pH 5.2.
  2. On brew day, condition your malt and mill it. I believe conditioning is important because it produces a better, more effective filter media and reduces the amount of particulate material that makes its way into your kettle. If you can filter it now you don't have to deal with it later.
  3. Use LODO trifecta in your mash and employ a Hochkurz-eque infusion mash, striking at 148F(64.5C) for 60min, then infuse to 158F(70C) and recirculate for 30min to filter as much particulate matter as possible. This extended mash should net you a properly dry beer and excellent efficiency.
  4. Sparge and lauter as normal, using LODO techniques. Your pre-boil entire running should be very, very clear. Using 85% phosphoric acid, adjust your pre-boil pH to pH 5.2, typically no more than 1ml is necessary. You'll notice in the recipe sheets below that I decided to second guess my notes and I missed my pre-boil pH target. I use DC tap water and I sometimes miss my mark when I anticipate predictable, seasonal changes. This last batch was a prime example of that. Still, because I brew with a pH meter, I was able to get it right and achieve the correct result with acid additions later in the process. If I had been brewing with only a spreadsheet I would've missed that mistake and I'd be frustrated because my beer was hazy and I'd have no clue why.
  5. Boil for 90min, using a trifecta charge with your finings and yeast nutrient. Also add 1 ml of 85% phosphoric acid along with your finings, etc. Whirlpool while you chill and attempt to transfer the cleanest possible wort into your fermenter. Again, if you deal with it now, you don't have to deal with it later.
  6. Confirm that your post-boil pH is pH 5.0-5.1, adjust with a further 1-2 ml of acid if needed. Next, pitch two sachets of 34/70 or S-189. One will get the job done, but two will ensure we get the fermentation finished as quickly as possible. Oxygen is not needed on the initial pitch, but necessary on repitches. Use one drop of ionic zinc at pitching.
  7. Ferment using the “modern lager” technique. Pitch at 50F(10C), then allow the fermentation to free-rise to 52F(11.1C) once it establishes itself. Gradually allow the temp to free-rise in small, controlled increments until you hit 56F(13.3C) with ¼ of gravity remaining.
  8. Once the beer hits TG, crash the beer immediately and hold for 2-3 days. I have not found a D-rest to be necessary with 34/70 provided you pitch it big and healthy.
  9. With the beer crashed, keg into an oxygen purged keg using a closed circuit transfer. I prefer to pressure transfer, closed gravity transfers are beautifully elegant, but they lack reliability in my experience.
  10. Once racking is complete, dose your keg with 1/2 tsp of ascorbic acid and either gelatin (cheaper, more effective) or BioFine Clear (a bit less hassle, but expensive). I've used both with success. Perform the dosing by injecting the finings and ascorbic acid with a syringe through your gas in post.
  11. Pressurize your keg to 30psi and place it in your serving fridge, do not hook up your gas yet. Allow the keg to sit for two days, then hook up your gas and pour a glass. The first glass may be slightly cloudy, floating dip tubes tend to capture a bit of yeast during closed circuit racking. The second glass should be brilliantly clear. The carbonation should be slightly on the low side of the range, as I prefer. You may find it necessary to carbonate a bit more to suit your taste. If so, you may wish to put in on 40lbs of gas before putting it in the fridge. I've done that in the past and while I found it to work, the resulting beer was too gassy for my taste. I do not like even the merest hint of carbonic bite.

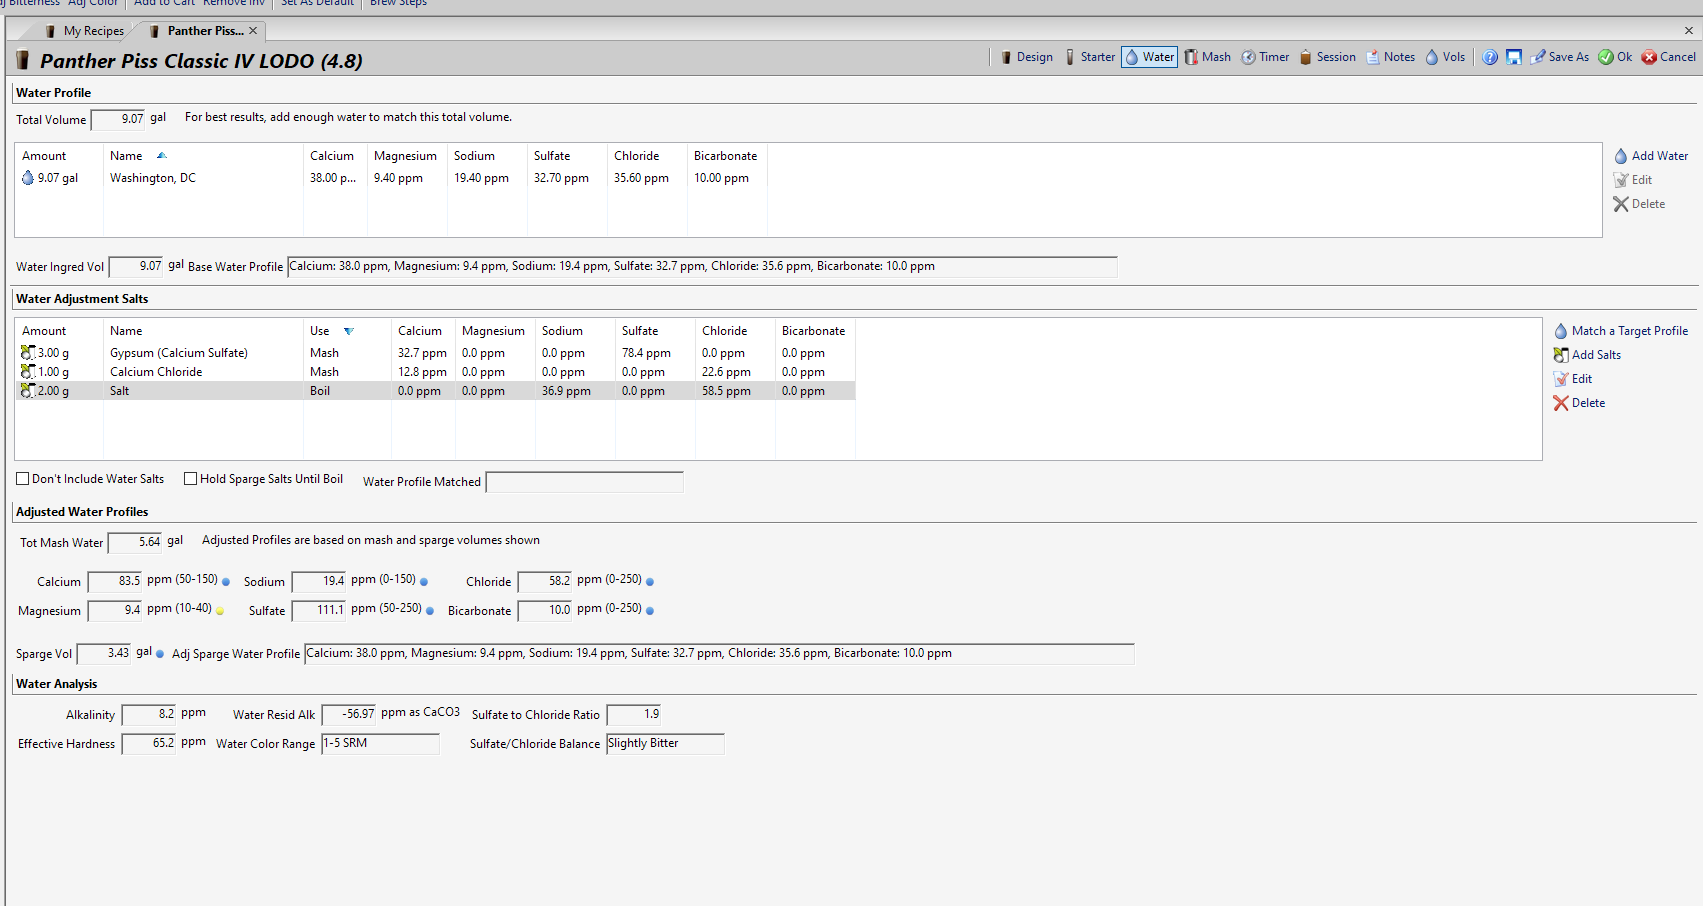
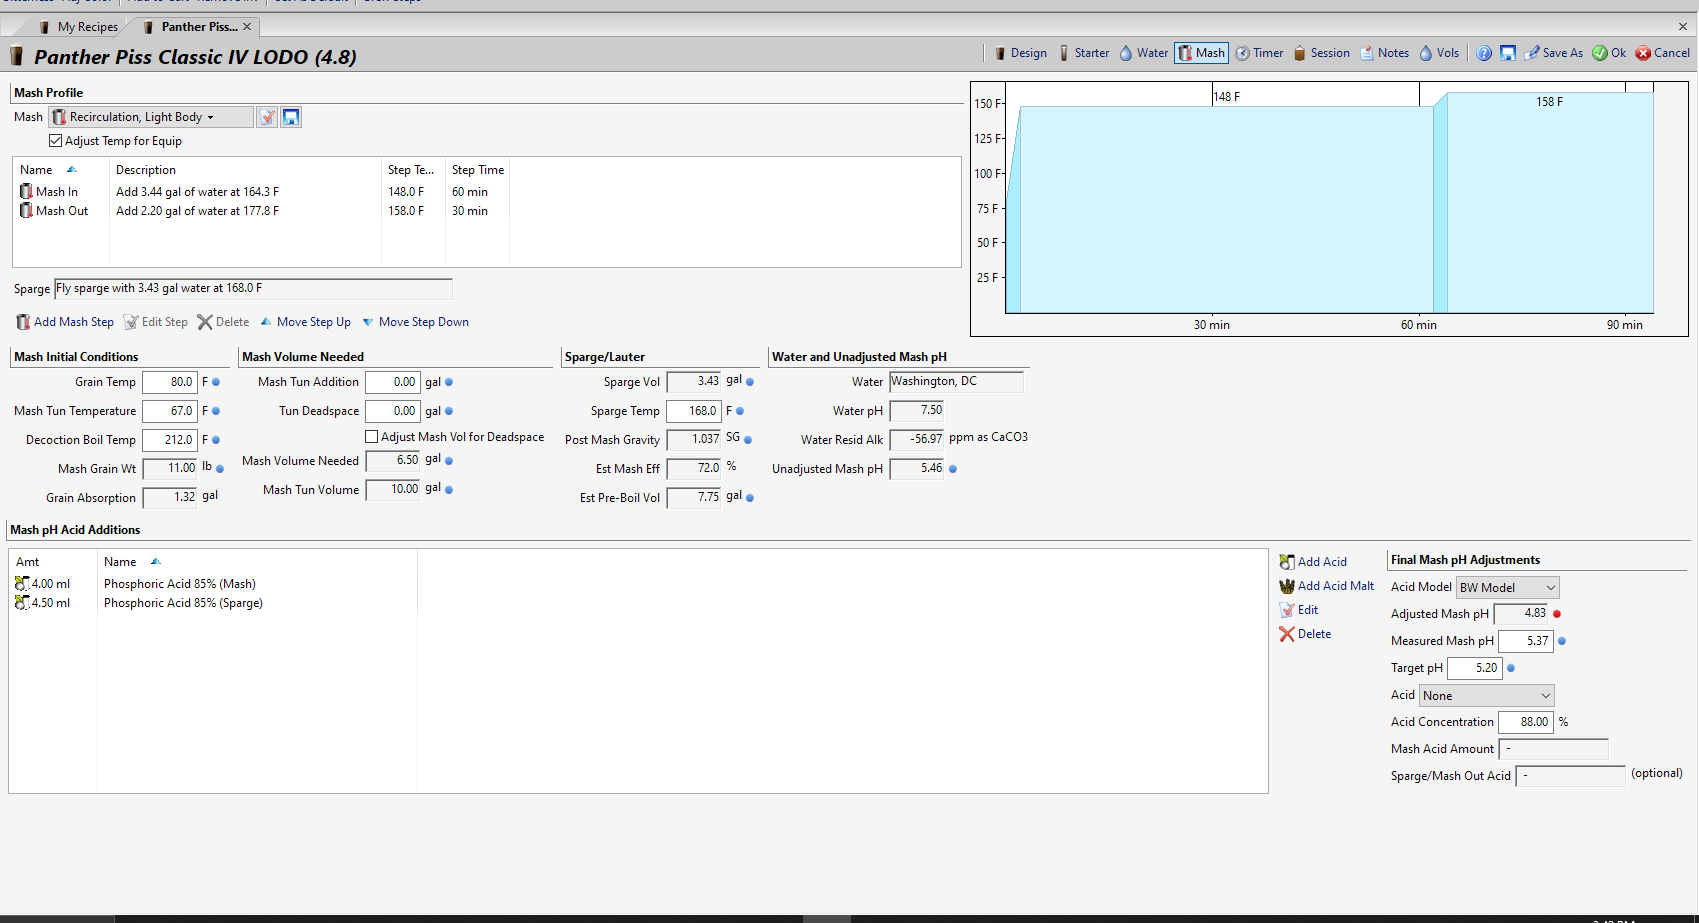
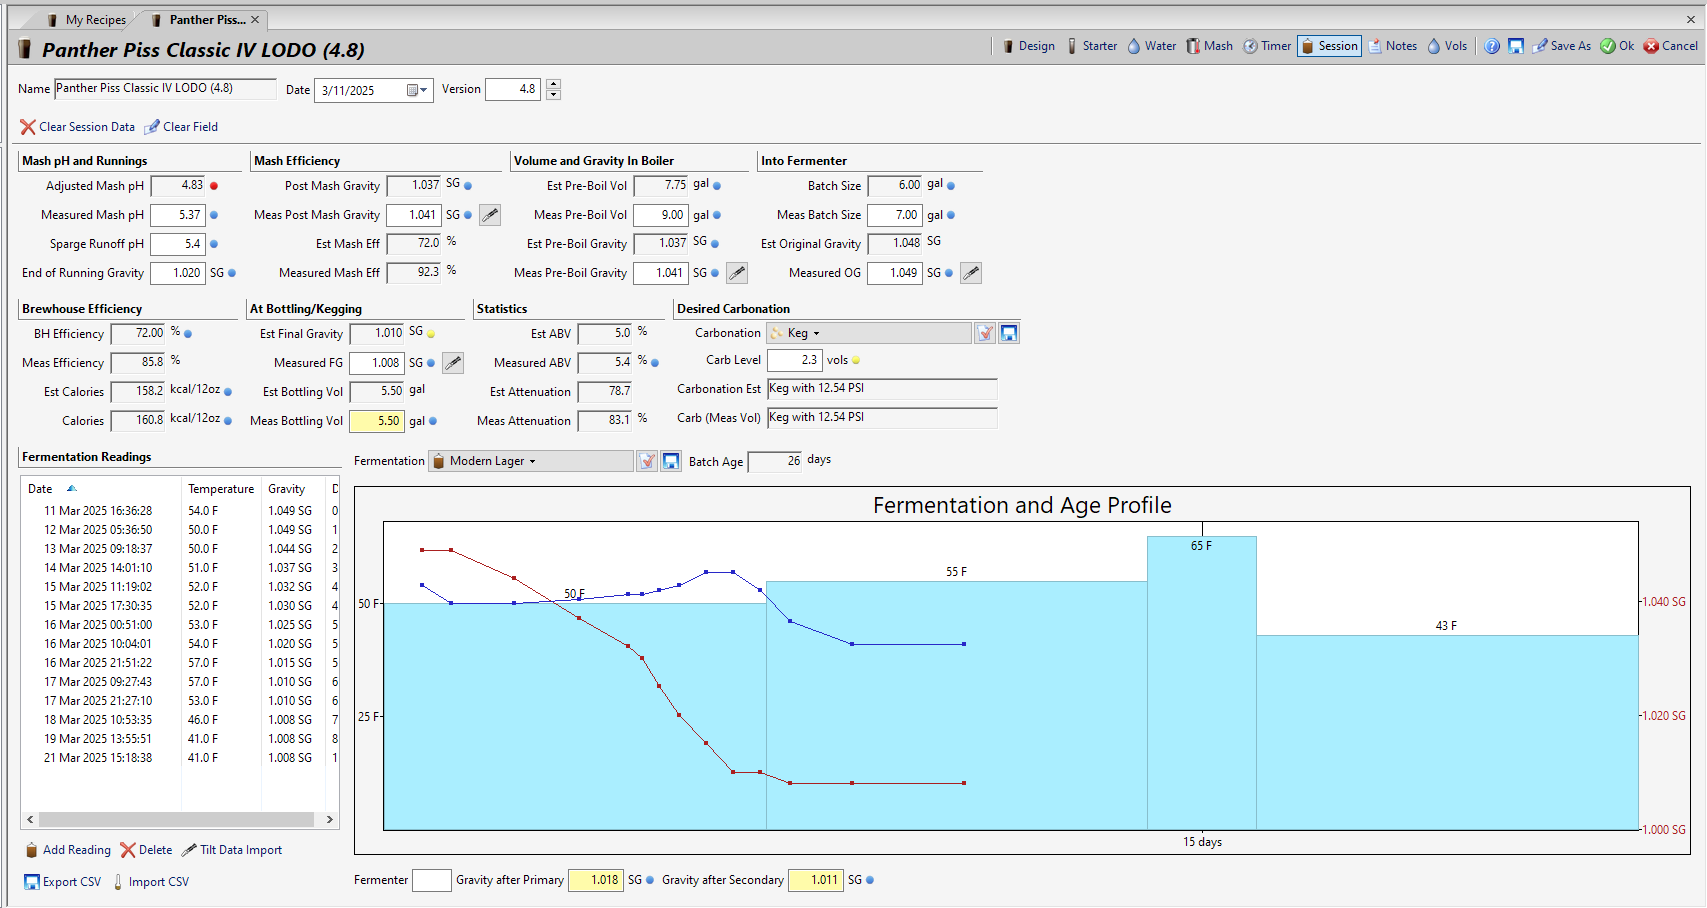
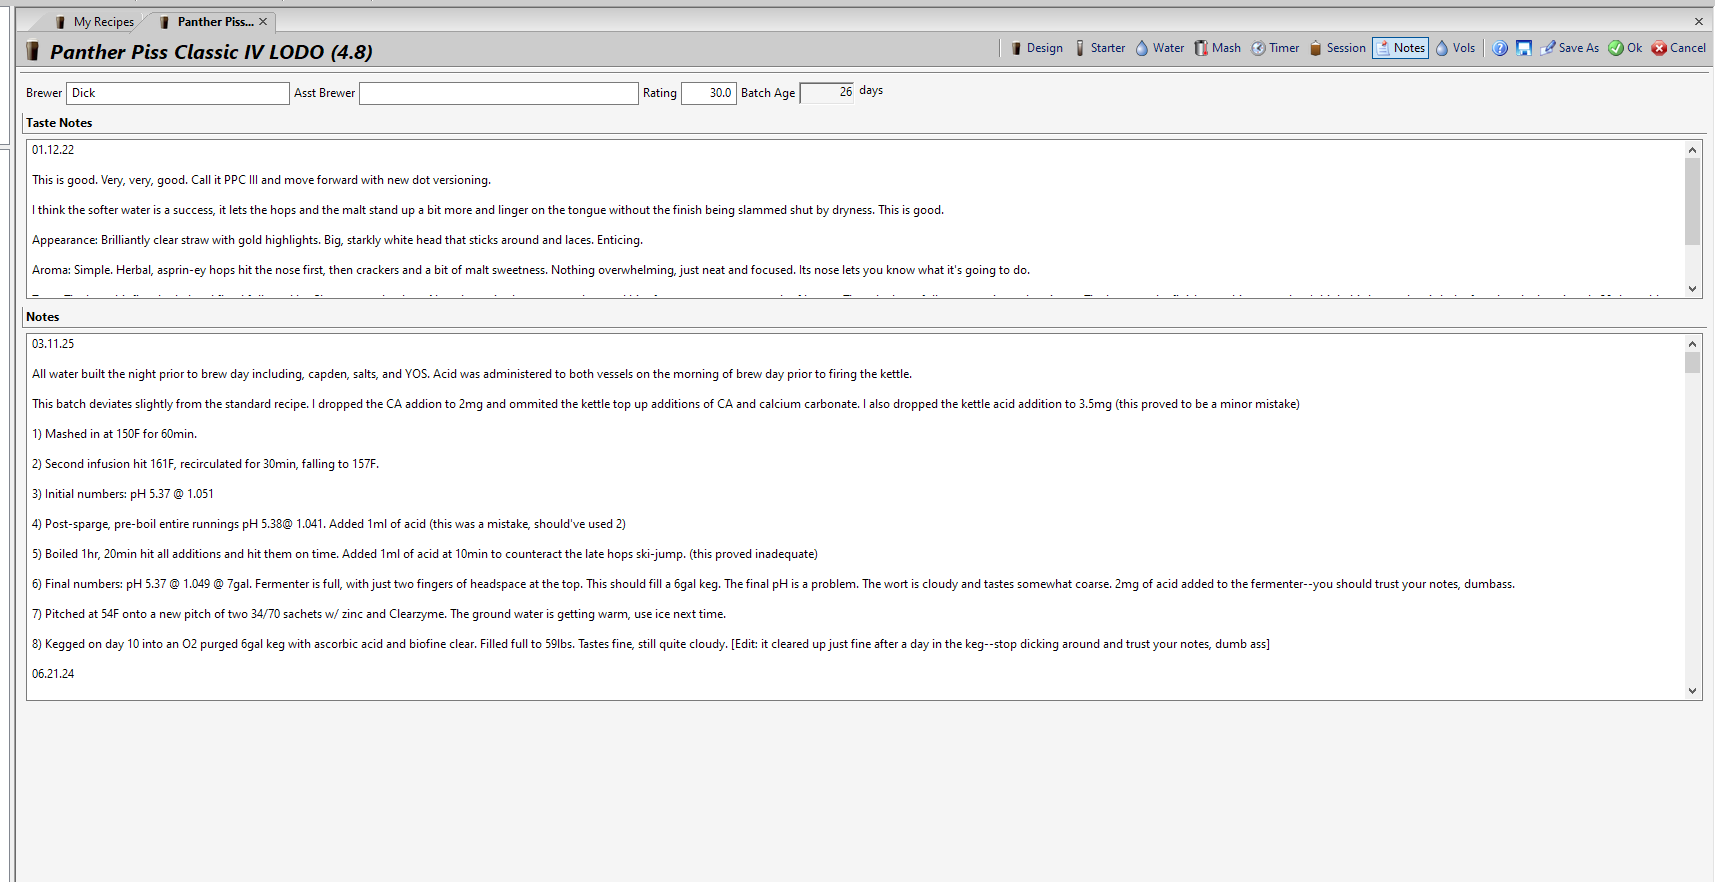
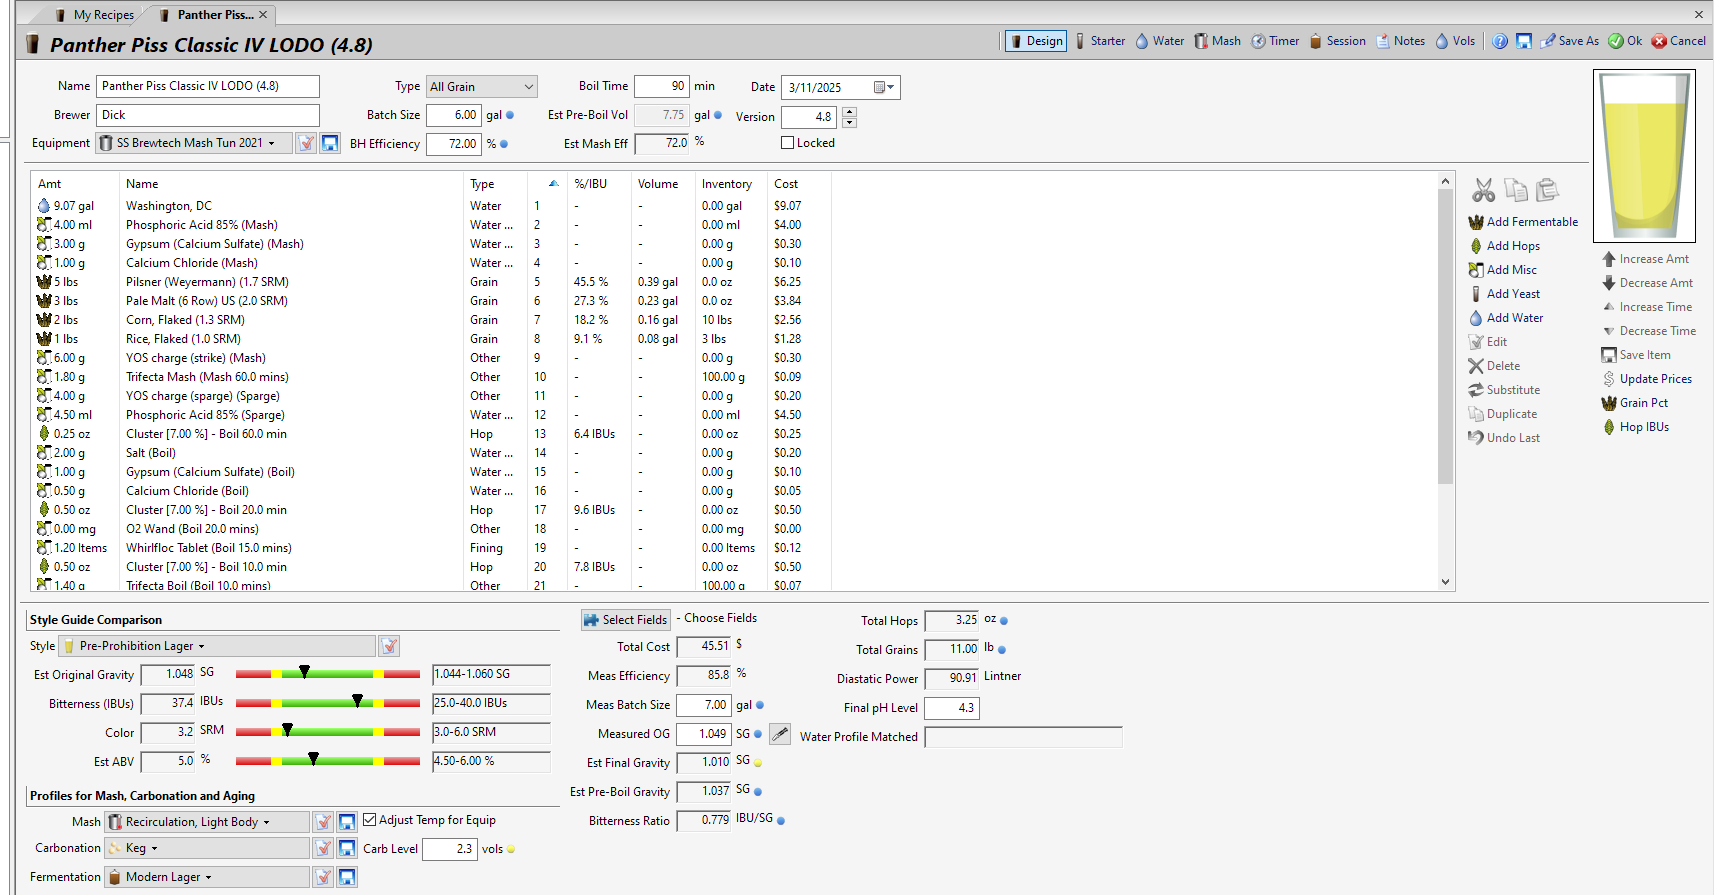
Here is the complete collection of BeerSmith recipe sheets from my most recent batch so you can follow along with the brew day—and laugh at my mistakes. Note that I'm still using the default efficiency setting in BS—I know how my system works and I'm too damned lazy to change it. I hope that doesn't cause any confusion. The correct, repeatable OG is 1.049 @7gal. I've also attempted to include the BeerSmith .bsmx file as an attachment--thank you, day_tripper! I've never done that before, give me a shout if I've screwed it up.
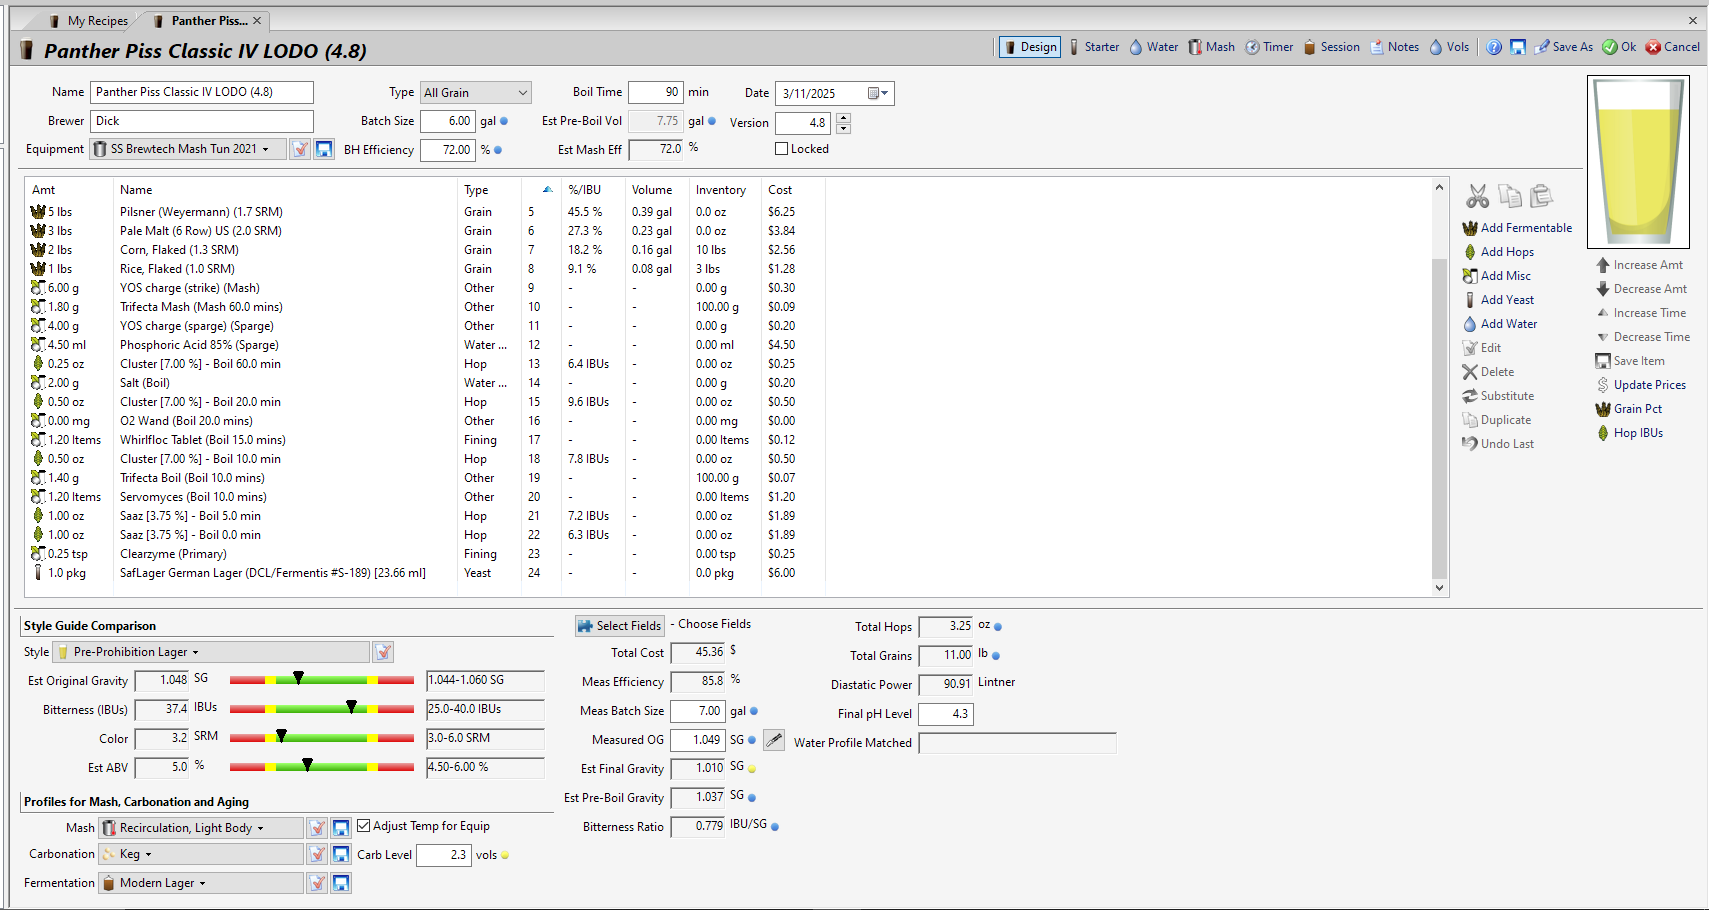
1.png

1a.png

2.png

3.png

4.png

5.png


A Quick Word About Enzymes

During the Panther Piss Project I tried two enzymes sold by MoreBeer that are purported to promote clarity. The first, GlucaBuster is no longer marketed as a clarity enhancer. I didn't find it to be terribly useful, either in the mash tun or the finished glass of beer. The second, Clearzyme, works somewhat when you miss high on post-boil pH. But if you're racking into the fermenter at pH 5.0, I haven't noticed that it makes much difference. I've intentionally (and unintentionally) brewed Panther Piss both with and without these enzymes and I believe their contribution is marginal at best. I'll use up my remaining stock, but I don't plan to replenish them when I run out. Frankly, I believe that they're a waste of money.

Some Thank Yous Are In Order

Finally, I'd like to offer my thanks to doug293cz for encouraging me to write this up. You wouldn't be reading this if it weren't for him. He also kindly helped me to organize my initial thoughts and got me pointed the right way. Thank you, Doug! I'd also like to thank Hoppy2bmerry, MaxStout, day_tripper, and doug293cz for pre-reading my draft and offering excellent advice about the content of this write up. Their suggestions drastically improved this post. My sincere thanks!

Lastly, thank you for putting up with all of the formatting mistakes that have crept into this write up as it has bounced back and forth between a word processor and this forum's formatting. I've done my best, but I'm aware that some weirdness has crept through. I've run out of patience, so it's time to post this thing and be done with it. Thanks for putting up with it.
 

Attachments

  • Panther Piss Recipe File.bsmx
    61.1 KB
Last edited by a moderator:
A note about BIAB and the Panther Piss Project...

One of the pre-readers of this write up asked if this process can be run on a BIAB system. Honestly, I do not know.

I used to run a very odd hybrid BIAB/infusion rig that was optimized for UK-style underlet brewing. Prior to the Panther Piss Project, I made a retrograde move and purchased a deeply discounted SS Brewtech Infusion Mash tun because I wanted to return to 3-vessel fly sparging due to its ability to run very clear wort into the kettle. I wasn't focused on beer clarity at that time, instead I was looking to boost my efficiency by cutting down on trub ingress into my fermenter and I wanted to make yeast harvesting from the fermenter an easier task due to less trub.

While teaching others how to brew I've had the pleasure of brewing on pure BIAB and AIO rigs, but I cannot claim any competence, much less expertise on such rigs. I wish I could offer advice for adapting the Panther Piss Project process to rigs of this type, but I can't in good faith. You guys know your rigs better than I do. I'll be happy to lend whatever support I'm able to offer, but I cannot tell you that this will work when transferred to a BIAB rig. I've never brewed Panther Piss on a BIAB rig, so I just don't know.

I think the majority of the heavy lifting, at least on the clarity front, comes from the enforced lowering of the pH throughout the process. In this respect, I'm optimistic that this process can be replicated on a BIAB rig, but I cannot in good faith say that I know it can be replicated.
 
Last edited:
Thanks for the writeup :bigmug:
2017 I participated in a Budweiser Platinum challenge sponsored by a large Texas and local distributor. I declined the challenge at first, but after some negotiations to make changes to my liking a new Platinum was born with more color and flavor changes.
They rewarded me with some nice presents.
I used only US malts, 70% 2-Row, 10% Bonlander Munich malt, and 20% Flaked Rice.
BudPlatinumGold4.jpg
 
Thanks for the writeup :bigmug:
2017 I participated in a Budweiser Platinum challenge sponsored by a large Texas and local distributor. I declined the challenge at first, but after some negotiations to make changes to my liking a new Platinum was born with more color and flavor changes.
They rewarded me with some nice presents.
I used only US malts, 70% 2-Row, 10% Bonlander Munich malt, and 20% Flaked Rice.
View attachment 872674
Brilliant! See? It's not just me! Nor is it the recipe, it's the process!

Although, I'm willing to bet that Claudius' process is waaaaaay better than mine! ;)
 
Last edited:
What a great write up, thanks for taking the time to do this! I am looking at upgrading my setup later this year, and should at that point be setup to be able to follow this closely. Still found some things I’ll implement immediately too. Couple of questions:

-How are you making your hop additions? Hop spider, straight up, etc.
-Have you tried this process with other beer styles? I could see it being good for things like milds since we’re looking at quick grain to glass
Thank you for the kind words, Brewer dad!

In terms of hopping, I've used bags and spiders in the past and I've made a (another) retrograde move on that front. I went back to going commando with my pellets several years ago. Frankly, I've never been satisfied with the results I've had from bags or spiders, especially with a whirlpool rig. The hops seem to clump into a solid lump and the wort just flows around that lump. I'd much rather deal with the limitations of going commando with my hops in exchange for what I believe is better utilization and expression of those hops. Reasonable brewers can reasonably disagree on this point. There are compromises to bags, spiders, and going commando. I prefer the compromises associated with going commando. The trick to keeping your hops from clogging your pump and whirlpool rig is to let them dissolve for 5-10mins before you turn on your pump. I know that seems blindingly obvious, but I'm not a smart man and it took me more years than I'd care to admit to figure that out. If you're willing to accept that compromise, there's no problems and no need for a spider or bag.

Also on the hopping front, I'm generally moving away from using late hops in ales and lagers unless the style is defined by late hops. Increasingly, I've found that I really prefer the more "integrated" flavor that you get from a solid charge of 60 and 20/30min hops vs. a beer that is lopsided toward late hops. If you look at the brewing notes attached to the first post, you'll see that I changed up the hopping schedule on this latest batch from the recipe on the design sheet, favoring 60 and 20min hops. I debated changing the recipe before posting it here, but I ultimately decided that I should post the Panther Piss Project Recipe as I was brewing it at the end of the project. I suppose I lied when I said the Panther Piss Project was in hibernation, but I don't think of my change toward 60 and 30min hops as being part of the Project. It's more of a global change in my brewery that I attached to this latest batch of Panther Piss.

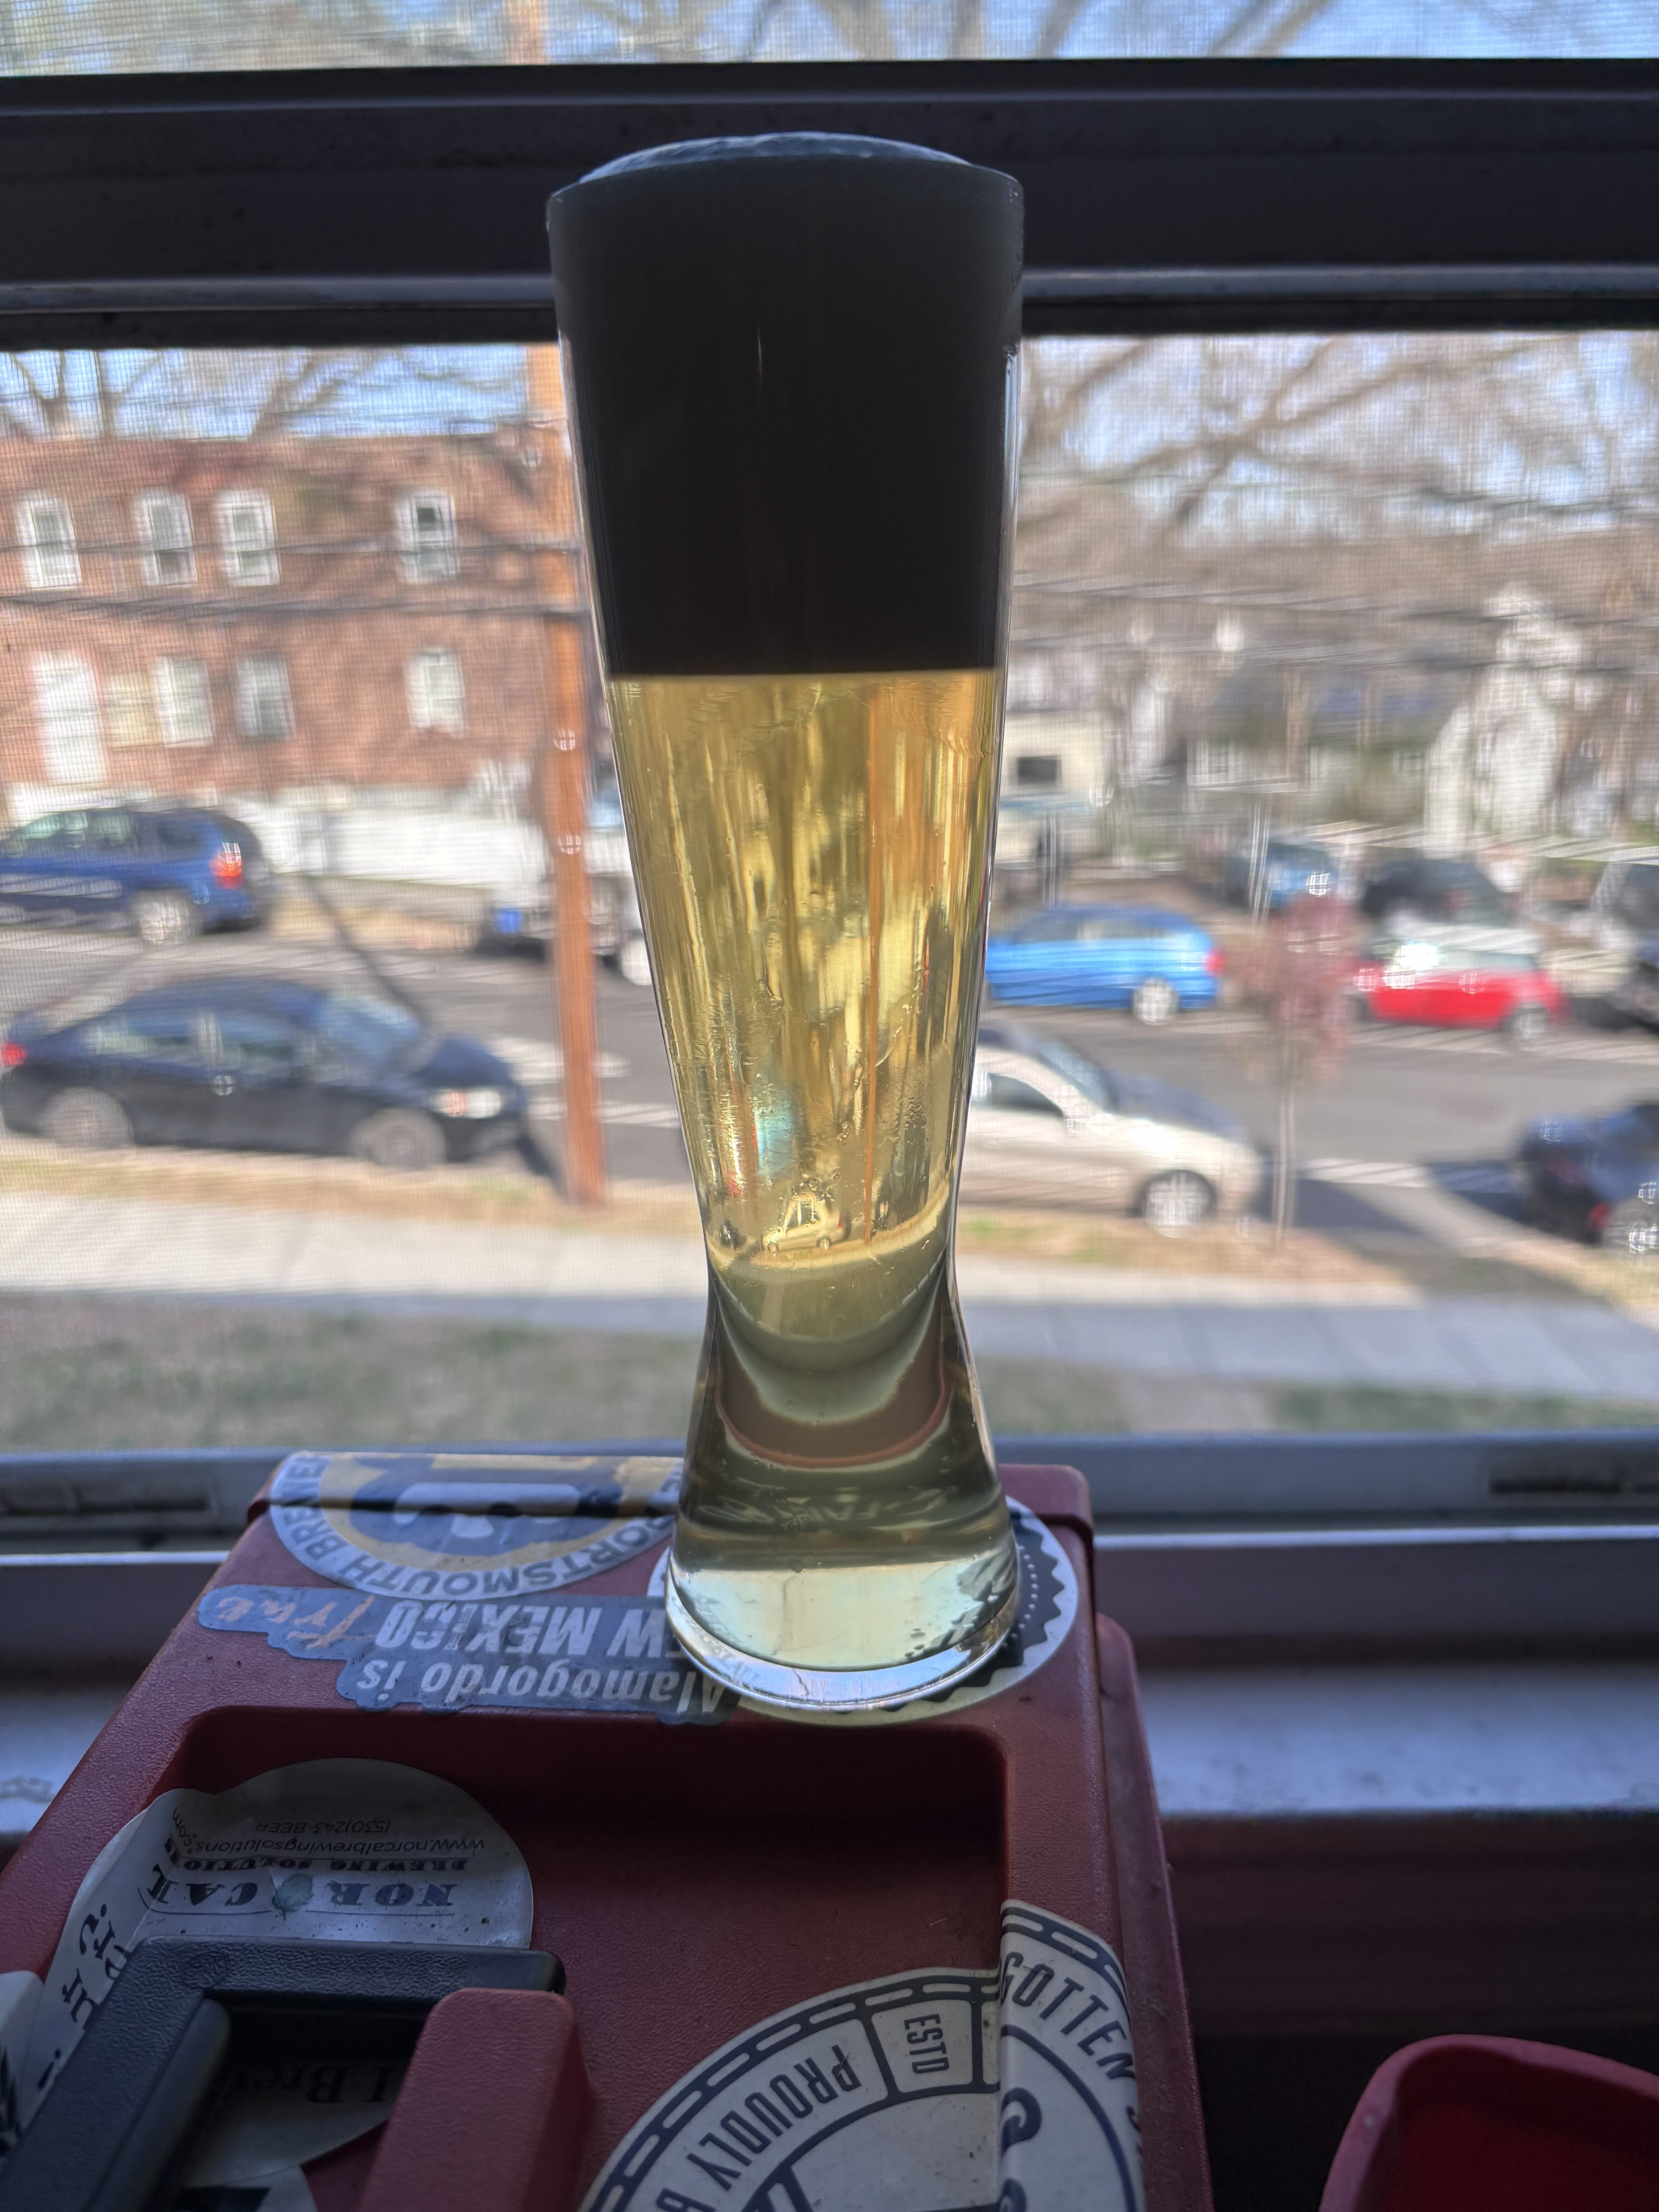
I've certainly used this process with other beers styles. In fact, it's pretty much my default process unless there's a style-based reason for me to deviate. Here's a picture of the Helles that I brewed with a portion of the yeast cake that created the picture of Panther Piss that you saw at the top of this article. I think this picture was taken at ~15 days? So it works fine with Helles, although krausening should yield a superior product.
IMG_5274.jpeg


As you suggest, I've used this process with success with UK-style ales. I've also used it with N. American hoppy ales. Both of these styles may be the subject of a write up in the years ahead as I learn how to deal with problems unique to these respective styles.

The UK ales are relatively straight forward, but it takes a lot of iteration to get it right. UK yeasts have a tendency to really acidify a wort before they go to work on it, so I've had to learn where the ideal post-boil pH is for each strain. I seem to be able to get away with pH 5.2 for the Fullers strain. I'm still working on the Yorkshire strain because I tend to use it with dark ales and that makes things complicated. I don't feel comfortable offering advice on that strain just yet. Same deal for the Ringwood strain, but I've only just started using it again after decades of ignoring it. I just don't have enough data yet.

Regarding hopping UK and US-style hoppy ales, there's a problem that I haven't been able to fully wrap my head around. I hope to do a write about this at some point, but I'm still trying to figure it out. In brief, late hops seem to really elevate the wort's pH, producing something that I've come to call "the ski jump effect." I'm not sure if I've coined that term, or if I've cribbed it off another brewer, but the effect is real and I'm still struggling with it. I'd sure help if I made more than one or two N. American pale ale/IPAs per year! I think "the ski jump effect" will be my next big, formal project. I have a pile of data, I just need to sit down, put it in a spreadsheet, and think about it in a more structured fashion for a while.
 
Thank you for the kind words, Brewer dad!

In terms of hopping, I've used bags and spiders in the past and I've made a (another) retrograde move on that front. I went back to going commando with my pellets several years ago. Frankly, I've never been satisfied with the results I've had from bags or spiders, especially with a whirlpool rig. The hops seem to clump into a solid lump and the wort just flows around that lump. I'd much rather deal with the limitations of going commando with my hops in exchange for what I believe is better utilization and expression of those hops. Reasonable brewers can reasonably disagree on this point. There are compromises to bags, spiders, and going commando. I prefer the compromises associated with going commando. The trick to keeping your hops from clogging your pump and whirlpool rig is to let them dissolve for 5-10mins before you turn on your pump. I know that seems blindingly obvious, but I'm not a smart man and it took me more years than I'd care to admit to figure that out. If you're willing to accept that compromise, there's no problems and no need for a spider or bag.

Also on the hopping front, I'm generally moving away from using late hops in ales and lagers unless the style is defined by late hops. Increasingly, I've found that I really prefer the more "integrated" flavor that you get from a solid charge of 60 and 20/30min hops vs. a beer that is lopsided toward late hops. If you look at the brewing notes attached to the first post, you'll see that I changed up the hopping schedule on this latest batch from the recipe on the design sheet, favoring 60 and 20min hops. I debated changing the recipe before posting it here, but I ultimately decided that I should post the Panther Piss Project Recipe as I was brewing it at the end of the project. I suppose I lied when I said the Panther Piss Project was in hibernation, but I don't think of my change toward 60 and 30min hops as being part of the Project. It's more of a global change in my brewery that I attached to this latest batch of Panther Piss.

I've certainly used this process with other beers styles. In fact, it's pretty much my default process unless there's a style-based reason for me to deviate. Here's a picture of the Helles that I brewed with a portion of the yeast cake that created the picture of Panther Piss that you saw at the top of this article. I think this picture was taken at ~15 days? So it works fine with Helles, although krausening should yield a superior product.
View attachment 873124


As you suggest, I've used this process with success with UK-style ales. I've also used it with N. American hoppy ales. Both of these styles may be the subject of a write up in the years ahead as I learn how to deal with problems unique to these respective styles.

The UK ales are relatively straight forward, but it takes a lot of iteration to get it right. UK yeasts have a tendency to really acidify a wort before they go to work on it, so I've had to learn where the ideal post-boil pH is for each strain. I seem to be able to get away with pH 5.2 for the Fullers strain. I'm still working on the Yorkshire strain because I tend to use it with dark ales and that makes things complicated. I don't feel comfortable offering advice on that strain just yet. Same deal for the Ringwood strain, but I've only just started using it again after decades of ignoring it. I just don't have enough data yet.

Regarding hopping UK and US-style hoppy ales, there's a problem that I haven't been able to fully wrap my head around. I hope to do a write about this at some point, but I'm still trying to figure it out. In brief, late hops seem to really elevate the wort's pH, producing something that I've come to call "the ski jump effect." I'm not sure if I've coined that term, or if I've cribbed it off another brewer, but the effect is real and I'm still struggling with it. I'd sure help if I made more than one or two N. American pale ale/IPAs per year! I think "the ski jump effect" will be my next big, formal project. I have a pile of data, I just need to sit down, put it in a spreadsheet, and think about it in a more structured fashion for a while.
I'm sorry if this is a dumb question, but what does having a lower pH at the end of the boil do VS a higher pH at the end of the boil?
 
Thank you for the kind words, Brewer dad!

In terms of hopping, I've used bags and spiders in the past and I've made a (another) retrograde move on that front. I went back to going commando with my pellets several years ago. Frankly, I've never been satisfied with the results I've had from bags or spiders, especially with a whirlpool rig. The hops seem to clump into a solid lump and the wort just flows around that lump. I'd much rather deal with the limitations of going commando with my hops in exchange for what I believe is better utilization and expression of those hops. Reasonable brewers can reasonably disagree on this point. There are compromises to bags, spiders, and going commando. I prefer the compromises associated with going commando. The trick to keeping your hops from clogging your pump and whirlpool rig is to let them dissolve for 5-10mins before you turn on your pump. I know that seems blindingly obvious, but I'm not a smart man and it took me more years than I'd care to admit to figure that out. If you're willing to accept that compromise, there's no problems and no need for a spider or bag.

Also on the hopping front, I'm generally moving away from using late hops in ales and lagers unless the style is defined by late hops. Increasingly, I've found that I really prefer the more "integrated" flavor that you get from a solid charge of 60 and 20/30min hops vs. a beer that is lopsided toward late hops. If you look at the brewing notes attached to the first post, you'll see that I changed up the hopping schedule on this latest batch from the recipe on the design sheet, favoring 60 and 20min hops. I debated changing the recipe before posting it here, but I ultimately decided that I should post the Panther Piss Project Recipe as I was brewing it at the end of the project. I suppose I lied when I said the Panther Piss Project was in hibernation, but I don't think of my change toward 60 and 30min hops as being part of the Project. It's more of a global change in my brewery that I attached to this latest batch of Panther Piss.

I've certainly used this process with other beers styles. In fact, it's pretty much my default process unless there's a style-based reason for me to deviate. Here's a picture of the Helles that I brewed with a portion of the yeast cake that created the picture of Panther Piss that you saw at the top of this article. I think this picture was taken at ~15 days? So it works fine with Helles, although krausening should yield a superior product.
View attachment 873124


As you suggest, I've used this process with success with UK-style ales. I've also used it with N. American hoppy ales. Both of these styles may be the subject of a write up in the years ahead as I learn how to deal with problems unique to these respective styles.

The UK ales are relatively straight forward, but it takes a lot of iteration to get it right. UK yeasts have a tendency to really acidify a wort before they go to work on it, so I've had to learn where the ideal post-boil pH is for each strain. I seem to be able to get away with pH 5.2 for the Fullers strain. I'm still working on the Yorkshire strain because I tend to use it with dark ales and that makes things complicated. I don't feel comfortable offering advice on that strain just yet. Same deal for the Ringwood strain, but I've only just started using it again after decades of ignoring it. I just don't have enough data yet.

Regarding hopping UK and US-style hoppy ales, there's a problem that I haven't been able to fully wrap my head around. I hope to do a write about this at some point, but I'm still trying to figure it out. In brief, late hops seem to really elevate the wort's pH, producing something that I've come to call "the ski jump effect." I'm not sure if I've coined that term, or if I've cribbed it off another brewer, but the effect is real and I'm still struggling with it. I'd sure help if I made more than one or two N. American pale ale/IPAs per year! I think "the ski jump effect" will be my next big, formal project. I have a pile of data, I just need to sit down, put it in a spreadsheet, and think about it in a more structured fashion for a while.

Interesting, it seems we have similar tastes. I have found the same regarding late additions, especially with Saaz and EKG. I also have found I am not a huge fan of carbonic acid.

Differences based upon changes from effects of malt and yeast makes sense. Looking forward to reading your future works!
 
I'm sorry if this is a dumb question, but what does having a lower pH at the end of the boil do VS a higher pH at the end of the boil?
That's hardly a dumb question. It's a very astute question and it cuts to the core of the Panther Piss Project.

I apologize about the delay in my answer, but I haven't had the time to dig through my big pile o' research to put together the answer you deserve. An adequate amout of Ca coupled with the enforced lowering of the beer's pH is the core of the project, so when I answer your question, I want to get it right the first time.

I hope to have something for you by the end of the week.
 
Interesting, it seems we have similar tastes. I have found the same regarding late additions, especially with Saaz and EKG. I also have found I am not a huge fan of carbonic acid.

Differences based upon changes from effects of malt and yeast makes sense. Looking forward to reading your future works!
Carbonic acid, man. It's the unstated assumption of brewing. It's a huge needle mover as far as taste. It should be listed as an ingredient in every recipe.
 
I'm sorry if this is a dumb question, but what does having a lower pH at the end of the boil do VS a higher pH at the end of the boil?

I've gone back through my notes expecting to find the smoking gun that encouraged me to target end of boil pH as a possible solution to my problems, but I've failed to find it. It appears that I made the decision prior to recording proper notes.

I was a very frustrated brewer in the years prior to the Panther Piss Project. Frankly, I was stuck in a decade-long rut in which I was able to make nice tasting beers and ales, but they never cleared fully or quickly and my hops tended to be a bit coarse unless I pushed them toward late additions. I was doing all the things you were supposed to do in terms of mash pH control and water chemistry, but I wasn't getting the results that I wanted. I was frustrated, my beer wasn't what I wanted it to be, I was out of ideas, and looking to try something to break me out of my rut.

As COVID grew ever darker on the horizon it was clear that I was going to have some time to really focus on brewing, so I replaced my old copy of Greg Noonan's Brewing Lager Beer with the updated New Brewing Lager Beer and started looking at the internet for ideas for the first time since the wild old days of HBD convinced me that books were just fine, thanks. Along the way, I stumbled upon Scott Janish's blog and a nice, friendly brewing forum called HomebrewTalk.

In preparation for this post I cracked open New Brewing Lager Beer with the expectation that I'd find the answers to your question. To my surprise, Noonan doesn't have a lot to say about post-boil pH other than a short paragraph that supplies target post-boil pH ranges of pH 5.0-5.5, with pH 5.3-5.5 “still considered normal” for lagers. I certainly remember this HBT post having a big influence on my decision making. I clearly remember reading and re-reading that post with a stack of books on my desk, trying to really understand it. I think Janish's blog also encouraged me to start actively pushing my pH numbers down throughout the brew day. Here's a post from Janish's blog from that time period, but it mostly talks about dry hopping. I can't seem to find the smoking gun that influenced me to specifically target post-boil pH.

As mentioned above, as the Panther Piss Project started I was motivated to make aggressive changes because what I was doing before, while “correct,” wasn't yielding the results I wanted. I had a decade of failure and no progress in my rear view mirror because I trusted the "correct" way to brew. It was time to make a radical change. I ditched the received wisdom that soft water is best for lagers and plugged in a pale ale water profile and I made my first efforts at forcing the pH downward. I was flying blind and got lucky really lucky on that first batch with my pH additions. I also realized that my old Milwaukee pH meter wasn't up to the task. A couple batches later, the Apera pH60 came in and made things much easier.

The results of the first batch were eye opening. The beer cleared quickly, it was crisp, the hops were more vibrant and not the least bit coarse, and the grist was very evident. I finally made a lager that tasted like a proper lager, not a decent enough homebrew lager. It needed some work, but I was clearly seeing improvement for the first time in many long years.

The rest of the project was mostly about learning how to quickly, efficiently, and accurately dose the wort with acid to hit my pH targets while also dialing back the water salt additions to optimize the beer's flavor--that pale ale profile was a bit much. Also, as mentioned above in post #9, the results of the project now have me pushing my hops back toward 60 and 20min additions, often forgoing late hops altogether (unless the style requires them). It makes a huge difference. The enforced lowering of pH clearly made a difference for me, but I cannot honestly explain how I came to that conclusion, or how the brewing science supports my claims.

Ultimately, all this is to say, “I dunno, it worked for me.” That's not a satisfactory answer. I'll continue digging, there's gotta be a smoking gun somewhere, but I'll be damned if I can find it. I'm sorry, I wish I could've given you a better answer.
 
Last edited:
I get it, and I also get the connection with the phenomenon of English ale yeasts lowering pH significantly at the beginning of fermentation.

I have never pitched a lager yeast, and I am a rank amateur compared to many on these forums, but I have produced some amazingly clear, crisp ales in similar short time frames. I've been ridiculed here for "drinking green beer." But I have a decent palette and know what green beer tastes like. When I say "crisp" I mean every component of every flavor in focus at once. And it doesn't take six weeks to get there.

I suspect that turning a beer around fast with a normal English yeast is easy mode, but works the same way as your method: mainly by steadily falling pH. Hard water, a touch of crystal, some simple sugar, restrained hopping, then a big pitch of active hungry top-cropped English yeast. If all the elements are there the pH at flocculation time will be quite low, and that time will only be a week from pitching. If anything is wrong, it might take an extra 2-3 weeks to get across the finish line, if you get there at all. I bet with lager yeast, soft water, and acid additions, a miss will add a month.

Do you find that these beers you make get any better with actual lagering? Or is that what one does when one has dropped a stitch?

How do you think this maps onto pre-industrial lager brewing practices? How did they keep the pH down?
 
I've gone back through my notes expecting to find the smoking gun that encouraged me to target end of boil pH as a possible solution to my problems, but I've failed to find it. It appears that I made the decision prior to recording proper notes.

I was a very frustrated brewer in the years prior to the Panther Piss Project. Frankly, I was stuck in a decade-long rut in which I was able to make nice tasting beers and ales, but they never cleared fully or quickly and my hops tended to be a bit coarse unless I pushed them toward late additions. I was doing all the things you were supposed to do in terms of mash pH control and water chemistry, but I wasn't getting the results that I wanted. I was frustrated, my beer wasn't what I wanted it to be, I was out of ideas, and looking to try something to break me out of my rut.

As COVID grew ever darker on the horizon it was clear that I was going to have some time to really focus on brewing, so I replaced my old copy of Greg Noonan's Brewing Lager Beer with the updated New Brewing Lager Beer and started looking at the internet for ideas for the first time since the wild old days of HBD convinced me that books were just fine, thanks. Along the way, I stumbled upon Scott Janish's blog and a nice, friendly brewing forum called HomebrewTalk.

In preparation for this post I cracked open New Brewing Lager Beer with the expectation that I'd find the answers to your question. To my surprise, Noonan doesn't have a lot to say about post-boil pH other than a short paragraph that supplies target post-boil pH ranges of pH 5.0-5.5, with pH 5.3-5.5 “still considered normal” for lagers. I certainly remember this HBT post having a big influence on my decision making. I clearly remember reading and re-reading that post with a stack of books on my desk, trying to really understand it. I think Janish's blog also encouraged me to start actively pushing my pH numbers down throughout the brew day. Here's a post from Janish's blog from that time period, but it mostly talks about dry hopping. I can't seem to find the smoking gun that influenced me to specifically target post-boil pH.

As mentioned above, as the Panther Piss Project started I was motivated to make aggressive changes because what I was doing before, while “correct,” wasn't yielding the results I wanted. I had a decade of failure and no progress in my rear view mirror because I trusted the "correct" way to brew. It was time to make a radical change. I ditched the received wisdom that soft water is best for lagers and plugged in a pale ale water profile and I made my first efforts at forcing the pH downward. I was flying blind and got lucky really lucky on that first batch with my pH additions. I also realized that my old Milwaukee pH meter wasn't up to the task. A couple batches later, the Apera pH60 came in and made things much easier.

The results of the first batch were eye opening. The beer cleared quickly, it was crisp, the hops were more vibrant and not the least bit coarse, and the grist was very evident. I finally made a lager that tasted like a proper lager, not a decent enough homebrew lager. It needed some work, but I was clearly seeing improvement for the first time in many long years.

The rest of the project was mostly about learning how to quickly, efficiently, and accurately dose the wort with acid to hit my pH targets while also dialing back the water salt additions to optimize the beer's flavor--that pale ale profile was a bit much. Also, as mentioned above in post #9, the results of the project now have me pushing my hops back toward 60 and 20min additions, often forgoing late hops altogether (unless the style requires them). It makes a huge difference. The enforced lowering of pH clearly made a difference for me, but I cannot honestly explain how I came to that conclusion, or how the brewing science supports my claims.

Ultimately, all this is to say, “I dunno, it worked for me.” That's not a satisfactory answer. I'll continue digging, there's gotta be a smoking gun somewhere, but I'll be damned if I can find it. I'm sorry, I wish I could've given you a better answer.
This is very interesting, thanks for sharing your experiences.

It made me think, somewhere in the back of my head was something about sauergut, that it is used during multiple times during the brewing process for traditional German lagers. After some googeling, this was confirmed. And it also explained what you guys have been witnessing, giving some hints why my friend @corncob might enjoy drinking green beer so much.

In the following I am basically repeating in my own words what is written on this German page here: https://gradplato.com/kategorien/know-how/ph-wert-tuning-mit-biologischer-saeuerung

First, there are usually two stages of Sauergut dosing (lacto fermented wort, very acidic).

First dose goes into the mash to modify mash pH. This lowers the activity of unwanted enzymes and does not affect or even enhances the activity of wanted enzymes, like alpha amylase for example. It also leads to a higher amount of zinc in solution, which is very beneficial for the yeast. I have read somewhere else that Sauergut specifically also protects from oxidation, but I cannot find that source any more and cannot really say more about the how and why this should be the case.

The second dosing of Sauergut, to the wort, is the interesting part, at least for me. This is supposed to have multiple benefits that were not on my radar before I read this thread here. The lowered pH results in better flocculation which results in clearer wort and clearer beer, according to the source quoted above. I might be overinterpreting a bit, but my guess is that the stuff that brewtan b is supposed to help to settle out quickly is the stuff that is affected with the acidification of the wort as well. The wort is also less affected by unwanted microorganisms as they have a harder time to thrive under lower pH. According to the source, everything here also affects foam stability and shelve life in a beneficial way.

One thing I have already noted is that usually when my beers have cleared up, a lot of the "greenness" is also gone and the foam stability usually also improved significantly. One might think that this means that a lot of the stuff that causes the green flavour is indeed in the proteins or whatever else is floating around, causing the haze. Getting this to fall out quicker through enhancing particle size by glueing them together and/or by creating circumstances that promote the flocultation of even more of this stuff, might result in better beer quicker. And this is basically what the acidification does, at least according to what I have read.

Only downside is that the lower the pH, the lower the alpha isomerization, so we get less IBUs from the hops. The common solution is to add the Sauergut at the end of the boil. I don't know if this is necessary for us homebrewers as we are not looking to save 10% of hops or something along those lines.

My personal takeaway is that I might be buying a pH meter and see how low I can go with the wort and mash pH and what the effect might be on the time the beer needs to not taste green any more. Maybe I will be enjoying green beer as well?
 
Last edited:
That's a really interesting post, Miraculix. I think that your observation that, "One thing I have already noted is that usually when my beers have cleared up, a lot of the "greenness" is also gone..." really gets at the core of my experience with the Panther Piss Project. Once the beer clears and the yeast gets out of the way the beer immediately snaps into focus. Once it's clear an extra week helps it a bit (mostly because it takes some time for the carbonation to even out) but the vast majority of the improvement seems to happen when the beer drops gin clear. I think anything after that really is diminishing returns. The beers I brew with the Panther Piss Process don't seem to improve with age--even after they've been on the line for a couple of months. They're quite good, if I may say so myself, once they drop clear, so their failure to improve doesn't cause me to worry. Perhaps the style has something to do with that? But I've found the same to be true with the Paulaner Helles clone-ish beer that I've worked up over the past 18 months, and the German pils that I established a few years back with these techniques.

Clarity seems, from what I've learned during the Panther Piss Project, to be a virtue independent of age. I'll concede that that is a bold claim that contravenes much accepted and traditional knowledge about lagers. Nevertheless, I've learned that it's best to follow the data and the data from the Panther Piss supports that claim. Lagering is a traditional technique, but with modern tools and methods,I'm not sure that it's a necessary technique with light-colored lager beers of modest gravity in the 1.045-1.050 range.

I fully agree with your assessment that this process shaves off some IBUs. I've found that I'm hopping more robustly at the 60min and 20min marks and I'm getting enough aroma and flavor that I'm able to forego late hops entirely. The recipe posted above is the recipe that did the heavy lifting for the project and it isn't properly representative of what I'm currently brewing. The current recipe is just 60min and 20min hops and it gets the job done in terms of bitterness, aroma, and flavor. I'll occasionally toss in 1oz of Saaz at KO because I like the flavor of 1oz of Saaz at KO...but that gets me into that damned ski jump thing that I'm still trying to figure out.

Moreover, the Panther Piss process, when applied to Ron Pattinson's recipes, suddenly made them make actual sense--and ales that didn't suck. The positively stupid amounts of 90min, 60min, and 30min hops suggested by Shut Up About.. made zero sense to me until I started actively pushing down my pH. Now that I've done that, those recipes are suddenly not harsh, awful ales that make your tongue feel like a shag carpet. Now, they're quite pleasant and brimming with hop flavor and aroma, if assertively (but not unpleasantly) bitter. I mention this because I know you have an appreciation for UK ales and read Pattinson's work.

I'm not a German speaker, so I'm a bit curious about this sentence that you wrote: "The second dosing of Sauergut, to the wort, is the interesting part, at least for me. This is supposed to have multiple benefits that were not on my radar before I read this thread here." I'm assuming that this is an addition that occurs prior to the boil, or perhaps during the boil? I'd like to learn more about the specifics of this addition, if you have the time. I very nearly went down the Sauergut rabbit hole in year two of the Panther Piss Project, once it was clear that I was winning. Fortunately, I was wise enough to pull myself back from that ledge and appreciate the fact that I was making some decent lager beer for once. Nevertheless, it's something that I intend to tackle once I've completed some other, more pressing, projects in my brewery. I'd like to learn more about when that addition is made, if you'd be so kind.

I appreciate your remarks, you have a unique vantage point on this discussion that I simply cannot provide. I appreciate the fact that you took the time to do that.

Thanks, man!
 
This is very interesting, thanks for sharing your experiences.

It made me think, somewhere in the back of my head was something about sauergut, that it is used during multiple times during the brewing process for traditional German lagers. After some googeling, this was confirmed. And it also explained what you guys have been witnessing, giving some hints why my friend @corncob might enjoy drinking green beer so much.

In the following I am basically repeating in my own words what is written on this German page here: https://gradplato.com/kategorien/know-how/ph-wert-tuning-mit-biologischer-saeuerung

First, there are usually two stages of Sauergut dosing (lacto fermented wort, very acidic).

First dose goes into the mash to modify mash pH. This lowers the activity of unwanted enzymes and does not affect or even enhances the activity of wanted enzymes, like alpha amylase for example. It also leads to a higher amount of zinc in solution, which is very beneficial for the yeast. I have read somewhere else that Sauergut specifically also protects from oxidation, but I cannot find that source any more and cannot really say more about the how and why this should be the case.

The second dosing of Sauergut, to the wort, is the interesting part, at least for me. This is supposed to have multiple benefits that were not on my radar before I read this thread here. The lowered pH results in better flocculation which results in clearer wort and clearer beer, according to the source quoted above. I might be overinterpreting a bit, but my guess is that the stuff that brewtan b is supposed to help to settle out quickly is the stuff that is affected with the acidification of the wort as well. The wort is also less affected by unwanted microorganisms as they have a harder time to thrive under lower pH. According to the source, everything here also affects foam stability and shelve life in a beneficial way.

One thing I have already noted is that usually when my beers have cleared up, a lot of the "greenness" is also gone and the foam stability usually also improved significantly. One might think that this means that a lot of the stuff that causes the green flavour is indeed in the proteins or whatever else is floating around, causing the haze. Getting this to fall out quicker through enhancing particle size by glueing them together and/or by creating circumstances that promote the flocultation of even more of this stuff, might result in better beer quicker. And this is basically what the acidification does, at least according to what I have read.

Only downside is that the lower the pH, the lower the alpha isomerization, so we get less IBUs from the hops. The common solution is to add the Sauergut at the end of the boil. I don't know if this is necessary for us homebrewers as we are not looking to save 10% of hops or something along those lines.

My personal takeaway is that I might be buying a pH meter and see how low I can go with the wort and mash pH and what the effect might be on the time the beer needs to not taste green any more. Maybe I will be enjoying green beer as well?
I agree with everything you said here, except for the green beer part, obviously. My point is that this line of thinking might be a bridge between a brewing tradition that embraced acid additions and long maturation times and one that embraced fast, acid-producing yeast. Our man @Bramling Cross is making German yeast perform on English timetables by careful pH manipulation, and he's turning brews around faster than even this "green beer" enthusiast.
 
I agree with everything you said here, except for the green beer part, obviously. My point is that this line of thinking might be a bridge between a brewing tradition that embraced acid additions and long maturation times and one that embraced fast, acid-producing yeast. Our man @Bramling Cross is making German yeast perform on English timetables by careful pH manipulation, and he's turning brews around faster than even this "green beer" enthusiast.
Corncob sees right through me, at my core I'm a UK-style brewer, and raises a really interesting point!

I was freaked out when I tried the Panther Piss method on my first UK ale because, as you mention, UK strains tend to be stout acid producers. While I had one rather spectacular mishap (while I was still trying to figure out my working acid additions on UK malt and my acidic homemade invert) by and large, UK ale yeast don't seem to add additional acidity on top of what you already provide them. If you give them what they want, they won't add acidity. You can really make your UK stuff fly, using this method.

That said, there's a lot of UK yeast out there. I only know the above to be true with the Fullers, T. Taylor, Thames Valley, and Ringwood strains. I don't use the dried UK strains, so I cannot comment on their performance.
 
I agree with everything you said here, except for the green beer part, obviously. My point is that this line of thinking might be a bridge between a brewing tradition that embraced acid additions and long maturation times and one that embraced fast, acid-producing yeast. Our man @Bramling Cross is making German yeast perform on English timetables by careful pH manipulation, and he's turning brews around faster than even this "green beer" enthusiast.
This is an interesting viewpoint that I didn't think about. I agree with this. This really has a huge potential as this topic has been widely neglected by the home-brewers.

Corncob sees right through me, at my core I'm a UK-style brewer, and raises a really interesting point!

I was freaked out when I tried the Panther Piss method on my first UK ale because, as you mention, UK strains tend to be stout acid producers. While I had one rather spectacular mishap (while I was still trying to figure out my working acid additions on UK malt and my acidic homemade invert) by and large, UK ale yeast don't seem to add additional acidity on top of what you already provide them. If you give them what they want, they won't add acidity. You can really make your UK stuff fly, using this method.

That said, there's a lot of UK yeast out there. I only know the above to be true with the Fullers, T. Taylor, Thames Valley, and Ringwood strains. I don't use the dried UK strains, so I cannot comment on their performance.
I will definitely try this on my bitters. Let's rephrase "acid producing yeast" to "yeast that prefers a lower pH environment".

That's basically what the English strains are doing, manipulating the environment they live in till it suits their needs. If we already lowered the pH, yeastie boys don't have much work left on this!

How low can you go with wort pH? My source quoted above says that the yeast is usually fine with 4.4 pH. Have you tried going lower than 5? When does it start to impact the taste in a negative way? When does the benefit of lowering it further stops?

Many questions left ...


Typical beer pH is quoted as 4 to 4.5 in most of the online sources. So maybe there's some benefit in lowering it to 4.4 ish pre-pitch, during the boil?
 
Last edited:
That's a really interesting post, Miraculix. I think that your observation that, "One thing I have already noted is that usually when my beers have cleared up, a lot of the "greenness" is also gone..." really gets at the core of my experience with the Panther Piss Project. Once the beer clears and the yeast gets out of the way the beer immediately snaps into focus. Once it's clear an extra week helps it a bit (mostly because it takes some time for the carbonation to even out) but the vast majority of the improvement seems to happen when the beer drops gin clear. I think anything after that really is diminishing returns. The beers I brew with the Panther Piss Process don't seem to improve with age--even after they've been on the line for a couple of months. They're quite good, if I may say so myself, once they drop clear, so their failure to improve doesn't cause me to worry. Perhaps the style has something to do with that? But I've found the same to be true with the Paulaner Helles clone-ish beer that I've worked up over the past 18 months, and the German pils that I established a few years back with these techniques.

Clarity seems, from what I've learned during the Panther Piss Project, to be a virtue independent of age. I'll concede that that is a bold claim that contravenes much accepted and traditional knowledge about lagers. Nevertheless, I've learned that it's best to follow the data and the data from the Panther Piss supports that claim. Lagering is a traditional technique, but with modern tools and methods,I'm not sure that it's a necessary technique with light-colored lager beers of modest gravity in the 1.045-1.050 range.

I fully agree with your assessment that this process shaves off some IBUs. I've found that I'm hopping more robustly at the 60min and 20min marks and I'm getting enough aroma and flavor that I'm able to forego late hops entirely. The recipe posted above is the recipe that did the heavy lifting for the project and it isn't properly representative of what I'm currently brewing. The current recipe is just 60min and 20min hops and it gets the job done in terms of bitterness, aroma, and flavor. I'll occasionally toss in 1oz of Saaz at KO because I like the flavor of 1oz of Saaz at KO...but that gets me into that damned ski jump thing that I'm still trying to figure out.

Moreover, the Panther Piss process, when applied to Ron Pattinson's recipes, suddenly made them make actual sense--and ales that didn't suck. The positively stupid amounts of 90min, 60min, and 30min hops suggested by Shut Up About.. made zero sense to me until I started actively pushing down my pH. Now that I've done that, those recipes are suddenly not harsh, awful ales that make your tongue feel like a shag carpet. Now, they're quite pleasant and brimming with hop flavor and aroma, if assertively (but not unpleasantly) bitter. I mention this because I know you have an appreciation for UK ales and read Pattinson's work.

I'm not a German speaker, so I'm a bit curious about this sentence that you wrote: "The second dosing of Sauergut, to the wort, is the interesting part, at least for me. This is supposed to have multiple benefits that were not on my radar before I read this thread here." I'm assuming that this is an addition that occurs prior to the boil, or perhaps during the boil? I'd like to learn more about the specifics of this addition, if you have the time. I very nearly went down the Sauergut rabbit hole in year two of the Panther Piss Project, once it was clear that I was winning. Fortunately, I was wise enough to pull myself back from that ledge and appreciate the fact that I was making some decent lager beer for once. Nevertheless, it's something that I intend to tackle once I've completed some other, more pressing, projects in my brewery. I'd like to learn more about when that addition is made, if you'd be so kind.

I appreciate your remarks, you have a unique vantage point on this discussion that I simply cannot provide. I appreciate the fact that you took the time to do that.

Thanks, man!
I almost overlooked your main answer, thanks for the info. There's a bit more to be said than I could cover on my toilet breaks during work so bear with me, I'll respond tonight or tomorrow evening.
 
That's a really interesting post, Miraculix. I think that your observation that, "One thing I have already noted is that usually when my beers have cleared up, a lot of the "greenness" is also gone..." really gets at the core of my experience with the Panther Piss Project. Once the beer clears and the yeast gets out of the way the beer immediately snaps into focus. Once it's clear an extra week helps it a bit (mostly because it takes some time for the carbonation to even out) but the vast majority of the improvement seems to happen when the beer drops gin clear. I think anything after that really is diminishing returns. The beers I brew with the Panther Piss Process don't seem to improve with age--even after they've been on the line for a couple of months. They're quite good, if I may say so myself, once they drop clear, so their failure to improve doesn't cause me to worry. Perhaps the style has something to do with that? But I've found the same to be true with the Paulaner Helles clone-ish beer that I've worked up over the past 18 months, and the German pils that I established a few years back with these techniques.

Clarity seems, from what I've learned during the Panther Piss Project, to be a virtue independent of age. I'll concede that that is a bold claim that contravenes much accepted and traditional knowledge about lagers. Nevertheless, I've learned that it's best to follow the data and the data from the Panther Piss supports that claim. Lagering is a traditional technique, but with modern tools and methods,I'm not sure that it's a necessary technique with light-colored lager beers of modest gravity in the 1.045-1.050 range.

I fully agree with your assessment that this process shaves off some IBUs. I've found that I'm hopping more robustly at the 60min and 20min marks and I'm getting enough aroma and flavor that I'm able to forego late hops entirely. The recipe posted above is the recipe that did the heavy lifting for the project and it isn't properly representative of what I'm currently brewing. The current recipe is just 60min and 20min hops and it gets the job done in terms of bitterness, aroma, and flavor. I'll occasionally toss in 1oz of Saaz at KO because I like the flavor of 1oz of Saaz at KO...but that gets me into that damned ski jump thing that I'm still trying to figure out.

Moreover, the Panther Piss process, when applied to Ron Pattinson's recipes, suddenly made them make actual sense--and ales that didn't suck. The positively stupid amounts of 90min, 60min, and 30min hops suggested by Shut Up About.. made zero sense to me until I started actively pushing down my pH. Now that I've done that, those recipes are suddenly not harsh, awful ales that make your tongue feel like a shag carpet. Now, they're quite pleasant and brimming with hop flavor and aroma, if assertively (but not unpleasantly) bitter. I mention this because I know you have an appreciation for UK ales and read Pattinson's work.

I'm not a German speaker, so I'm a bit curious about this sentence that you wrote: "The second dosing of Sauergut, to the wort, is the interesting part, at least for me. This is supposed to have multiple benefits that were not on my radar before I read this thread here." I'm assuming that this is an addition that occurs prior to the boil, or perhaps during the boil? I'd like to learn more about the specifics of this addition, if you have the time. I very nearly went down the Sauergut rabbit hole in year two of the Panther Piss Project, once it was clear that I was winning. Fortunately, I was wise enough to pull myself back from that ledge and appreciate the fact that I was making some decent lager beer for once. Nevertheless, it's something that I intend to tackle once I've completed some other, more pressing, projects in my brewery. I'd like to learn more about when that addition is made, if you'd be so kind.

I appreciate your remarks, you have a unique vantage point on this discussion that I simply cannot provide. I appreciate the fact that you took the time to do that.

Thanks, man!
Sorry for the late reply.

The second dose of sauergut goes either in pre-boil or at the end of the boil. It looks like the big guys might delay it to get more ibus out of the hops, which doesn't seem necessary for us homebrewers. We just add a bit more hops.

It sounds to me like the hot break is promoted by the lowered ph, so it would make sense to lower it early enough so that the impact on the hot break is the biggest.

One thing I try to keep in mind is that hot break is not just proteins. The proteins are the glue that binds it together, but there's more trapped inside. Lipids, other fatty acids, some harsh tasting compounds, some which can easily oxidise and lower the shelf live, some which might have the tendency to stay in solution forever within the final beer and probably most of them affect each other in a way that we cannot predict.

So by lowering the pH of the wort pre-boil or during the boil, we might do several things at the same time. Better hot break, bigger flocks. Maybe there is also more of the "bad" stuff trapped inside the hit break this way.

We give the yeast a head start as the environment is acidic, which the yeast likes and competitors don't. The yeast also does not have to spend resources on creating and excreting acid itself to lower the pH of the liquid. Now that I'm thinking about it, the benefit is doubling up, as we can choose the acid type this way. Some acid have a distinctive taste, like lactic acid for example. Too much of this and you will taste it. This won't happen if the yeast doesn't produce it because phosphoric acid already did the job.

I'm probably going down the rabbit whole that proper Sauergut seems to be, but I'm sure that most of the positive effect can be achieved by intelligent dosing of acids, as your have already shown.

One big question for me remains, which is, do these benefits still apply if the hot break makes it's way into the fermenter.

I got a limited boil size and I biab. So I would lose a significant portion of my wort if I would first let the hot break settle down and then try to decant the liquid off the lees. It would mean about 20% loss or more if I really try to keep the hot break in the pot.
 
Last edited:
.....

One big question for me remains, which is, do these benefits still apply if the hot break makes it's way into the fermenter.

I got a limited boil size and I biab. So I would lose a significant portion of my wort if I would first let the hot break settle down and then try to decant the liquid off the lees. It would mean about 20% loss or more if I really try to keep the hot break in the pot.

What a glorious opportunity for a side by side comparison did just appear in my head?

I'll do the decanting thing, filling my main fermenter with relatively clear wort.

I'll dump the whole remainder, including the hot break, into a smaller fermenter and ferment them side by side and compare the resulting beer.
 
Back
Top