• Please visit and share your knowledge at our sister communities:
  • If you have not, please join our official Homebrewing Facebook Group!

    Homebrewing Facebook Group

The full Monti

Homebrew Talk

Help Support Homebrew Talk:

This site may earn a commission from merchant affiliate links, including eBay, Amazon, and others.
GM, how far will your flash boiler be located from the mlt and boil kettle? You are working with 5-6' now. I assume you lose some heat as the steam travels that distance but one could tune the system to take that into account. Could it be further, 10'? Just have me thinking about a remotely located flash boiler outside the brewery.....

Yes, I am currently running 5-6' of steam line now. Though I am pushing a small amount of steam that distance. I would bet I'd be pushing my luck for boiling that far away. Just because of what you said. I would loose a bit to the steam line. Since I am not going full out with treated water to generate the steam with. I am not seeing the full potential of steam right now. I should see more power out of my steam if I was to de-aerate it. Steam can get pretty deep. I'm not doing any of that cause this is a simple home brew rig. I am also doing short run times and not very frequent runs of steam.

I'm setting my FB up just beyond a foot from the kettle and my MLT will be on the other side of the kettle. Though I don't plan on running the steam line all the way to the MLT. I am going to run it to the MLT recirculation line. My steam line for the MLT will do double duty, it will carry strike water, then I will make steam for the mash temps, then the same line will carry my sparge water.

I had several thoughts about placing my boiler remotely. This would solve a lot of problems with venting the propane. Then I thought about the steam vapors from my kettle and the MLT. I have to vent them anyway. I figure a hood over the brewing rig will take care of both needs. Just like a gas range in a kitchen.
 
I hear ya... IMO, nothing will ruin a hobby faster than a budget and a schedule.

With my salery and my other hobby of reef aquariums......this hobby is a bad addition. Though I have been HBing longer then I have had a reef tank. So I can't just drop the brewing.

Very nice welding skills.

Thank you.:mug:

Monti, I'm welding with a Miller Dialarc 250 (stick welder) from the early '80s (I think, I don't even remember), so I'm right there with ya. I actually had to fabricate a few parts for it, since they don't make them anymore.
My skills aren't anywhere close to yours, though. Keep up the good work, I'll be watching this as I'm quite intrigued by the idea of steam setups. :mug:

What parts?

I have had a few issues with mine lately. A little tinkering and I have managed to keep it running. I am still in need of a resistor or two as my starting on the low amperage is getting really bad. If I am not maxed out on the low setting it wont start. I have to floor it and get it going and then I back off on the heat. After it starts it will run nice a steady with the smallest of arcs.

Not to be a cocky pric# but. My welder is the 310. I can get it down cold enough to weld razor blades together. I have to start the arc on the bench and then move onto the razors. These blades measure .010". As you can see I welded the cutting edges together, no filler. Just a fusion. I have to start on the table cause the HF is enough to eat the material away.
P1010140.jpg
 
GM - That's cool and all, but how do you shave with those blades?

Just kiddin... That is really amazing, I love to see stuff like this.
 
I got it welded up. Now I must turn my attention to getting the bottom finished up by placing a drain fitting and welding in the new manifold.

Here is another shot of the concept.
P1010024.jpg

P1010025.jpg


This is how I will weld in the manifold to the bottom.
P1010026.jpg


Here is how the T section finished up.
P1010027.jpg
 
What parts?

I have had a few issues with mine lately. A little tinkering and I have managed to keep it running. I am still in need of a resistor or two as my starting on the low amperage is getting really bad. If I am not maxed out on the low setting it wont start. I have to floor it and get it going and then I back off on the heat. After it starts it will run nice a steady with the smallest of arcs.

Not to be a cocky pric# but. My welder is the 310. I can get it down cold enough to weld razor blades together. I have to start the arc on the bench and then move onto the razors. These blades measure .010". As you can see I welded the cutting edges together, no filler. Just a fusion. I have to start on the table cause the HF is enough to eat the material away.


Just a few interior connectors that had melted due to a fused lead, nothing major.
Yours is also a TIG, while mine's just a plain ol' arc welder :( 
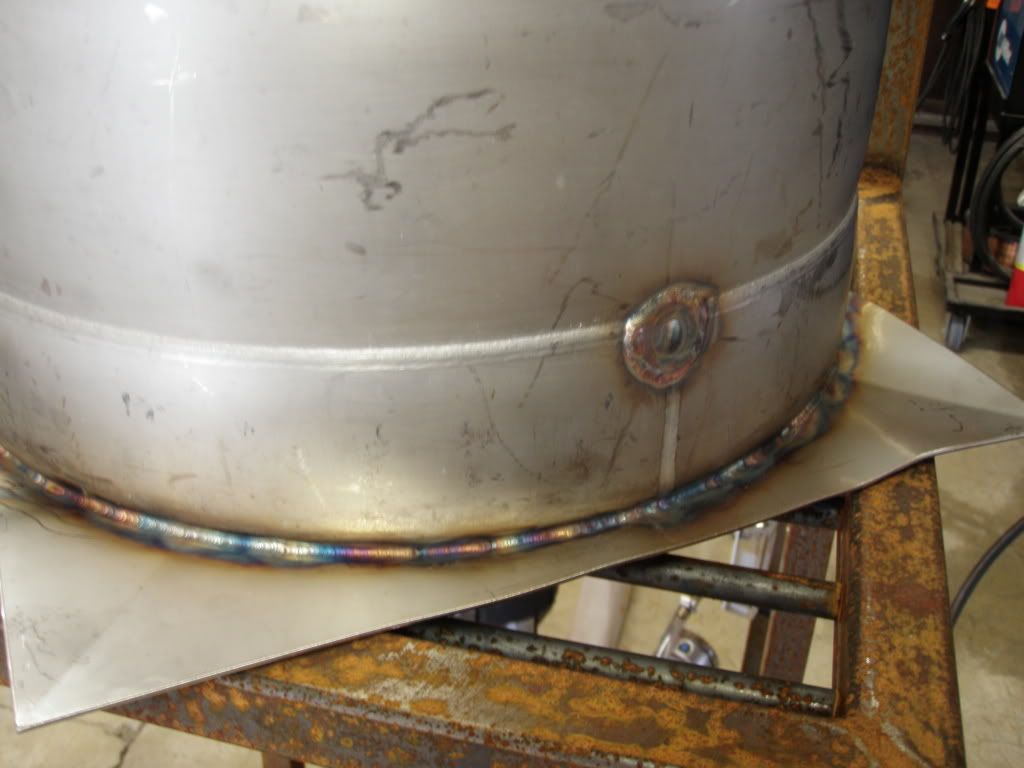
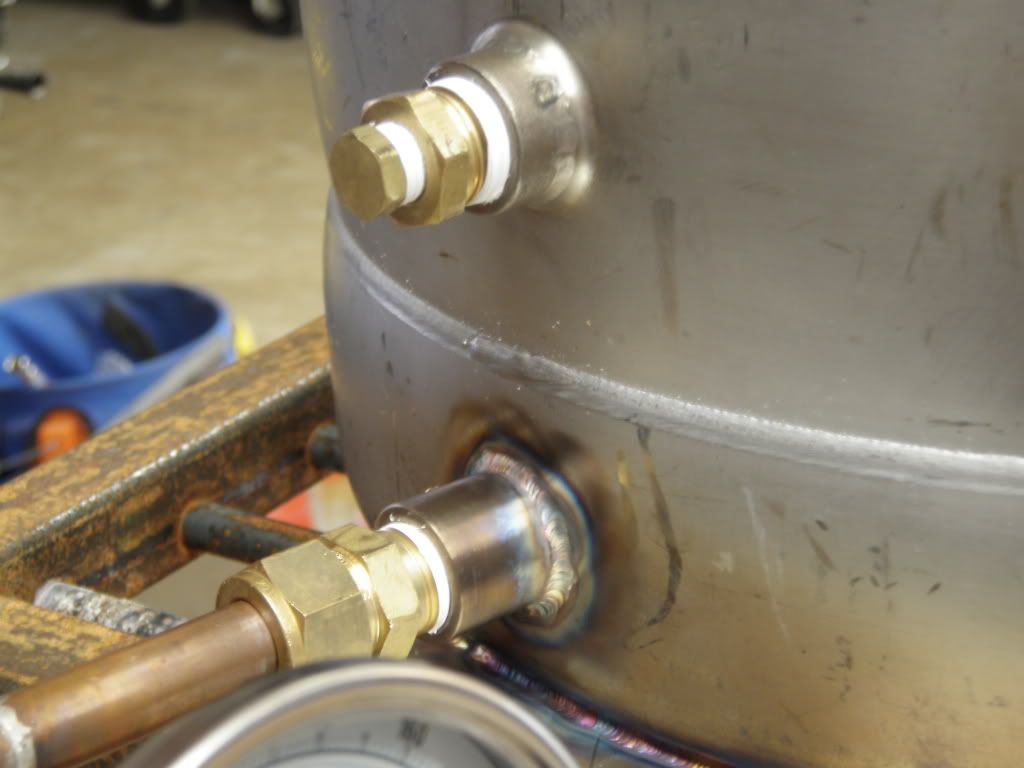
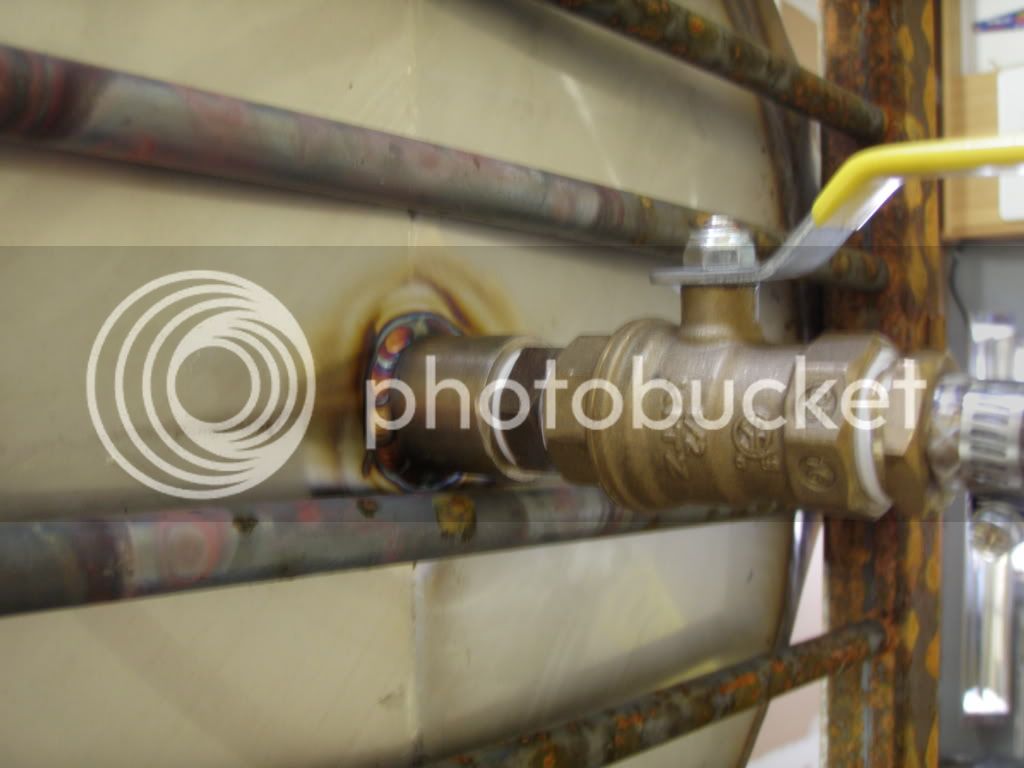
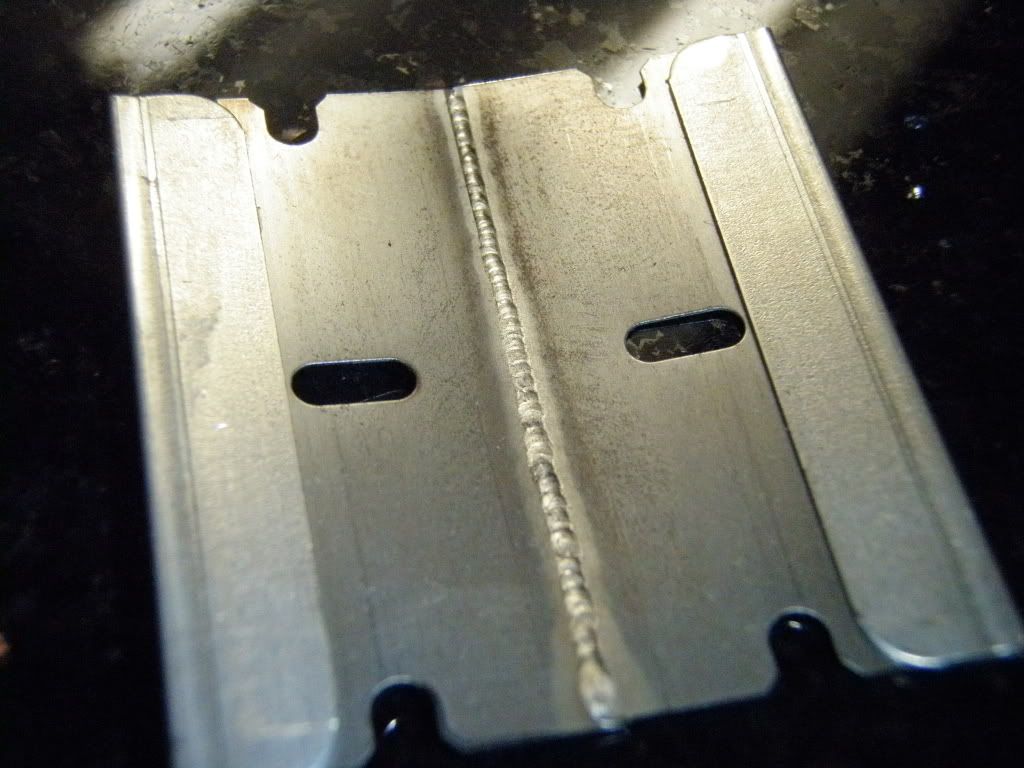
It would probably turn those razors into a puddle (especially considering my welding skills). But it works well enough for my purposes - at least until I have enough money to throw at a MIG or TIG.
 
P1010027.jpg

I love your work:mug:

You should use your vacation time to tour the country and visit all the home brewers in need.
I got some sh*** work done in this town.

Keep up the great work.
ClaudiusB
 
Seems like heating the base of the kettle to 212 degrees will take a LONG time to get 10 gallons boiling. Or am I missing something?
 
I'm kinda confused about that too. Steam jacketed kettles surround the entire kettle with steam for more heat transfer. Is this only going to be at the bottom or up the sides as well?
 
I thought I read early on in this thread that he was using this as a test and later jacket the whole thing. Or maybe I missed something too.
 
Seems like heating the base of the kettle to 212 degrees will take a LONG time to get 10 gallons boiling. Or am I missing something?

I can't boil using 212 degree steam in this manner. There must be some sort of a temp difference. My keggle will be under about 6 PSI so my steam will condense at about 230 degrees. I was able to boil with steam at 0 PSI using direct injection (that one never hit the boards) but I had to superheat the steam to achieve the boil. But for every upside there is a down side. My volume increased during the boil. Not so good for us.

I'm kinda confused about that too. Steam jacketed kettles surround the entire kettle with steam for more heat transfer. Is this only going to be at the bottom or up the sides as well?

Mine, only at the bottom. The amount of liquid that I intend to boil this works just fine. I am and have been very happy doing 5 gallon batches, I do the occasional 10 gallon run. IF I were going to be doing larger batches all the time I would most certainly look very hard at a custom kettle build. Since I am a humble home brewer and the efficiency this will give me. I am just fine with its performance. I will need 1.5 pounds of propane to get to the boil from sparge temps and complete the boil.

I thought I read early on in this thread that he was using this as a test and later jacket the whole thing. Or maybe I missed something too.

If I made it seem that way sorry. This will be my system when I am done. One that I am going to use for a long time.


This is/was my test on this application. I welded on a piece of SS sheet metal to close in the bottom skirt area on another keggle. I placed a steam input and a drain and I fired it up. It worked. So I have decided I want my new brew setup to be done in that manner. Yes, traditionally steam jackets go up the sides as well. I don't have the patience or the cash "RIGHT NOW" to take on a build that involved. So, just the bottom will have to do.

This is the old setup.
P1010001-3.jpg

This is the steam input
P1010002-3.jpg

This is the drain
P1010003-3.jpg
 
P1010027.jpg

I love your work:mug:

You should use your vacation time to tour the country and visit all the home brewers in need.
I got some sh*** work done in this town.

Keep up the great work.
ClaudiusB

Thank you ClaudiusB,

I would do that but............that would be a long tour and I don't have that much vacation time.

Cheers:mug:
 
Very interesting project Monti, did you attempt any other forms of steam heating? Namely coils guess, i worked at a micro brewery for a short time and they had steam coils in their MLT and BK. It would seem that might be a more efficient at transfering heat than even a full steam jacket. I understand at least one advantage to a jacket is cleaning is no more complicated than a regular kettle, while cleaning coils might be annoying.

I wasn't able to find any threads on the subject although i only did a quick search.
 
Yes, traditionally steam jackets go up the sides as well. I don't have the patience or the cash "RIGHT NOW" to take on a build that involved. So, just the bottom will have to do.

Hey if it works that's all that matters.... and from reading your other thread (which I missed up to this point) it sounds pretty good.

You could probably also just run a few stainless tubes around the inside wall of the kettle, connected to the bottom steam reservoir to increase the contact area. Not sure how much that would help though...
 
Very interesting project Monti, did you attempt any other forms of steam heating? Namely coils guess, i worked at a micro brewery for a short time and they had steam coils in their MLT and BK. It would seem that might be a more efficient at transfering heat than even a full steam jacket. I understand at least one advantage to a jacket is cleaning is no more complicated than a regular kettle, while cleaning coils might be annoying.

I wasn't able to find any threads on the subject although i only did a quick search.

Yes, I have. I have done a couple different coils. The links that are posted by bendavanza are good links if my pics hadn't gone south. A lot of info in my FB thread is gone and I believe all my info is gone in the MK-I thread. I had an issue with my photo account and I only kept a few pics on disc. I put back what I had, the others are lost.

My main reason for this method is what you mentioned, cleaning.


Yea, see above post.

Hey if it works that's all that matters.... and from reading your other thread (which I missed up to this point) it sounds pretty good.

You could probably also just run a few stainless tubes around the inside wall of the kettle, connected to the bottom steam reservoir to increase the contact area. Not sure how much that would help though...

I just like the cleanliness of this better. There is nothing wrong with the coils. I am just after a clean interior in my kettle. I am also thinking of doing the drain different then using my puller. (those pics are gone too)
 
Ok, I'll say sorry right up front. I didn't get to take any pics until this point of this build.

This is the beginning of my siphon gauge build. I am using 1/4" OD tubing, 1/2" OD tubing, and 1" OD tubing for this. This is really nothing more then a fancy water trap. The idea is to trap and keep water in this piece so there is a water barrier between the steam and the pressure gauge. This prevents high temp steam from entering the gauge and destroying the insides of it. This piece will go in the T section I just finished. I am going to place it in between the pressure gauge and the steam manifold.


This is built on the same idea of an air lock only the insides don't move.
This is the inside piece. This sets the water level inside and diverts any incoming steam down into the water. So, the flow goes in through the 1/4" tubing, then down the inside of the 1/2" tubing that you see here.
P1010028.jpg


This is the inside piece sitting inside the main body.
P1010030.jpg


This is the same assembly as the above pic, only flipped over. Your looking at the washer from the first pic, that is going to get welded to the main body.
P1010029.jpg


Here is an over view of what it will all look like when done. I am missing a coupling in this pic for the gauge to screw into but, you get the idea. The male threads will screw into my steam manifold.
P1010031.jpg
 
Looks real nice GM, sure beats the pipe pigtails for steam gauge isolation. The pressure cookers get by because the steam is never over 220 degrees, the flash boiler can take it to 500+ degrees if you let it.
 
Loving the steam trap! These are really good ideas. I am looking for a container right this second to jacket my kettle with. I love your steam setup, but I wish you could try a 14 gallon boil so I could see what is possible with your setup. What are your plans after the metalwork? Are you going to insulate the kettle? If you could see it in your heart to try the 14 gallon with insulation, it sure would save me a lot of sleepless nights wondering what I should do. LOL, I am still thinking for me to be happy with all those welds I would have to be jacketed, but for what you are wanting to accomplish... I think you are golden!!! Great work Monti.
 
Looks real nice GM, sure beats the pipe pigtails for steam gauge isolation. The pressure cookers get by because the steam is never over 220 degrees, the flash boiler can take it to 500+ degrees if you let it.

Thank you Kladue, and thank you for bringing this piece to my attention. I never paid much attention in the past when I saw them on other equipment. I just figured my steam gauge would be ok since it was made for steam. As you mentioned though, the FB has the ability to make big time HOT steam.

If you have any other ideas or you see something I am missing please let me know.
Prost:mug:

Loving the steam trap! These are really good ideas. I am looking for a container right this second to jacket my kettle with. I love your steam setup, but I wish you could try a 14 gallon boil so I could see what is possible with your setup. What are your plans after the metalwork? Are you going to insulate the kettle? If you could see it in your heart to try the 14 gallon with insulation, it sure would save me a lot of sleepless nights wondering what I should do. LOL, I am still thinking for me to be happy with all those welds I would have to be jacketed, but for what you are wanting to accomplish... I think you are golden!!! Great work Monti.

Thank You,
I may find the time to setup the test rig again and see how it does with larger amounts of water. I may, I am having a pretty good time building right now.:D Though I am very curious about that myself. What if I want to do a 10 gallon batch, or if I should ever decide to brew 10 gallon batches all the time. I have thought about insulating the kettle bottom area. I kinda want to insulate it up to the first rib in the keg. I am still unsure if I want too yet. I haven't come up with a nice enough idea in my mind that pleases me. I am toying with either a brass or copper sheet that will cover the insulation to break up all the SS. I think SS is nice but, it gets cold feeling real quick IMO. That's part of the reason I'm doing a mild steel stand. It's for the paint.
Cheers friend.:mug:


On another note. I got the siphon gauge completed. I am hoping to get some work done on the bottom. I can't stand looking at that ugly bottom. I hope to get the drain in and a nice finish on it so I can weld in the steam manifold.
P1010033.jpg

P1010032.jpg
 
The only thing left is a way to trap the steam and release the condensate cheaply and automaticaly. In your case maybe a short coil of 1/4" copper tube will work like the capillary tube does in refrigeration, liquid flows better than gas does through tube, and the condensate will hold the steam back. Some research is needed to get the required length worked out, or else start with 10' and reduce length until steam pressure drops to where you want to run at.
 
The only thing left is a way to trap the steam and release the condensate cheaply and automaticaly. In your case maybe a short coil of 1/4" copper tube will work like the capillary tube does in refrigeration, liquid flows better than gas does through tube, and the condensate will hold the steam back. Some research is needed to get the required length worked out, or else start with 10' and reduce length until steam pressure drops to where you want to run at.


What I was hoping to do was. Use a ball or a gate valve at the drain of the kettle. Directly after the valve I will place the heat exchanger/pre-heat coil for the boiler feed water. My thoughts were that the condensate would flash back to steam when it entered the heat exchanger. The valve would be closed to the point that I would get my pressure.

Do you think this is a good idea?
 
That looks awesome. I love following your threads Monti. Quick question: Does that siphon work like an airlock on a fermenter to isolate the gauge from the steam?
 
This is off topic, but can you post a video showing how you clean/brush those fittings so perfectly?
 
That looks awesome. I love following your threads Monti. Quick question: Does that siphon work like an airlock on a fermenter to isolate the gauge from the steam?

Yes, that's almost exactly how it works. I say almost, cause there is no moving parts in this. But, it holds water just like an air lock, and yes. Its purpose is to isolate the gauge from the steam. In order for steam to reach the gauge it will have to go through the water first which will make it condense.

This is off topic, but can you post a video showing how you clean/brush those fittings so perfectly?

The secret is my wood lathe. I chuck up the parts in it so it does the spinning for me. I can't cut any metal on it or machine parts, but I can turn them for the polishing.

Today after I get the drain welded in the bottom. I am going to turn the head stock 180* so that the bottom will clear the bed on my lathe. I am going to turn it with a polishing wheel to get rid of the AB stamping on it and give an even finish. I hope it all works out.

All I can say Monti is that I wish you lived next door to me.:)

Hey, all you gotta do is move.:) Joking. Thank You for the kind words.

Cheers you guys.
 
Whoa Whoa WHoa, your going to chuck the entire keg and turn it on your wood lathe? I have a sizeable wood lathe but I don't know how I would manage that. Did you make a special faceplate to hold it? By the way, you don't have to go to all that trouble on my pieces you're welding.
 
My curbside ShopSmith multi tool find will swing a keg.
A steel plate with 3 rod couplings with allen bolts to lock
below the bottom hand ring of the keg.
At the kegs top a live center on the tailstock mount on the
ShopSmith with a stepped sleeve that fits into the the kegs
filler, this on kegs before the tops were cut open. A steel disk
with six 1/2" nuts welded to center keg tops that have been cut.
This with a 9" buffer and a 1 1/2 HP tread mill motor with its speed
control (a neighbors curbside find) to get the kegs surface speed way
down low to buff. Zero money involved just curbside items. Ths ShopSmith
tailstock also works on the Bridgeport with a rotary table holding kegs horzontal
to mill and maintain a solid and slow rotation.
 
Whoa Whoa WHoa, your going to chuck the entire keg and turn it on your wood lathe? I have a sizeable wood lathe but I don't know how I would manage that. Did you make a special faceplate to hold it? By the way, you don't have to go to all that trouble on my pieces you're welding.


No. I don't have a large enough lathe to swing the entire keg on it. I only have a 14" diameter lathe. So I just miss the ability. Other wise as BrewBeemer mentioned, I would probly come up with some way to mount a full keg on there.:D I just turn small parts on it to get the nice finish. What I turned today was the bottom the will be welded to my kettle. The piece that is pictured with the manifold.


So, after a few hours of work I have the bottom at a place I think I am happy with it. I got the drain welded in and I got a pretty good finish on the outside of it.

I drilled a 7/8" hole in the bottom and I cut a coupling in half. This a shot of the fit. I ran a bead along the joint and polished it off. I had thoughts of doing a fusion weld only, then I thought what the heck. I'll add wire.
P1010034.jpg


Here is how it came out.
P1010035.jpg


I also ran a bead on the outside of the coupling. You can see the stamping of the AB nomenclature from the inside of the skirt.
P1010037.jpg


But on the outside it is.....Anheuser who??:D
P1010036.jpg


So, now I am going to stare at this stuff for a while, while I try and figure out how I want to go about the purge for the manifold welds. Once that's welded in I can fine tune the fit to the bottom of my kettle and get it welded on.

Thanks for looking everyone.
 
ShopSmith will swing 16 1/2" vs a keg's 15.756" OD on the larger size kegs down to 15.517" OD on a Full Sail keg. I also have Jack a Jack Daniels 15.5 keg.
Monti, those tread mill motors are 90 VDC with a LED shutter to maintain constant rpm's no matter the different loading on the tread mill. A solid constant speed motor also great for a grain mill drive. The one I have is rated at 1 1/2 HP, bad part the big plastic eyesore control panel has to tag along.
 
Ok, its been a busy day. I managed to get the manifold welded in on the inside. Looks like its time to fit the bottom. :rockin:

Once I get my kettle done I may just start using it on a wood stand of 2x4's or something.

Some pics for the crowd.
P1010039.jpg

P1010038.jpg
 
Back
Top