• Please visit and share your knowledge at our sister communities:
  • If you have not, please join our official Homebrewing Facebook Group!

    Homebrewing Facebook Group

Stc-1000+

Homebrew Talk

Help Support Homebrew Talk:

This site may earn a commission from merchant affiliate links, including eBay, Amazon, and others.
Hi guys!

I've been gearing up for an attempt to sell a few preflashed units here in sweden. While I won't be selling a finished product like Will, I will offer to include a programmer. So I thought I'd share my take on how to make a dedicated programmer for the stc-1000. Sorry, for the picture heavy post, and for the image quality.

30il30j.jpg

This is the material used. An Arduino pro mini 5V 16Mhz (or rather a cheap chinese knockoff) + CP2102 (RS232 TTL to USB converter) combo, $5 on ebay. 20cm (about 8 inches) female-female 5 pin dupont cable (I buy these in ten packs, don't really know the cost, but they are cheap). I also use some 15mm diameter shrink tubing and some hot glue (not shown in picture) to make a nicer end product, so that is optional.

2dshbpc.jpg

I start by straightening the pinheader on the CP2102. It is a 90 degree bend pinheader and I need it straight(ish).

vi1sb8.jpg

The 3.3V pin needs to go. You could probably just cut it, but I heat up the solder with the soldering iron while at the same time puling it from the other end with some pliers.

s3h7w7.jpg

The pin is out.

29d7q7s.jpg

I just prop on the pro mini, the pins line up correctly and solder it in.

263zs4z.jpg

Cut off the excess pins length.

2hn553l.jpg

Then just cut off one end of the dupont cable. Strip just a little bit of insulation off the end of each cable and pre tin. Solder each cable in the correct position (9, 8, GND, VCC, 3). Best to feed it from below the board, as the reset button (which will still work) is on the other side.

xqjdid.jpg

I cut a few pieces of hot glue and put around and under the wires. Then feed it through and appropriately cut length shrink tubing (usb connector first). 15mm dia shrink tubing is a snug fit, it is absolutely the correct size. When heating the tubing, the glue will melt and make a cheapish stress relief.

200qzrp.jpg

This is the finished product. Just plug into the STC and USB port and flash away :)
Yes, the cable is kind of short and there are no connectors that can be mounted in the enclosure. I have decided to do it this way to keep it simple for me to build and cheap, but still fully working as is. If the user wants to, he/she can by themselves buy the connector of their choice and make adapters.

Hope this will be of interest for someone :)

Cheers!
 

Indeed. I belive it was Kirkegaard that said ”Alles, was dir begegnen wird, ist leider nicht zu vermeiden". Now, I don't interpret that as there is no such thing as free will or that we are dictated by destiny, just that "sh*t happens".
 
I haven't looked at one in some time, but could the relays from the non-compatible ones replace the fried ones? Provided that was all that was damaged obviously.

Maybe, but that's not what I need in my situation. I'm extending the relay function so that I can run the fan in both heat and cool modes. The external relay board will effectively have a fan relay (for heat or cool) and a cool only relay.
 
Some good news to report: I just received 250 pcs of the correct controller version! I'll drop them on my website for sale as soon as I have some time to box/ship them. I'll ask $20/pc for them, which is at a small markup, but seems fair. I'll also offer them flashed for $30 for folks that want to do the build but don't want to mess with the flashing.
 
Some good news to report: I just received 250 pcs of the correct controller version! I'll drop them on my website for sale as soon as I have some time to box/ship them. I'll ask $20/pc for them, which is at a small markup, but seems fair. I'll also offer them flashed for $30 for folks that want to do the build but don't want to mess with the flashing.

Excellent!
Will you be working from the 'sign up' emails, or first come first serve once you open up the buy on the site?
 
That is great news! So it won't be long for the "Black Box" to be complete too?


Nope, should be finishing those up in the next few days, will email the list when I have a firm date for availability!


Sent from my iPhone using Home Brew
 
Excellent!

Will you be working from the 'sign up' emails, or first come first serve once you open up the buy on the site?


First come, first serve. I have plenty now and can get more pretty easily, so should be able to get one for everybody that's looking for one. I'll put them up right now if you guys are ok waiting for a day or two for me to get around to shipping them.


Sent from my iPhone using Home Brew
 
First come, first serve. I have plenty now and can get more pretty easily, so should be able to get one for everybody that's looking for one. I'll put them up right now if you guys are ok waiting for a day or two for me to get around to shipping them.


Sent from my iPhone using Home Brew

I'm ready to click the buy button on the flashed DIY models. I'm in no hurry, but don't want to miss my chance. My 0 for 6 buys is par for my course and I'm ready for the right one!
 
Just put the Flashed and "Flashable" controllers in stock, fire when ready.

I also have the v1.1 (wrong version) controllers posted for $12 (less than I paid for them, sadly) and will ship them for free if you're buying something else. If you've got a keezer project or something and are able to take these off my hands, I'd be forever grateful. :)
 
I need some "explain it like I'm 5" help. I have 2 stc's that are version 1.04 and I'd like to bump them to v1.05. I looked through the manual but it didn't mention best practices for upgrading. What file do I need to download? I'm guessing I take file x, upload it to the arduino, plug in the stc and use the "Send 'g' to upload Fahrenheit version (program memory only)." since i've already initialized the EEPROM data the first time?

Is 1.05 the version I should use?
 
Sounds to me like you got it right. Just dowload latest or go to the releases page and get v.1.05 and use that ino file.
If you want to retain eeeprom data then I think that should be fine. But if you don't care much about your settings, it should always be safest to use 'f'.

On another note, this thread just broke 1000 posts!!! Fitting as it is STC-1000+ ;)
 
I need some "explain it like I'm 5" help. I have 2 stc's that are version 1.04 and I'd like to bump them to v1.05. I looked through the manual but it didn't mention best practices for upgrading. What file do I need to download? I'm guessing I take file x, upload it to the arduino, plug in the stc and use the "Send 'g' to upload Fahrenheit version (program memory only)." since i've already initialized the EEPROM data the first time?

Is 1.05 the version I should use?

To update you can pretty much just follow the same process you did to flash originally. You're right that you can send "g" instead of "f" if you like, but it doesn't hurt to do the full flash all over again, either.

And yeah, 1.05 is the latest "production" version.
 
Some good news to report: I just received 250 pcs of the correct controller version! I'll drop them on my website for sale as soon as I have some time to box/ship them. I'll ask $20/pc for them, which is at a small markup, but seems fair. I'll also offer them flashed for $30 for folks that want to do the build but don't want to mess with the flashing.

I'd say that is more than fair, after all you did all the work securing a reliable supplier (and got burnt trying). I hope you can make up your losses from the v.1.1 ones!
Good job Will!
 
Thanks Mats! I've gotta say, I was pretty relieved when I opened up the box today and had finally gotten the right version!


Sent from my iPhone using Home Brew
 
I'm still confused about which file I need to download. I don't see a picprog.ino file with v1.05 next to it. I only see a stc1000p.h which I don't know how to use.
 
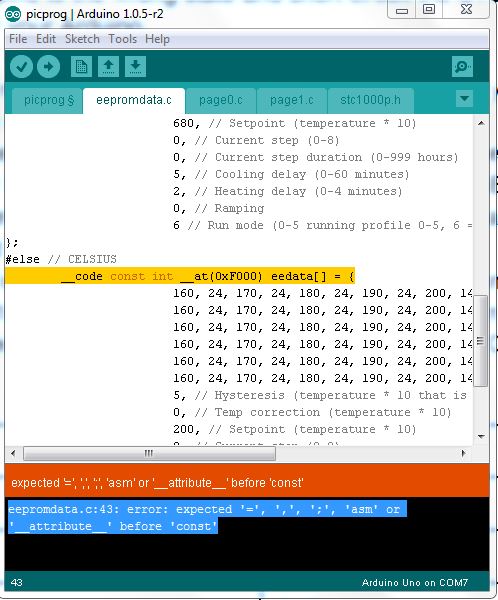
I get the following error when trying to upload the sketch. any ideas what the issue is? I have uncommented the Farenheit constant.

Thanks
Jim

STC-1000.JPG
 
So will either the "Flashed" or "Flashable" versions have the header installed on the pins needed for programming, or is that part still DIY?

Thanks!
 
I'm still confused about which file I need to download. I don't see a picprog.ino file with v1.05 next to it. I only see a stc1000p.h which I don't know how to use.

I get the following error when trying to upload the sketch. any ideas what the issue is? I have uncommented the Farenheit constant.

Thanks
Jim

I think both of you have kind of the same problem. You only need the picprog.ino file. That is what you open in Arduino IDE and upload. Everything else is only needed to make the ino file and is included for completeness.
The files are packaged into versions, so the file will still be picprog.ino, no matter what version it has. You just need to get the correct one. Latest version is 1.05 you can get it by just 'dowload ZIP' from first page or by visiting releases page.
 
So will either the "Flashed" or "Flashable" versions have the header installed on the pins needed for programming, or is that part still DIY?

Thanks!

Neither has a header soldered in, as I use the "solderless" method of flashing. However, if you order one and want a header installed, just shoot me a note and I'll solder one in before I ship to you.
 
Matts, it looks like there isn't a standard pin out on those cp2102 boards. The ones I'm finding have the pins in different orders.

Did you seek one out that lined up with the pro mini or did you just get lucky? Do you remember which eBay vendor you used?

Btw, nice compact, cheap setup. I'm thinking about building one to free my Uno up for another project.
 
I buy them as a combo search for "pro mini 5v 16m cp2102" on ebay.
Note also that rx should connect to tx and tx to rx.
The seller I bought from was alice1101983.
 
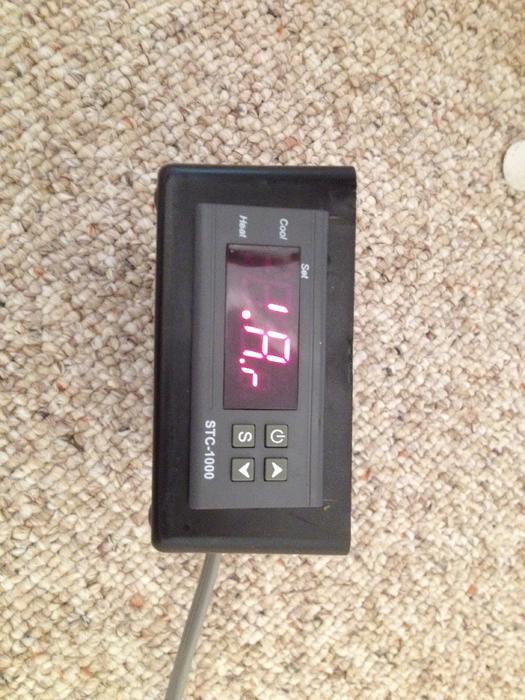
So I updated my 2 controllers to 1.05 last night had had a straight freak-out moment when I saw the screen in picture. To the point I called disney7 and he had to do the "did you turn it on ya'dummeh?" except way nicer, b/c he's awesome. Anyway, all it took was holding the power button until the led's blinked and then holding it again to turn it on and everything was fine. It's hard to tell but yes there is a thermocouple installed. The second unit showed "8.n" instead of "'.A.r" but otherwise behaved the same.

2014-08-06 18.03.21.jpg
 
Thanks Mats, that was the ticket. I deleted the rest of the files from the picprog directory and it verified perfectly.

I appreciate the quick response.

Jim
 
Alpha, thanks for the e-bay pointer on the pro-mini/CP2102 combo. I couldn't help but order a few extras since they are so cheap.

Regarding the last post from StoneBriar, I'm still running 1.04 on my "production" units and haven't had the chance to open the cases up and update them.

On mine, if I soft power-off the unit, unplug them, and then plug them back up to mains, I see some junk like StoneBriar mentioned appear on the display for less than a second before the display goes blank. At that point, soft powering on turns the unit on fine.

Did you change anything that might relate to that between 1.04 and 1.05? Sounds like 1.05 might be leaving the junk on the display until you soft power the unit on. Was that intentional?

Thinking back, I seem to recall you saying that implementing an "off" display for a few seconds after applying mains power would take up too much code space.
 
To the guy who removed the relays. What voltage is controlling the relay ?
I too would need fan control with this solution. Only my fan needs 5-10v.
So ideally, it would be easy to pinout the relay control to drive a computer fan.
 
To the guy who removed the relays. What voltage is controlling the relay ?
I too would need fan control with this solution. Only my fan needs 5-10v.
So ideally, it would be easy to pinout the relay control to drive a computer fan.

I got a reply of "I think they are 12v" but that was all. I've not pulled my 2 fried ones out of the enclosure yet.
 

Latest posts

Back
Top