• Please visit and share your knowledge at our sister communities:
  • If you have not, please join our official Homebrewing Facebook Group!

    Homebrewing Facebook Group

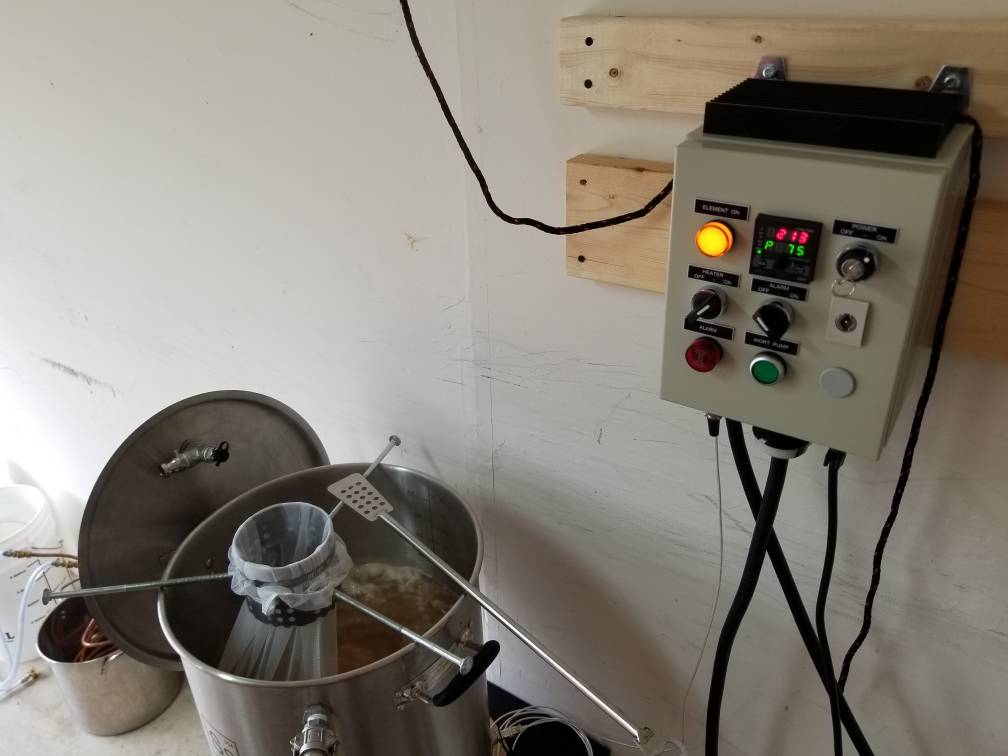
Ss Brewtech 15 gallon Electric Kettle Conversion

Homebrew Talk

Help Support Homebrew Talk:

This site may earn a commission from merchant affiliate links, including eBay, Amazon, and others.
Thank you! Here is a very crude schematic. You just have to manage 3 wires (L1, L2 and GND) since there is no need for N in this setup. No bells and whistles here, just pure function. ...

As an added safety feature, I recommend OP, and anyone copying OP's design in the quoted post, to add a 30A DPST (double pole single throw) switch between the incoming power and the SSR/SSVR and element. This holds whether you are using an SSVR controlled with a potentiometer, or an SSR driven by a PID or EZBoil (I recommend the EZBoil over a PID.) The reason for this is that SSR's and SSVR's tend to fail in the "on" mode, and there is also enough leakage current (even when operating correctly) to give you a shock. You want to have a mechanical switch to protect against these characteristics. A Leviton 3032 (or equivalent) is suitable. They look like ordinary light switches, but are different inside. Below is a schematic for a simple system that uses an EZBoil + SSR.

DSPR120 1 - Element  240V only.PNG

Brew on :mug:
 
If you do have 4 wire service as above, a 120V line with switch could be added to drive a pump right? It was go across the neutral and either line 1 or 2? I plan on making this exact controller once I make the switch from my induction burner.
 
If you do have 4 wire service as above, a 120V line with switch could be added to drive a pump right? It was go across the neutral and either line 1 or 2? I plan on making this exact controller once I make the switch from my induction burner.

Absolutely! Here's the version of the design that has a pump outlet.

DSPR120 1-Pump Simple.jpg

Brew on :mug:
 
. I also choose twist lock connectors instead of outlets to save on cost.

Can you tell me what kind of connector you used to protect the connections on the heater element? Is it a water tight connection to protect from splashes?
 
My parts list is a lot more than $260 for the Kettle...
$200 for the Kettle (eBay)
$41 for the element
$26 for the element enclosure
$28 for the bag
$35 for the false bottom
$31 for the spin cycle (whirlpool)
$15 for the cable (used)

So expecting $260 for a pre-built unit is underestimating the cost. And this does not include the fittings, plumbing, pump and hardware.

Don't ever let my wife see this post...
Some people look harder for the better deals and or use different (more economical) components that function the same so everyones prices will vary but you can easily hit that goal I think..

My 16 gallon e kettle...

$127 shipped from amazon for the bayou stainless 1062 kettle with spigot.. (scratch and dent which had neither ordered 2 kettles this way)

$16 (+15 shipping =$31) tc based with 30p twist lock plug built in 5500w heating element.. (ordered 2 directly from manufacturer found on alibaba)

$35 false bayou bottom new from ebay.

$25 bag (which I got from the popular bag vendor here custom made but never used)

$12 cable+ $8 for the outlet to plug the element in and $9 for 30 amp aviation connection for the other end at my control panel.

about $23 for the weldless TC fitting from brewhardware to mount the element.

$18 shipped for the 24v dc food grade high temp 3 gallon per minute pump...

I could go on but this additional stuff is not needed nor is it included in the cost of an electric kettle really...
 
A high quality PT-100 RTD probe is a sound investment. I've had to bin a cheap ebay probe due to it being so far off I had no confidence in it even after calibration. A good quality RTD will be constructed from a material with excellent linearity and have low drift over the temperature range you care about. They do still need calibrating though. As a bare minimum you should verify it reads 0.0C in an ice water bath.
How odd... I havent exactly shared your experience but I did get burned on one crap probe.
I have bought about 12 different cheap rtds off ebay and only had one issue with a crap non stainless one I bought for $6 on amazon (I have bought similar stainless metric m8 based ones that measured perfectly but replaced due to not caring for the permanently attached stainless cable which I dont care for.... In fact the same cheap generic chinese rtds auber sells as their own are up on ebay for $12 the only difference being the plug at the probe end of the rtd is a 4 pin with only 3 being used vs auber having a 3pin version of the same connector.

Auber doesnt make rtds... they buy them from china in bulk and resell at a large markup..
Their supplier actually uses their photos on alibaba and sells them in 304 or 316 stainless for about 1/3 the cost... brau supply used to use the same supplier (not sure if they still do).

this pt100 sensor is from the same manufacturer and uses the same type of connector only 4 pin
http://www.ebay.com/itm/RTD-Pt100-T...560657&hash=item1eb2a071b4:g:lL0AAOSwqBJXXWGy

as this one,
http://www.auberins.com/index.php?main_page=product_info&cPath=20_15&products_id=261

The main difference here is one costs over 4 times more with the stainless cable "upgrade" + shipping than the other...

in fact I know of 2 people here that went the other direction and after having shorts develop in the wiring of their auber sourced probes replaced them with these and had no problems so YMMV I guess..

BTW I use these in my boil and HLT and have for over 3 years now..
http://www.ebay.com/itm/RTD-PT100-T...946264?hash=item280fedfa98:g:1SAAAOSw-zxWm6lk

I find the teflon shielded cable is better and less likely to kink than the stainless stuff which I have as well on other probes.


EDIT speak of the devil, heres another example from today
https://www.homebrewtalk.com/showthread.php?t=634235
 
Nice work. I've been toying with converting my gas fired system. I'm curious as to the watt density of your heating element? I would imagine sourcing the wort would be fairly easy with 5500w. Any issues?

Cheers
 
Nice work. I've been toying with converting my gas fired system. I'm curious as to the watt density of your heating element? I would imagine sourcing the wort would be fairly easy with 5500w. Any issues?

Cheers
scorching the wort is very unlikely (and actually difficult to do with the ULWD ripple elements)... Its more common with the higher watt density straight elements.
 
BTW I use these in my boil and HLT and have for over 3 years now..
http://www.ebay.com/itm/RTD-PT100-T...946264?hash=item280fedfa98:g:1SAAAOSw-zxWm6lk

I find the teflon shielded cable is better and less likely to kink than the stainless stuff which I have as well on other probes.

Good to know. I was looking at those as well for the short probe, but for some reason the images put me off - gray appearance of the SS. I did order for an Inkbird IPB-16 one of the $12 units with the metal cable sleeve you also recommend. Should be on my doorstep tonight and hope to solder up to a plug this weekend, then test.
 
Can you tell me what kind of connector you used to protect the connections on the heater element? Is it a water tight connection to protect from splashes?


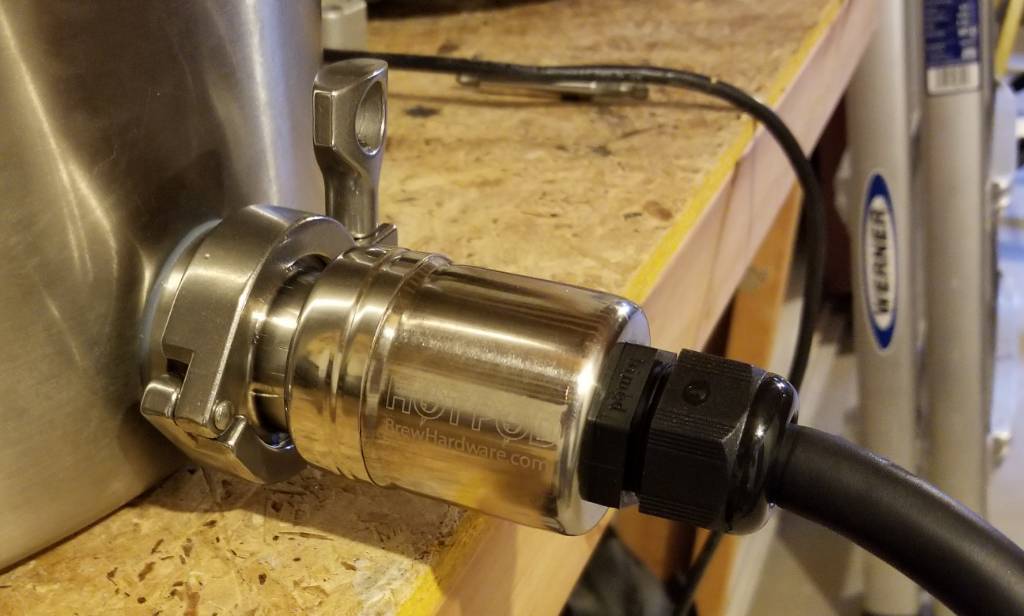
I am just using standard twist lock connectors. I just keep them out of way from splashes. At the kettle I have a hot pod from Brew Hardware.
 
Can you tell me what kind of connector you used to protect the connections on the heater element? Is it a water tight connection to protect from splashes?
For elements with integral L6-30 plugs, an o-ring between the element plug and the cord receptacle is effective at keeping liquid out of the connection.

Brew on :mug:
 
So another update.

15 months ago I began the journey into electric brewing. Starting with a brew kettle with and element, then moving to the eBIAB system. I am now ready to commit more money to my controller after learning what I need. I ended up going with this kit from Auber, found here. I feel this was a great deal. I did a little modification with only 1 pump and capped off the water pump switch and outlet. Another big effort on my part was running a new 10/3 (copper) line versus my old 8/2 aluminum cable. I needed a neutral wire for my pump control and main contactor. So far I did a simple wet test to confirm the controller works without issues. I am so excited for my next brew day, however, I have to wait until after the weekend of April 15th, since I will be in Paris. So expect another update when i document my brew day with this controller.
 

Attachments

  • 20180316_172300.jpg
    20180316_172300.jpg
    1.4 MB
  • 20180316_172316.jpg
    20180316_172316.jpg
    1.7 MB
  • 20180316_181438.jpg
    20180316_181438.jpg
    1.6 MB
  • 20180316_181451.jpg
    20180316_181451.jpg
    1.6 MB
  • 20180316_181456.jpg
    20180316_181456.jpg
    2 MB
  • 20180317_060208 (1).jpg
    20180317_060208 (1).jpg
    2.1 MB
  • 20180318_182229.jpg
    20180318_182229.jpg
    1.5 MB
  • 20180320_053040.jpg
    20180320_053040.jpg
    1.3 MB
  • 20180319_203801.png
    20180319_203801.png
    1.4 MB
Thank you for documenting your progress, and I look forward to more updates!

Just curious. If you had it to do over again and were starting from scratch here in mid-2018 (as I am!) just wondering you'd still go the DIY route, or consider a kit from High Gravity (which offers a 15 gal SS kettle, a Blichman BoilCoil and the Wort-hog EBC-130), or perhaps wait for the SS full electric system coming out in a few months?
 
I really enjoy the DIY aspect of home brewing. So I would do it again. I would have done a couple things different or remove steps from here. One being, start with an ezboil out of the gate (still make the cheap controller first). And use a TC fitting for my element.

I see nothing wrong with the prebuilt kits, one has to determine their preference and comfort.

Good luck!
 
Finally was able to do my inaugural brew day on my new controller. I had some left over 1318 from a NEIPA and decided to try my own take on Dawson's Boat Bitter from Chop & Brew. Ended with 6 gallons in the fermenter, hitting my OG dead on.
Screenshot_20180527-083919.jpeg
20180527_073316.jpeg
20180527_070009.jpeg
20180527_081826.jpeg
 
Active fermentation kicked off about 8 hours after pitching the yeast. Added a blow off tube just in case.

Schedule for fermentation:
First day at 65F
Then slowly rise to 70F over the next 7 days.
20180528_082600.jpeg
 
Active fermentation kicked off about 8 hours after pitching the yeast. Added a blow off tube just in case.

Schedule for fermentation:
First day at 65F
Then slowly rise to 70F over the next 7 days.View attachment 572439

I really appreciate everything you have documented on this thread. I have been struggling to get out of my 10 gallon setup for some time due to being restricted by my apartment. I finally found a good deal on a 15 gallon spike locally and will probably go your route with the auber controller and having someone weld a ferrule into the kettle.

On a side note, what kind of fermentation fridge is that?
I'm not sure what type of software and hardware tofuguy is using to control the temps but thats a haier beverage cooler... We have the same one behind the bar at our brewpub.. I think home depot carries them.
 
I'm not sure what type of software and hardware tofuguy is using to control the temps but thats a haier beverage cooler... We have the same one behind the bar at our brewpub.. I think home depot carries them.
Correct, it's a Haier beverage cooler. I am using an Arduino Brewpi setup to control the wort/beer temperature. It's been running strong for nearly 3 years without issues.
 
So another update.

15 months ago I began the journey into electric brewing. Starting with a brew kettle with and element, then moving to the eBIAB system. I am now ready to commit more money to my controller after learning what I need. I ended up going with this kit from Auber, found here. I feel this was a great deal. I did a little modification with only 1 pump and capped off the water pump switch and outlet. Another big effort on my part was running a new 10/3 (copper) line versus my old 8/2 aluminum cable. I needed a neutral wire for my pump control and main contactor. So far I did a simple wet test to confirm the controller works without issues. I am so excited for my next brew day, however, I have to wait until after the weekend of April 15th, since I will be in Paris. So expect another update when i document my brew day with this controller.

Did you buy the kit with the output connector option and what size temp probe did you go with to fit in the T you have on top of the kettle?
 
Did you buy the kit with the output connector option and what size temp probe did you go with to fit in the T you have on top of the kettle?
I already had extra plugs (connectors) so no.

For the the probe I bought the PT100-L601/2NPT from before and used that. I had to screw it into the top of the tee for this to work.
 
Quick update: I recently upgraded my weldless element to be removable via enlarging my kettle's hole from 1-1/4" to 1-5/8" to fit a weldless tri-clamp bulkhead.

Details on making this transition can be found here:
https://www.homebrewtalk.com/forum/index.php?threads/656233/

This was one of my regrets after I built my kettle. I quickly realized it was not easy to clean my element between brew days thoroughly. This will be worth it.

I bought this bulkhead off AliExpress for ~$12 including shipping. It can be found here: https://s.click.aliexpress.com/e/81NEhr2
20180930_203547.jpeg
 
Very nice! I have tri clamp elements on my rig and I love being able to remove the element from the boil kettle to bring it to the sink! Cleaning the elements is so much easier when you can remove them.

John
 
@Totally I have the same kettle as you and i installed the SS Brewtech whirlpool fitting and bulkhead in the top port of the two in the bottom of the kettle (where your thermowell/probe is located). Does that thermowell/probe interfere with your biab bag at all?
 
Back
Top