SQ1 - 110v 6 Gallon Electric Brewery Build

Homebrew Talk - Beer, Wine, Mead, & Cider Brewing Discussion Forum

Help Support Homebrew Talk - Beer, Wine, Mead, & Cider Brewing Discussion Forum:

This site may earn a commission from merchant affiliate links, including eBay, Amazon, and others.

Mirilis

Lvl 10 Beer Nerd
HBT Supporter
Joined
Feb 15, 2008
Messages
1,876
Reaction score
164
Location
Chicagoland
I thought I would share my concept for the 2nd Gen of my Square1 brewery. I literally just built the first one and brewed on it 1 time before I decided I didnt like the panel and I want to add a few things. At my new job I have access to a laser cutter and a 3D printer so I am going to be using them for this build.

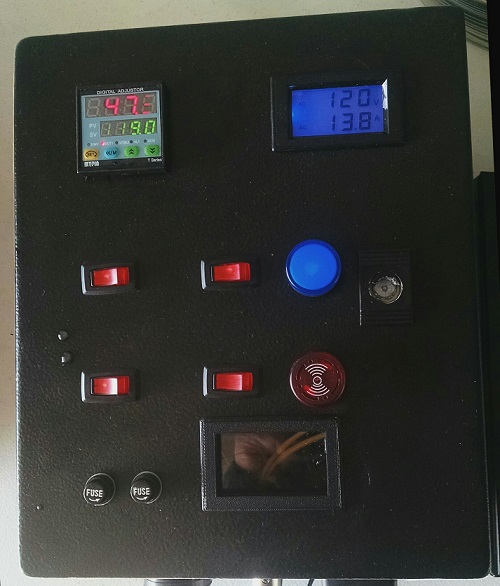
My R1 panel is my avatar. Anyway Below is an image of my R2 panel design. It will have a 3D printed body and 2 stainless laser cut face / back plates.

As I build it I will post it through here if anyone is interested in its progress.

All the power switches are 15a red LED toggle switches (hense the square hole)

sq1-3d-64527.png
 
Do you have a view of the back side? I'd run your probe wire out the back so that you don't have cords draping across the front that could inhibit operation.
 
well the PID is on the face plate and so the wires will go from the PID to the Probe mount.. that way they dont string to the back. I will be able to remove the face and the back independently.

Inside the extruded tube will just be busses for power.

In the back is just 2 rectangular holes for outlets. 1 will be GFCI for the element. The other will be for the pump

The Heatsink will also mount on the inside of the back plate (DIN rail style), and the SSR will mount to that.

Im at home now but will take an image of the back tomorrow and stick it up here.
 
Aren't you going to have wires stringing to the back anyway? The PID will also have to connect to the SSR which is mounted on the back, so you're going to have wires going to the back anyway. Also, if you are utilizing a DIN style mounting system for the SSR/Heatsink, you might consider using a DIN mounted breaker instead of the fuses as that would allow you to reduce the amount of wire running from the front to the back and not potentially burn through consumable fuses. You could potentially even get a GFCI breaker so that all of your system is protected by GFCI as opposed to only your element or whatever is plugged into the GFCI outlet.
 
In the back is just 2 rectangular holes for outlets. 1 will be GFCI for the element. The other will be for the pump

You'd want the whole thing protected by GFCI, not just the element, correct? I would think water could inadvertently get splashed on your box or pump and find its way to where it's not supposed to be.

Anyway, your model for your enclosure looks pretty sweet.

Is this for HERMS, RIMS, BIAB? Do you have a wiring diagram worked out yet?
 
I'm confused by this also... the idea is to not have to pull the covers off once its built? And you just leave some slack in the wire inside so its not an issue if you do..thats what I did. Plus you still have wires going from the front to the other plugs on the rear or wherever they are going to be right?

You can mount the plugs for sensors and elements anywhere you want. the cabling is easily routed inside the panel and the length wont effect its purpose..
The front is less than ideal in my opinion unless you dont have quick disconnects at the pot and you like to drag the wiring around with the pot and have it catch around things like doorknobs and create damaged probe wiring (Ask me how I know this :)) I upgraded my probes for that reason to the $18 ones on ebay with included quick disconnects...
My panel hangs on the wall so I have all my wiring plugging in from the bottom and find it best for that type of setup.

I also would also think twice about a pid power switch... Why is it needed or wanted? as long as the panel has power I would think you would want the pid to display temps even when the element switch is off.... this also prevents you from mistakely forgetting to turn off the main power switch on the control panel. (which is more important IMHO whether you use a breaker or a switch)
I also agree th`at the whole thing should have gfci protection... with wet/damp hands in a possibly damp enviroment from any steam the hood doesnt catch and electronics its just a good idea IMHO this will also protect your pumps if something gets wet.
 
Would a timer be useful for you on there?

Also, kind of along the lines of what augiedoggy was saying about a PID power switch and safety, why a power switch on the alarm?
 
20a 120v switches are cheap and easy to source... if you just planned on using the ssr to cut power you will still have voltage leaking from the nuetral side to the element even when the ssr has killed the heat to the element... not really the ideal or safe method..I suggest a $10 contractor or relay to resolve this or in the least a main dual pole power switch. unless you can remember to unplug the main power before touching the element cords every time.
 
I have a couple contactors.. i could use one to cut power to my element no problem. Also I agree with the probe being in back. I ll just move the hole back there.

The face and rear panel will have some extra wiring length so that I can remove either panel if i needed to get in there and mess with it. I have a couple of the shock buster GFCI plugs that the panel will be plugged into, so technically the element one isnt even needed. I just wanted it.

I thought about a timer but since I brew with BrewersFriend i have been using the brew sessions timer function and its been working for me.

With the PID power switch i just put it there because I wanted it and I had one on hand. I dont like things comign on the instant i plug them in but theres nothing wrong with leaving it out either. If i try to reduce my form factor then I will probably go with that.

I really juse chose that style of enclosure because it was something a little different. I have an 8x10x12 NEMA12 i suppose i could use. If you guys think it would be better.
 
Ohh i forgot about the alarm power. Ive never used the alarm feature of my PID before, but I imagine that when the alarm is sounding i have to go through the menu and shut it off or something. Meanwile its still buzzing in my face.

What I would like to do is set it, then walk away while my strike water heats up. After that I will just hang out and have a beer.. when the buzzer goes off ill flip the switch and shut it up. Then ill go through the menu later if i want to and reset it.
you dont have to rest it... once you flip the switch to turn it off its off... the pid will turn off the "alarm" led once its out of the range of the alarm and basically reset itself....and come on again if the alarm criteria are met again and the manual external alarm switch is turned back on.

nothing wrong with being different I was just trying to offer my advice... you may have good reason to do something a different way that I may just not be aware of...
using a contractor and a switch as a "main" power switch would turn the pid on and off just the same and accomplish more safety wise would it not?
 
I am thinking of using the Element Power switch to turn the 110 coil on the contactor that will feed the element.

That way when I chill i can just shut element power off and still read my temps
 
Well I just decided to switch it to my NEMA12 box. It is 8x10x12.. seems big for what I want it to do so maybe ill add a few things.

Does anyone have a cheap timer that works halfway decent. Maybe I can link my Timer to the alarm as well and set notifications that way. Though I probably wouldnt use them.

I used a sestos timer... there are dual stage ones for $25 on amazon and 4 stage ones for hop additions for about $32....
 
Well I just decided to switch it to my NEMA12 box. It is 8x10x12.. seems big for what I want it to do so maybe ill add a few things.

Does anyone have a cheap timer that works halfway decent. Maybe I can link my Timer to the alarm as well and set notifications that way. Though I probably wouldnt use them.

I just looked up the one used for theelectricbrewery, I didn't realize those things were so pricey! A search on amazon for "panel mount programmable timer" brings up some stuff you might be able to rig or hack to suite your needs.

Hopefully someone here will point you in a better direction. [edit] ^ heh, augiedoggy already pointed you in a better direction.

You could easily make your own with a micro-controller if you were into that sort of thing. (this is what I'll be doing)
 
Ill be honest i probably wont even want to program it.. its just as easy to use my laptop software when i brew. I mean all i want to do is control the mash and then the panel wont be used for anything other than turning the element to 100% manual mode, and shutting the pump off.
 
Ok, I somewhat went back to the drawing board and re-layed out the things that I wanted onto my 10x12x8 NEMA box. I should be cutting it this week, and hopefully painting it after the first of the year. I will throw a few pics up after its cut.

There is still a small debate of just cutting the bulk of the face off the box and laser cutting a stainless plate to mount inside the lid. Thats why its taking so long.
 
The second switch/element.. I don't even use it.. Plus I wanted an alarm in hindsight... That's really it. I want it to look a little more professional and less like I cobbled it together (which I did)
 
I want it to look a little more professional and less like I cobbled it together (which I did)

I personally think the homebrew look is fitting for homebrew equipment.

(Not to detract from your new build at all, just speaking in generalities)
 
Well I had some spare time today so I got the bottom cut out done for my panel. I have 2 outlet holes (1 for pump and 1 for element). I put the power in port (gland), and i got the hole for the mini XLR connector i want to use for my probe.

I am going to get the face cut Friday probably.
sq1r2-case-bottom-64577.jpg
 
Just finished dry fitting the components on the bottom of my box. I also did the rough cut of the face. I need to do a little grinding to get the sizes perfect and then I will be able to dry fit it and get it painted.

img_20141226_133142-64583.jpg


img_20141226_133233-64582.jpg
 
I have 2x 1650W elements. My first brew I had to heat 8 gallons (BIAB) from 59 to 155. It took roughly 40 minutes. When I pulled out the bag I had roughly 7 gallons and I went from 155 to boil in a roughly 20 minutes.. I didnt time the boil part but i know it was boiling before I got my hops out and ready.
 
Finally got to do a little work on it today.. its been a while. I got the inside components set and ran the main power wire.
img_20150108_152447-64687.jpg

Hopefully I can find time to wire the rest of it then I can get to Acid Etching my Kettle.
 

Latest posts

Back
Top