Spike Solo Owner's Thread

Homebrew Talk - Beer, Wine, Mead, & Cider Brewing Discussion Forum

Help Support Homebrew Talk - Beer, Wine, Mead, & Cider Brewing Discussion Forum:

This site may earn a commission from merchant affiliate links, including eBay, Amazon, and others.
Brewed up a NEIPA this past weekend and hit 69% mash efficiency.
- 84% 2 row, 16% flaked oats
- Single crush at .045"
- No bag
- pH 5.25
- Tee off the pump to allow whirlpool and recirculation during mash
- 90 minute mash @150F with 10 minute mashout @170F

I was considering using a bag inside the basket for this batch but decided to try coarsening up my crush instead. I'll probably continue doing things this way but will need to figure out what to do about smaller grain kernels since .045" might not crush them.
What rate do you recirculate at?
Do you recirc just using the tube spike provides?
 
What rate do you recirculate at?
Do you recirc just using the tube spike provides?

Not sure of the rate TBH. This was also a test of sorts.

At first I used a loc-line tube in the mash basket to direct the wort return under the liquid level but decided to switch it up mid-mash. I then added loc-line ring with nozzles and tried positioning nozzles down towards the mash vs. up towards the lid. Towards the end of the mash I put things back to just the loc-line tube, got a nice flow going that had the wort above the grainbed spinning slightly which is what I will strive for in the future.
I plan to use a blichmann autosparge so that IF I walk away and it gets stuck I don't have a mess on the floor.
I do plan to test with water different flow rates and find a way to measure/mark them on a ball valve. I intend to start with the often suggested here on HBT 75% back to whirlpool and 25% to recirculation with the riptide wide open.
My Solo arrived, I sent the dinged kettle back today and a new kettle has already shipped. I have a couple more parts coming to make it all work and I cannot wait to autotune and test.
 
I plan to use a blichmann autosparge so that IF I walk away and it gets stuck I don't have a mess on the floor.
I do plan to test with water different flow rates and find a way to measure/mark them on a ball valve. I intend to start with the often suggested in here 75% back to whirlpool and 25% to recirculation with the riptide wide open.
My Solo arrived, I sent the dinged kettle back today and a new kettle has already shipped. I have a couple more parts coming to make it all work and I cannot wait to autotune and test.

I was going to use my autosparge but it wasn't fitting all that well in my triclamp basket with the BLQD to NPT adapter I grabbed from Bobby. Good luck on your first brew! Man I can't believe they are still shipping these things without the kettle ports being protected. Mine arrived with one of the ports smooshed in a little but I decided to live with it.
 
I was going to use my autosparge but it wasn't fitting all that well in my triclamp basket with the BLQD to NPT adapter I grabbed from Bobby. Good luck on your first brew! Man I can't believe they are still shipping these things without the kettle ports being protected. Mine arrived with one of the ports smooshed in a little but I decided to live with it.
Do you have pics of the parts you were gonna use for the auto sparge?
From what I've measured my setup should fit, but now you have me second guessing myself.
You have 20 or 15 gallon solo?
 
Do you have pics of the parts you were gonna use for the auto sparge?
From what I've measured my setup should fit, but now you have me second guessing myself.
You have 20 or 15 gallon solo?

I actually have a 10 gallon solo :)

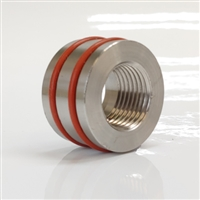
This is the part I'm using on the basket:
https://www.brewhardware.com/product_p/tc15xblqdxfpt.htm
The problem I noticed is when I had the autosparge threaded onto that adapter, the barbed output of the autosparge was awfully close to the basket wall. Sorry I don't have photos of the autosparge on the basket.
 
This would be better then..
1615321214158.png
 
I actually have a 10 gallon solo :)

This is the part I'm using on the basket:
https://www.brewhardware.com/product_p/tc15xblqdxfpt.htm
The problem I noticed is when I had the autosparge threaded onto that adapter, the barbed output of the autosparge was awfully close to the basket wall. Sorry I don't have photos of the autosparge on the basket.
lol, I have the opposite from norcal brewing. (QD outside basket and threaded male npt inside. I had an extra female npt/male BLQD laying around)
I bought a female npt/female BLQD to thread onto the autosparge.
Someday I'll be npt free, but this is all fine for now and into the foreseeable future.
I wish there was a tc male BLQD on both sides.
 
I was going to use my autosparge but it wasn't fitting all that well in my triclamp basket with the BLQD to NPT adapter I grabbed from Bobby. Good luck on your first brew! Man I can't believe they are still shipping these things without the kettle ports being protected. Mine arrived with one of the ports smooshed in a little but I decided to live with it.
Fwiw, they literally responded to my email within 5 minutes and had a replacement kettle shippng out within an hour. This is within 1.5 hours of me recieving it!
I shipped back the dented kettle today as I hope to show them the same courtesy they have shown me. I aim to test it all out this weekend (perhaps sooner and brew this weekend!)
The Solo seems odd in that many people have no issues and are in the 75% range and many have nightmares and are in the 50s with a pound of grain in the bk.
I think with everything I've absorbed here and on the spike fb user group I'll be ok.
If I have to use a bag I'll at least still be able to utilize the basket to easily drain on the hooks.
Btw, seeing the hooks in person has me way skeptical it'll take the weight over the long run, lol
 
Actually if you plan to attach the autosparge to a female QD to snap on to the part we're talking about, I don't think that will work. The QDs can swivel a bit and it may rotate enough to render the autosparge useless.
 
Actually if you plan to attach the autosparge to a female QD to snap on to the part we're talking about, I don't think that will work. The QDs can swivel a bit and it may rotate enough to render the autosparge useless.
Of course.
I hadn't considered that. I'm gonna give it a shot since I have the parts now and then figure out something better afterwards
 
I'm playing with this right now and it's pretty solid but it can pretty easily be made to rotate, so I see what you're saying.
I'm racking my feeble brain trying to think of an easy way to stabilize it...
 

Attachments

  • 16153910315455479996135667819169.jpg
    16153910315455479996135667819169.jpg
    929.3 KB · Views: 125
Curious what everybody's thoughts are on temperature probe placement as well as the importance of wort temperature vs grain bed temperature on a recirculating all-in-one like the Solo.

Even with splitting my pump's output to whirlpool port and top of grainbed I noticed a difference in temps reported by the temp probe in the kettle and my thermapen placed at top of the grain bed. Keep in mind that I've calibrated the controller with an offset so that the kettle filled with water read 150F on controller and my thermapen.

My thinking has always been the enzymes are in the liquid so the wort temperature is most important. Since I'm whirlpooling the liquid under the basket, it seems to me the temp probe in the kettle is ideal.

As for the grain bed vs kettle temp difference. I would have figured they'd eventually equalize but never actually did. The grain bed was always about 2F lower.
 
2F is really nothing in the grand scheme of mash temps. HERMS and RIMS systems sometimes run a 5-6F offset.
Angle your whirlpool outlet slightly "up" so that you get some vertical mixing between the basket and kettle wall. You'll have to see if your final gravities land where you expect them to be. If things tend to overattenuate, you'll just want to bump your mash targets up 1-2F to compensate.
 
Hi! I'm trying to calculate the consumption of energy, total per batch of 10gal, with the 240v 5500w. Does someone have the total time the heating element was on? I need the kw used in one batch, to calculate the costs in my country. I would love help with this! Thank you!

I'm going to use mostly metric because I'm assuming you're more familiar with it and because the calculations are easier. From a theoretical point of view, it takes 4180 Joules to raise 1 L (1 kg) of water by 1°C. This is called specific heat. Suppose you are making a 10 gallon eBIAB batch, you will probably need between 64 and 65L of water in the mash. To cover a kind of worst-case scenario, I will assume 65L with a starting temperature of 25°C that will be raised to a strike temperature around 67°C (152.6°F). The increase of 42°C for 65L means we will need 11,411,400 Joules in total (not accounting for losses or heating the kettle). This is calculated by 4180 J/L/°C * 65L * 42°C. Regarding the 20 gallon kettle and basket, the BeerSmith profile provided by Spike says it weighs 35lb or 15.88kg with a specific heat of 502 J/kg/°C (I think that's equivalent). To raise its temperature by 42°C, you would need 334,814 Joules for a total of 11,746,214 Joules to heat the kettle, basket and water. Knowing that 1 Watt = 1 Joule/sec, and knowing that the heating element is 5500W (5500 J/s), it should take around 2136 seconds or 35.6 minutes to reach the strike temperature. I recommend you leave the lid on while raising the temperature to minimize evaporative heat losses. I have to go to work now, but let's assume an extra 5% of power to account for heat losses. I don't know if that is reasonable or if we should assume more, but it's quite a bit more of a mess to calculate that and depends on a lot of assumptions (wind speed, ambient temperature, sunshine, etc.). You can make your own adjustments to the assumptions I've made, but I'm estimating a total duration of 37.4 minutes (35.6 min * 1.05) and a total energy consumption of 3.43 kWh (5.5 kW * 37.4/60 hours) for only the brewing part of your power consumption. The kW that you are asking about is the immediate demand and would just be adding the 5.5 kW of the heating element plus everything else your house is using at the time (air conditioning, water heater, microwave, etc. etc.).
 
I agree. I only have one 10 gallon batch under my belt but the efficiency numbers were spot on according to the profile in brewfather. I stirred as I added the grains, stirred after 10 minutes and stirred again about 30 minutes into the mash. My mistake was crushing the grain to 0.032" which did result in a stuck mash...which made me stir more frequently than I would have otherwise done. I also had to stir up the mash as I removed the grains because it would have taken hours to get the wort out of the grains otherwise (not something I'd recommend doing!) I'm going to try 0.035" next time which I believe is the size recommended by Spike anyway.

Did you use rice hulls? I used them in my last batch (5% of grain weight) and it flowed a lot better. I don't know that my efficiency got a lot better, but at least I didn't have a stuck mash.
 
Appears to be a non issue just playing with it, @Bobby_M
I guess I'll see with just water first when kettle number 3 arrives. (First two had bad dings & dented in TC due to shipping)
Moved it up and down forever and it seems to stay centered
 

Attachments

  • PXL_20210312_214413177.jpg
    PXL_20210312_214413177.jpg
    2.1 MB · Views: 146
  • PXL_20210312_214359012.jpg
    PXL_20210312_214359012.jpg
    1.6 MB · Views: 149
  • PXL_20210312_214348027.jpg
    PXL_20210312_214348027.jpg
    1.6 MB · Views: 141
Appears to be a non issue just playing with it, @Bobby_M
I guess I'll see with just water first when kettle number 3 arrives. (First two had bad dings & dented in TC due to shipping)
Moved it up and down forever and it seems to stay centered


You may want to try adding a few bends. A small tubing bender helps a lot. For reference this is the 12 inch rod in a 20 gallon mash tun.

Edit: Nevermind ... I though I saw a recirculation manifold in there.
 

Attachments

  • 337C7865-7880-46B5-97C4-C8E5F4CBB881.png
    337C7865-7880-46B5-97C4-C8E5F4CBB881.png
    3.4 MB · Views: 81
It can move it's whole range of motion unimpeded. Why bend it?

I’m running a recirculation manifold on top of my grain bed. The hose going into the center of the manifold interfered with the ball float. With all your silicone I thought you were using a manifold. I see that you’re not. Bending is not an issue for you.
 
I've done 7 5gal batches on my Solo and my efficiency has dropped quite a bit. My old setup [10gal Igloo, HLT, Kettle] achieved around 72% but I've been getting around 60% on the Solo [as low as 58% and my highest was 64%]. I'm using a 3 roller Monster Mill set at .035. I ended up adding a Brew Bag after the second batch because I was getting a lot of grain into the kettle and had a couple of stuck mashes which caused a dry fire and a ridiculous amount of scrubbing to clean up. Anyways, just curious if anyone has suggestions on how to increase my mash efficiency.
 
I feel like the solo setup is similar to my brew boss in how the mash works. There is a lot of water that is not inside the mash. I would average around 65% efficiency. I think folks just need to accept that biab efficiency is never going to be as high as a 3v fly sparging system. Efficiency can be improved but sacrifices have to be made. You’ll need to find the balance between efficiency gain and sacrifices.

The absolute best way to get better efficiency in biab is a finer grain crush. I went as low as about .25. The sacrifice with a finer crush is stuck sparge or recirculation. I used rice hulls to try and combat that. I hear you can also condition grain but I never tried it.

Water chemistry helps as well. Manage pH so that it’s best suited for your grain bill.

In a biab setup, I feel like recirculation is only important for maintaining temps. Conversation happens very fast in a finely crushed mash. You can manually stir every 15 minutes or so to gain a few points. You can mash longer to gain a few points. You can boil longer to drive off more water. You can hold back some water and rinse it over the bag or basket after draining to get a sort of sparge.

In my old brew boss system balancing the water level to grain amount was prohibitive. If I added more grain, I needed more water to cover it. I needed to add more grain to make up for efficiency loss, but the design of that system made it hard to get the amounts of grain vs water that I needed.

Also, the more grain I added, the less efficient the system was. It was easier to brew a smaller beer. 1.040 to 1.050 was pretty easy and I could see close to 70 to even 75% efficiency. When I went to 1.060, it fell into the 65% range. Adding grain to make up for what I was missing in my OG made it fall even more. In a 1.070 or higher beer I hit my limits in the 55% range and my water to grain ratio got out of hand.

In the end, you can take pre boil gravity and make up for any missing points with DME. All that being said, if I was planning to make a barley wine or some very strong high alcohol beer in a system like this, it just wasn’t going to happen via all grain. It can always be done, but I would have to reduce my overall volume from 10 gallons down much lower.
 
I brewed my first batch last weekend.
I use the 15 Gallon solo on a gas burner. I‘ve read this thread prior purchasing the solo and was aware of some experience grains falling through ... so I bought a brew bag as a lot of you. But I don’t like the fit of the brew bag in the basket.
So I end up using my old 12“ false bottom, an old grain bag (custom sewed by my wife :)) and a 10G brewbuilt false bottom gasket. This gasket fits perfectly and I won’t have to use the brewbag. I didn’t have any issues with grains falling through...
Mash efficiency was 65%, let’s see how much more is possible with the next brewdays. For recirculation I use a custom welded ball valve/ dip tube from @Bobby_M and attached my old CPVC manifold ... still locking for a better way (something like picture 4 would be perfect) 9DDFABA7-26F1-405C-AD7D-12719299CB8D.jpegF7313ABE-70DF-435C-8F8B-2A1072537DF5.jpeg8C40A1B2-BD57-42E8-81A6-29E7AFACEDF5.jpeg7E27C080-CEA1-49AE-B6DF-8FEFDE9D8126.jpeg
 
Last edited:
Ready for the 3/4 whirlpool/ 1/4 recirculation now. Need to see how many gpm that comes out to now
 

Attachments

  • PXL_20210315_213909200.jpg
    PXL_20210315_213909200.jpg
    2.3 MB · Views: 147
I'm joining the Spike Solo+ 20 gal. club as of this morning. Looking forward to reading through this thread again and learning all I can before my system arrives.
Welcome friend! Lots of good discussion in this thread so far. Definitely feel free to chime in with experiences of your own once you have them as we'd all like to learn from each others successes and mistakes!
 
I ordered and recieved my 15 gallon solo a few weeks ago. I'm now waiting on my 2nf replacement kettle as it seems they cannot ship these without damage. Lol, poor packaging.
Oceangrace24, welcome to the club!
 
Once the weight of the autosparge is on it, maybe it won't turn. Set it up and just keep lifting the float upwards to full closure over and over to see if it eventually turns.

Do you have a list of components needed to make the AutoSparge work with the Spike Solo? I have the 20g TC version and I'd like to buy the parts but I see there are several ways to accomplish the task.
 
Brewed yesterday and loved the solo.
Of course, I totally screwed up right from the start of brewing. Up until 3 batches ago I've just had my lhbs mill my grains and then I come directly home and dump em into my waiting prepped/heated mash water. Been doing this for 8 years now.
So, naturally I dumped 2/3 of the grain in and then realized what I had done, stopped, and pulled the basket out.
I actually laughed. I milled the dry grains I had and then milled the soggy grains too. It looked like it sorta "hurt" the grains but they were far from correctly milled. I then proceeded with my brew day.
63% mash efficiency.
This doesn't mean anything to me tho and I look forward to finding out what kinda numbers I hit with a real crush.
That said I ended up at 1.053 after the boil rather than the beersmith predicted 1.063.
Beersmith was, however, DEAD on with all water/wort volumes. 6 gallons into the fermenter almost exactly.
Because 2/3 of my grains were merely bruised u had no issue with stuck recirculation.
The mash temp was consistently 2⁰F lower than what the solo was reading. This made it easy as I just turned up the solo controller 2⁰. I continued to check temps during the mash, but don't think it'll be necessary in the future.
 

Attachments

  • PXL_20210325_160926180.jpg
    PXL_20210325_160926180.jpg
    2.3 MB · Views: 118
  • PXL_20210325_160936439.jpg
    PXL_20210325_160936439.jpg
    1.8 MB · Views: 118
  • PXL_20210325_192118895.jpg
    PXL_20210325_192118895.jpg
    1.8 MB · Views: 113
Back
Top