Spike Complete System

Homebrew Talk - Beer, Wine, Mead, & Cider Brewing Discussion Forum

Help Support Homebrew Talk - Beer, Wine, Mead, & Cider Brewing Discussion Forum:

This site may earn a commission from merchant affiliate links, including eBay, Amazon, and others.
Goodness. It’s here. Still waiting on CF10. AND the electrician...
D4B13CDC-0093-4B1A-A2E0-90D3394BA651.jpeg
The table legs were hacksawed to 25 inches. Much better since I would’ve had to use a step ladder.

It’s just surreal since this system was a fleeting thought a month or so ago when I started engaging in this thread. Thanks again to you all.
 
For my brewing table I just bought a 5' SS table that had a shelf underneath. Paid $125 for it at a local restaurant supply house. The big difference is probably that I only put my Spike 22 gallon HLT (with herms coil) and my Spike 22 gallon Boil kettle on the top of the table. Underneath I have a plate chiller and two chugger pumps.

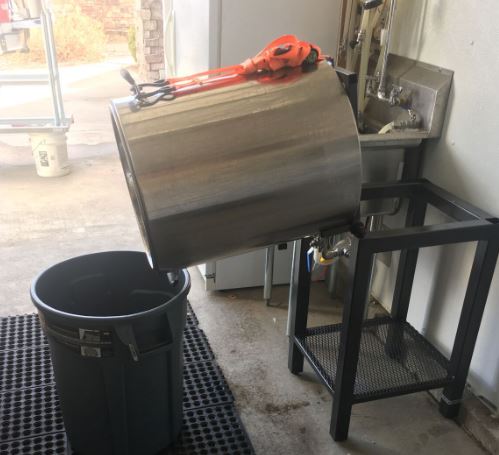
My mash tun is a 1/2 BBL SS Brewtech. Love the conical bottom even if the drain hole is too small. But it is too heavy for me to dump grains safely by myself. To avoid hurting myself or the tun I welded up a tilting table that allows me to attach the tun directly to the table (which is strapped to the wall). I use a ratchet clamp in back to cinch the handle down to prevent it from falling over. Now I can tip the tun over the 30 gallon trash can when i need to dump my spent grains - all with with no effort at all (no more squished manometer tubes).

As far as the kettles go, I will say that I love the tri-clover heating elements that are on the spike kettles for cleaning. I went with only the etchings on the boil kettle and sight glass and etchings on the HLT. Huge improvement over the last chinese kettles I had.

I built my electric brewery panel (30A) about 5 years ago and to date I've around 75 batches, with 24 (15 gallon) batches last year and 10 so far this year. Efficiency for me is typically in the 75-85% range.

Electric is a great way to go if you have the disposable income, and it has kept me brewing more often as it is a joy to use.


Tilt table.JPG
 
Good news folks! Got an electrician working on my plug today! Finally! Thanks again for all the advice given. This electrician is just doing a plug and no questions asked. Now it’s just the matter of the inspection tomorrow (fingers crossed).

Edit: Spike forgot the push fittings for the HERMS coil :cool:
 
Last edited:
Good grief, my first batch hit all the target numbers!

I started out years ago with a keggles and cooler system on propane. I then recently switched to BIAB. I had several brews down on that but weirdly enough I missed a 3 vessel system. Something about BIAB while great I felt I needed to be more OCD.

I did my water test and that went smoothly. Then I switched vessels around to HLT, MT, then BK from left to right. Which is opposite from how Spike sets the system up. I tried it their way but was confused at times when I would glance at the panel as ebrew’s layout is from left to right. I have my own table so my pumps are mounted on the bottom shelf instead of on one side on a leg. Also having the table low helps so much.

First brew ... everything went smoothly. Only hiccup was that I forgot to turn off the heating element when cooling the wort. It’s because electric is so quiet! If it was propane then I probably would’ve noticed right away. Anyway, I brewed a stout and had a blast on the system. What a joy it was. And cleaning was a breeze too. Some of you mentioned using a wet vac and now I see why (next on my shopping list).

BIAB was fine for me and perfect for others. But for the sake of us 3 vessel folk this was an ideal outcome. You all are the best with your suggestions. I don’t regret what I’ve chosen.
 
Congrats and enjoy your new system. I've trained myself to always start by turning the kettle off to avoid a dryfire situation. Then move on to valves, pumps etc
 
Hi all, so I tried another experiment to verify the accuracy of the gradations on my sight glasses. If you saw my very long previous post last year in this group, you know I did this experiment previous using a BSG bucket where I filled it up to the 5 gallon mark of the bucket (assuming the bucket volume markings were accurate) and poured it into the kettle to see if it matched up with the sight glass 5 gallon mark...did this 3 times to get to 15 gallons...anyway long story short since you can read it all in the previous post, the sight glass volumes were off and I posted an equation that corrected for this (it lets you know what to expect the sight glass to read for any volume added). As I mentioned - all of this will only hold true IF the BSG bucket volume markings are accurate....

So, I bought a 65LB capacity Anvil scale (shown here: https://www.morebeer.com/products/anvil-large-scale.html) and it's fantastic!!! To verify its accuracy I put a butterfly valve on my smaller precision scale, noted the weight, and put the same valve on my new Anvil scale, and am happy to say it read the same weight (I was unsurprised since they mention the scale has been calibrated ahead of time, but wanted to verify). Had the idea to check my sight glass gradation accuracy BY WEIGHT using this scale instead of the previous volume method I used. Here is my process:

I placed an empty 6.5 gal capacity BSG bucket on the scale and filled it with 5 gallons of water by weight. Water weighs 8.34LB per gallon at 62F, so I tared the scale with the empty bucket and started filling it up until it reached a weight of 41.7LB (5*8.34LB) to know that I had 5 gallons of water I was working with. This volume of water only came up to the ~4.5 gallon marker on the bucket so I was intrigued. I poured the 5 gallons of water into my boil kettle and turned on my control panel to see the temp (it read 66F...close enough to the required 62F for 8.34LB/gallon to be true). I also put a level across the top of my kettle to make sure it wasn't sloping or anything. I then noted the volume shown on the site glass was 4.6 gallons! The site glass sheathing that has the gradations on it can move up and down slightly, so please note that the sheathing in this test is all the way DOWN (which I assume is normal). I then did this 2 more times at 10 and 15 gallons...

5 gallons by weight = 4.6 gallons on site glass
10 gallons by weight = 9.6 gallons on site glass
15 gallons by weight = 14.5 gallons on site glass

Putting this data into an excel graph with 5,10,15 on the X-axis and 4.6, 9.6, and 14.5 on the Y-axis yielded the following linear equation with an R^2 = 1:

y = 0.99x - 0.3333

This means that if you have a pre-boil volume of 15 gallons, the site glass will read 14.52 gallons. My previous equation based on volume actually went the opposite way... site glass would have read around 15.5 gallons. If this is all true and I should only be adding a site-glass-displayed volume of 14.52 gallons (for an actual pre-boil volume of 15 gallons), it will yield a slightly higher pre-boil gravity and higher mash efficiency since that last 0.5 gallons (or 1 gallon if you were using my previous equation) will be super diluted last runnings and, although there is some sugar being added still, it's most likely so diluted that it it's knocking down my pre-boil gravity instead of bring it up.

I did some math for a beer I recently brewed to see what the pre-boil gravity would have been if I had stopped filling my kettle at 14.5g (per new equation) instead of going to 15.5g (per the old equation). I measured a pre-boil gravity of 1.055 on that brew day (let's say 55 pts to make it easier) at 15.5 gallons in my kettle. If I had stopped filling at 14.5g, I would have had something like...

(55)(15.5) = (X)(14.5) -------> X = 58.8 pts (round up to 1.059)

This is a pre-boil gravity error of nearly 4 points!

Anyway, this was a very interesting exercise and it may vary slightly between these 20 gallon spike systems if they're not all EXACTLY the same. If any of you have some time, let me know if you see an error in my ways and please try this on your own and post your results here! I would be great and validating to see if others are getting the same results for true consistency.

- Mike (Fictional Brewing Company)
 
Has anyone done a price breakdown of each part to see if it would be cheaper to piecemeal everything out?
 
Weighing the NPT vs the yet to release/soon to drop triclamp system. Are you guys finding the NPT fittings a PIA to clean/disassemble ? Love triclamps but that's $1000 worth of triclamp.
 
Weighing the NPT vs the yet to release/soon to drop triclamp system. Are you guys finding the NPT fittings a PIA to clean/disassemble ? Love triclamps but that's $1000 worth of triclamp.
There not a pia to clean. Homebrewers have been using them since the beginning of homebrewing. T clamps on a 10/20g kettle is overkill imho.cheers
 
I built my own version of the spike system with 30 gallon kettles. I ordered my stainless 72x24" table from webrestaurantsupply.com it was about 250 shipped all stainless rated to hold 900lb I bought some unistrut from Lowe's and reinforced the underside just to be safe. It doesn't even flex with all 3 kettles completely full. I also shortened the legs to make the kettles a more reachable height. For my panel I went with a custom 60a panel it's great being able to file multiple elements at a time for cleaning while I'm boiling. As for kettle insulation I ordered 3 large silicon pot holders to put under the kettle so that the table doesn't act as a huge heat sink. I brewed without them and felt the table, the entire table was hot. I'm sure it helped insulating the kettle from the table but I haven't checked if it reduced my heating time. My mash tun holds temperature better without a doubt.View attachment 551929View attachment 551930
I am VERY interested in the re-enforcemnet you did you your table. Anyway you can show me some detail pics of the uni-strut and how it is all attached?
 
Weighing the NPT vs the yet to release/soon to drop triclamp system. Are you guys finding the NPT fittings a PIA to clean/disassemble ? Love triclamps but that's $1000 worth of triclamp.
if your planning on using something like camlocks screwed onto the npt fittings then IMO thats the better route. I use camlocks at home and triclamps at the brewery and once the bling factor wears off tri clamps are really a PIA compared to camlocks to use on the hot side.
I have never removed any of my npt fittings for cleaning.. I just pump pbw through them when I cip in my setup but on the hotside the only thing that needs to be cleaned inside whether its pbw or dissembling is the pumps and ball valves (unless the spike system comes with sanitary butterfly valves)

New system is all butterfly valves.
 
Personally my only regret is that I didnt order my spike kettles with all tri clamp fittings. If you break down the price of adding tri clamps 1000 difference isnt bad. There are 400 in butterfly valves alone. I have well over 1000 converting my system to all tri clamp. Albeit mine is all hard piped with tons of clamps. I mich prefer using tri clamps to any other fitting but my day job for the last decade also uses tons of tri clamps on a daily basis so I have grown pretty comfortable with using them.

One thing I will say is weather you decide on triclamp or cam lock I'm sure you will be happy, however the ball lock style quick connect fittings that come with the regular spike system in my opinion are terrible. I hated them on my first rig, spent a ton swapping them all out to cam locks and then spent even more swapping to tri clamp. I didnt mind the cam locks but wanted every thing to be interchangeable throughout my brewery.

As far as cleaning the threaded fittings, that is not a concern. I dont ever take mine apart to clean them.
 
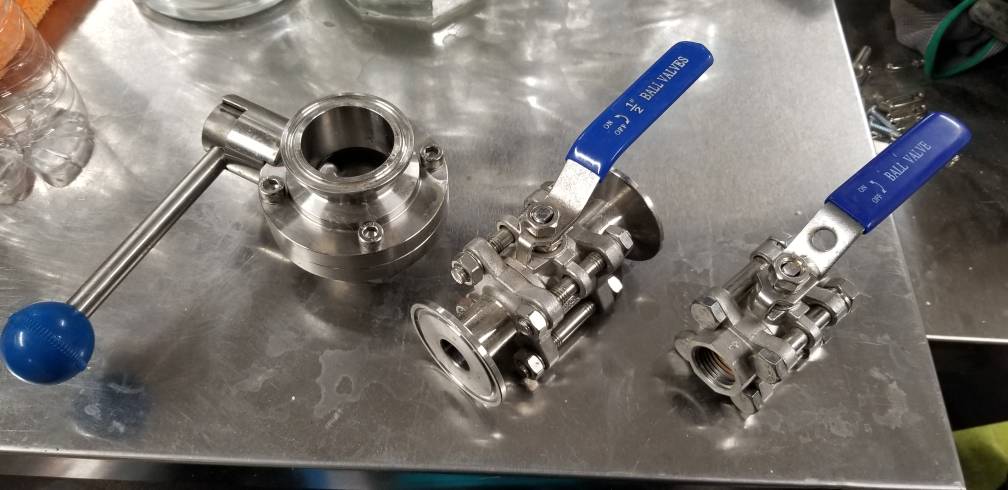
Here is a great place to get the butterfly valves like spike uses.. $25 each shipped they have recently come down in price and these have extra epdm seals.
Not to be difficult because I know you can likely spend $1000 on tri clamp fittings for this system.. To be fair you can also get everything for under $500 if you shop around too. Case in point below.. 2 of these cost me $48... one of these from spike is $50 + shipping. I know they are not from the same manufacturer but I dont care what brand they are, only how well they work.
I bought a ton of tri clamp hardware for my brewbubs 3bbl setup.. still I dont believe I spent $1000 on them added up and I have 4 fermenters and 3 brite tanks on top of the hot side..

https://www.ebay.com/itm/1-5-38mm-Sanitary-Stainless-Steel-TriClamp-Butterfly-Valve-TC-Clamp-SS304/122063179557?hash=item1c6b884f25:g:HsMAAOSwZsFbIjL7#shpCntId
 
Last edited:
Personally my only regret is that I didnt order my spike kettles with all tri clamp fittings. If you break down the price of adding tri clamps 1000 difference isnt bad. There are 400 in butterfly valves alone. I have well over 1000 converting my system to all tri clamp. Albeit mine is all hard piped with tons of clamps. I mich prefer using tri clamps to any other fitting but my day job for the last decade also uses tons of tri clamps on a daily basis so I have grown pretty comfortable with using them.

One thing I will say is weather you decide on triclamp or cam lock I'm sure you will be happy, however the ball lock style quick connect fittings that come with the regular spike system in my opinion are terrible. I hated them on my first rig, spent a ton swapping them all out to cam locks and then spent even more swapping to tri clamp. I didnt mind the cam locks but wanted every thing to be interchangeable throughout my brewery.

As far as cleaning the threaded fittings, that is not a concern. I dont ever take mine apart to clean them.


Strange. I have my hot side fitted with those style quick connects and I love them. Fast, easy one handed connect/disconnect and no leaks. What didn't you like about them?
 
Strange. I have my hot side fitted with those style quick connects and I love them. Fast, easy one handed connect/disconnect and no leaks. What didn't you like about them?

I, too, have the quick connects and like them....
 
Strange. I have my hot side fitted with those style quick connects and I love them. Fast, easy one handed connect/disconnect and no leaks. What didn't you like about them?
I had issues with the o-rings wearing over time and leaking, and it seemed like every time I disconnected one I would get my hand covered with hot water/wort. Also the wort would get into the slide and cause it to gunk up and not work well. I was constantly soaking them to clean. With the tri clamps a simple rinse off and done.
 
I had issues with the o-rings wearing over time and leaking, and it seemed like every time I disconnected one I would get my hand covered with hot water/wort. Also the wort would get into the slide and cause it to gunk up and not work well. I was constantly soaking them to clean. With the tri clamps a simple rinse off and done.

Strange. I just run hot water through 'em to clean, then I cycle 180 degree water on the system through 'em to clean the pump, valves, etc. Hang 'em up and use 'em the next time. I've never had issues with the connectors getting gunky. As far as getting stuff on me when I connect/disconnect, I wear insulated rubber gloves when working with the hot side stuff, but I don't have issue with the gloves getting messy. I just wear them because connectors are hot and they grip well. They're also handy for squeezing the bag for my cooler-based MIAB system.

I'm happy that you found a solution that works well for you. I'm also happy that the much less expensive system works for me!!
:mug:
 
Here is a great place to get the butterfly valves like spike uses.. $25 each shipped they have recently come down in price and these have extra epdm seals.
Not to be difficult because I know you can likely spend $1000 on tri clamp fittings for this system.. To be fair you can also get everything for under $500 if you shop around too. Case in point below.. 2 of these cost me $48... one of these from spike is $50 + shipping. I know they are not from the same manufacturer but I dont care what brand they are, only how well they work.
I bought a ton of tri clamp hardware for my brewbubs 3bbl setup.. still I dont believe I spent $1000 on them added up and I have 4 fermenters and 3 brite tanks on top of the hot side..

https://www.ebay.com/itm/1-5-38mm-Sanitary-Stainless-Steel-TriClamp-Butterfly-Valve-TC-Clamp-SS304/122063179557?hash=item1c6b884f25:g:HsMAAOSwZsFbIjL7#shpCntId
Just my luck I decided to upgrade some of my old ball valves to butterfly valves and the price went up by $20 each. [emoji21] cheapest I can find them is about $35 each now.. that's what I get for waiting. Let me know if you have another source that's cheaper..
 
For what it is worth I have now done several overnight mashes with the system. The first was a bit nerve wracking but now I really kinda like it. Get the water up to temp by 10 or 11 then mash in. Let it sit for 30 min stir then get the pumps going and let it be. Get up at 5 ish sparge then boil. Clean up and all done by 9 or 10 depending on whirlpool for NE IPAs
 
For what it is worth I have now done several overnight mashes with the system. The first was a bit nerve wracking but now I really kinda like it. Get the water up to temp by 10 or 11 then mash in. Let it sit for 30 min stir then get the pumps going and let it be. Get up at 5 ish sparge then boil. Clean up and all done by 9 or 10 depending on whirlpool for NE IPAs
Wait what? Lol I thought we were talking about cheap butterfly valves :D

I suspect your efficiency is off the charts.

I was thrown a curveball this morning setting up my brew day so I was contemplating this.
 
Wait what? Lol I thought we were talking about cheap butterfly valves :D

I suspect your efficiency is off the charts.

I was thrown a curveball this morning setting up my brew day so I was contemplating this.

Ha! I was trying to ignore the butterfly valve talk. I really like my system as is and I feel like I have it dialed in so trying not to tinker to much... for now!
 
Just my luck I decided to upgrade some of my old ball valves to butterfly valves and the price went up by $20 each. [emoji21] cheapest I can find them is about $35 each now.. that's what I get for waiting. Let me know if you have another source that's cheaper..
The price actually went up to 38 bucks shipped, I noticed this a couple days ago.. glad I got the 5 I did.
 
Here is a great place to get the butterfly valves like spike uses.. $25 each shipped they have recently come down in price and these have extra epdm seals.
Not to be difficult because I know you can likely spend $1000 on tri clamp fittings for this system.. To be fair you can also get everything for under $500 if you shop around too. Case in point below.. 2 of these cost me $48... one of these from spike is $50 + shipping. I know they are not from the same manufacturer but I dont care what brand they are, only how well they work.
I bought a ton of tri clamp hardware for my brewbubs 3bbl setup.. still I dont believe I spent $1000 on them added up and I have 4 fermenters and 3 brite tanks on top of the hot side..

https://www.ebay.com/itm/1-5-38mm-Sanitary-Stainless-Steel-TriClamp-Butterfly-Valve-TC-Clamp-SS304/122063179557?hash=item1c6b884f25:g:HsMAAOSwZsFbIjL7#shpCntId
So you have bought these and they're decent quality? I just clicked on the link and the 1.5s are $35 now, but they have the 2s on sale for $19! That's insane! Like can't pass them up even though I don't really need them level insane.
 
So you have bought these and they're decent quality? I just clicked on the link and the 1.5s are $35 now, but they have the 2s on sale for $19! That's insane! Like can't pass them up even though I don't really need them level insane.
yes they are very nice.. much better than the valves that came with my 3bbl system. they even came with an extra seal in retail packaging.
 
for those of you with the spike system - what is your table height? either using the table that came with the system, or another table you bought at a different store - or making your own? On the Spike System it says 30 inches -- most aftermarket tables seem to be 35 inches... what are you guys finding works best?
 
Goodness. It’s here. Still waiting on CF10. AND the electrician...
View attachment 578372
The table legs were hacksawed to 25 inches. Much better since I would’ve had to use a step ladder.

It’s just surreal since this system was a fleeting thought a month or so ago when I started engaging in this thread. Thanks again to you all.
I have a table that is just like that but too high as well. How much hassle was it to hacksaw the legs? I was looking for an extra large pipe cutter to cut mine off as I'm lazy.
Uber nice kit you have there. Have fun!
 
I have a table that is just like that but too high as well. How much hassle was it to hacksaw the legs? I was looking for an extra large pipe cutter to cut mine off as I'm lazy.
Uber nice kit you have there. Have fun!
Hiya. It took less than 30 min with a standard sized hacksaw but with a pack of blades rated for metal. Gloves and safety goggles recommended. @macbrewer 25” is just the right size I at least for me. Also provided more clearance for mounting the control panel.

It’s a great system. I’ve been having very successful brew days since I took the plunge. Ive been able to hit my target numbers on system consistently.

I was going to install an exhaust hood as well but jumped on a thread here about adding a steam condenser on the boil kettle which saved a lot of $$ and hassle. I used it yesterday for the first time and I didn’t have to open the garage door at all!
 
Last edited:
for those of you with the spike system - what is your table height? either using the table that came with the system, or another table you bought at a different store - or making your own? On the Spike System it says 30 inches -- most aftermarket tables seem to be 35 inches... what are you guys finding works best?

I think you're going to find it depends on how tall you are, and how tall the kettles are. I'm using a 10-gallon kettle on a wooden bench that is about 38 inches tall. The bench was built originally as a workshop workbench, and 38" tall is a good height to work at so you don't have to bend over to reach the table. I'm 5'11" tall, btw.

I have my kettle and mash tun on that bench, and it's not occurred to me to wish the bench was shorter. I can look in the kettles to see what's going on, and connections are at a comfortable height, for me.
 
I am 5'9 with 30 gallon kettles and my table is also 25" tall. Perfect height for looking in kettles, and scooping out grain even from the bottom of the mash tun. I do have long arms though.
 
I ended up contacting a seller on Ebay "goodsisbest" about some butterfly valves and they gave me a great deal for a large order.. I averaged $28 shipped per valve. But I did order 14 butterfly valves, 3 sight glasses, and 3 diaphragm valves from them.. decided to upgrade my entire brewery from ball valves to sanitary butterfly's. Anybody need some tri clamp valves? I have a lot for sale..
20181025_003121.jpeg
 
What are you guys finding for average hours to brew? What about time to double batch?

I am thinking about purchasing and considering if the 50 amp panel is a worth while upgrade.
 
Hiya. It took less than 30 min with a standard sized hacksaw but with a pack of blades rated for metal. Gloves and safety goggles recommended. @macbrewer 25” is just the right size I at least for me. Also provided more clearance for mounting the control panel.
Just an FYI, I ordered a Ridgid pipe cutter (1 7/8"size) and cut my table down to a total height of 24"----27" with wheels I added. The pipe cutter was easy but only for the first 3 legs. I guess it got tired and a small part of the wheel broke on the 4th leg so it took some doing but I got it off as well. But, the cuts were clean.
A new cutting wheel is only about $4 so it's good for future pipe cutting needs.
 

Latest posts

Back
Top