Thanks for the reply!!! I think I'll give that a try.
Out of curiosity... When you say .003" are you talking gap on the mill? Do you really mean .030"? .003" seems crazy tight to me.
30 thousandths is what I meant

Thanks for the reply!!! I think I'll give that a try.
Out of curiosity... When you say .003" are you talking gap on the mill? Do you really mean .030"? .003" seems crazy tight to me.
Help, I'm in the middle of a brew and power went out to both elements. The panel works fine, PID's work fine, pump works fine, but the heating elements won't fire. (50A Panel) Any quick ideas?


![Craft A Brew - Safale S-04 Dry Yeast - Fermentis - English Ale Dry Yeast - For English and American Ales and Hard Apple Ciders - Ingredients for Home Brewing - Beer Making Supplies - [1 Pack]](https://m.media-amazon.com/images/I/41fVGNh6JfL._SL500_.jpg)


2" should be fineWhat size (length) temp probe are you guys using in the boil kettle and HLT ? I'm currently using 6" probes because they are mounted in a T with the sight glass on the keggles. I'm guessing 2-4" should be sufficient.
Here is how I have mine set up. It realistically predicts my volumes very well
To get my brew day down to 5 hours I do as many things in parallel as possible.
- I heat strike water and HLT water simultaneously - and weigh out all hops, grains, and water additions while heating
- I usually mash for 60 minutes tweaking mash temp as needed
- sparge for about 30 minutes adjusting flow rates to mash the runoff to the sparge flow as needed
- I have the boil element turned on as soon as its covered in wort so that I'm boiling almost as soon as the sparge is complete
- As soon as sparge is complete I start cleaning the mash tun by scooping out most of the grain into a bucket and the vacuuming the rest out with a shop vac
- I spray out the mash tun with pressurized water then vaccuum and repeat.
- When there's no visible residue remaining, I undo my TC fitting on the mash tun outlet and pull out the dip tube and false bottom to clean under it.
- When no visible residue is remaining I scrub out the mash tun with barkeepers friend and a sponge and use the rinse/vacuum method repeatedly until I'm confident there's no soap residue
MadKing, how do you handle cleaning the herms coil? Your process is pretty close to mine, just looking for different ways to save time that is not needed.
Thanks for tip on the amount of PBW for the element I’ll try that.I run my sparge water into the mash tun through the HERMS coil which cleans it while sparging. I'll run PBW through it every 4th or 5th brew day out of caution but it always runs clean.
I run PBW through my brew kettle, wort pump and chiller at 2 oz per gallon - so a full pound of PBW in my boil kettle - at the end of every brew day. I'll let that circulate for 40 minutes and then rinse with cold water, then rinse with hot water. When I do the herms coil I just add it to that loop and go from:
BK out -> Pump in ->
Pump out ->chiller in ->
chiller out ->HERMS in->
HERMS out->BK in
btw, that strength of PBW will keep your heating element shiny as the day it was made and it won't have that white film on it anymore. Oxyclean doesn't seem to remove that white film like real PBW does.
I run my sparge water into the mash tun through the HERMS coil which cleans it while sparging. I'll run PBW through it every 4th or 5th brew day out of caution but it always runs clean.
I run PBW through my brew kettle, wort pump and chiller at 2 oz per gallon - so a full pound of PBW in my boil kettle - at the end of every brew day. I'll let that circulate for 40 minutes and then rinse with cold water, then rinse with hot water. When I do the herms coil I just add it to that loop and go from:
BK out -> Pump in ->
Pump out ->chiller in ->
chiller out ->HERMS in->
HERMS out->BK in
btw, that strength of PBW will keep your heating element shiny as the day it was made and it won't have that white film on it anymore. Oxyclean doesn't seem to remove that white film like real PBW does.
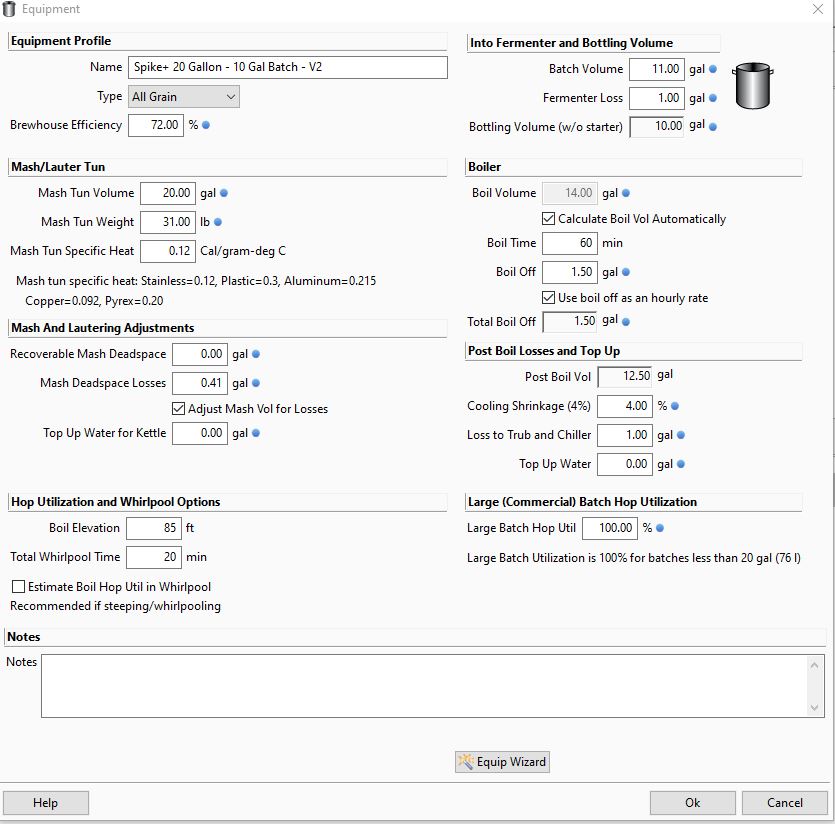
I've had two brew sessions on my Spike 20g system. The first one I missed my OG significantly. I hit 1.043 when my target was 1.062. I didn't measure gravity after the mash, but I wasn't thinking and put all 15g of water into the mash tun for 22lbs of grain. I figured that was the reason my OG was off.
For my second batch I tweaked my equipment profile to match what I observed with my first batch. I used basically the same recipe, just changed slightly based on actual boil off and losses. I had a good mash this time and had 1.052 (as expected) going into the BK. However, after the boil the OG was 1.048. No idea how this went down. I'm using a Steam Slayer, so my boil off was only 0.75g. It's possible that my measurements are off slightly, but 1.048 is a long way from 1.062. It's also a recipe that I scaled up from 5g, so I could have messed that up.
I tried measuring pH during the mash and got very low around 4.0 using test strips. I haven't really started understanding pH and it's impacts, but I realized that was low.
So, how did I screw up?
")
I too have a steam slayer and I adjust my pre-boil volume and still boil for an hour I just turn the heat down and don’t collect as much wort from the spargeThanks guys. I think its safe to assume that my pre-boil gravity was inaccurate. I took three measurements with a hydrometer. The first two were crazy high, and then low. The third was near perfect, but I didn't test again. For OG I used a hydrometer and a Tilt.
Your point on needing to boil 2-3 hours I think is the key. It looked like a large increase in gravity with only losing 0.75 gallons, but I didn't give it much thought.
I'm using BrewersFriend. I updated my recipe to base volumes off of the ending kettle volume instead of the fermenter. This got the pre-boil and OG to be within a few points of each other which makes more sense. I had to add more grain to the recipe to get the OG/ABV I was going for. My new pre-boil is 1.058 and OG 1.061.
I guess now I have to brew again to check
Cool! Keep us posted on your results as I am in the same boat and keep learning every time I brew on this system.agreed. I wasn't planning to boil for 2-3 hours. If i wanted to raise the gravity that much I would have needed to.
Great to hear you are getting the equipment profile to match your experience. Not sure about BrewersFriend but BeerSmith has a boil off rate that is set in the equipment profile.
I'd love to see what you have for an equip profile, here's my Spike+ 20
How many of you guys are running the HERMS coil with the "push to fit" fittings? First brew with new Spike HLT. Had a bad leak at first test but that was because I didn't have the coil pushed in all the way. Fixed that and proceeded to brew. Seemed to work fine but considering changing to compression fittings with the plastic ferrules.
I had a problem once when I was auto tuning the system (didn't have it pushed in all the way). Now every brew day I make sure they are pushed in before I fill the HLT. Also I never take out the herms coil from the HLT. I did however order replacement o-rings for herms coil and other fitting just to be safe. since then, no issues
But the valves are added bling value?...I had this issue, and raised it with Spike who said that I probably didn't have the connections pushed in all the way. I am 100% sure that I did, and after thinking about it, I am pretty sure I know the root cause of the problem. The standard configuration is to have valves on either end of the HERMS. If you ever have the HERMS filled with liquid and both valves closed, and then heat your HLT, then the trapped water will expand. With the fluid being essentially incompressible, it has nowhere to go but to begin pushing out the HERMS from its fittings. Liquid expands about 3.5-4% from 70-200F, and so there is no doubt this can happen. I described this to Spike, but they said they had never seen this before. But trust me, it is real, and it happened to me again (because I am a dufus and accidently let it happen again!).
To solve this potential problem (i.e. idiot-proof the system), I removed the valve from the top HERMS connection. I also removed the top valve from the MT port (since you typically will have a hose connecting the two), otherwise you can still be exposed to this "trapped liquid" situation. In most situations, you really don't need to ever isolate the HERMS on each end and don't need these valves.
Hope this helps you in case that was your issue.
How many of you guys are running the HERMS coil with the "push to fit" fittings? First brew with new Spike HLT. Had a bad leak at first test but that was because I didn't have the coil pushed in all the way. Fixed that and proceeded to brew. Seemed to work fine but considering changing to compression fittings with the plastic ferrules.
https://www.ebay.com/sch/i.html?_fr...w=1/2+stainless+compression+fittings&_sacat=0 where I get all mine now...It absolutely a pressure problem. When I clean up for the day, I run CO2 through my coil (I found some gunk in it once, so now I’m paranoid) to blow out all the water when I’m done. Well, being goofy one day (one day) I left a valve closed because I wanted to build up a little pressure and see it condense on release, and wouldn’t you know it, both of the seal popped out a little bit. Not enough for the seals to fail completely, but just enough to let out some pressure. I replaced to o-rings and haven’t built pressure up since.
As far as weight on the coil goes, I had a harder time with my SS compression fittings leaking until I changed to the ferrules and cranked the bajezzus out of them. Made them impossible to take off, but didn’t leak.
I like my Spike connectors, not the price. I think if there was a cheaper than $20 a connector, I’d probably use them in more places. Augiedoggy, any ideas on where to maybe get some?
link works for me? I dont know what spike uses? the nylon sleeved puch lock connectors like ro water lines use?link didn’t work, I did the search though. Are there any push-to-connect ones like from Spike??