• Please visit and share your knowledge at our sister communities:
  • If you have not, please join our official Homebrewing Facebook Group!

    Homebrewing Facebook Group

Speidel Braumeister (brewmaster)

Homebrew Talk

Help Support Homebrew Talk:

This site may earn a commission from merchant affiliate links, including eBay, Amazon, and others.
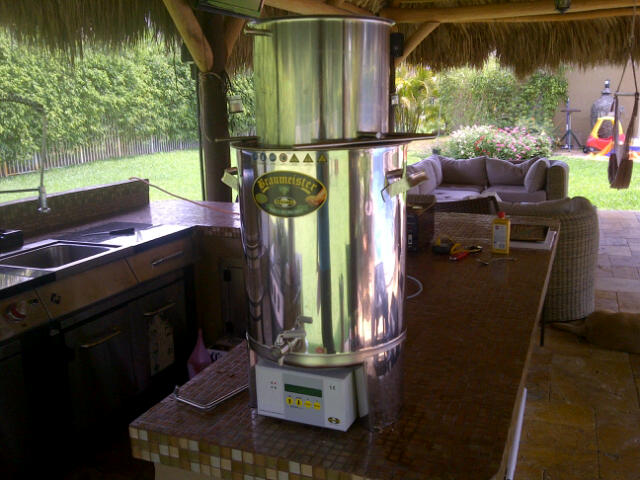
i just bought a voltage converter. i think like 150.00 dollars 5000 watts 5year warranty. i just wanted to have the ability to plug it in anywhere. i have 220 in the garage but i like brewing under the tiki hut in the back yard.

Thats sounds nice, brewing under the Tiki Hut!

So this converter will allow you to plug into a regular household 110 receptacle? Would that work on the 50l unit?
 
Has anyone here actually cut off the euro plug and installed a U.S. type plug? Thorsten replied to me that it is "an easy fix", however hasn't provided any instructions on exactly how to do it.
 
Has anyone here actually cut off the euro plug and installed a U.S. type plug? Thorsten replied to me that it is "an easy fix", however hasn't provided any instructions on exactly how to do it.

Warranty still in effect if you do that? Did he/they provide that in writing? Why is the company selling that to the US market in that fashion.

I really like the look of the machine, but sounds like they are just winging it on the US market at this point.
 
Thats sounds nice, brewing under the Tiki Hut!

So this converter will allow you to plug into a regular household 110 receptacle? Would that work on the 50l unit?

Well, the converter he's buying specs at 5KW. The 50l Speidels unit is quoted as 3200W for the "heating spiral", and 2 x 23W for the two pumps. So- 3250W; they don't say anything about the draw of the control unit, but it wouldn't be over 100-150W, so be generous and say 3500W. Still a long way from 5KW.

If I were buying this unit now, I'd be more concerned about it being supplied with a Euro style plug, and all that implies: they're not really established in the U.S. market, so what about warranty, parts, service, etc.?
 
Logic tells me that you would take their hot (230v) and swap it with one of our hots (120v) and swap their neutral with one of our hots (120v) for 240v out of phase. Ground would go unchanged. That's just my thought, I am NOT an Electrician. Get the proper instructions before you proceed.
 
i just bought a voltage converter. i think like 150.00 dollars 5000 watts 5year warranty. i just wanted to have the ability to plug it in anywhere. i have 220 in the garage but i like brewing under the tiki hut in the back yard.

Thats sounds nice, brewing under the Tiki Hut!

So this converter will allow you to plug into a regular household 110 receptacle? Would that work on the 50l unit?

It should be ok.
FiveKai: remember that converter can draw up to 50A from the 120V line. Make sure your circuit can handle the load safely.
 
wyzazz, I agree with your description of wiring the plug. That is how some have rewired plugs for euro instant hot water heaters. I just want an acknowledgement from Speidel or MoreBeer4U before I proceed that way. Otherwise I think a converter is the only other way to go, but it would require a 30amp circuit for the 20l system, and wouldn't be as economical as going straight to 240V.
 
Setting up my 20l Speidel Braumeister and a few observations: First I contacted Internation Video and Electronics about their DS-5000 Transformer. This is their reply:

"Technically speaking the DS-5000 should work with no problem however, heating products work a little differently than regular electric products. Over time the excessive output from your boiler could wear the coils out in the DS-5000. Most large appliances we do not recommend using transformers because they are not a pernament solution. The boiler may work for you several months even years however at some point it will burn out. There is also a HZ issue because European countries run on 50HZ and the U.S runs on 60HZ. When the machine is running it will be running at a faster pace than it is normally designed to and this adds to the motor failure. If you would like to try it out, the DS 5000 is the model to go with, however we do not recommend it ."

I also contacted Thorsten about changing the plug. He was quite helpful. Subsequently I cut off the Euro plug and installed a 3-wire 240V 30 amp dryer plug. Mine has 2 prongs at angles and 1 shaped like a small L. The leg with the small L is the ground and must be connected to the yellow/green striped wire in the Braumeister's cable. The other 2 get connected 1 each to the other 2 legs. After plugging it in it works just fine and I didn't get electrocuted. Warranty is still good if properly done. Specifically states on website that U.S. users must change plug. I tested the pump and heater and both work fine. I expect to brew on Sunday so I'll have more info then. One issue is when draining the pot with the spigot a little over 1 1/2 gallons remains. This is not exceptable. Speidel has you tilt the pot to get more out. The spigot connects to a welded fitting on the pot. On the inside of the pot is a large smooth bored hole. I think there is plenty of room (between the pot and malt pipe) to fashion a pickup tube that should drain to within 2 or 3 cups.
 
As more people acquire and use the Speidels unit (which I feel is going to happen), this thread will prove invaluable to those moving into this method of brewing. Continuing to post tips and tricks used with the Braumeister to this thread will merit petitioning for sticky status at some point, I'm sure.
 
Thanks hfk2! Mine should be here by next Friday. Can't wait!!

Look forward to reading about your brew session Sunday. Take lots of pics or a video if that is an option. :mug:
 
Yambor44, just so know even though you can set the language to English, the temperatures will still be in Celsius. You will have to convert your recipes. Also I was surprised when I cut the plug off because the actual wire sizes in the cable are only 16ga. I figure for the 20l you're only drawing about 8.5 amps at 240V. That's really nothing, but the wire gauge seems quite small.
 
Yambor44, just so know even though you can set the language to English, the temperatures will still be in Celsius. You will have to convert your recipes. Also I was surprised when I cut the plug off because the actual wire sizes in the cable are only 16ga. I figure for the 20l you're only drawing about 8.5 amps at 240V. That's really nothing, but the wire gauge seems quite small.

Thanks, "hfk2." This is the kind of info I'm talking about.
 
Also I was surprised when I cut the plug off because the actual wire sizes in the cable are only 16ga. I figure for the 20l you're only drawing about 8.5 amps at 240V. That's really nothing, but the wire gauge seems quite small.

Yup. That's the beauty of using a higher voltage.
 
So I am currently brewing centennial blonde . Mashed for 60min hit 1.043, the boili just got going and I added my centennial hops. While the boil got started I washed the malt tube and got it put away. So far the machine is extremely easy to use. You can set up to 5 different phases to the mash with times and temps . This recipe just called for one Phase. Now me and my bro are just relaxing until the next hop addition. I love this thing!:mug: pics will be posted later:ban:
 
here is one pic with the malt tube up in the draining position. i just recycled some wort from the spout through the grain bed again. after the boil i stirred to create a whirlpool and it was pretty cool how all the sediment just settled in the center in a cone shape. i didnt thin the whirlpool was going to work well due to the heating elements inside the kettle but it worked perfectly.

the only problem I had was that my brother added 1 oz of centennial pellets instead of 1/2 oz as stated in the recipe. we will see how this comes out.

IMG-20110409-00005.jpg
 
here is one pic with the malt tube up in the draining position. i just recycled some wort from the spout through the grain bed again. after the boil i stirred to create a whirlpool and it was pretty cool how all the sediment just settled in the center in a cone shape. i didnt thin the whirlpool was going to work well due to the heating elements inside the kettle but it worked perfectly.

the only problem I had was that my brother added 1 oz of centennial pellets instead of 1/2 oz as stated in the recipe. we will see how this comes out.

I can't remember- looks like you have the 20l version....if you recall, I'd like to get an idea of the times involved, e.g., heating the strike water, getting the various temperature rises, including the boil. I assume you're using a standard IC to chill, and didn't order the Speidels unit....it looks like a pretty standard SS coil chiller to me.
 
FiveKaiBrewing said:
here is one pic with the malt tube up in the draining position. i just recycled some wort from the spout through the grain bed again. after the boil i stirred to create a whirlpool and it was pretty cool how all the sediment just settled in the center in a cone shape. i didnt thin the whirlpool was going to work well due to the heating elements inside the kettle but it worked perfectly.

the only problem I had was that my brother added 1 oz of centennial pellets instead of 1/2 oz as stated in the recipe. we will see how this comes out.

What a great brew area! Did you take any other pics? Glad to hear it went smoothly.
 
Finally put the 20l Braumeister together. I installed it on an old night table I had. Added castors and my march pump. Within an arms length I have 240V power, water, and my basement door to discharge cooling water.
Braumeister on stand.jpg

This show the interior of the kettle. The discharge hole is so high that it leaves about 1.5 gallons in the kettle. I added the copper tube and now it leaves about 1 cup.
DSC_0766.jpg

You add 23liters (about 6gals) cold water, program the controller and hit start. When kettle reaches temperature it beeps to indicate to add malt pipe, the first stainless screen and the stainless cloth. Then add malt, stirring as you go.
addingmalt.jpg

Acknowledge malt is added and top screen and cloth are in place and press start and the Braumeister starts the protein rest or whatever program you put in.
mashing.jpg
The water pushes up through the malt pipe through the malt and cascades over the sides. I put shims under the wheel to get an even flow over the top of the malt pipe.

Thought I'd show the plug replacement. Easy to do. Yellow/green wire in Speidel cord is ground. That must be connected to ground plug. The other 2 hot/neutral wires go to the other 2 wire in the Speidel cord.
DSC_0769.jpg
 
Continuing with my brew day. Mash is complete. You can't tell from photo but wort is very clear.
mashcomplete.jpg

I decided to use the pump and counter circulate the wort back through the grain bed so I could sparge and not loosen the bed and get grains in the wort. I gently ran the pump and left the strainless screen and cloth in place to evenly distribute the water.
sparging.jpg

I sparged with just under 3 gallons, which was too much. I have to adjust my numbers in BeerSmith. I figure I ended up with about 7 gallons of preboil wort. The malt pipe with spent grains is easily lifted out of the pot to be disposed of, however the first lift is a little heavy until the suction is broken.
spentgrains.jpg

This is where the problems came in. Up until now the machine performed exceptionally. Temperature and times were right on target, gravities were exactly as wanted. I found I couldn't get a strong rolling boil.
boil.jpg
 
So finally realizing starting with 7 gallons and not having a huge boil I wasn't going to get down to my +5.5 gallons of wort. I ended up placing a large sheet of aluminum foil over the top and left and opening about the size of my fist.
This got the boil going good. At this point I put the machine in manual operation and was able to crank up the temperature to 102 degree C. It never got up there but did get to 100C which kept the heating element constantly on.
boilingfoil.jpg

The unit is pretty easy to clean. I ran PBW with both pumps on and the heating element on for about an hour. Wash with a sponge and drained thoroughly.

This shows the control head. Even though it is in English it gives temperatures in Celsius.
controller.jpg

These are the stainless screens and cloths used in the malt pipe. One heavy screen goes in first followed by the stainless cloth. The malt is added then the second stainless cloth and final stainless screen is added. The whole thing is held down by the pipe and wingnut. A gasket on the bottom of malt pipe makes a good seal with the bottom of the pot.
screens.jpg

Finally this is the insulating cover on the Braumeister. It is a foam with a vinyl covering. It seems to be well made and I expect it to last quite a while.
All in all the whole routine was stress less, and easy. While the Braumeister is heating and mashing I could be getting things ready for the next step, or cleaning on the fly. You still have hands on. You need to formulate a recipe. Grind grains if you do that, input your mash schedule, temps and times, and add your adjuncts and hop additions. It gives you automation and extreme accuracy. I can now brew on the raining, snowy days that I couldn't before. I can't give thumbs up or down until I sample the brew, for color, haze, smell and flavor. Let you know in about 2 months.
 

Attachments

  • braumeisterwithcover.jpg
    braumeisterwithcover.jpg
    35 KB
Hfk2,

Nice pictorial and process explanation! Thanks for taking the time to do this. One question, where did your 3 gallons (even though too much) of sparge water come from? Did you heat it up with something separate?
 
I heated the sparge water in one of my very old cheap 5 gallons pots on a butane hot plate I use to use on my boat. I think that good looking copper hood may do a lot more than just look great. My next session I am going to do the whole boil with the foil over the top. I'll also keep track of times, with respect to length to reach temps. My basement is 60 degrees F. Maybe in the summer I wont need the foil. Also when in auto mode, the boil program was set to 100C. When the pot got to that temp the heating element would cycle on and off. Next time I will check to see if I can program 102C in auto, like I could in manual mode. It made a huge difference in the quality of the boil.
 
I heated the sparge water in one of my very old cheap 5 gallons pots on a butane hot plate I use to use on my boat. I think that good looking copper hood may do a lot more than just look great. My next session I am going to do the whole boil with the foil over the top. I'll also keep track of times, with respect to length to reach temps. My basement is 60 degrees F. Maybe in the summer I wont need the foil. Also when in auto mode, the boil program was set to 100C. When the pot got to that temp the heating element would cycle on and off. Next time I will check to see if I can program 102C in auto, like I could in manual mode. It made a huge difference in the quality of the boil.

How the unit achieves a boil was a thing that jumped out at me as I was reviewing the Braumeister manual. Section 4.6 begins:

As described in the previous section, the automatic process has been continued, and the boiling of the hops started to. The display again shows the time and temperature of the phase. Since the set temperature of 100°C cannot always be reached, the time begins to run with an additional period of 3 min after reaching at least 95°C. The beer wort is boiled
during this phase.


Since this has obviously been translated from the German, I'm not quite sure what they're attempting to say here. Naturally, an electric element can only be cycled on and off to achieve a particular set temperature. I'm assuming what you accomplished by setting a higher temperature (102°C) was to establish a higher set point where the element will cycle. I'm still a little puzzled by the phrase "Since the set temperature of 100°C cannot always be reached-"
 
rico 576
When using the automatic mode the pre-programed temp is 100C. The boiler was able to reach 100C but when it does it starts to cycle the heating element on and off. This starts the boil, then stops the boil because the element is always going on and off. I'm not sure yet whether I can increase the boiling temp to 102C like I could in the manual mode. However when in manual mode I reached 100C but could not reach 102C and this caused the heating element to constantly stay on. When I partially covered the pot I got a nice rolling boil. I notice that when I boil with propane my temp is always up around 218 -220F to keep a rolling boil

Thanks.....it doesn't sound like it's something you can't control. Something I forgot to ask- does that insulating jacket come with the Braumeister, or did you have to purchase it separately?
 
It's extra. About $70. I thought I would need it brewing in the basement in New England

Wow. That's steep. If I buy a Braumeister, I'll probably just go with the material I used on my current boil pot. It's actually automotive firewall insulation I got from JC Whitney, along with a fireproof metal tape to put it on and heat-resistant spray glue to make it stick to the pot. Has worked like a charm now for two years, and even made the transition to a turkey-fryer burner. Makes a difference in heat retention.
 

Latest posts

Back
Top