Soldering Stainless steel

Homebrew Talk - Beer, Wine, Mead, & Cider Brewing Discussion Forum

Help Support Homebrew Talk - Beer, Wine, Mead, & Cider Brewing Discussion Forum:

This site may earn a commission from merchant affiliate links, including eBay, Amazon, and others.
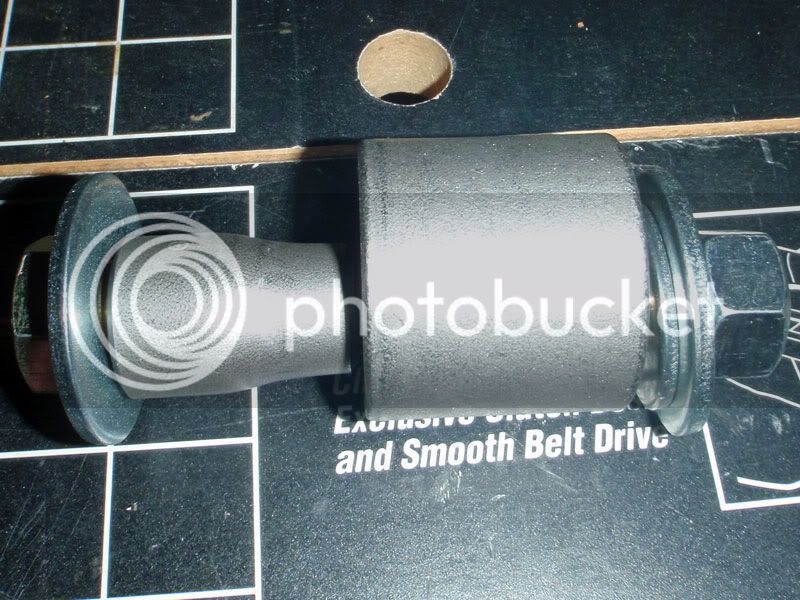
All the info to build one is on this forum. I was able to build mine pretty cheap since I already had the washers, nuts, all-thread, and 1" PVC coupling lying around. And although crude and cheap I was able to get 6-7 good dimples made with the same setup before I totally caved in my not quite thick enough washers.
Take your time, keep it straight and don't pull it all the way through, and you'll be golden.

yeah I have most of the items too but will get the rest. One main question I have is does the coupler need to be flush with the dimple? or can it be say half in, half out through the hold? Or what is the preferred placement for a kettle to use with a ball valve. I wouldn't think it matters much and would be up to the users preference as you could thread on both sides regardless.
 
I've got them in whatever way is necessary for what it does. I have some flush to the inside for outlet/whirlpool ports. I have 1 that's almost flush with outside for the upper fill port on my HLT. I got half couplings that are kinda halfway for thermowells and probes. It's really up to you. Just think about what's going to be in the coupling. And how you may need to access it. Like if you need to torque down a fitting, you may want to leave enough to one side or the other to be able to grab hold of it with a wrench for backup. But you may need to have some weight on a fitting and you don't want to stick all the way out because it could shear off. It's really about preference. Just remember that if you go flush to the inside of the dimple you wanna leave a little sticking into the dimple so that the solder fills the gap without flowing down into the threads.
 
I've got them in whatever way is necessary for what it does. I have some flush to the inside for outlet/whirlpool ports. I have 1 that's almost flush with outside for the upper fill port on my HLT. I got half couplings that are kinda halfway for thermowells and probes. It's really up to you. Just think about what's going to be in the coupling. And how you may need to access it. Like if you need to torque down a fitting, you may want to leave enough to one side or the other to be able to grab hold of it with a wrench for backup. But you may need to have some weight on a fitting and you don't want to stick all the way out because it could shear off. It's really about preference. Just remember that if you go flush to the inside of the dimple you wanna leave a little sticking into the dimple so that the solder fills the gap without flowing down into the threads.

Thanks, that answered my question perfectly, there is not a wrong way to put in but really depends on application and don't go totally flush and have the solder run down the fitting :drunk:
 
Not much special in how this would be done other than leave out the gasket and just fill in all the gaps. You might want to simplify the collection of parts to only what you need to make the bulkhead seal. That can be a nipple flanked by two locknuts. Solder would go between the nipple threads and the locknut and also between the edges of the locknut and pot wall.

Short of doing the dimple that increases surface area, you definitely want a more mechanical squeeze and some increased surface contact on the face of the pot wall.
 
I soldered it,,,,,with just the flange/nipple fitting. I wrapped the nipple with the solder , heated up the pot a tad, then heated up the fitting. I used my large (left handed/metric) crescent wrench to help weight down the fitting when the solder started to flow. Did a leak test and I passed. Now I just need to buff up the area around the fitting. It's not as "neat" as some of yours, but it's only a boil pot.
 
well I got some couplers put in with a bit of trouble on the dimple. The couplers that I bought are a bit thinner than the norm I guess becuase the pipe fitting reducer made a hole too big for them :(, luckily I still have my hold rid and just swapped out one on a weldless fitting where size is not important.

One the next one I paid carefull attention to not go all the way through and just enough to then push the thin walled coupler through.

The soldering went ok, it was really black but bar keepers friend took care of that.
 
When you pull your dimple tool too far you can close the hole back up by tapping it with a hammer.
 
It adds a bit of time to each fitting dimple, but I use my calipers and get a custom diameter for each coupling. Then I'll trial and error my way up to the final dimple diameter. I actually undersized mine and used the bolt assembly to slowly draw the coupling into the dimpled hole. Makes for a VERY tight mechanical fit to bolster the soldered connection.
 
What I usually do is get the dimple tool to start a flare then I just pull the fitting through. That way I don't have to keep checking and I end up with a very snug fit.
 
Stopped by my local big box tonight. Picked up a tungsten carbide bit for my Dremel, which allowed me to open the tapered coupler up enough for the 5/8" bolt to pass through. So I was able to finish the tool properly.

Left to right parts are:

5/8"-11 x 4 1/2" bolt
5/8" washer
3/4" to 1/2" stainless steel butt-weld pipe fitting
1" stainless socket weld low pressure coupling
1/2" washer (drilled to 5/8" with the step bit)
5/8" washer
5/8"-11 nut

dimple_tool.jpg


The reason for the 1/2" washer is to center the coupler on the outside. It nestles perfectly in the slight taper at the end of the coupler.

dimple_washer.jpg


Here's the fitting pulled all the way through. It is a tight fit. Completely unmovable by hand. Exactly what I was hoping for.

dimple_outside.jpg


And the inside. The end of the fitting is actually level with the inside wall of the kettle. I'll probably draw it in just a little deeper, but I like the fact that there is plenty of surface for solder.

dimple_inside.jpg


Now I just need to grow the cojones to do this to my real kettle...

-Joe

Nostalgia, I'm curious the size hole you drilled in the keg before making the flare/dimple. My concern in making it to small/large and cracking the keg or not getting enough dimple for the solder.

Thanks,
Adam
 
Does the 7/8" give enough mechanical "grip" so you have to complete the dimple with the coupler you plan on soldering?
 
7/8" is smaller than the coupling size so a dimple is required. Unless you are soldering the nipple. Then something around the same size of the nipple would be required. I went with the 7/8" because I had previously went with weldless fittings.
 
Last edited by a moderator:
I'm still using the cheap 10 dollar torch and bottle setup I bought at lowes. It's not self-igniting but it's perfect for soldering stainless.
 
I've been hobbling along with a cheap light-it-yourself torch for 20 years and I FINALLY got a self igniting torch and I'll never go back. For one thing, it saves gas because it's off when you don't need the heat. It's also safer for that reason. Because it sucks to light the manual ones, you'll leave it sitting on the work bench burning when you get distracted. My dad actually lit the back of his jacket on fire for this reason.
 
I've been hobbling along with a cheap light-it-yourself torch for 20 years.... and I FINALLY got a self igniting torch and I'll never go back. ...you'll leave it sitting on the work bench burning when you get distracted. My dad actually lit the back of his jacket on fire for this reason.

Your so right! Many times on a stepladder in my basement sweating a copper pipe...the convenience of a self igniting torch must be heaven. I have a collection of inherited old school torches and strikers with broken flints...maybe someday, but it is a tool I seldom use.
 
Ok - i sent a similar message to Nostalgia moments ago, but thought I'd post it here to get your feedback....I've read through all 147 pages of the thread (quickly) and still have a question.

First, I'll be using triclamp fittings - mostly 1" but a single 2" fitting too...can you folks see any reason to NOT have the dimple going INTO the keg/pot/barrel rather than coming out?

The reason I have in my brain for doing it this way is to provide a little more stability up the throat of the fitting rather than just at the end...but perhaps there's a reason for not doing it that way...also might be easier since you could potentially actually pull the fitting in, rather than making the dimple and trying to bang the fitting in AFTER the dimple was made....

Thoughts?

Moby
 
If you plan to sink a TC fitting into the dimple you may want to seriously consider the dimple being formed outward. I say this because it will give you much more clearance to actually turn the thumb knob on the clamp. You'll want that real estate... trust me.
 
If you plan to sink a TC fitting into the dimple you may want to seriously consider the dimple being formed outward. I say this because it will give you much more clearance to actually turn the thumb knob on the clamp. You'll want that real estate... trust me.

The fittings I have are all 1" in depth...how deep are the dimples that everyone else are doing?

Moby
 
So bought a keggle off craiglist. Fittings have already been installed and welded on the outside. Unfortunately the work inside was not as good in fact although the don't leak I was wondering if I soldered in the inside by heading the fitting could I effect the weld on the front?

Sorry if this is a dumb question.

That solder will melt LONG before you get enough heat on the stainless welds to damage them...
 
If it is welded on the outside and not soldered, you won't effect the welds on the outside at all. BTW, there are no dumb questions here. :)
 
Thank you, the guy swears he used stainless fittings and a stainless rod for the welding on the outside. He then indicates he covered each outside weld with jb weld to ensure no leaking. I'm suspect so I'm calling around to find out whether I can get it cleaned up and tig welded otherwise I might hit it with barkeepers friend, a pipe cleaner, sandpaper, acetone and the flux/8 % silver solder. I don't like the look of the joint at all. He did not dimple and I wasn't sure if I could basically redo the whole thing i.e. cut this all out. My guess is probably not...

I suppose this is what I get for not looking more carefully before loading up the truck he insists it's not rust and that it couldn't be given its stainless steel. I disagree...

20150106_112318.jpg


20150106_112326.jpg
 
That would make quite a hole when cut out. You would need a chunk of metal to replace the hole.


Adding some solder over the top of that might slow the oxidation down. Or even JB weld coating. Some people use silicone on heating elements that rust. Probably get a couple years from it even if you did nothing.
 
Yeah that's why I'm thinking of just soldering or getting it welded. If I only get 1 or 2 years out of the three keggles secondary to rusting I can say well I didn't spend a whole lot and got some use out of it. At the end of the day, I just want to get going on this system but don't want rust, etc... in the finished product...
 
Try to sand and polish the area and do your best to passivate it with a paste of Bar Keeper's Friend. You may be surprised that it just might clean up really well and stay that way. Yeah it sucks that the dude did shoddy work, but try to fix what's there before you cut things out.
 
More than likely he either didn't back gas the weld or he cleaned it with a non stainless wire wheel. What you should do is get a 120 grit flapper disc sand the hell out of it. Clean it up with acetone and let it sit up for about a week somewhere dry with a constant room temp and low humidity to let the stainless re-oxidize as stainless. Judging by the color he didn't tig weld it but used a stick. Which pretty much means he didn't use any gas. Its very important to back gas a stainless weld or its going to rust. That's red meaning its more than likely iron oxide.
 
Back
Top