• Please visit and share your knowledge at our sister communities:
  • If you have not, please join our official Homebrewing Facebook Group!

    Homebrewing Facebook Group

Soldering Stainless steel

Homebrew Talk

Help Support Homebrew Talk:

This site may earn a commission from merchant affiliate links, including eBay, Amazon, and others.
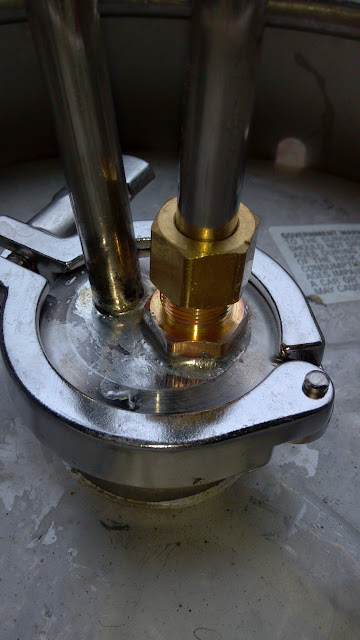
I used Propane to do my soldering too. Also sand paper on the fitting and the kettle area is important.

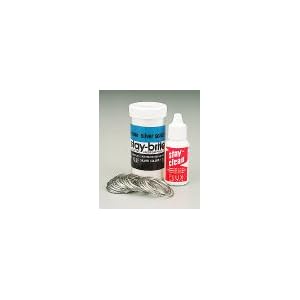
I did a LOT of looking into this before soldering a 1" Nut onto my Blichman kettles and found that propane will heat the solder up enough to melt. But is at a low enough temperature to cool fast enough to not allow the nut to "wander" before setting up. The Stay Clean helped too of course.

Here is some other tips I found.

Use a round ring of the solder the size of the hole in the kettle. Put it on the top of the kettle, and then place the nut on top of that. Heat the nut with the torch until the solder melts and then IMMEDIATELY remove the heat source. If not the solder will run.

Make sure to heat up the area on the kettle too, not just the fitting
 
I plan to read this thread more in depth when I get home, as it isn't fun via mobile, however would anyone mind telling me how these couplers are holding up?

I need some on my keggle, and it looks fun to do, but how resilient are they? I tend to over torque my stuff down...

Thank you.
 
the coupler pieces will be fine, you may go through some washers, nuts and bolts. Ive bent up some washers pretty good.
 
As usual I seem to be about 2 years behind everyone, but I finally read through this entire thread and I think I'm ready to try this. I'm using kegs for BK, HLT, MT. I have 3 seperate 1/2" valves on my BK now (Drain, temp/sight, and whirlpool). I've also been waiting to go to electric, so I'll probably add a 1" NPS fitting on the kettle too.

I haven't even started designing the HLT or MT yet. Assuming I stay with electric for those, I would need two more 1" NPS fittings, and two 1/2" couplers for each?

Sorry, I know I'm all over the place, but I'm trying to order everything online and I'm a bit overwhelmed. I'm just switching to AG for those who haven't caught on to that. :) I have friends telling me to get half couplers, some full couplers.

Maybe I'll just hold off until I have a better plan. :drunk:

You shouldn't need an element in the mash tun. If you are going electric, put bottom drains on the vessels, you'll thank yourself to be rid of the scourge of dip tubes.
 
Well I ended up ordering all the stuff to make "the tool" using as much help as possible from Nostalgia's video. For some reason things just didn't fit. I got the 5/8" 11 4 1/2 bolt but it wouldn't even slide through the 3/4" to 1/2" reducer. I had to drill a millimeter or 2 out of the reducer to get it to slide through. The 5/8" washers I ordered are extra thick, but they aren't as big as the OD of the 1" coupler. I planned on grinding one of the washers down to make an angled edge then soldering it to the coupler. I also plan on soldering the other 5/8" washer to the reducer. Hopefully everything stays centered. Another problem is that the reducer's OD is larger than the OD of the 1/2" couplers I bought from bargainfittings.com. Not a huge deal just means I wont be able to pull the dimple tool all the way through the hole, but instead have to keep checking the diameter to find out when the coupler will fit through. Or I could pull the reducer all the way through and then use a mallet to reduce the whole slightly then pull the coupler through. I'm considering grinding the reducers OD down a smidge so that it matches the OD of the couplers.

I also bought all my fittings from bargainfittings.com, so I think I'm ready to solder everything together. I bought flux from mcmaster while I was ordering parts. Hopefully it's good flux.

Mcmaster parts list:
4335T64 1 " COUPLING
45605K711 REDUCER
92620A810 GRADE 8 5/8" BOLT
98125A035 5/8" THICK FLAT WASHER
7695A1 FLUX FOR STAINLESS 1 PINT
 
Good luck! If I were you I wouldn't grind the reducer. Just stop before it pulls through. You want the reducer to stretch the hole out the last bit so it's trapped in there snugly.

There was a note on the 5/8" bolt in the video description:

Youtube said:
Parts list for the dimpling tool - note the tapered adapter may need to be opened slightly to fit over the 5/8" bolt (just a few thousandths of an inch). If you don't have a Dremel or other tool to do this, you may want a 9/16" bolt instead:

I should probably make an annotation so folks don't miss it.

-Joe
 
You're probably right about grinding the reducer. I remember that the half coupler OD is slight larger than the full couplers.

You know Joe I do remember reading that, but apparently I stored it in the round file instead of keeping that in mind when I got the parts. It was an easy fix because I happen to have a 5/8" drill bit and cutting oil handy. Took about 30 seconds and now the reducer slides perfect.

Because I often come off as an ass, I'll take this opportunity to thank you for making the video. It was the final push I needed to order everything and get started on soldering everything.
 
Because I often come off as an ass, I'll take this opportunity to thank you for making the video. It was the final push I needed to order everything and get started on soldering everything.
No offense was taken, but thanks for saying so. Cheers! :mug:

-Joe
 
I encountered the same issue when I ordered the reducing coupling. It was slightly bigger than the OD of our 1/2" NPT couplings.

My solution was to measure my OD of the coupling with a caliper and made a mark on the reducing coupling where I wanted to stop pulling it through.
 
I encountered the same issue when I ordered the reducing coupling. It was slightly bigger than the OD of our 1/2" NPT couplings.

My solution was to measure my OD of the coupling with a caliper and made a mark on the reducing coupling where I wanted to stop pulling it through.

I did that exact thing this morning and have successfully converted my boil kettle to soldered fittings. Thanks again Joe and Wayne.

By the way, bargainfittings.com is awesome, I just spent another $140 there today. I may have a problem. :)

6490-soldered-fittings-boil-kettle.jpg


Still have a little cleaning but it turned out well. Practiced with 2 sacrificial couplers on some scrap stainless before I attempted this one.

And yes, this wasn't the ideal place to put a valve, right over the hole in the bottom of the kettle. Wish I would have read about that before a I drilled a year ago.
 
Is this correct product?: Amazon.com

thanks
--Dusty

21an6PEFwsL._SL500_AA300_.jpg

How many connections are you doing? What type of connections? Do you plan on practicing first? If you're dimpling coulings in, you might only get a few connections done with that kit. It's the right stuff it's just very small. Although I'll admit the 1lb roll of solder i bought is overkill. But was only $20. The pint of flux was $17. Lifetime supply I suppose.
 
Last edited by a moderator:
Not sure yet, would definitely be a good idea to practice a couple first before anything on my BK. I found a link in this thread for a kit from Home Depot too. I just wanted to make sure this was the right stuff - I have gift cards to Amazon from Christmas so anything brewing related I can find there is "free" :)
 
Here's the stuff I used to solder. I paid just over $40 total for both. After practicing twice on the scrap stainless I had, I was ready to try it on my boil kettle. Turned out great.
6566-flux-available-mcmaster-com-solder-available-orchard-supply.jpg


Here's everything I used from drilling the holes to finishing the solder. The only thing not pictured is 40 grit black sand paper.
6567-almost-everything-i-used-drilling-hole-soldering-couplings.jpg


Here's how I held the kettle to keep the dimple as level as possible to the solder wouldn't want to wander while molten.
6568-keg-held-2-pieces-scrap-wood-hold-place.jpg


I dimpled the coupling from the outside in. Used one wrap of solder around the OD of the coupling, heating for about 30 seconds from the INSIDE of the keg, then let cool for 15 minutes before cleaning with the same flux.

I also plan on re-applying Barkeepers Friend to everything before I use this kettle again.
 
Wow after 2 days straight reading this thread and watching nostalgia's great video I am going to start practicing my soldering. I'm in the middle of my first all grain electric build with all weldless fittings and hope that soon enough my soldering will be good enough to use on my keggles. Great thread with tons of information. Thanks all
 
For anyone interested in making dimples for 1.5" TC ferrules:

Stainless Steel 316 Cast Pipe Fitting, Reducing Coupling, Socket Weld, MSS SP-114, 1-1/4" X 1" Female


This part is nice because you can use the other end for making dimples for 1/2" NPT fittings.

Stainless Steel 304/304L Pipe Fitting, Concentric Reducer Coupling, Butt-Weld, Schedule 10, 1-1/2" X 3/4" Pipe Size


Make a 1-5/16" hole.

Has anyone used these parts as suggested? Figured I'd check before I go ahead and place an order to dimple my kettle for tri-clover ferrules.
 
Last edited by a moderator:
Has anyone used these parts as suggested? Figured I'd check before I go ahead and place an order to dimple my kettle for tri-clover ferrules.

I ordered the concentric reducer but can't for the life of me figure out why I would want the reducing coupling. I ordered a 2" butt-weld coupler to make 1" dimples for heating elements. I'll confirm this configuration when the parts get here, and when I figure out what washers to get to replace the 5/8" washers used for 1/2" dimples.
 
Stopped by Airgas today and the local branch carries the Radnor Stay Clean liquid flux and Stay-Brite silver solder kit for $10. However, they don't carry any documentation on whether it is the same as the Harris kit, or whether it is FDA certified for food contact. Can anyone tell me if this is the product I want?

http://www.airgas.com/browse/productDetail.aspx?Category=26&product=RAD64001776

I don't see it listed earlier in this thread as most of the links are broken to the Radnor products, but it is listed here:

http://www.airgascatalogs.com/guide/RadnorProductsCatalog/159.asp#

And there it says it's NSF 51. From here:

http://www.nsf.org/business/food_equipment/standards.asp

I would deduce that it is likely food safe... Any help would be greatly appreciated to determine if this is the same kit as the Harris.
 
...
I would deduce that it is likely food safe... Any help would be greatly appreciated to determine if this is the same kit as the Harris.
That is the same as the Harris Stay-Brite kit. No problem. The solder in the kit is labled "Harris" and the flux is the same as the Harris Stay-Clean flux.
 
I got the reducing coupling because you can use the large end as a backstop for the 1.5" TC flare, and then if you want to make dimples for 1/2" coupling you can use the other end as a backstop for that. You want it to be a fairly close diameter to the hole and fitting you're pulling through.

I had to figure out a way to stabilize the TC fitting on the bolt with some pvc pipe scraps I had laying around as it did not want to go in perfectly straight. A larger bolt would probably help also.
 
That is the same as the Harris Stay-Brite kit. No problem. The solder in the kit is labled "Harris" and the flux is the same as the Harris Stay-Clean flux.

Thanks for the clarification, I figured as much but wanted to make sure before using it! Don't want anything not food safe in the kettle.
 
What gauge solder are you guys finding works the best?
1/8 inch or 1/16 ?
Does it make much difference?
 
Back
Top