• Please visit and share your knowledge at our sister communities:
  • If you have not, please join our official Homebrewing Facebook Group!

    Homebrewing Facebook Group

Single Vessel, All Electric, NS, NC Brewery

Homebrew Talk

Help Support Homebrew Talk:

This site may earn a commission from merchant affiliate links, including eBay, Amazon, and others.
I got the 1" FPT x 1.5" Triclover at St. Pat's....as well as the sightglass. I was worried, but I had a seamless transaction...so no complaints here :)

KLG Stainless has by far the best prices, but selection is somewhat limited....so I got all my elbows, clamps etc. from them and went elsewhere for the odds and ends.

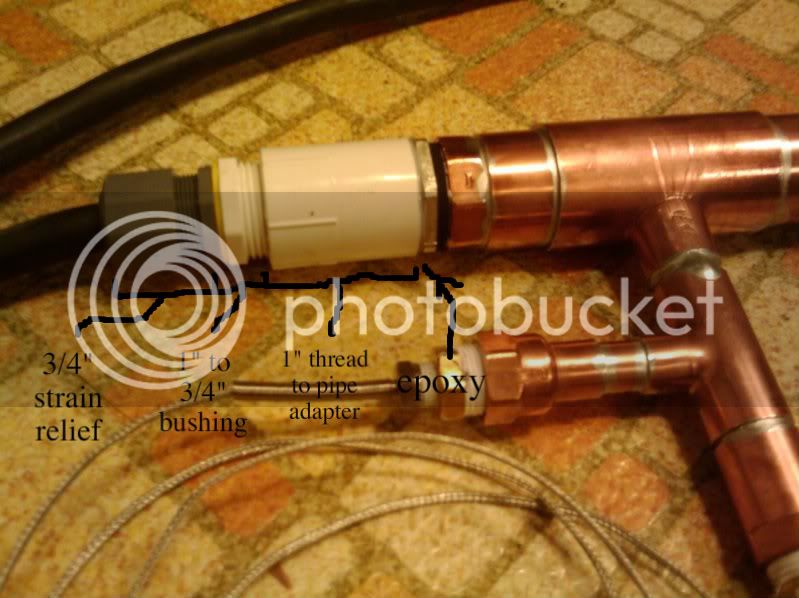
I haven't wired anything yet, but I'll probably solder a lug onto the element's TC fitting. That way I can pull the element out in one piece without disconnecting wiring.

Question....I will properly ground the toolbox and everything that connects to it...but how should I ground the stand? I want the rig to be able to roll freely....
 
how should I ground the stand? I want the rig to be able to roll freely....

Stand in a puddle and lick it?

You'll have to run a wire from the ground block inside the toolbox to the stand/components since they should have a common ground. You can use a strap or anything conductive, it doesn't have to be insulated but it should be able to carry enough current to trip the breaker. The last thing you want is an undersized ground that just gets really hot when have a short.
 
I guess what I'm saying is, if the pump and RIMS have grounds in their cords....and they get plugged into the box....and the box has a ground block....and the box is plugged into the wall....isn't it all grounded? I.e. There is a path for the stray signal to travel to ground in any situation.....

Just don't want to connect the toolbox to the stand since it's supposed to be portable....and I don't recall seeing other boxes of this type being connected by a ground to the stand.....
 
Oh, I thought you wanted to ground the vessel and hardware, which is a good idea. If you short the element to the hardware, it won't pop the breaker unless the hardware is grounded. It will just sit there energized until you touch it and then you might become the ground.
 
Grounding the toolbox: Would a cable with an alligator clip and a banana plug or an alligator clip on each end work? It would be something like the static wrist straps and anti-static pads that people use when working on electronics.
 
You need something large enough to carry the current load of your heating element to ground. Reading back, you mentioned that you ARE grounding the elements to the triclover mount. As long as the ground is carried from the triclovers to the stand itself through the mounting bolts, everything will be grounded and you're fine.
 
I was going to solder a lug to the 1" FPT triclover adapter that the RIMS element is screwed into. With the TC clamp on, it should carry the ground signal from the stand as well as the RIMS chamber. As far as the kettle, I'll probably solder a lug onto the outer wall of the kettle, pot the other 2 element connections with epoxy, and cover with a black PVC reducer coupling....screwing in a strain relief.
 
Like so?

2010-07-29221520-1.jpg
 
That's pretty dang close! I was hoping theyd have a 1" FPT x 3/4" FPT reducing coupler...then just screw the strain relief in. So did you put your ground on the back of the element base?
 
The adapter is only threaded on one side. I looked for a 1" tube to 3/4" NPT, but couldn't find one. Not sure if they even make that part. And yeah, I drilled a hole in the base of the element and soldered the ground wire in that. That way, the nut touches the threads of the element, and the pot, so everything is grounded. I'd be careful doing this if you're using lots of teflon tape, definitely check for continuity between the pot and the ground.
 
Okay guys, a little more progress....today I set up the elements. I used 3 wire dryer cords, SLB conduit elbows (pretty slick, I think), and potted them hardcore with JB Weld. I ran the ground through a hole in the body which I will seal with silicone in addition to the backplates and conduit fittings.

P1040070.jpg


P1040081.jpg


P1040083.jpg
 
Here's the epoxy.....much easier this time vs messing with the screen!

P1040086.jpg


P1040087.jpg
 
I also changed my plumbing a bit, I've been racking my brain about how to integrate the water filter in a clean fashion...so I chopped it and dropped it. It's now the perfect height for drainage. I have plans to integrate a 40 plate chiller in a unique way...more to come on that ;)

P1040066.jpg


P1040067.jpg


P1040068.jpg
 
Looks like some great progress so far! I'm curious if you ever picked up a PID. I'd recommend a BCS-460 if you want to automate some stuff in the future, it's been working great for my applications. You'd need to pick up some SSR's (see PM).

On a separate note though... your fitting on the bottom of the kettle. I'm looking at going that route now... what tips do you have and can you go into more detail for the process. What pieces did you pick up to jury-rig a "hole bender"? Did you use a soldering iron and lead-free solder or a silver braze it or what?

Cheers,

:mug:
 
I did get a PID...an SYL-2352...I was originally going to use 1 PID and switch it between elements like PassedPawn did in his toolbox thread but I decided to just go with 2 PIDS and switch 1 element at a time using contactors and a 3PDT toggle. I'm also going with an ASL-51 timer....they look sweet.

As far as the kettle...I couldn't leave well enough alone an did more work on the fittings....I used propane, lead free solder, and a keg-tool...you should really read the homebrewer's soldering bible if you haven't already....paying special attention to Nostalgia's method....which creates BEAUTIFUL joints. If I could do it again, I'd just go 3/4" instead of 1"...it was too big to control and the hole wasn't flared evenly so soldering was a pita. The trick is to make a tight pocket and the solder just pools perfectly. Amazing how the price in fittings >3/4" jumps too. At least I'm set if I ever go to mega size batches :D
 
So here's some shots of my kettle revision....I just couldn't leave the bottom drain alone and so I redid it. This one has a small groove in it (first pic), which I eventually filled with silicone for 100% drainage (second pic). The solder drizzled through this time, which was a PITA, but I eventually figured it out and I think it's stronger now because I know the solder is completely penetrating and filling the joint. If I could do it over, I think I would have practiced the flare technique on some scrap...it was a mistake to try it with a huge coupler...especially jury-rigging the tool with PVC. It would have been better to get a cheap galvanized fitting and clean up with BKF....

P1040100.jpg


P1040126.jpg


P1040125.jpg
 
Here's the street elbow on the left. It's going to be for whirlpool return. The shoulder made it really easy to solder, and it's hella strong.

P1040129.jpg


P1040095.jpg


P1040131.jpg
 
And here's the coupler on the right that'll be used for the RTD probe. This one came out great and was really easy to do.

P1040121.jpg


P1040092.jpg
 
I also soldered ground lugs onto the RIMS chamber and the BK, respectively:

P1040106.jpg


P1040116.jpg
 
And here's some pics of the big guns, and their placement! I threw some silicone adhesive around the conduit gaskets, strain reliefs, ground wires, and faces of the elements (to prevent rusting). I may very well put some on the element's NPS threads since they don't properly seal in the FPT coupler.

P1040119.jpg


P1040133.jpg


P1040138.jpg
 
And here's a pic of what I *think* the final valve configuration will be (right side in front)....I hated the hopback module in front...it looked too phallic :D Plus, I think it looks kinda like catback exhaust. Another reason why triclovers rule, they're like legos for toughguys :rockin:

P1040140.jpg
 
I'm curious about the whirlpool return. You won't be able to thread in an elbow with it that close to the bottom. Will you be using a flare/compression fitting and some bent tubing?
 
I should be able to put another street elbow in there...it's about 1/2" from the bottom....if not, yeah....I'll probably use copper.
 
Ah, I was envisioning the long end of the street elbow swinging around, but I guess it would be tough to thread FPT into FPT.

derr...
 

Latest posts

Back
Top