• Please visit and share your knowledge at our sister communities:
  • If you have not, please join our official Homebrewing Facebook Group!

    Homebrewing Facebook Group

Simplest Hop Sock / Stopper Ever???

Homebrew Talk

Help Support Homebrew Talk:

This site may earn a commission from merchant affiliate links, including eBay, Amazon, and others.
Are any of you concerned about using non-stainless threaded rod and/or safety pins, etc. for this project? I'd think that steam would condense on the metal parts and drip back into the beer... since we're all so anal about using only stainless/copper/brass (and some may restrict this list to less than that), I'd think this would be frowned upon.

The reason I ask is that neither Home Dump nor BLowes carry threaded stainless rod.


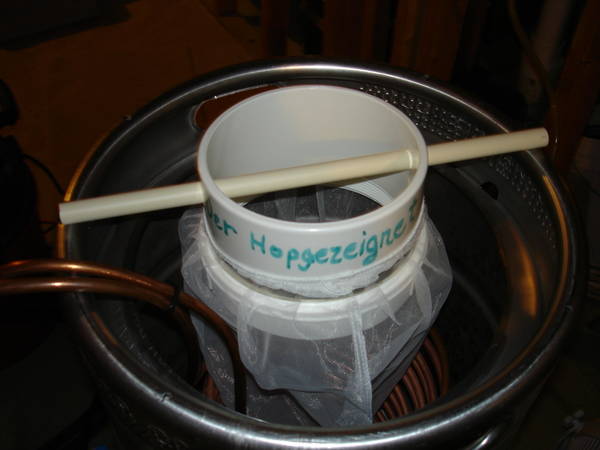
That's why mine looks like this;


Are any of you concerned about using non-stainless threaded rod and/or safety pins, etc. for this project? I'd think that steam would condense on the metal parts and drip back into the beer... since we're all so anal about using only stainless/copper/brass (and some may restrict this list to less than that), I'd think this would be frowned upon.

The reason I ask is that neither Home Dump nor BLowes carry threaded stainless rod.
The risk, if any from this would be insignificant. It's amazing how many homebrewers obsess about miniscule risks of contamination from things, but we have no qualms dumping a 9% Barleywine down our throat. :confused:
 
The risk, if any from this would be insignificant. It's amazing how many homebrewers obsess about miniscule risks of contamination from things, but we have no qualms dumping a 9% Barleywine down our throat. :confused:

Hey... I never said it was logical! Of course it's an obsession!! It's beer!!! :rockin:

I guess I'm just defending how anal I am about such things. I guess I'll look into Schlenkerla's CPVC route. Tell me, please, how does yours work? Is the CPVC pipe cemented to the ring? With only two support points, does it roll around?

-John

It work great, It doesn't move around much either. I believe I built mine for $14.00

The first time I used it I was making a Barleywine with more than half a pound of whole hops.

There is a video out there somewhere.
 
:off: Sorry for the off topic...but I laugh audibly whenever I see BMs kettle :D

9958d1235443579-simplest-hop-sock-stopper-ever-hopbag6.jpg
 
I'm wondering how well the hop sack will work with an electric keggle. It will probably sit down low enough to hit the element, but since the wort is moving past the element so quickly (boiling) it may keep the sack off it. Thoughts?

I don't like just using the stainless scrubbie over/under the dip tube, doesn't seem to work as well. Also I may go with a bottom mounted drain which means it would be even harder to filter out the hops.

I have always considered it to be one of lifes un-written rules to never risk having your sack exposed to the elements. No matter what the context.
 
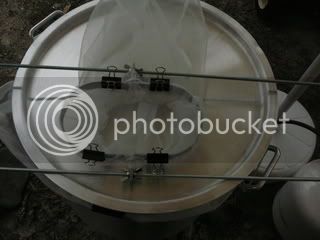
I liked this idea so much that I borrowed it. I made a slight modification to avoid using clips. Instead of two 'C' brackets, I bought 4 and used two on each side. This way, the bag is sandwiched between the two. The brackets I used, also have a rounded grove in them that helps to pinch the bag in place. On my strength test for this configuration, I actually tore the bag before any slippage failure. To remove the bag, I simply loosen the tension on the wing nuts and slide the bag out.

http://i42.tinypic.com/zw19q9.jpg
 
I tried the clip to the kettle method in my last DIPA batch, but the bag floated to the top, so I said screw it and did my usual toss the hops in free floating in the boil, then strained into a second kettle at flameout that had a bag similarly attached with clips. Then I pulled the bag out to drain and cooled the wort.

I try to reduce splashing to avoid HSA, and my method is an aeration risk, but there is the argument that hops utilize better when floating free in the boil. Plus, with DIPA's, could you really fit all the hops in that little bag?

The hop straining thing has been bedeviling me for a while, now that I am doing IPAs, but the free-float boil, then pour into another bag-lined kettle @ flameout, seemed to be the best method so far (then again, the proof will be in the beer, still in the fermenter).

Thoughts?
 
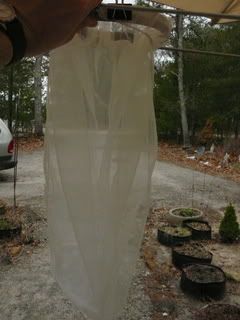
I should mention it's important to add something inside the 'sock' so the bag hangs down all the way... I usually use 4 dessert spoons. Just remember to remove them before dumping the hops, they're easy to miss among all that muck!
 
My second version of hop strainer is this -
hop%20stopper.jpg


I salvaged the frame from a cheapie pizza stone that has long since cracked from using it as a base for sweating copper pipe - actually exploded. Advantage is a very wide mouth opening and no building whatsoever. Just some binder clips and a Northern brewer large filter bag. Make life with whole hops easier.

Not included in photo is the use of 2 plastic Harbor freight clamps to hold the frame on the keggle rim for added stability.
 
Thanks for the suggestion on the hop bag, fast tricky. I like that design.

Concerning BM's keggle cut: damn.
 
My second version of hop strainer is this -
hop%20stopper.jpg


I salvaged the frame from a cheapie pizza stone that has long since cracked from using it as a base for sweating copper pipe - actually exploded. Advantage is a very wide mouth opening and no building whatsoever. Just some binder clips and a Northern brewer large filter bag. Make life with whole hops easier.

Not included in photo is the use of 2 plastic Harbor freight clamps to hold the frame on the keggle rim for added stability.

I have that exact same broken-pizza-stone wire base! I kept it thinking to myself "I know I'll have a reason to use this!". Looks like a great usage of it.

Now all I need is a nice Full Sail Keg like that one you have there....
 
As I move from the valley of whole hops to using more pellets..... I have been playing with hop bags and have been intrigued by this base design...

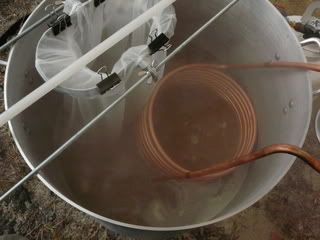
I have one question.... For those who use Immersion Chillers how do you handle putting the chiller in at the 15 min mark?

(Note Last 3 brews I've just put the chiller in at the start of the mash....)
 
My concern with these things is the netting getting clogged with hot break and then having a low extraction from minimal wort movement through. Anyone experience this?
 
My concern with these things is the netting getting clogged with hot break and then having a low extraction from minimal wort movement through. Anyone experience this?

Yes, that's been my experience exactly. Pellet hops will also clog the mesh greatly reducing hop utilization. I no longer use one of these contraptions. Now I rely on my false bottom to hold back the majority of the break material and hop debris.

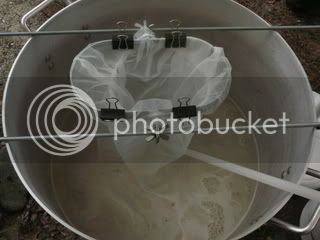
Here's the one I built FWIW:

4238651542_c61a9fae65.jpg


4238651688_4741c448e5.jpg


The support rod is a fiberglass driveway marker that I cut down. A single rod is all that is needed. I may give this thing another try sometime, using only whole hops.
 
As I move from the valley of whole hops to using more pellets..... I have been playing with hop bags and have been intrigued by this base design...

I have one question.... For those who use Immersion Chillers how do you handle putting the chiller in at the 15 min mark?

(Note Last 3 brews I've just put the chiller in at the start of the mash....)

Instead of inserting my stainless chiller for the last 15 min. I just let it sit in my star-san bath up until I turn off the heat. While I drain the rest of the wort from the bag, I also let the solution drip from my chiller.

Here is a pic of my contraption (without the bag).
IMG_0372.JPG


It is a stainless sink hole for a garbage disposal.

It seems to work fine for me. Maybe the IBU calculations are a bit off, but I'm not unhappy with my brews using this.
 
Yes, that's been my experience exactly. Pellet hops will also clog the mesh greatly reducing hop utilization. I no longer use one of these contraptions. Now I rely on my false bottom to hold back the majority of the break material and hop debris.

Here's the one I built FWIW:

4238651542_c61a9fae65.jpg


4238651688_4741c448e5.jpg


The support rod is a fiberglass driveway marker that I cut down. A single rod is all that is needed. I may give this thing another try sometime, using only whole hops.

Sorry to dredge up an ancient thread, but I am looking at building one of these this weekend. Has the topic of hops clogging the hop sacks been explored any further? The two LHBS's in my area both carry almost exclusively pellet hops. I have used the muslin bags for individual hop additions for years.

The idea of a reusable piece of equipment like this is appealing. If I am already using muslin hop bags ( I tie them with enough head space so as not to compact the pellets), should I see any real difference in my hop utilization with one of these?
 

Latest posts

Back
Top