Simple Controller/Panel to control single electric 5500 element?

Homebrew Talk - Beer, Wine, Mead, & Cider Brewing Discussion Forum

Help Support Homebrew Talk - Beer, Wine, Mead, & Cider Brewing Discussion Forum:

This site may earn a commission from merchant affiliate links, including eBay, Amazon, and others.

mongoose33

Supporting Member
HBT Supporter
Joined
Dec 16, 2015
Messages
8,141
Reaction score
8,122
Location
Platteville, WI
I need a controller for a single 5500-watt electric element. I see some of those wonderful blinking-light panels and wish I had the money for one, but I'm about tapped out for that kind of thing.

What I need is a simple panel to control a single 5500-watt element. On-off, obviously, but also something to control current.

I'm not averse to DIY, but if it were cheap enough, I'd rather buy off-the-shelf.

Someday, I'll get a Kal-type panel, but for now, all I need is simple. Any ideas or sources on this? Thanks!
 
I made mine really simple, essentially close to what your needs are

lXFvBo0l.jpg


It was $150 for the components from amazon and I have extra's left over.
 
I'm just knowledgeable enough to be dangerous, not knowledgeable enough to know exactly what to do.

FWIW, I have a PID controller for controlling a pot of alloy for casting purposes, and I wired it myself. So I'm not averse to doing the work--what I'm not sure about is the exact things to do.

The above examples look great--but what I'm not clear on his how those throttle down the element. I want the element to go full-bore when I'm trying to bring water or wort to boil, then throttle it down when I want to maintain a decent but not excessive boil.

Something with a pot would seem to fill that bill, but I have no idea how to make that work with 240v.


Do the above examples allow that? They would seem to be based on temp, not power. BTW, the Stilldragon kit--http://stilldragon.com/index.php/diy-large-controller.html--would appear to do that.
 
Both of the PID controller's you see on this page have the ability to turn down the power on the Element so you can control the boil better. The EZ Boil probably does it better than my Inkbirds but I'm happy with the performance.
 
Taking the info above I've been looking on the web at these various options. I'm now scratching my head, trying to alter my assumptions about this to see if I can produce a better idea.

Here's what I'm planning: A RIMS system along w/ an electric brew kettle. Separate mash tun.

I was thinking about an auber plug-and-play basic control box, it's in the low $300 range. I was also thinking about adding a control box from Bobby to control the RIMS. At that point I'm in the $400+ range.

But it would be more elegant to have it all in one box. As I was perusing the Auber site I ran across this:

https://www.auberins.com/index.php?main_page=product_info&cPath=52&products_id=735

What has complicated this--and when did anyone do an electric brewing setup that wasn't complicated?--is that I'm running a 4-wire feed to the garage from my main panel. We (electrician and I) had planned to terminate it in a sub-panel and then feed off that. But now, since the Auber offering looks like it requires 4-wire directly, it seems like I should be able to feed a hot-tub panel (with GFCI) and then use that to feed the Auber. That would save me money which I could put toward this controller.

BTW, I appreciate greatly the willingness of all of you to help me work my way through this.

EDITED: Darn it. It doesn't appear to allow me to control the RIMS. There's a pump outlet, and a sensor outlet, but no way to control the element.
 
Last edited:
my setup! Obviously wise, you i mean ;). I spent a very very long time researching everything and not even worried about price really and what you want is what I came up with. I have detailed my system but I don't know how to find it for you. Along with all the thinking that went in with it which will help you as well. I was going to get a little more serious about leaning you in this direction on that other thread, but I didnt feel like getting into it. Here's the reasons why I believe my simple 5500 watt system is King. In my opinion, the Next Step Up is a grainfather. I'll answer your question in a second.

Even though I haven't done it and I've been talking about it for years with a simple $80 aluminum 25 gallon kettle I could Brew 10 gallons easily full volume and very quickly. I can Brew lower gravity beers in my 15 gallon at 10 gallons full volume quickly. I have no equipment to move no more equipment to buy. All I have to do is move my heat Stick Over.

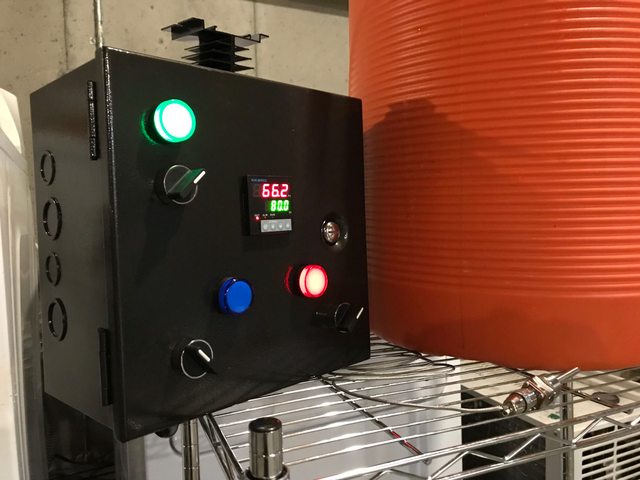
Just like you I wanted a simple control panel. But I didn't want any cheapy Parts. Auggie says they are all the same, idk. I also wanted a 110 on the control panel case I wanted to use a pump in the future which I don't. I wanted a potentiometer and I wanted a breaker switch. Potentiometer is easier to control boil but you can also use the PID. I wanted a good PID and not a cheap one. One with versatility.

Auber sells a simple controller like I'm describing like you want. But when I bought it they didn't have the potentiometer option. I think they do now. I feel really blessed and lucky that one day after hours and hours of research I found the Jagger Busch. I talked to him and he was a cool crazy genius. I believe he was very talented. He built the controllers with all high-quality parts. Auber pid, etc, good ssr. Breaker switch, 110 volt plug, potentiometer, everything. Simple, perfect, something I could store in the kettle, which I do. It was $275 dollars. You can make your own for super cheap but you have to wait for the parts and put it together, I just wanted to plug in play.

The sad news, he passed away. But I've seen his controllers out there for sale on websites and I think it's what you need. If you can't find it look at the Auber easy boil. Get the hot rod and 5500 watt element from Bobby and you basically have my system. And you're not alone. I have seen a lot of them. I can't remember who on brulosophy has the same system too. 110 or whatever for the hot rod and element and 275 for the controller and you're Brewing 10 gallons in 3 hours for $400. This is what I came to. I don't even use the thermometer or PID. I just use thermometer and that has created some arguments. Hope I've helped and sorry for a little extra, i really enjoy your writing and thoughts. Cheers.

I see that in the time it took me to write this there are many other great answers and you are considering the rims. yeah, I was too and Bobby helped walk me through the whole thing. He really is incredible if you've never talked to him. He help me design the whole thing. All you have to do is add some ball valves, Quick Connect tubing, camlocks, ports, etc... I am so glad I didn't but to each their own. Still just a simple little controller with an on-off switch for the pump I think would work. Then I was going to build a stand out of wood with wheels on the bottom, but thought man those Home Depot metal shelves are nice enough.

By the way get a nice long cord and you can Brew wherever the you want. Another $80 I've been talking about splashing out forever and haven't. I don't have room in my garage for a simple little Brew stand and I don't want to leave my equipment out back for thieves.

.
Screenshot_2018-08-06-10-41-32.png
Screenshot_2018-08-06-10-40-57.png
Screenshot_2018-08-06-10-40-04.png
20180224_170808.jpg
20180224_155932.jpg
 
Last edited:
Here's about the simplest thing you can build to safely use an Auber EZBoil. The EZBoil will automatically drive the element hard until you reach boil temp (or just below), and then cut back power to a pre-set percentage. Can also be used to control mash temp if you are able to recirculate.

DSPR120 1-Pump Simple.PNG


You can leave out the pump switch, pump outlet, and 10A fuse, if you don't need to control a pump.

Brew on :mug:
 
The panel in my avatar was also under $300 to build... 3 mypin td4 (later I swapped one out with an EZboil) pids, 3 24v pumps with speed control and a sestos timer (also sold as an inkbird) with alarm. it controlled 3 heating elements and used xlr and aviation style power and probe connectors in the carlon plastic enclosure from the home depot.
Just pointing out that it doesnt have to be expensive if you take the time to shop around for parts. I retired it in favor of brucontrol which is more fun and more versatile IMO but I understand where your coming from wanting something simple and easy too. My vote is for the stilldragon for kettles and a simple pid setup for the rims like the inkbird I believe you already purchased.
You can also buy the larger stilldragon kit and mount an ezboil in it instead of the pot knob... that would cost you about $120 or so to build I believe with plugs and such.

I understand about 94 percent of all this--I've built a PID controller, I'm not afraid of wiring and such, provided the directions are clear.

But the issue is in not knowing what to buy and knowing when it's the wrong part. For instance, in Doug's wiring diagram above, I had to look up what an XLR connector was. Now I know. It's the plug for the temp probe (the RTD PT-100).

So I'd have to figure out where to find the XLR parts (male and female), one of which would be attached to the box.

And the box...what kind? Where? Metal or plastic? How do I punch holes in it? In my PID I cut the holes with a dremel, drilled the other holes as they were small. But this....I dunno.

Building something like you have would be fabulous. I'd even enjoy doing it, I'm sure. But you've got speed controls, used xlr and aviation style power and probe connectors.....it's just that I don't understand how it all fits together.

Guys like you just...know. I am not sure where I might get the wrong part and compromise the system. Doug's schematic above is pretty clear, but even figuring out where and how to put a heat sink on the SSR isn't self-evident to me.
 
Yep, and then you figure it out. The right box, amps, wire, diagram you need. Order it, wait put it together. Document the build here as many have done. I bailed. I dont usually bail, but did on this. After buying all auber i didnt save as much either i figured. Mostly i didnt want a big box. I like that homemade one above that is smaller. They make kits though i think with all the parts now. Some of these simple controllers are way to much though as pretty as they are. You dont really need a potentiometer as the pid in manual mode can control output. The newish auber ezboil has one built in. Best of luck hope you share what you go with.
 
understood.. I know it can seem overwhelming but not one step at a time. these were things I learned out of curiousity and as you could see from pics of my first panel things changed quite a bit over the years as I picked up more knowledge. The inside of my first panel looked like a rats nest of wires not properly routed or color coded. my second panel wasnt much better. if this forum hadnt changed the rules for picture sizes I could share pics to show you but everything I previously shared in other threads now come up as "file too large"... sigh, im not resizing all my old photos.
Say you went with the large $40 stilldragon box. thats plastic. you can easily use a dremel or even a jig saw after drilling two corner holes to cut out the pid hole. then buy one of these https://www.ebay.com/itm/RTD-PT100-Temperature-Sensors-1-2-NPT-w-Telfon-Cable-and-Detachable-Connector/223089250702?_trkparms=aid=222007&algo=SIM.MBE&ao=2&asc=52935&meid=20c5e4ea3c6e4064b3be5c6e495aa337&pid=100005&rk=5&rkt=6&sd=173453890428&itm=223089250702&_trksid=p2047675.c100005.m1851
Or these
https://www.ebay.com/itm/Waterproof-Tri-Clamp-RTD-PT100-Temp-Sensors-Telfon-Cable-Detachable-Connector/253378587548?hash=item3afe8a6b9c:m:mTTq-5qwPOpefFX7RqAmjMg&var=552542228523&_sacat=0&_nkw=detachable+pt100&_from=R40&rt=nc&_trksid=m570.l1313
and a 3 pin aviation connector like this if you even want to bother having it disconnect at both ends if you cant solder, skip this altogether. https://www.ebay.com/itm/M16-16mm-3-Pin-Screw-Type-Electrical-Aviation-Plug-Socket-Connector-Hot-us999/261831434391?hash=item3cf65ea097:g:6LAAAOSwBahVLdDR&_sacat=0&_nkw=3+pin+aviation+connector&_from=R40&rt=nc&LH_TitleDesc=0 (the teflon cable will hold up much better than the stainless braided stuff many sell)

the rest is the same as the directions for building the kit as it comes. the other stuff such as alarms and even the contactors is nice but as long as you kill the power to the unit after your done using it or before you go messing with the element plugs with wet hands, you will still be safe.

you'll likely develop a want for more and revise the panel a couple of times making improvements as you want to tackle the projects and feel comfortable.
 
Last edited:
So is auber literally charging 3x the price for the EXACT same thing? Is the difference shipping. I noticed that little xlr connector said it could ship as late as october. Having dealt with china before they seem to ship faster than they say but they probably need to cover themselves. Seems like buying the parts on ebay with thay stilldragon kit one could be ready for 120? Including all cords, cables, and plugs. Pretty sweet. Auber parts would be 2x that. The guy who built mine was smart and saved cable plug money by using a laundry cord cut in half, i think. Brilliant. One half for the out, half for the in. In the long run even at 120 for the box i was glad to pay 160 more and have it built on my porch 3 days later. Shopping from all these different vendors and waiting for all the parts to come from China and then assembling it once everything came in, i didnt have the patience for, but either way buying a 450 dollar version makes no sense to me either, but man some people can afford stuff like that so easily. Wish i had auggies talent, but i dont.
 
auberins does have thier own products they design and have others in china make for them like the temp controllers.. for much of what they sell though they are just resellers.. They offer better support and faster shipping but in many cases its the same generic stuff you can find online for much less.. As you pointed out it all depends on the buyers patience and priorities as well as whether they feel they need the extra support. everyone charges markup fees.. The standard used to be 30-35% but that seems to have grown quite a bit depending on vendor and product. Ive seen some charge upwards of 400%.. Its all about what they can get away with I guess. Ive seem $40 components sell for over $2000 at work over the years (old employer) because of rebranding and markups when going through all the "proper" channels to the customer.. people just assume this stuff is somehow a premium product but many times its not. Its more about stocking fees and multiple stages of distribution all taking a cut.
 
I think i am the one who needs to make one, and sell mine and pocket the money :) i never quit and i quit on this project. You helped me, everyone did. Then I bought it and wired the 240 myself in a live box! So pretty much did the harder part in a way. Living in old house where it won't turn off I had no other option and I was tired of overpriced quotes and or hacks. Keep that in mind mongoose. You are going to need 240. At some point point the grainfather robo Brew become considerable in my opinion depending on how much beer one makes or wants to make. And how much space.

Thanks augie for the knowledge. Your knowledge of systems, chinese parts, and controllers is so helpful. Your comment left me a little unconvinced about some parts but others it's a no-brainer. For example those nice looking affordable temperature sensors seem a no-brainer. I might have to put mine in someday. Also I think the mypin is quality, no. Not sure I like that XLR connector or the wait for it. The stilldragon looks solid. Add a my pin and you are on your way. My problem is I get to obsessive and it takes me too long to build it when it should be short.

It's a design flaw that you have to have the thermometer. We've all debated plenty about whether to use it but since I don't even use it it would be nice to save the money on the connector and probe
 
...

It's a design flaw that you have to have the thermometer. We've all debated plenty about whether to use it but since I don't even use it it would be nice to save the money on the connector and probe
No, it's not a design flaw. A feedback signal (temperature) is required for a closed loop temperature controller (which is what a PID or EZBoil are) to even function. They cannot operate as temp controllers without the temperature probe to tell them what the temp is. If you just want a manual, open loop power controller, then a temperature probe is not required. Just because a PID or EZBoil can be operated in an open loop (manual) mode, doesn't change the fact that their primary purpose is closed loop control.

Edit: There is a manual only version of the EZBoil - DSPR1 - that does not require a temp probe to operate.
Brew on :mug:
 
I think i am the one who needs to make one, and sell mine and pocket the money :) i never quit and i quit on this project. You helped me, everyone did. Then I bought it and wired the 240 myself in a live box! So pretty much did the harder part in a way. Living in old house where it won't turn off I had no other option and I was tired of overpriced quotes and or hacks. Keep that in mind mongoose. You are going to need 240. At some point point the grainfather robo Brew become considerable in my opinion depending on how much beer one makes or wants to make. And how much space.

I've got a licensed electrician helping me. He also is a homebrewer so he understands why I'm doing what I'm doing.

Last night I drilled holes in joists and a buddy helped me pull that 4-wire, 6-gauge cable. Not easy. But it's done, all but the cleaning up the drill shavings. :) Now to figure out where I want that to terminate in the garage.

Part of my angst in all this--and it'll get resolved one way or the other--is not knowing what will work best. Most of the time when I've set up my brew space to accommodate something new, it has taken 2 or 3 times to get it how I want it.

Same with this--I'm reasonably sure I'll want to change some things, I just don't know what. So I'm trying to be as flexible as is reasonable.
As long as you terminate the new feed wire at a receptacle that is convenient for all possible locations of the control panel, there should be no issues. You don't want to hardwire the panel to the structure wiring, as then the panel technically needs to meet code. As long as the panel is a plug-in appliance, it doesn't have to be code compliant.

Brew on :mug:
 
No, it's not a design flaw. A feedback signal (temperature) is required for a closed loop temperature controller (which is what a PID or EZBoil are) to even function. They cannot operate as temp controllers without the temperature probe to tell them what the temp is. If you just want a manual, open loop power controller, then a temperature probe is not required. Just because a PID or EZBoil can be operated in an open loop (manual) mode, doesn't change the fact that their primary purpose is closed loop control.

Edit: There is a manual only version of the EZBoil - DSPR1 - that does not require a temp probe to operate.
Brew on :mug:
Right, umm, I was just making sure that everybody was paying attention haha. Thanks man, that makes perfect sense. That dspr1 would have been perfect for me. I think we discussed this before. Even though many would not want to brew with a manual only, this ultimately helps answer op question in at least a simple, small, open loop controller is an option.
 
I've got a licensed electrician helping me. He also is a homebrewer so he understands why I'm doing what I'm doing.

Last night I drilled holes in joists and a buddy helped me pull that 4-wire, 6-gauge cable. Not easy. But it's done, all but the cleaning up the drill shavings. :) Now to figure out where I want that to terminate in the garage.

Part of my angst in all this--and it'll get resolved one way or the other--is not knowing what will work best. Most of the time when I've set up my brew space to accommodate something new, it has taken 2 or 3 times to get it how I want it.

Same with this--I'm reasonably sure I'll want to change some things, I just don't know what. So I'm trying to be as flexible as is reasonable.
Exactly, that's why I went with not only a small cheap controller but also the heat stick. I figured if I wanted to go rims in the future I could and also I wanted to get a bigger pot I could. Also if I wanted to install the element in the future, I could do that as well or maybe get a second. I was just like you I didn't know what I was going to need or want exactly yet until I started. If you don't spend too much and want to go three vessel with a big panel you can do that in the future and many of the parts you can still use. Was just my thinking. I got my stainless steel table from web restaurant and it was affordable and nice. Unfortunately it's in the laundry room and I'm brewing out back.

So cool you got the 240 done. That's a big part of it. Get a little controller and a element and you are well on your way.
 
I did my build based on what Kal shows, but often using parts from local big box home improvement store, etc. I have a PID from auber, a temp probe that is just wired in (no XLR), a few switches for pump, fan, and alarm (I bought a buzzer that responds to the alarm of the PID when strike water hits a certain temp, etc.). It's got a 4 wire drier plug that feeds a spa panel that feeds the control box. I just went with what Kal said unless I could get something cheaper elsewhere (switches, etc.). You can often get cheap dryer cords at thrift shops, FYI, so that was where I got my heavy gauge wire.

I recirc with the main element to do mash temp control and have no problems.
 
Back
Top