• Please visit and share your knowledge at our sister communities:
  • If you have not, please join our official Homebrewing Facebook Group!

    Homebrewing Facebook Group

Show us your electric brewing rig

Homebrew Talk

Help Support Homebrew Talk:

This site may earn a commission from merchant affiliate links, including eBay, Amazon, and others.
Ok, just one teaser picture with my panel wide open (being the **** I am)...

IMG_6681.jpg


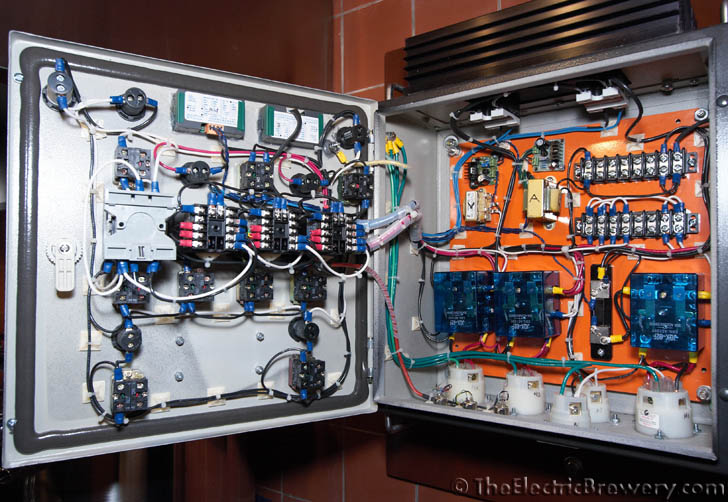
I'm working on writeup for this portion of the site now...

Kal

I am late to the show, however, I cam across this thread with the intent of starting my own project....After Kal's post, I no longer saw a need to continue past page 2. Geeze.
 
Simple single vessel BIAB system, no sparge, RIMS, plate chiller, PID for mash temp control, manual override for boil. Mash, boil, recirculate through the plate chiller then pump into a corney. Attach spunding valve & ferment under pressure in the corney. Counter pressure rack to serving corney.


dscn16721-55670.jpg


dscn16731-55671.jpg
 
Check out my link below. Kal clone with some mod's.


I went back and as i was looking at your build i thought..." damn, thats some nice woodworking for a Steelworker"

I cant imagine what mine would look like if i tried wood. I should be done with my panel and picking up tubing next weekend for the stand.

Great job gary
 
I went back and as i was looking at your build i thought..." damn, thats some nice woodworking for a Steelworker"

Thanks, I cant imagine what mine would look like if i tried wood. I should be done with my panel and picking up tubing next weekend for the stand.

Great job gary

With wood I just use different tools. The hood and the grain mill were the most difficult but not that bad over all. Just takes time. Hope you get your going soon!:tank:
 
Yep, the wall plug is GFCI. Wouldn't do without, I promise. :)

(Had to post this as totally ghetto and what not to do, cause everyone else's are so neat and tidy.)

((But I did make a beer this weekend, so that means it's connected right and worked ok!!))
 
Latest incarnation using CFC for HERMS and post-boil cooling. Heating and bypass valves held over from previous design. Pulse meter and solenoid valve for accurate water dispensing is also nice. PLC control using a Siemens S7-200 controller and old OP-7 HMI.

Brewstand1.jpg


Brewstand2.jpg
 
Old thread, but I finally have a stand to complete my electric rig.
Built to expand to 10 Gal, with an additional pump and the HLT below the Mash Tun, I currently can do 5 gal Brutus 20 style with gravity taking place of the 2nd pump. The heat stick attaches to the side when packed away.

IMG_8624.jpg


IMG_8626.jpg


IMG_8629.jpg


IMG_8632.jpg
 
Alot of really nice builds.

DeeDub76 - very nice.

Like you and TheFlyingBeer, I am using a stainless steel table. I got mine from Costco a while back for something else and figured it would be cheaper than building a stand.

Looks like you used unistrut for the control panel. I am using that as well for mounting alot of the components.

Here are some shots of mine partially done. It's missing the HLT that goes on the left.

IMG00056-20110224-1839.jpg


IMG00055-20110224-1838.jpg


IMG00054-20110224-1838.jpg
nice control panel mount, I also love the vintage hp designjet plotter in the background... I used to service those for years... I still have one customer using one.
 
Nice mtbr_brewer! That's quite the before and after change!

Kal

Hey, thanks Kal!

Not quiet as impressive as your basement transformation! I loved the ascetics of your brewery, so I wanted a similar gray industrial look. I did all the renovation work myself to save money, and that alone took several weeks. I'm hoping my Christmas present will be a utility sink next to my brew stand, but it may be a little tight. Nonetheless, appreciate the detailed guide you created! The dream is to purchase one of your control panels at some point, but for the time being I will work with the budget Hosehead I picked up and focus on making great beer!
 
Back
Top