• Please visit and share your knowledge at our sister communities:
  • If you have not, please join our official Homebrewing Facebook Group!

    Homebrewing Facebook Group

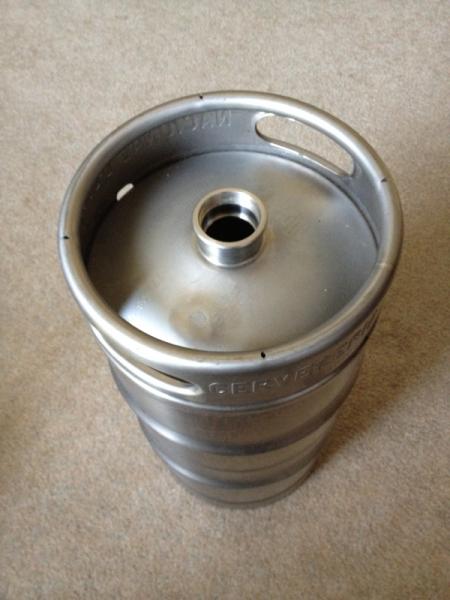
Sanke Fermentation Vessel

Homebrew Talk

Help Support Homebrew Talk:

This site may earn a commission from merchant affiliate links, including eBay, Amazon, and others.
A good rinse when emptied and then about 2-3 gallons of PBW solution (slosh it around inside really good while it's hot) and then let it soak for X days. I then use one of the carboy/keg cleaners and spin that sucker inside. Cleans it really well. I then rinse fully and set aside for use later. When I'm getting ready to use it, I just put a few quarts of StarSan in it, put the bung in (with the hole closed/blocked) and shake/swirl to coat the entire insides.

I do use a telescopic, bending, mirror to inspect the underside (of the top) to ensure it's clean before calling it clean.

So far, this has worked really well for me. I do have one keg that I picked up the other weekend that's the first I've needed to do a full fill soak with PBW solution. It's a miller keg, so it's got nasty all inside it. :drunk:
 
Yay! 2 sankes for $30. Now i need to make beer.

What size?? I usually put 6.5-7 gallons in one of the pony (1/4 bbl) kegs.

I need to do some more work on the remaining 1/6 bbl kegs I have, fitting them with gas posts. I need to order more posts (liquid and gas) so that I can finish fitting the kegs I have yet to modify. Using the sanke fermenter kit, I found that I can put a Cornelius ball lock post on it, with a dip tube under it. I simply fit two o-rings on the dip tube and it seals up nice and tight. I'm in the process of getting, marking, and cutting liquid dip tubes so that I can push my finished brew out of the fermenter that way.
 
Golddiggie said:
What size?? I usually put 6.5-7 gallons in one of the pony (1/4 bbl) kegs.

I need to do some more work on the remaining 1/6 bbl kegs I have, fitting them with gas posts. I need to order more posts (liquid and gas) so that I can finish fitting the kegs I have yet to modify. Using the sanke fermenter kit, I found that I can put a Cornelius ball lock post on it, with a dip tube under it. I simply fit two o-rings on the dip tube and it seals up nice and tight. I'm in the process of getting, marking, and cutting liquid dip tubes so that I can push my finished brew out of the fermenter that way.

They're half barrel kegs. I've seen some guys on here simply use the sanke spear to transfer their beer as the keg was originally designed to function. A carbon cap is what I'm going to use until I get my parts in from brewers hardware and make a nice triclover fermentation dealio like he sells, but with a bit different design to it for my personal uses.
 
The large universal bung fits in the opening nicely. It's also far easier to use than the orange carboy cap. I was using the cap to transfer my brew after fermentation (barb fitting on the tall post, stainless racking can in the center post). If you don't get the caps soft (running it under hot tap water for a few minutes is usually enough) they're a PITA to get onto the keg.

Since I don't have any metal working machinery where I am, I'm using the kit from Brewer's hardware, slightly modified. I'll try to get some pictures of my modifications this weekend. Basically, I could do without the 1/2" tube part for the airlock or blow-off tube. Since you can fit a 1/2" ID hose on the fitting that takes the racking cane. I do like his thermowell design. I plan on getting a few more from him, with shorter thermowells. That way I can use them in my two 25L and one short pony keg.
 
Golddiggie said:
The large universal bung fits in the opening nicely. It's also far easier to use than the orange carboy cap. I was using the cap to transfer my brew after fermentation (barb fitting on the tall post, stainless racking can in the center post). If you don't get the caps soft (running it under hot tap water for a few minutes is usually enough) they're a PITA to get onto the keg.

Since I don't have any metal working machinery where I am, I'm using the kit from Brewer's hardware, slightly modified. I'll try to get some pictures of my modifications this weekend. Basically, I could do without the 1/2" tube part for the airlock or blow-off tube. Since you can fit a 1/2" ID hose on the fitting that takes the racking cane. I do like his thermowell design. I plan on getting a few more from him, with shorter thermowells. That way I can use them in my two 25L and one short pony keg.

I was playing around with the carboy cap last night and didn't have too much trouble with it.
 
A good soak, rinse and then a 10 minute boil and all is good. Nothing is going to infect your fermentation that could possibly be left inside.

They are really the best single thing I have added to my process, now I just need to use them instead of my corny kegs for conditioning and serving. I hate splitting the batch part way through, but cornies are more practical for lifting into the keezer.


This is what I do too. Hot PBW soak (keg holds heat for a long time). rinse well. Boil a few gallons with tri clamp fitting sitting on top. Steam works magic.

Flush with star san (about a half gallon) and turn upside down with cap/tri clamp for storage.
 
Ohio-Ed said:
I found it can be a challenge.

I built a keg/carboy washer using a small utility pump. Basically just sits in a rubbermaid tub of warm oxiclean sprays and recirculates into a a vessel sitting upside down over it. I ran it for probably an hour and could still see "stuff" stuck in the keg.

I went at it with a carboy brush... did a full 15 gallon oxiclean soak for a week, attached a piece of cloth to a wooden dowel in a drill and spun it against the sides... and could STILL see bits of crap stuck really high up on the side.

For me the problem is that as hard as it is to get anything into the keg to clean it with, its just as hard to see whats actually going on in there.

I know you said un-cut, but...
I ended up cutting the top out. I made the hole smaller than the one in a keggle and used a keggle cutout, a couple clamps and a big silicon o-ring as the new top. I just fermented my first batch in it and used co2 to transfer out of the sanke, so it makes a great seal. Obviously cleanup was no problem.

Do u have pics?
 
I'm curious about turning my 7.75 gal euro sanke into a fermenter but there are many dilemmas. Sweet keg, almost new and free from local nano brewer who bought a couple and decided not use them.

First thought of using the 2" Triclamp Sanke fermenter setups from either St Pats or Brewer's Hardware but the euro sanke kegs have threads inside where dip tube valve was...adds cleaning concern.

Second is the cleaning issue...thinking maybe a specially bent long carboy brush but then are you really sure it's clean inside?!? And then there are the pesky threads inside the valve body.

Finally I'm considering having a 4-6" Triclamp ferrule welded into the top which would allow easier cleaning but haven't talked with a welder to see if a sanitary weld is possible with no inside access and such a small place to work.
 
The 2" TC cap will work with the threaded opening since the part that matters is the lip. I've used mine on 25L kegs (threaded) without issue.

For cleaning I use a keg cleaner with PBW solution. I'm getting ready to make a pump driven keg cleaner over the next couple of weeks/weekends. Get some plain TC caps so that you can completely seal the keg and you'll be able to invert it and get a PBW soak of the top seaction (easily).
 
Thanks for the replies. I guess cleaning is my biggest concern as St Pats and Brewers Hardware kits are available and nice. Gonna email the welder and see if he can do sanitary welds and decide from there. Keep the replies coming.

image-3154227098.jpg
 
St Pats??

I had a local welder/machine shop fabricate my kits, as well as install a fitting so that I could use a gas post on the keg.

2012-03-17_10-53-30_622.jpg


I had him ream out the same fitting before welding it into the TC cap so that I can use liquid dip tubes to extract my finished beer. Works great. Next set I have done, where the keg is welded, I'll have him shorten up the fitting so that it's basically flush with the inside of the keg.

I've also had him weld a 4" ferrule into a 50L keg to make it a 10-12 gallon fermenter. All the fittings are welded to the 4" TC cap, which makes it even easier. I include at least a liquid fitting and thermowell on the fermenter caps. For the two extractor caps I had made, they just have the reamed fitting for a liquid post, with dip tube. The 4" cap is different since there's enough room to have both the liquid and gas posts there, and able to put QD's on them at the same time. Not so with the 2" TC caps I've found.

If the welder can TIG weld, and is good, he'll be able to make sanitary welds for you.
 
I have an 8" short ferrule that I was going to have welded on a keg. I was going to have it welded around the outside. On the inside I am planning on leaving a small ledge that the interior could be welded to, then with a die grinder and sanding drums smooth the interior weld until there are no places for nasties to hide.
 
Well the last welding job I had done was one 2" triclamp ferrule to my blichmann boil kettle and it turned out awesome but was $190 so that's why I'm having to consider the pre-made options from Brewers Hardware and St Pats. I have also found that just because a welder advertises they do TIG welding doesn't mean they know anything about making clean welds let alone sanitary.

Hopefully I'll find out today.
 
$190?? Did they at least apply some lube before graping you?

The welder I'm using also makes medical devices for hospitals, so he knows about making sanitary welds. Still, I might try silver soldering in the fittings for my next sight tube build. I just need to clean up my setup and check it over before running gas through the lines. Its been more than a few years since I've used it.
 
It was nerve racking taking a $350 beautiful Blichmann in to be worked on but they specialize in brewery, beverage, dairy work and you can't tell where the weld is...looks like factory from Blichmann. Worth the cost but yeah, damn expensive.
 
Thinking more about using the Brewer's Hardware conversion kit but a question comes up...is the 1/2" blowoff tube adequate? When we use a blowoff tube in a glass fermenter it is a much larger diameter tube/hose. I know a lot of folks are using these kits with sanke kegs but are there problems, especially during very active fermentation?
 
I've not had any issue fixing a blowoff assembly to my fermenter kits. I've used the one from Derrin before, as well as my own with a silicone hose section that bridges to either an airlock or the bent metal tube that then goes to the blowoff tube into a bucket/jug half filled wit StarSan solution.

IMO, it's no worse (in fact, probably better) than putting a blowoff tube into a carboy bung/stopper when needed. At least with this setup, you don't need to worry (as much) about it getting clogged and such.

IF you do go with the one from Derrin, I would advise getting at least once solid (2") TC cap too. That way, you can seal off the keg if you wish to age something and not worry (at all) about air getting into the keg. You can also top it off with some CO2 (if you're kegging) if you transfer for aging (on oak for instance) and then seal it up with the cap.

BTW, with the kit from Derrin, if you don't want to have the racking cane in the assembly while it's fermenting you can get a piece of 3/8" OD stainless tube, cut it about two inches long, and put that in it's place (cap it)...
 

Latest posts

Back
Top