You are using an out of date browser. It may not display this or other websites correctly.
You should upgrade or use an alternative browser.
You should upgrade or use an alternative browser.
Roxton Garage/Brewery build
- Thread starter RoxtonBrewing
- Start date

Help Support Homebrew Talk:
This site may earn a commission from merchant affiliate
links, including eBay, Amazon, and others.
toolboxdiver
Well-Known Member
subscribed
RoxtonBrewing
Well-Known Member
JBoehman said:Where are you located in the big O'?
West Side. J isn't Jason, is it?
J-Malone
Well-Known Member
Any updates on the keg conversions? Pics? I'd love to see the coil fully mounted, as I am in the process of doing this as well...thanks!
RoxtonBrewing
Well-Known Member
I will try to post some more tonight, but I have Beer School at the local watering hole. Might not be until tomorrow.
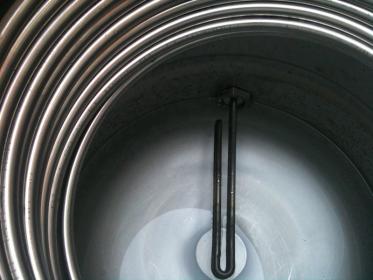
I have it mounted and tested. Looks good if I say so myself.
I have it mounted and tested. Looks good if I say so myself.
slakwhere
Well-Known Member
looking good so far...
where'd you order the greenlee?
where'd you order the greenlee?

$176.97
1pc Commercial Keg Manifold 2" Tri Clamp,Ball Lock Tapping Head,Pressure Gauge/Adjustable PRV for Kegging,Fermentation Control
hanhanbaihuoxiaoshoudian

$479.00
$559.00
EdgeStar KC1000SS Craft Brew Kegerator for 1/6 Barrel and Cornelius Kegs
Amazon.com

$33.99 ($17.00 / Count)
$41.99 ($21.00 / Count)
2 Pack 1 Gallon Large Fermentation Jars with 3 Airlocks and 2 SCREW Lids(100% Airtight Heavy Duty Lid w Silicone) - Wide Mouth Glass Jars w Scale Mark - Pickle Jars for Sauerkraut, Sourdough Starter
Qianfenie Direct

$53.24
1pc Hose Barb/MFL 1.5" Tri Clamp to Ball Lock Post Liquid Gas Homebrew Kegging Fermentation Parts Brewer Hardware SUS304(Liquid Hose Barb)
Guangshui Weilu You Trading Co., Ltd

$53.24
1pc Hose Barb/MFL 1.5" Tri Clamp to Ball Lock Post Liquid Gas Homebrew Kegging Fermentation Parts Brewer Hardware SUS304(Liquid Hose Barb)
yunchengshiyanhuqucuichendianzishangwuyouxiangongsi

$719.00
$799.00
EdgeStar KC2000TWIN Full Size Dual Tap Kegerator & Draft Beer Dispenser - Black
Amazon.com

$22.00 ($623.23 / Ounce)
AMZLMPKNTW Ball Lock Sample Faucet 30cm Reinforced Silicone Hose Secondary Fermentation Homebrew Kegging joyful
无为中南商贸有限公司

$159.50 ($26.58 / Count)
3M High Flow Series System BREW120-MS, 5616001, For Brewed Coffee and Hot Tea, Valve-in-Head Design
Amazon.com

$76.92 ($2,179.04 / Ounce)
Brewing accessories 1.5" Tri Clamp to Ball Lock Post Liquid Gas Homebrew Kegging Fermentation Parts Brewer Hardware SUS304 Brewing accessories(Gas Hose Barb)
chuhanhandianzishangwu

$20.94
$29.99
The Brew Your Own Big Book of Clone Recipes: Featuring 300 Homebrew Recipes from Your Favorite Breweries
Amazon.com

$7.79 ($7.79 / Count)
Craft A Brew - LalBrew Voss™ - Kveik Ale Yeast - For Craft Lagers - Ingredients for Home Brewing - Beer Making Supplies - (1 Pack)
Craft a Brew

$44.99
$49.95
Craft A Brew - Mead Making Kit – Reusable Make Your Own Mead Kit – Yields 1 Gallon of Mead
Craft a Brew

$28.98
Five Star - 6022b_ - Star San - 32 Ounce - High Foaming Sanitizer
Great Fermentations of Indiana

$10.99 ($31.16 / Ounce)
Hornindal Kveik Yeast for Homebrewing - Mead, Cider, Wine, Beer - 10g Packet - Saccharomyces Cerevisiae - Sold by Shadowhive.com
Shadowhive

$58.16
HUIZHUGS Brewing Equipment Keg Ball Lock Faucet 30cm Reinforced Silicone Hose Secondary Fermentation Homebrew Kegging Brewing Equipment
xiangshuizhenzhanglingfengshop
RoxtonBrewing
Well-Known Member
Amazon
RoxtonBrewing
Well-Known Member
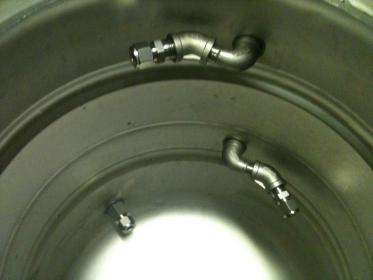
Found these photos on my phone of the heat-X mounted in the HLT.
Filled with water and tested for any leaks.
More to come.


Filled with water and tested for any leaks.
More to come.


J-Malone
Well-Known Member
Nice! Thanks!
Why did you mount it so far from the bottom of the keg? It seems like you'd have to have a completely full (or nearly completely full) HLT? I was thinking of mounting mine so that the bottom port is at the top of the lower 1/3 of the keg... Just curious...
Why did you mount it so far from the bottom of the keg? It seems like you'd have to have a completely full (or nearly completely full) HLT? I was thinking of mounting mine so that the bottom port is at the top of the lower 1/3 of the keg... Just curious...
extra_medium
Well-Known Member
very sexy! subscribed.
West Side. J isn't Jason, is it?
Nope, Jon. I just started brewing a year ago and am gathering components for my own brew rig. Seen your intriguing thread and noticed you were local. Small world. I see you're going to Gambrinus as well, Maybe I'll catch you there sometime. Keep up the good work and keep us posted.
Nice! Thanks!
Why did you mount it so far from the bottom of the keg? It seems like you'd have to have a completely full (or nearly completely full) HLT? I was thinking of mounting mine so that the bottom port is at the top of the lower 1/3 of the keg... Just curious...
i wondered this as well. maybe b/c of the electric element? i would think it could still have been mounted lower.
RoxtonBrewing
Well-Known Member
It could have been mounted lower. Part of the problem was just bad planning.
I had actually punched the top hole before I had finished the coil and thought I would have about 25 to 30% more coils in it. I thought it would have been taller and that the bottom would have been lower.
Next one I build will be better.
Oh well, I will just have to put more water in to cover it. I am using a 5500 element, so I don't worry about heating the extra water.
J-Malone
Well-Known Member
aaaahhh, no worries! Looks fine, I was just wondering if there was a strategic advantage to it that I hadnt thought of. Thanks
Thanks to RB, I'm now back into brewing. So much so, that I just volunteered myself to be in charge of the control box. RB was gracious enough to accept my offer so now we're going to be "partners".
The first item I needed was the box itself. We wanted to keep it all SS and since those can be rather pricey, I decided to build it myself. I work at a wholesale food distributor (where his rig table came from) and we have a large pile of scrap metal around back from where we do freezer/dishwasher/etc installs. There was a 12ft long SS sandwich prep station that's been sitting for two years and the drawers from that made the perfect raw materials. I then bought some SS mig wire and started cutting/welding/grinding.


I'm less than a novice welder so flap disks are my friends. I have to mount the back plate, make/install the door and figure out how to mount it to the rig. I've got most of the internals ordered so in the next week or two, I can also start wiring. RB will also have to do his special polishing routine to this baby so it will shine like his keggles.
-casey
The first item I needed was the box itself. We wanted to keep it all SS and since those can be rather pricey, I decided to build it myself. I work at a wholesale food distributor (where his rig table came from) and we have a large pile of scrap metal around back from where we do freezer/dishwasher/etc installs. There was a 12ft long SS sandwich prep station that's been sitting for two years and the drawers from that made the perfect raw materials. I then bought some SS mig wire and started cutting/welding/grinding.

I'm less than a novice welder so flap disks are my friends. I have to mount the back plate, make/install the door and figure out how to mount it to the rig. I've got most of the internals ordered so in the next week or two, I can also start wiring. RB will also have to do his special polishing routine to this baby so it will shine like his keggles.
-casey
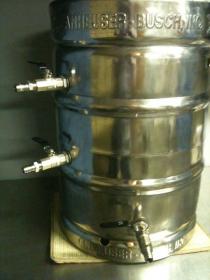
I made some more progress tonight.
I made the backplate from a computer case cover from the first computer I owned. I got it 1993. I'm glad I hung on to it. Never throw away any metal. It'll be useful sometime.

Remove two set screws and you'll be able to remove the box from the mounting pole if you want.

Rounded off the straps a little.

I found these great collars in the scrap pile at work.

It was a pretty good night in the building. Now all I have left to do is to wait from the SS hinge to arrive and figure out how to mount it to the rig table.
I made the backplate from a computer case cover from the first computer I owned. I got it 1993. I'm glad I hung on to it. Never throw away any metal. It'll be useful sometime.

Remove two set screws and you'll be able to remove the box from the mounting pole if you want.

Rounded off the straps a little.

I found these great collars in the scrap pile at work.

It was a pretty good night in the building. Now all I have left to do is to wait from the SS hinge to arrive and figure out how to mount it to the rig table.
RoxtonBrewing
Well-Known Member
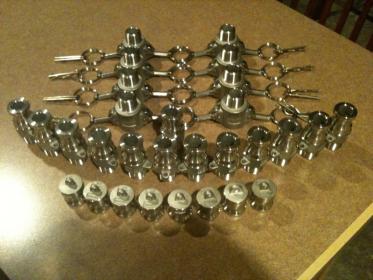
Decided to change out the QC on the keggles.
The ones I had been getting were really getting expensive.
Went with the cam/groove option.
Should work well.

The ones I had been getting were really getting expensive.
Went with the cam/groove option.
Should work well.

jrathfon
Member
subscribed, always fun having picture threads (and getting in on them early)!
RoxtonBrewing
Well-Known Member
Have had to put the build on hold.
When the wife wants you to put down 1500 sq ft of wood floors, you have to go with it if she is on board for your brewery build.
When the wife wants you to put down 1500 sq ft of wood floors, you have to go with it if she is on board for your brewery build.
RoxtonBrewing
Well-Known Member
Almost done with the floor project.
Looking forward to getting back to the brewery build.
Looking forward to getting back to the brewery build.
AdamCanFly
Well-Known Member
Subscribed.
Subscribed...
I'm in the process of doing the same thing....
Do you by chance have a part list for all your SS for the HLT & MLT?
I'm in the process of doing the same thing....
Do you by chance have a part list for all your SS for the HLT & MLT?
RoxtonBrewing
Well-Known Member
lonepalm,
I do not have a parts list made up, but I actually used Kal's build as a guide.
You can find his build here..........
http://www.theelectricbrewery.com/
He has the best site for following an electric build.
I "stole" a lot of his ideas. He has a good parts list to follow.
If you need additional info, you can PM me and i will be happy to help an any way possible.
- Joined
- Dec 9, 2008
- Messages
- 558
- Reaction score
- 51
Looking good!
rdann87
Well-Known Member
Very nice. I like the all SS approach.. very sexy
RoxtonBrewing
Well-Known Member
I have been told that if you are going to do something, do it right the first time.
I have also been told that I always go overboard on everything I build.
I guess there is a little truth to it.
I just figure SS will give it that "cool" look.
I have also been told that I always go overboard on everything I build.
I guess there is a little truth to it.
I just figure SS will give it that "cool" look.
Lucky_Chicken
Well-Known Member
it does give that cool look! just wish i had the time and resources to do that.
I have been told that if you are going to do something, do it right the first time.
I have also been told that I always go overboard on everything I build.
I guess there is a little truth to it.
I just figure SS will give it that "cool" look.
I hear you... I've been gathering parts for a modified version of Kal's build (less amp meter and volt meter)... when it was all said and done, I was $50 in parts away from duplicating his plan exactly, so I said F-it and I just bought those parts now too!
Might as well go with a tried and true system!
Similar threads
- Replies
- 6
- Views
- 877
- Replies
- 4
- Views
- 607
- Replies
- 16
- Views
- 2K
- Replies
- 1
- Views
- 618


![Craft A Brew - Safale BE-256 Yeast - Fermentis - Belgian Ale Dry Yeast - For Belgian & Strong Ales - Ingredients for Home Brewing - Beer Making Supplies - [3 Pack]](https://m.media-amazon.com/images/I/51bcKEwQmWL._SL500_.jpg)


