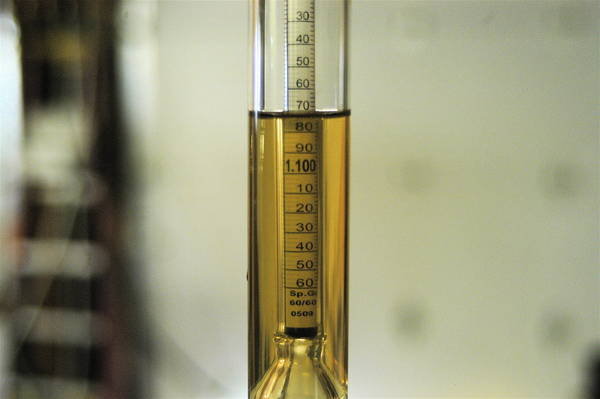
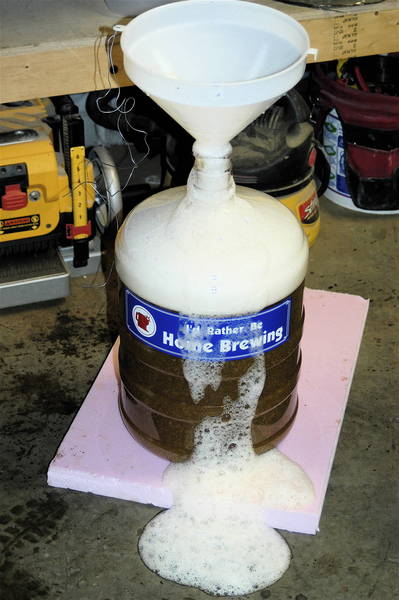
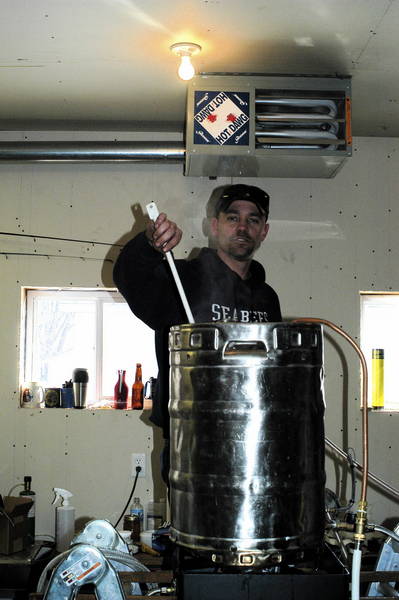
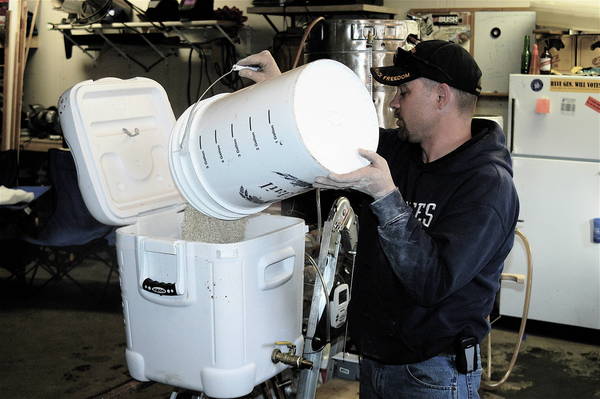
• Please visit and share your knowledge at our sister communities:
  • If you have not, please join our official Homebrewing Facebook Group!

    Homebrewing Facebook Group

RIMS set up!

Homebrew Talk

Help Support Homebrew Talk:

This site may earn a commission from merchant affiliate links, including eBay, Amazon, and others.

slnies

Well-Known Member
Joined
Aug 11, 2007
Messages
851
Reaction score
10
Location
Maple Lake MN
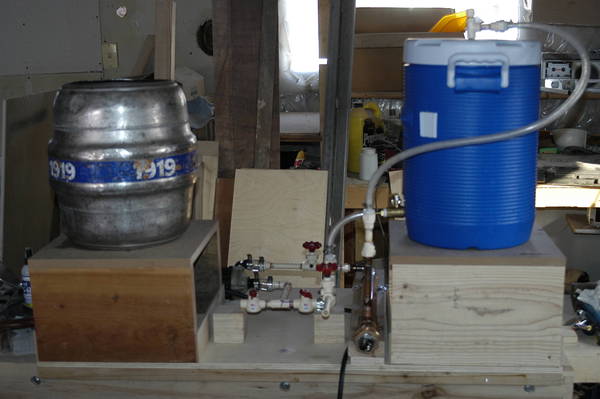
So this is the set up I am going to build. I think I will do both a steam and an electric version of the manifold. How does it look?


brew_setup.jpg
https://cdn.homebrewtalk.com/gallery/data/1/medium/brew_setup.jpg
 
i like it, i started to build a rims setup and im alltile over my head now.lol
 
i will definitly need to come ask you i just finished my keggle mash tun today and my manifold... alot of work but the only part im remotly having is figuring out how to wire this damn thing i dont have any electrical components but im thinking about running a ranco or pid to controll my heating element and a float to controll at the end of the manifold for the recurculating wort to keep the grain bed at the same level... hard to explain sometimes
 
DSC_0111.JPG


Sorry it took so long, but here is the new brew rig. Only a few more days and she will be complete.
 
DSC_0109.JPG


This is the over all view. I have built it so I can trade out the HLT and the MLT for bigger sanke kegs latter.
 
kickflip_mj said:
i will definitly need to come ask you i just finished my keggle mash tun today and my manifold... alot of work but the only part im remotly having is figuring out how to wire this damn thing i dont have any electrical components but im thinking about running a ranco or pid to controll my heating element and a float to controll at the end of the manifold for the recurculating wort to keep the grain bed at the same level... hard to explain sometimes

Sorry I didn't get back to you sooner. For equipment on my rig, I am using a Watco PID and a 40 amp SSR with a heat sink, paired with a 4500W ULD water heater element. I am running it on 115-120v or whatever i have where ever I go. I am building this thing to be mobile. Every thing breaks down and fits in the Mercury mystic, my gas sipper. This I suppose will only last until I have bigger vessels, then i will have to use the truck. If you have anymore questions Kickflip, feel free to send me a PM. S.
 
slnies, where did you get the copper arround the heating element at? Been looking for some large diameter tube with little luck
 
Virtuous said:
slnies, where did you get the copper arround the heating element at? Been looking for some large diameter tube with little luck
Local Hardware store. They sell it by the foot. This is good though, because a full stick will cost you 60-80$ depending on where you go.
 
kickflip_mj said:
oh i love it, the exchanger looks awsome, can i ask you what pump are you using??
The pump is a March pump, it is not the standard 805, this one has more power, but it was a deal I could not refuse. I will put more info out on it tonight. S.
 
DSC_0005.JPG
DSC_0007.JPG
DSC_0004.JPG


So, these are pic's of the system in operation, One is the element connection and the protector that I made for it, so as I don't electrocute myself when I am not paying attention, and the last is of the grounding of the heating manifold. I will later change the wire out to green, but I wanted to test so, what ever was lying around. Other things that will happen are a twist lock male and female cap for fast element removal, another PID and SSR for an electric HLT, and maybe the new PID I order with ramp and soak control and I will switch it out with the one that is operating the MLT now and that one will operate the HLT. I don't know, we will see what the SWMBO lets me get away with.
 
Sorry, I should explain the middle picture. This is the PID in operation. The red is the mash liquid temperature, and the green is the temperature set point. So reading the directions was a pain, but the actual set up was easy. This said, anyone could operate this thing. It really is as easy as pushing the up and down arrows. S.
 
Seabee John said:
I can't wait to see her in operation on Sat! Looking good.
Me too, I am thinking about a Mild, as a first for the new rig. I have some WLP 005 to burn up so...:off:
 
slnies said:
Me too, I am thinking about a Mild, as a first for the new rig. I have some WLP 005 to burn up so...:off:

you will have to show me the in's and out's on this... Not saying I want to go that route, but you have my attention.
 
were did you put your thermo?? is yor pid wired to the heating element and the thermo is wired to the outgoing or ingoing wort?? bc im trying to figure this out for my set up:)
 
oh and how did you put the thermo in did you have to by a thermowell wo install the sensor??
 
kickflip_mj said:
were did you put your thermo?? is yor pid wired to the heating element and the thermo is wired to the outgoing or ingoing wort?? bc im trying to figure this out for my set up:)
The sensor is in the return manifold. I drilled a hole into the top of a CPVC cap and friction fit the sensor through it. It works great.
 
Can you give some more info on the pump? I've been trying to find a good one...

Great lookin' set-up!!
 
Pump info for kickflip and bewilder. The pump is a March AC-3C-MD, It is rated at 180 degrees F. From experience though, I have seen this pump operate for years with liquids in excess of 212F. This of course voids warranty, but for my purpose the pump will not see temperatures over its rating. My mash out temp is 168F. That is still 12 degrees under the factory limit. For 20 bucks though, I can't complain one I'ota. S.
 
DSC_0019.JPG

DSC_0016.JPG

DSC_0031.JPG

First Pic is my first running out of the mash tun, corrected it is 1.091. The second Pic is me posing and being proud of my machine. And the third it the conclusion of the brew day.
 
DSC_0013.JPG

DSC_0027.JPG

DSC_0030.JPG

These are more pictures of this weekends brew day. This is Seabeejohn with his HERMS system. This weekend we were humbled by Murphy's Law. If it could go wrong, it did. One system worked great and the other had issues. His system worked tops the last brew together. I think we were just trying to many new things at once. It still went well though. That said, John did brew 20 gallons of brew on that machine this weekend. An accomplishment in any book.
 
slnies said:
DSC_0013.JPG

DSC_0027.JPG

DSC_0030.JPG

These are more pictures of this weekends brew day. This is Seabeejohn with his HERMS system. This weekend we were humbled by Murphy's Law. If it could go wrong, it did. One system worked great and the other had issues. His system worked tops the last brew together. I think we were just trying to many new things at once. It still went well though. That said, John did brew 20 gallons of brew on that machine this weekend. An accomplishment in any book.

After thinking about all that went wrong, and reflecting on the fact that because of this website, I had the knowledge to rectify the situations, I'm pretty happy that I'm surrounded by 20 Gal blurping away... Funny part is, it's destined to be the best beer ever made, cause there is no earthly way to replicate any part of that brewday. It was a good experience to go through, and now be able to re-engineer my system to be as fail safe as possible.

Oh, and about that RiMS system, Sean... Not to shabby. I was impressed... I would have shown it more if I wasn't dealing with BS on my rig. 85% eff... that's damn good. Sean was brewing a cream ale... I kept accusing him of brewing bud light, because the wort was the same color as water. But that OG reading in his first pic is correct, and beer smith did adjust for temp and declare 1.091 for his first runnings. I saw it while mopping my hot wort off the floor.
 
Some more commentary. There are a few things that I will change on my system. The first is to add more slots to my manifold in the MLT. The reason is, better flow rate. I was able to compact the grain bed once in the beginning of the mash. it was easily rectified with some blow back, and I will note that it did not happen again. I just want to open the envelope a little. The second is really an experiment. The observation that I will make is that the PID set at the correct mash temp would give me an actual mash temp two degrees higher. In the water test this issue did not occur, but I think because of the density in the grain bed, that heat in the grain bed was being retained better. I am open to suggestions as to where I should be placing my thermocouple. It now resides in the return manifold. I think the next place I will try is in the side of the mash tun. Any suggestions are welcome. S

One more thing, A special thanks to Kladue, and Wihophead for their input and suggestions that made this system possible. And another thanks to all of those who took the time to post their systems and answer random questions that I had about RIMS. Sean
 
I like the exchanger. I hadn't seen anyone use a heating element in such a confined area before but it certainly takes away the stratafication you'd get in a larger vessel. Interestingly enough, I just went digging through the stainless dumpster at the local scrap yard and found a similar piece of kit. It was a 4" stainless pipe with end cap flanges. I pulled one end out and it had seven 3000 watt x 240v elements inside. Talk about heating capacity. Sh!t. If the elements didn't look so beat, I might have bought it. Well, that and where am I going to get a spare 112 amps from my panel?

It got me thinking though. With enough power, you could use this setup as both an instant water heater for dough in/sparge and with the flick of a few valves could also use it for HERMS. I hate to say it, but I'm rethinking my 3-burner nat gas system.
 
Very cool. About the time slnies was writing about his RIMS set up I was thinking about doing the same thing with the heat exchanger for my Brutus 20 but wasnt sure how. Opened this page and there it was. Finally finished ordering all the parts for it yesterday. Bookoo thanks to slnies for doing all the leg work.
 

Latest posts

Back
Top