• Please visit and share your knowledge at our sister communities:
  • If you have not, please join our official Homebrewing Facebook Group!

    Homebrewing Facebook Group

Question about Mash Tun...whats the best hardening agent to use on outside of tun??

Homebrew Talk

Help Support Homebrew Talk:

This site may earn a commission from merchant affiliate links, including eBay, Amazon, and others.

mister704

Well-Known Member
Joined
Feb 5, 2014
Messages
299
Reaction score
34
Location
Centreville
So I posted this in the equipment section which I thought may have been a bad place. Have not had one view all day....so I am posting here where folks actually use mash tuns.
_____________________________________________________

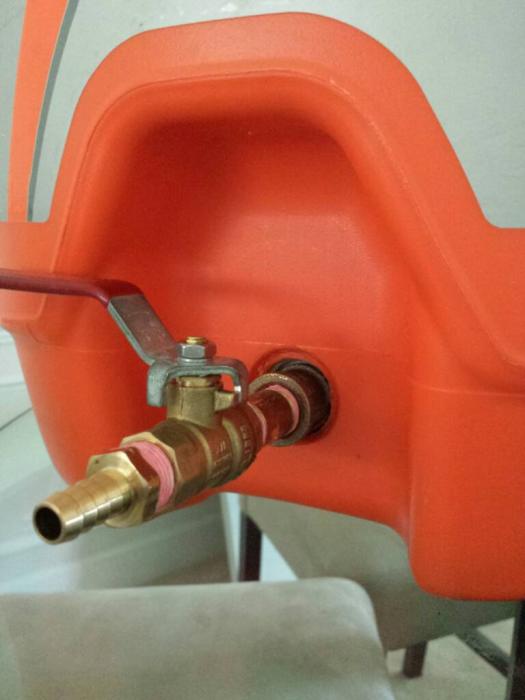
So I finally got around to building my own mash tun. Works perfect and does not leak a drop. Problem is that on the outside, I had to dremel away a little so I could get to the brass nipple. So now there the spigot is directly attached to the inner wall which is weak and not strong like the outer layer.

Good thing is inside my mash tun is flat so the washer is perfectly snug to the inside allowing perfect leak protection.

My question is can I use a spray hardening foam or epoxy cement to enclose the weak area on the outside? I just know that once epoxy is set.... Its done. But that means I will be stuck if it ever starts to leak.

Any suggestions?

Here is video = Loose Mash Tun: http://youtu.be/g29Lidc4Le0
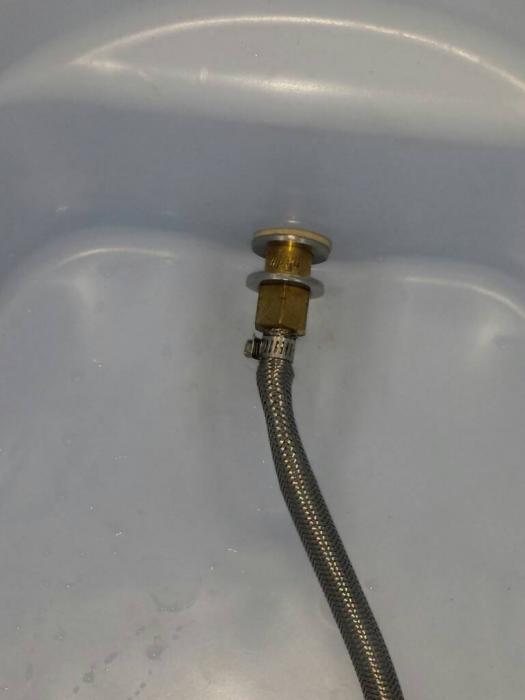
MashTun1.jpg


MashTun2.jpg
 
You could certainly try some sealant or epoxy to solidify the connection, but I think you would be better served to get different fittings and a large washer to try and sandwich both walls of the cooler.

I would not worry about the epoxy being so permanent that you couldn't repair it, not many glues stick to plastic that well so I'm sure you could remove and fix as well.

I think a longer nipple and washers would allow you to clamp both walls of the cooler and make the valve more rigid.
 
If you dremeled away the outer layer, then re-enforcing it with something would be good. I would not use something too permanet like epoxy. Spray foam might be a good alternative.
 
You could certainly try some sealant or epoxy to solidify the connection, but I think you would be better served to get different fittings and a large washer to try and sandwich both walls of the cooler.

I would not worry about the epoxy being so permanent that you couldn't repair it, not many glues stick to plastic that well so I'm sure you could remove and fix as well.

I think a longer nipple and washers would allow you to clamp both walls of the cooler and make the valve more rigid.

I actually took it to the local hardware store to try and see if a longer nipple would work. The issue is that I would have to get one threaded or try to find an all threaded one because every nipple has roughly the same amount of threads.

What my setup is....is

From the inside going out....

1. Steel braided line
2. Connected Male adapter
3. Connected to 2 inch nipple
4. Nipple has the original seal combined with flat washer that connects to inside of cooler

Outside

5. Brass adapter (because nipple did not have enough threads long enough to come out past the dip in the cooler)
6. Connected to 2 inch brass nipple
7. Connect to ball valve
8. Connected to female adapter.


I think even if I got a longer threaded nipple, I still will have that loose area so no matter what, I need to secure that open area.
 
I actually took it to the local hardware store to try and see if a longer nipple would work. .
As said above, parts exist to make this a sturdy usable connection, a local hardware store likely does not have the length nipple you need, if you want to seek out the proper nipple that would likely be best. If you try packing the void w/ epoxy putty you are still only attached to the inner wall of the cooler. If you keep flexing the inner wall of the cooler like in the video, it could crack.

My vote is a proper nipple....
 
I made my MLT with one of those straight thread fittings and it took me a while to figure out how to get it sealed up.

This is what finally worked. https://www.homebrewtalk.com/f51/using-pipe-sealant-mash-tun-fittings-safe-467877/#post6024380

There is no tape or pipe dope sealant inside the MLT. It's all rubber/silicone gaskets at/between the parts. Tried several times with tape, many layers, but no go until I got it set up like in the picture.

I need more information. I am not understanding his photo.

Is this the CPVC part?

119336.jpg


If so how will this help me on the outside of my cooler.
 
Alright F-THIS!!!

This is the plan.

j6vA0UV.jpg


1. Dremel out a little bit more of the orange cooler. This will allow for the first washer to sit snug inside the walls.

2. Attach the first washer to the nipple along with rubber grommet. Screw that threw the wall from the outside.

3. Once inside, attach original cooler white grommet and another washer on the inside

4. Screw on female mip adapter. This should now have a wall to wall tight connection.

NOW REINFORCEMENT

5. Outside on other end of nipple, add 3 or 4 or however many needed to secure against the hard outer shell.

6. Attach new ball valve. The one I had originally is just too big to fit into the cooler indention. So...I am replacing with a small easy 1/4 turn ball valve

7. Attach mail mip adapter...and success.


I have already proven to myself that the rubber grommet on the threads creates a full seal so I know I can go from the outside instead of the inside.

I may change up the process as I get into the job but this is going to be close to the finished product.
 
You seem to be trying to hybrid what you've already got with that setup. Just remove the whole setup and replace it with one of these. http://brewhardware.com/valves-69/136-vbx.


You don't need a washer on the outside of the cooler lining (which is what you've got) AND washers on the outside of the cooler shell. In fact, I think your leak is just a matter of time by putting that much stress on that inner lining. Also, JMHO, but 1/2" is the homebrew standard. Parts and fittings are more abundant, especially in stainless. So I'd swap out the 3/8" for 1/2".

Edit: This is essentially what Wilser and Srice have suggested. They've got the right idea IMHO.

Said screw it and just ordered all the dang parts. Ordered

Bazooka Screen
1/2 Variable Buckhead with the 2 lock nuts
1/2 Male Hose barb
1/2 Mini Ball Valve

Grand Total = 49 shipped


Pissed but hopefully I can take these old parts I purchased back to home depot and get my money back which was roughly $30.

Purchased cooler for $19 off craigslist...and with the real parts grand total will be $70 for 10 gallon mash tun.

HD will take em back for sure. That's a pretty good price for a 10G mashtun. Good luck!
 
I need more information. I am not understanding his photo.

Is this the CPVC part?

119336.jpg


If so how will this help me on the outside of my cooler.

Yeah, that's the CPVC part.

It doesn't help you on the outside of the cooler. But, if that nipple you ordered is straight thread rather than tapered pipe, you just might need a fitting like that to get it to seal.

The nuts that same with my setup are pretty thin and no amount of thread tape seemed to get them to seal. Had to ditch the tape and use the fittings so there was a gasket sandwiched between each part. Then, that CPVC jobbie on the very end seals the deal as liquid would eventually wick down the spiral thread without the sealing of that inside gasket to the end of the nipple.

Also, with that straight, longer nipple, you'll probably need to find something to use as a bushing that's roughly the thickness of the cooler so you don't squish the cooler too much.

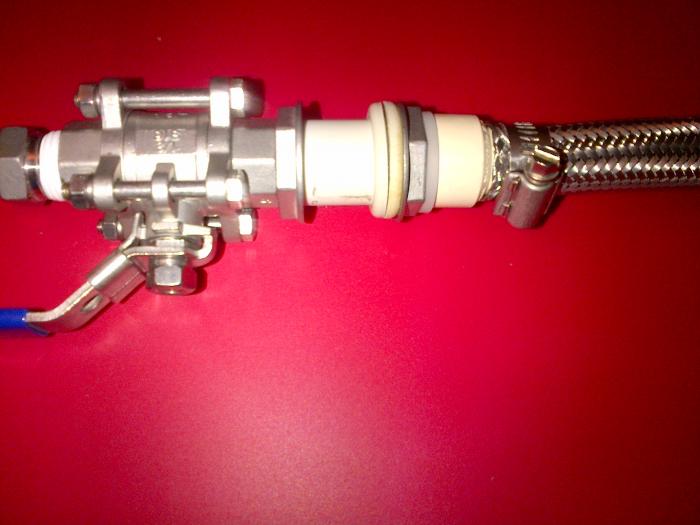
In the attached picture maybe you can see the setup a little better.

From left to right is: 1/2" ball valve, flange nut, bushing (that prevents squishing the cooler wall too much), grommet in the inner wall of the cooler (from original cooler drain fitting), then another flange nut, silicone seal washer, CPVC fitting.

I had to trim about 1/8" from the threaded end of the CPVC doohickey so that it would screw on far enough to slightly compress the silicone gasket and the gasket inside the doohickey against the end of the nipple.

IMG-20140417-00178.jpg
 
Received the variable bulkhead and its solid as ever from the outside but NOW it leaks. I hav no idea why.

Nothing I am doing stops the leak.

I did put the putty on the outside to strengthen the exterior. Thats perfect...but for some reason the thing is leaking even with the rubber grommet and everything.
 
Nevermind....

I had no pipe tape on the outside because it said not to put any. Looks like that was wrong because it seemed that it was coming to the ball valve but then back filling into the threads. Put some thread tape and its looking good so far. Lets see how it goes.
 
Back
Top