Problem with building ribcage IC - physics teachers?

Homebrew Talk - Beer, Wine, Mead, & Cider Brewing Discussion Forum

Help Support Homebrew Talk - Beer, Wine, Mead, & Cider Brewing Discussion Forum:

This site may earn a commission from merchant affiliate links, including eBay, Amazon, and others.

Elfmaze

Well-Known Member
Joined
Oct 22, 2008
Messages
635
Reaction score
27
Location
Pittsburgh
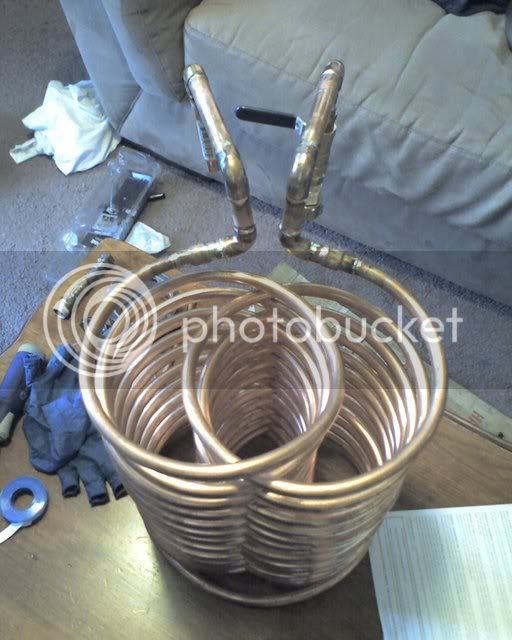
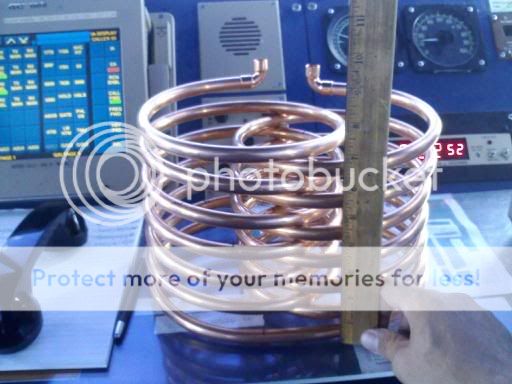
I bought a fifty foot roll of soft copper pipe. Cut the pipe in half after seeing the post on Ribcage IC's and seeing how big the chillers were with 25'.

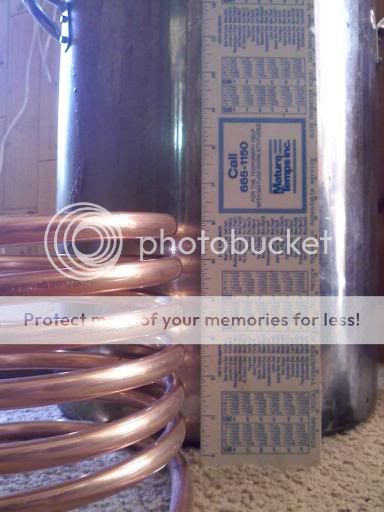
Mine doesn't seem that impressive. It stands all of 6" tall in the pot. In my brew pot( 32 quart) the wort stands 2" tall per gallon. Meaning for a 5 gallon batch the liquid is 10" tall.

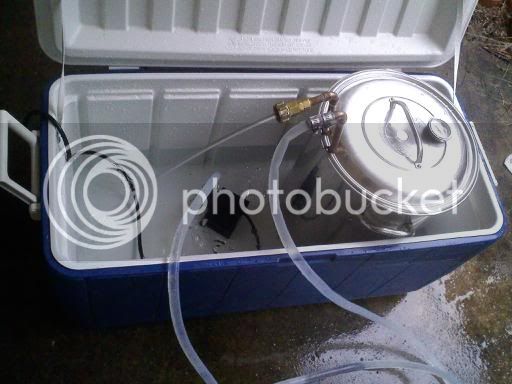
I will be circulating Ice water thru the IC via an ice water bath. so input water is ~32*. Will i benefit from making each side 25' and sweating the pipe back together. Or should i just wrap the 25' total in opposing coils?

get-attachment-3.jpg


Original post:
https://www.homebrewtalk.com/f51/diy-interwoven-rib-cage-immersion-chiller-106415/
 
Done with the coils. just need the uprights and she'll be ready to rock! BTW how do you guys deal with care of these things? Oxidization concerns?

chiller.jpg
 
I soaked mine in a warm water/white vinegar solution to remove some of that copper smell.

BTW, what's that in the background of your picture? Are you on a ship or in an aircraft control tower?:mug:
 
Lol, I plea the 5th. good eye though. Yes it was you tax dollars hard at work, i figure i got paid about 3 hours to do that one. It is indeed an air traffic tower. Cant tell you where though. dont know what the Faa would hate more. Arts and Crafts time or Cell phone in the tower. :ban:
 
Did my first boil run. just water this time to practice methods. But i was a bit dissapointed in my shiny new cooler. Boil took between 35-40 mins. But after 20 mins of the cooler it only had the temp down to 119* and it was only dropping 6-7* a 5 min window at that point.

Not as much thermal transfer as i was expecting at all. Now this was with tap water at 63* But still. It would take 40 mins to get the temp down just sitting there like that.

How long should i aim for, for a chill cycle?
 
Where you stirring while you were chilling? The more contact the liquid has with your chiller, the better it will work. That's one problem I see with your design vs. a normal coil is that you can stirr on the inside, you'd have to stirr on the outside of your loop.
 
i was wondering about stirring. I figured just leave the lid on it esp while its in the danger zone. stirring would reduce the cool time since i seemed to have a bubble of hot water over the coils.

Also i wasn't using ice this time. But if i used ice water pump circulation i could also put the pot IN the rubbermaid with the ice to cool it from the sides as well. that could bring the time down as well.
 
Used it last brew. Circulating ice water. the chiller was sitting on the bottom of the pot with maby four inches of wort over it. The temp difference between the wort on top and bottom was rediculous. like 20 degrees difference! i didn't want to expand it due to strength issues. but i may have no choice. anyone think making legs and having it sit at the top of the pot would work better?
 
Should and does are very different things ;)

The cooling action and temperature differentials are not enough to produce adequate circulation. Stirring or otherwise whirlpooling the wort in the pot will have a massive impact on your cooling rate. The 4" of wort above the coil will not even make a measurable difference.

Sorry Rhys79. Just the facts Jack.
 
I only have a few batches under my belt, but the stirring advocates have the physics right. I just use my IC itself to stir the water. Brought the temp down below 80 deg F in about 20 minutes yesterday, with no ice involved, when the ambient temp was around 80 also.
 
I didn't do the math on it, and apparently over estimated the flow rate that would be generated by the temperature gradiant. I'm too poor at the moment to afford the copper tubing to make a chiller to experiment with... If the voice of experience says it isn't sufficient, I'll take your word for it.
 
Interesting results. My 25' x 3/8" entry level copper IC from Midwest Supplies cools 5 gal. wort in maybe 21-22 min. Now first off, I have the advantage of 55F well water to help that process out....but just a few days ago, I learned something I hadn't known about wort chillers.
I noticed through the vinyl hose that there was something sticking out of the outlet end of the tubing. I removed the clamp & hose, and there is some kind of synthetic plastic tape in there. I tried to pull it out with pliers, but could only get about 3" out. So I e-mailed Midwest Supplies about what I assumed was something inadvertently left in the tubing. They replied that the plastic tape runs through the whole length of the tubing, is put in there deliberately to retard the water flow. The answer specifically said that without the tape inside, the chiller would take 15% longer to chill the wort. I'd like to hear a physics teacher explain that one....thermodynamics isn't exactly my forte.
 
What is the point of the "rib cage" design? It looks cool but I don't get the concept. Does it just add strength by supporting itself and allowing more surface area by seperating the coils?
 
Interesting results. My 25' x 3/8" entry level copper IC from Midwest Supplies cools 5 gal. wort in maybe 21-22 min. Now first off, I have the advantage of 55F well water to help that process out....but just a few days ago, I learned something I hadn't known about wort chillers.
I noticed through the vinyl hose that there was something sticking out of the outlet end of the tubing. I removed the clamp & hose, and there is some kind of synthetic plastic tape in there. I tried to pull it out with pliers, but could only get about 3" out. So I e-mailed Midwest Supplies about what I assumed was something inadvertently left in the tubing. They replied that the plastic tape runs through the whole length of the tubing, is put in there deliberately to retard the water flow. The answer specifically said that without the tape inside, the chiller would take 15% longer to chill the wort. I'd like to hear a physics teacher explain that one....thermodynamics isn't exactly my forte.

It is really more of and engineering thermodynamics kind of question, but that is all semantics ;)

Basically, turbulent flow (all crazy like with no flow patterns and all mixed up) transfers heat WAY better than laminar flow (straight flow lines, smooth flow). Flow patterns depend on several things but basically in a tube it depends on the roughness of the inner surface, the diameter of the pipe, the speed of the fluid within the pipe, and the geometry of the pipe itself. Their idea is sound but unless you are flowing your cooling water incredibly slow through that pipe, you will have very turbulent flow without the tape. Now if you have a 1" diameter tube, with very large coils, some sort or turbulence inducing feature would be extremely helpful.

In cooling our wort, the flow inside the coil is not the problem, it is the circulation and the turbulence of the wort outside the coil. Producing a good circulation and turbulence around the coil in the wort will make the biggest difference to your cooling times. That and coolant temps.
 
What is the point of the "rib cage" design? It looks cool but I don't get the concept. Does it just add strength by supporting itself and allowing more surface area by seperating the coils?

The idea is you are covering a larger area of the wort. However, the surface area of the chiller is all that matters if you have adequate turbulence outside the coil. This design only helps if you are not whirlpooling around the coil. I should say, it may be more efficient because it may cause a more turbulent flow immediately adjacent the coil, which would help, but I doubt it (not tested, so it may help).

If you have a set surface area, and adequate circulation/turbulence, the geometry of the coil doesn't matter. Heat doesn't care what shape a heat exchanger is, it just flows through surfaces. The more surface area, the more heat transfer.
 
it is indeed about the circulation. If there is no heat being applied to the wort, and no stirring method, you can have a normal wort chiller that will cool everything around it but the center will still be hot. think of when you are in cold water. You don't want to move because then the warm layer of water around you gets moved away. With the rib cage design, the concept was to have less distance between any given portion of the wort and the cooler.

Can't tell you if it accually does anything different or not though. Haven't compared the two side by side yet.

I don't see the point though. Copper ICs, in general, tend to heat the coolant enough that you just don't have enough temperature gradient to do anything by about 20 feet in, sometimes less. You'd be better off with two separate smaller chillers with separate water feeds.
 
+1, two circuits will cool quicker but be less efficient from a water usage standpoint. I decided parallel circuits were too complicated for the advantage and just went with a 50' 1/2" coil.
 
I don't see the point though. Copper ICs, in general, tend to heat the coolant enough that you just don't have enough temperature gradient to do anything by about 20 feet in, sometimes less. You'd be better off with two separate smaller chillers with separate water feeds.

FWIW that's what I did with my chest-cage chiiller. Its 50' total of 3/8" OD tubing. The inlet and outlets are split so that in effect there are two 25' chillers. I've only used it twice. For my most recent brew I ran 10 gallons of ~60 degree well water through it which brought the temp down to 130 in 6 minutes. I then ran ice water (using a very wimpy pond pump through it), obtaining the following time-temp readings:
10 min -> 108
16 min -> 90
25 min -> 80.

I'm not claiming that this is stellar performance, just throwing out some info.


The chest cage does make it hard to stir. Although I don't have much experience to compare with, I would characterize my stirring efforts/results as low/moderate.

EDIT: BTW this was 5.5 gallons in a 15.5 gallon keggle. About a 3rd of the chiller sits out of the wort.
 
OK, expanded the chiller vertically so it went from the top to the bottom of the wort. MUCH better thermal efficiency. I dare to say double. Garden hose water came out steaming down to 170 and to 75 degrees in 15 mins circulating ice water from 170 down. Very pleased with the results.
 
That is sure a pretty IC ya got there. however, after reading the results on this page, I am glad i did a cfc. i chill 10gal of boiling wort to 80deg in 10min...
 
True for large volumes CFC cannot be beat. But for the five gallon batches this works fine. CFC would be over kill. There is also talk of DMS production while the wort waits for its time in the chiller. The CFC dropps the temp all at once.
 
That is sure a pretty IC ya got there. however, after reading the results on this page, I am glad i did a cfc. i chill 10gal of boiling wort to 80deg in 10min...

I wouldn't say that. I get my full volume down below 140ºF in about 2-3 minutes, and down to lager temps (~58º, I bring it down further in my lager fridge) in 12 minutes. That test was on 13 gallons with 55º ground water.
 
The stirring works to actually force the wort to mix...otherwise the cold wort and warm wort would just happily separate (cold sinks to the bottom, warm floating above it). The Density of cold is less than hot, and the two will not break the thermocline without some external force, or enough time for them to come closer to equilibrium. The greater the difference in temps (and density), the more agitation is needed.

Granted the scale in a batch of wort is small, but you still gotta stir it...Or chill the whole volume at the same rate.
 
i had serious thermal effiency issues when the chiller sat on the bottom of the pot. but with it spread vertically i couldnt be happier with how it performed
 
I saw a similar design on one of these threads, and I am gonna have to make on of these soon. I was planning on rigging it up to pump ice water, or through an ice bath before the brew kettle.

When you run your set-up, do you recirculate the water round and round? Or do you just pump ice water through and dump it out the other end?

My plan was to use tap water at first, so I get some hot for clean up, then switch the hose to a sump pump I already have, which is sitting in ice water. What's your method?
 
I don't see the point though. Copper ICs, in general, tend to heat the coolant enough that you just don't have enough temperature gradient to do anything by about 20 feet in, sometimes less. You'd be better off with two separate smaller chillers with separate water feeds.
This is also my thinking, and I did exactly that with my chiller. It's a 25' coil inside a 25' coil.

I'm testing it out tomorrow. My last one of the same design worked really well in 1/4" copper. This one is 3/8" so I'm expecting good things.

-Joe
 
this s how i run mine. garden hose filling cooler and discarding hot water to170ish. then turn pot to start recycling and add 20lbs ice for real quick show

downsized_0911091802.jpg
 
What is the point of the "rib cage" design? It looks cool but I don't get the concept. Does it just add strength by supporting itself and allowing more surface area by seperating the coils?

With a traditional IC, there is a large portion of wort in the center of the IC spiral that doesn't touch any copper. Essentially, a cold pocket of wort is formed around the IC and a warm pocket sits in the center. As you probably know, copper is a much better thermal conductor than water so the interface between the cold pocket and warm pocket is essentially a poor way to transfer heat. Now, this problem can be easily remedied by stirring. No big deal, right? For some, that's true... In theory, if you have the same amount of pipe in either configuration, and you kept the wort in equivalent contact to it, they would act the same. For me, I hated standing outside stirring the pot and then there's always the possibility of oxidation while the wort is still hot.

The advantage to a rib cage chiller is that it covers the center portion of the pot. This leaves little to no warm pockets of wort and if done correctly, should make stirring unneccessary. I know from my experience, I unwound my regular IC I made and put it into a rib cage IC... the effects were dramatic! With my original traditional IC configuration, I stirred with the IC itself and the cool times were between 10-20 minutes for a 5 gallon batch... depending on if I actually stirred the whole time. I imagine if I didn't stir it'd take up to 45 minutes. With my rib cage configuration, the chill time went from boiling to 100 degrees in 4 minutes and I didn't lay a hand on the chiller. The batch went down below 80°F in about 8.5 minutes. Without stirring, I have no fear of oxidation while the wort is warm and I don't have to stand outside for 15 minutes.

Here's what mine looks like.
Chiller2.jpg
 
OK... as you can see from the pic it is time to make a new chiller. Two questions for you all.
1. Is there a reason you can't make a standard chiller and then just pull every other coil out slightly instead of rolling two separate coils?
2. Which is better, 25' of 1/2 or 50' of 3/8? Ooops, found the answer to this one. 50' of 3/8ths is better!

4634145036_c8bb749f14_m.jpg
 
OK... as you can see from the pic it is time to make a new chiller. Two questions for you all.
1. Is there a reason you can't make a standard chiller and then just pull every other coil out slightly instead of rolling two separate coils?
2. Which is better, 25' of 1/2 or 50' of 3/8? Ooops, found the answer to this one. 50' of 3/8ths is better!

I could see making a standard chiller and then pulling each coil apart becoming ugly real fast... I bet you would kink the copper at each transition too. On top of that, the standard chiller has the exit end at the bottom of the coil which I could see getting very much in the way.

It's really not that hard to make two separate coils and join them... Get something of paint can diameter.... find the center of your coil, which in the coils you buy from the hardware store, is very easy to find. Coil one side, then coil the other... Push them together. Done.
 
Back
Top