• Please visit and share your knowledge at our sister communities:
  • If you have not, please join our official Homebrewing Facebook Group!

    Homebrewing Facebook Group

Problem with building ribcage IC - physics teachers?

Homebrew Talk

Help Support Homebrew Talk:

This site may earn a commission from merchant affiliate links, including eBay, Amazon, and others.
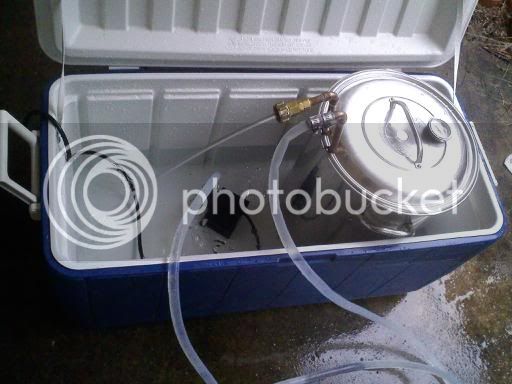
I saw a similar design on one of these threads, and I am gonna have to make on of these soon. I was planning on rigging it up to pump ice water, or through an ice bath before the brew kettle.

When you run your set-up, do you recirculate the water round and round? Or do you just pump ice water through and dump it out the other end?

My plan was to use tap water at first, so I get some hot for clean up, then switch the hose to a sump pump I already have, which is sitting in ice water. What's your method?
 
I don't see the point though. Copper ICs, in general, tend to heat the coolant enough that you just don't have enough temperature gradient to do anything by about 20 feet in, sometimes less. You'd be better off with two separate smaller chillers with separate water feeds.
This is also my thinking, and I did exactly that with my chiller. It's a 25' coil inside a 25' coil.

I'm testing it out tomorrow. My last one of the same design worked really well in 1/4" copper. This one is 3/8" so I'm expecting good things.

-Joe
 
this s how i run mine. garden hose filling cooler and discarding hot water to170ish. then turn pot to start recycling and add 20lbs ice for real quick show

downsized_0911091802.jpg
 
What is the point of the "rib cage" design? It looks cool but I don't get the concept. Does it just add strength by supporting itself and allowing more surface area by seperating the coils?

With a traditional IC, there is a large portion of wort in the center of the IC spiral that doesn't touch any copper. Essentially, a cold pocket of wort is formed around the IC and a warm pocket sits in the center. As you probably know, copper is a much better thermal conductor than water so the interface between the cold pocket and warm pocket is essentially a poor way to transfer heat. Now, this problem can be easily remedied by stirring. No big deal, right? For some, that's true... In theory, if you have the same amount of pipe in either configuration, and you kept the wort in equivalent contact to it, they would act the same. For me, I hated standing outside stirring the pot and then there's always the possibility of oxidation while the wort is still hot.

The advantage to a rib cage chiller is that it covers the center portion of the pot. This leaves little to no warm pockets of wort and if done correctly, should make stirring unneccessary. I know from my experience, I unwound my regular IC I made and put it into a rib cage IC... the effects were dramatic! With my original traditional IC configuration, I stirred with the IC itself and the cool times were between 10-20 minutes for a 5 gallon batch... depending on if I actually stirred the whole time. I imagine if I didn't stir it'd take up to 45 minutes. With my rib cage configuration, the chill time went from boiling to 100 degrees in 4 minutes and I didn't lay a hand on the chiller. The batch went down below 80°F in about 8.5 minutes. Without stirring, I have no fear of oxidation while the wort is warm and I don't have to stand outside for 15 minutes.

Here's what mine looks like.
Chiller2.jpg
 
OK... as you can see from the pic it is time to make a new chiller. Two questions for you all.
1. Is there a reason you can't make a standard chiller and then just pull every other coil out slightly instead of rolling two separate coils?
2. Which is better, 25' of 1/2 or 50' of 3/8? Ooops, found the answer to this one. 50' of 3/8ths is better!

4634145036_c8bb749f14_m.jpg
 
OK... as you can see from the pic it is time to make a new chiller. Two questions for you all.
1. Is there a reason you can't make a standard chiller and then just pull every other coil out slightly instead of rolling two separate coils?
2. Which is better, 25' of 1/2 or 50' of 3/8? Ooops, found the answer to this one. 50' of 3/8ths is better!

I could see making a standard chiller and then pulling each coil apart becoming ugly real fast... I bet you would kink the copper at each transition too. On top of that, the standard chiller has the exit end at the bottom of the coil which I could see getting very much in the way.

It's really not that hard to make two separate coils and join them... Get something of paint can diameter.... find the center of your coil, which in the coils you buy from the hardware store, is very easy to find. Coil one side, then coil the other... Push them together. Done.
 
Back
Top