"polishing your keg" is more than a clever euphemism

Homebrew Talk - Beer, Wine, Mead, & Cider Brewing Discussion Forum

Help Support Homebrew Talk - Beer, Wine, Mead, & Cider Brewing Discussion Forum:

This site may earn a commission from merchant affiliate links, including eBay, Amazon, and others.
I have a Megapot from Northern Brewer. Its that brushed stainless. Do you think that bad boy would polish up?

image_2385.jpg
 
Yeah, it will shine up. "Brushed" is how I'd describe my keg after a pass with the medium pads. You might want to hit it with the "fine" gator grit with a light touch to knock down the ridges before going to the polishing phase. YMMV.
 
I am almost done with mine and ready to put it to use for the first time in 8 years. The wife wants to know if it will actually make brewing her beer any better... :fro:
 
I like it. She wants to brew up an IPA on Sunday so she will get to break in the new shiny keg and the new March Pump.
 
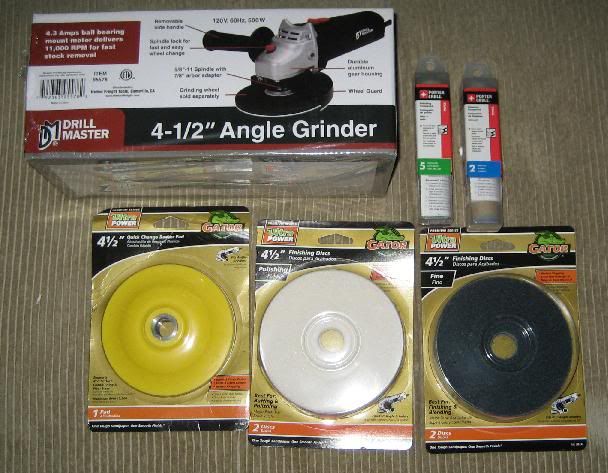
anyone got or can snap a pic of these gator pads? I want to make sure I'm buyin the right thing.
 
Sorry about that. I finally dumped godaddy and got a real host but I haven't put the pictures back up yet. That probably means that 5000 of my posts are currently lame... sorry.

The proper name for the pads are Gator Grit Finishing Pads, fine or medium.
 
Is there an easy way to etch a polished keg? I think it would be cool to have the brewery name etched into a polished keg, or polish just the brewery name in a regular scuffed keg... Masking tape isn't going to do the trick when you a taking an angle grinder to it.

I looked it up in google and it is talking about muriatic and sulferic acids and high temps... People already look at my brewing equipment and thing I'm making meth, I really don't need to start having kilns and acids and what not.
 
I would use a sheet of natural rubber with sticky back, install on the keg then pencil out your design and cut out with a razor blade. Use a pencil eraser with glass bead or fine diamond grit for a soft finish on the exposed area for your design. This is all they do at the sand blasting places with glass is use the sheet surgical rubber as a shield.
 
You could draw up what you want in the computer and have a sign shop cut vinyl - Then you put the "negative" part on the pot.

Then take it to a sandblasting place. Not sure what it would cost, but it should work great!

BTW, Bobby, Inspirational thread! I started polishing my Firestone Corny HLT last night... W.O.W does it look sweet!

Thanks!:ban:
 
Just wanted to take the time to thank Bobby, as well as the others who have placed thier input on this subject.
Thanks Again!

Also, wanted to confirm the following process worked fanstastic!!!
and maybe simplify for the community.

Tools
- 4 1/4 inch angle grinder
- backing pad for angle grinder, gator grit makes this in yellow (must use)

Cleaning
- clean with gator grit surface finishing disc: Fine (it's bluish grey)
- you can use the burgandy medium for tougher kegs but not needed, then move to the fine

Polishing
- surface polishing/finishing disc from gator grit (they are white)
- green high gloss polishing compound for hard metals (green rectangular stick, the manufacturer at lowe's changes frequently, you will find it near the grinder pads,i believe its the #5)
- you can use the black stick for cleaning first, but not nessesary, i believe its the #2, then move to the green.

Good Luck!
 
After working with a bunch of different pieces I'd say the above post is accurate with a few nuance options.

It's hard to know how rough a keg needs to be to justify backing out to the medium cleaning pad. You can use the fine to take out larger scratches but it will take longer and use up more of the pad. It may be worth circling bad scratches with a sharpie, hitting those with the medium, then do the whole thing with the fine. It's tricky to find deep scratches until you actually start working.

That also goes for the polishing step with the various rouge sticks. The grits go 1 to 5, with 5 being the coarsest. If you finish your gator fine pad with the lightest of touches to reduce swirl marks, you might be able to go right to a 4 or 5. If not, 4-5 first, then finish with a 1-2.

If you're going for a mirror, simply sick finish, you're best off polishing 1, 3, 5 changing the pad each time. I didn't even go that far. I went to #2 then #5 put a coat of carnuba on it.
 
Cool, thanks pass!
i was wondering what would be safe to get rid of that black crap that hides in the in the tough crevices and around the raised letters of a keg.
I imagine paint thinner works wonders.
i recall it being mentioned earlier in the thread, i was hoping to get more confirmation.
i am going to give this a try ASAP.
Thanks again!

I only used the paint thinner on the outside. It easily takes off the black stuff. Afterwards, I'd do the whole keg, inside and out, with Bar Keeper's Friend.
 
Here is my loot for the project. Everything was about $50 in total. I picked up the grinder from Harbor Freight for about $15.

They did not have the polishing compound at my Lowes which is featured in the pics on this thread. But I believe the stuff I got is basically the same thing.

polishingstuff.jpg
 
Here's a pic of my 2.5gal Mega-Mini-Mobile-Party-keg.
Plating shop polished it to mirror finish for $25

keg.jpg
 
You can't beat Harbor Freight for the pricing. Their stuff is usually cheap Chinese made. But for small projects they work good.

This same grinder will just be $9.99 as of Aug 4th. They have a promo on it.
 
So I started on this project this evening and wanted to remove the paint rings using a medium pad. I hit a snag. The wrench with the grinder doesn't fit the Gator Grit backing disc. The grinder pin wrench is 1 1/4" wide, the disc is 1 1/2". I went to Lowes, True Value Hardware and HD and none of them sell the pin wrenches. I looked at a few products in HD and they too had a 1 1/4" wrench with the grinder. The one that did fit however was a Dewalt.

I am going back to HF tomorrow to see if they have a larger pin wrench. If not I will have to exchange the grinder for one which does.


Harbor Freight sells an adjustable one for about $5.
 
No worries. You actually don't need to wrench tighten that. Hold the locking pin in on the grinder to keep the spindle from turning and lay your gloved hand flat on the gatorgrit pad and rotate your hand. You'll get it tight enough and as you use it, it will get tighter.
 
Words about tools: Don't scrimp on price and..............MAKITA

Sometimes I agree with that - Not really this time...

I bought a $100 miter saw when I framed my basement, just to decapitate 2x4's.
When I went to cut $1200 worth of oak crown molding, I borrowed the $700 DeWalt doublethrowdownmothergrabber compound miter saw with the 80,000 tooth blade.

Good tools have a place. I need an angle grinder about once every 5 years, maybe... And even then it'll never get abused like a jobsite tool.

Ratchet wrenches on the other hand... Are worth every penny :D
They are on my list of tools where "The guy that invented that, deserves a "Proper waking up" every morning for the rest of his life" :rockin:
 
Thanks Aaron. This has been the only nice item of quality and value i've ever had come my way in 30 years, well the wife also but I must still pay pay and pay to keep her happy. Two complete and running 1710 Allison V12's at $500 each count? Long story being a licensed A&P.
 
Thanks Aaron. This has been the only nice item of quality and value i've ever had come my way in 30 years, well the wife also but I must still pay pay and pay to keep her happy. Two complete and running 1710 Allison V12's at $500 each count? Long story being a licensed A&P.

What on earth are you gonna put those into? :D
Hell, you're almost to a P38!
Just need airframe, wings, empennage...

Get on it ;)
 
P-38's came with Allison's as well Mustangs not the Rolls Merlin's dad had in China and India he was lead mechanic Air Corps. No Germans allowed in Europe so he was screwed. I sold them for $5,500 each vs $500 paid to Unlimited Hydro racers in Seattle years ago, damn fool should of kept one. My storage was full with four 670 radials with props with a 2800 Pratt within reach that I lost out on. I'm not normal.

Sticky back abrasives are heck of a lot cheaper than hook and loop if your going thru many of them on your sanding and polishing projects. The 5" random sander by Porter Cable has run hundreds of hours of hard use vs El Cheapo brands that quit on me within a weeks use. I got tired of exchanges and stepped up, never looked back as well own every Milwaukee power tool made, magnetic base drill also.
Short time use tools cheapo's will work but don't kid yourself if used for a living or hard use.
 
My keg was in pretty good shape to start with. It is a Mexican one from Cervecería Cuauhtémoc Moctezuma (Tecate, Dos Equis etc).
kegbefore.jpg


With four hours work I got this.
- 1 hour fine pad (also quick blast with medium to take of paint).
- 1 hour polish pad (regular polish)
- 1 hour new polish pad (high gloss polish)
- 2nd 1 hour new polish pad (high gloss polish)
finishkeg.jpg


Bobby, thanks for this thread and all the tips. I just need the sight glass from you which shipped out earlier this week and I am all set.
 
Just wanted to take the time to thank Bobby, as well as the others who have placed thier input on this subject.
Thanks Again!

Also, wanted to confirm the following process worked fanstastic!!!
and maybe simplify for the community.

Tools
- 4 1/4 inch angle grinder
- backing pad for angle grinder, gator grit makes this in yellow (must use)

Cleaning
- clean with gator grit surface finishing disc: Fine (it's bluish grey)
- you can use the burgandy medium for tougher kegs but not needed, then move to the fine

Polishing
- surface polishing/finishing disc from gator grit (they are white)
- green high gloss polishing compound for hard metals (green rectangular stick, the manufacturer at lowe's changes frequently, you will find it near the grinder pads,i believe its the #5)
- you can use the black stick for cleaning first, but not nessesary, i believe its the #2, then move to the green.

Good Luck!


Tagging along
 
Here is my loot for the project. Everything was about $50 in total. I picked up the grinder from Harbor Freight for about $15.

They did not have the polishing compound at my Lowes which is featured in the pics on this thread. But I believe the stuff I got is basically the same thing.

polishingstuff.jpg


Reference point.
 
Back
Top