• Please visit and share your knowledge at our sister communities:
  • If you have not, please join our official Homebrewing Facebook Group!

    Homebrewing Facebook Group

No oxygen dry hopping

Homebrew Talk

Help Support Homebrew Talk:

This site may earn a commission from merchant affiliate links, including eBay, Amazon, and others.
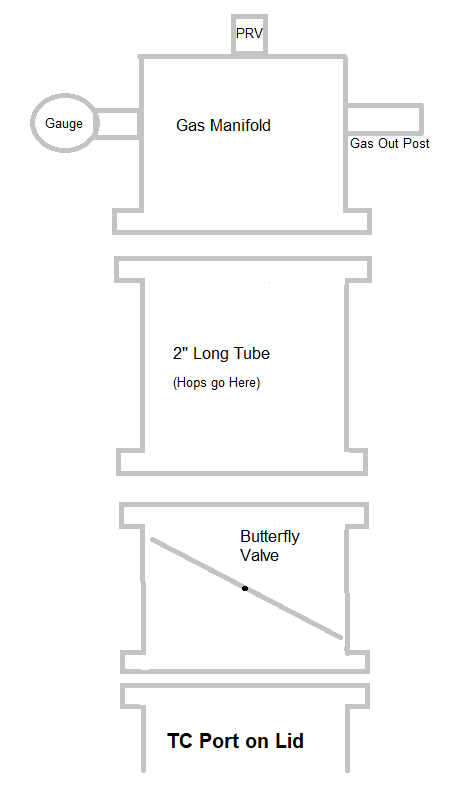
OK, another badly-drawn sketch from Max Stout.

Make a hops container that mounts atop a fermenter. The hops container has a butterfly valve on the bottom to release the hops and a blowoff connector on its top. The butterfly valve would be modified such that it cannot close all the way. At the closed position there's just enough aperture to let out escaping CO2 during fermentation, but not enough for any of the pellets to fall through. When the valve is opened all the way, the pellets drop. During fermentation, the valve is in the "closed" position and CO2 passes through the hops vessel, through the blowout and eventually displacing most of the air. The hops stay in a mostly O2-free environment. The Dry Hop Hopper.


LODO Dry Hopper.jpg
 
I know at least one of you has a Spike conical. (That's on my to do list)…
I'm wondering if something could be done with that big 4" TC top port that's just sitting there doing nothing for dry hopping?
I haven't bought that CF-10 yet and I don't want to deviate too far off track, but the instructions show removing the 1.5" blow tube on the top port at the end of fermentation, and installing the gas manifold to pressurize a cold crash. WTF? You've just added oxygen. Why not install the gas manifold at the start of fermentation, add a gas ball lock on the post with a silicone tube to some star-san. At the end of fermentation pinch the silicone tubing and connect that tube to the CO2? No opening the fermenter.

If I wasn't using it for a cooling coil, that kind of thing might work.

I've given thought to having Spike add a second tri-clamp port on the fermenter lid (the other I use for the pressure manifold, though some use it for a blowoff cane), and then do something like @MaxStout drew above. The beauty of a design like he drew--using the term loosely :)--is that the hops are purged by CO2 from fermentation, and then close off the top and dump 'em in.

Of all the designs we've fiddled with here, I like that one the best.

DOH! I forgot about the cooling coil.
I agree with Max's diagram. It would actually be workable.
 
Funny I should come across this thread. I used whole cone hops for the first time last week. At first I put them in a mesh bag, but found I've only created a raft for the hops to ride on top of. I then sanitized a spoon and pushed the hop bag down into my beer only to introduce even more O2. I held the bag under the sweet nectar hoping that the hops would get soaked up enough to get submerged. After what felt like an eternity (probably 2 minutes) I gave up and decided to cut the hop bag open and let the hops go where they may. This took probably 6 or so minutes and who knows how much oxygen into the beer. This got me thinking on how there could be a better way to dry hop my IPA's. Below was the solution I came up with...
001.JPG
002.JPG
003.JPG


I'm talking with my plastics guy to get some quotes on tooling.
 
OK, perforated butterfly valve. That solves the issue of allowing CO2 to pass out. No need to have a valve cracked slightly open.

Another workaround with a standard non-perforated butterfly: In the config I drew above, one could run another tube parallel that vents CO2 from the fermenter then the tube is connected into the lower side of the hopper. That way the valve can be fully closed during ferm, and CO2 would pass into the hopper, and out the blowoff tube on top. You still have the CO2 flushing out the air in the hopper during ferm and the hops stay in place until it's time to drop them.

I'm on my phone now, away from my pc so I can't do a new crappy sketch, but I hope you get the idea.
 
oooooo - and with the valve we could use a servo to open/close...with an Arduino or RPi to interface.

and the magnets...electromagnets!

now we are dry hopping with minimal O2 and automation!
 
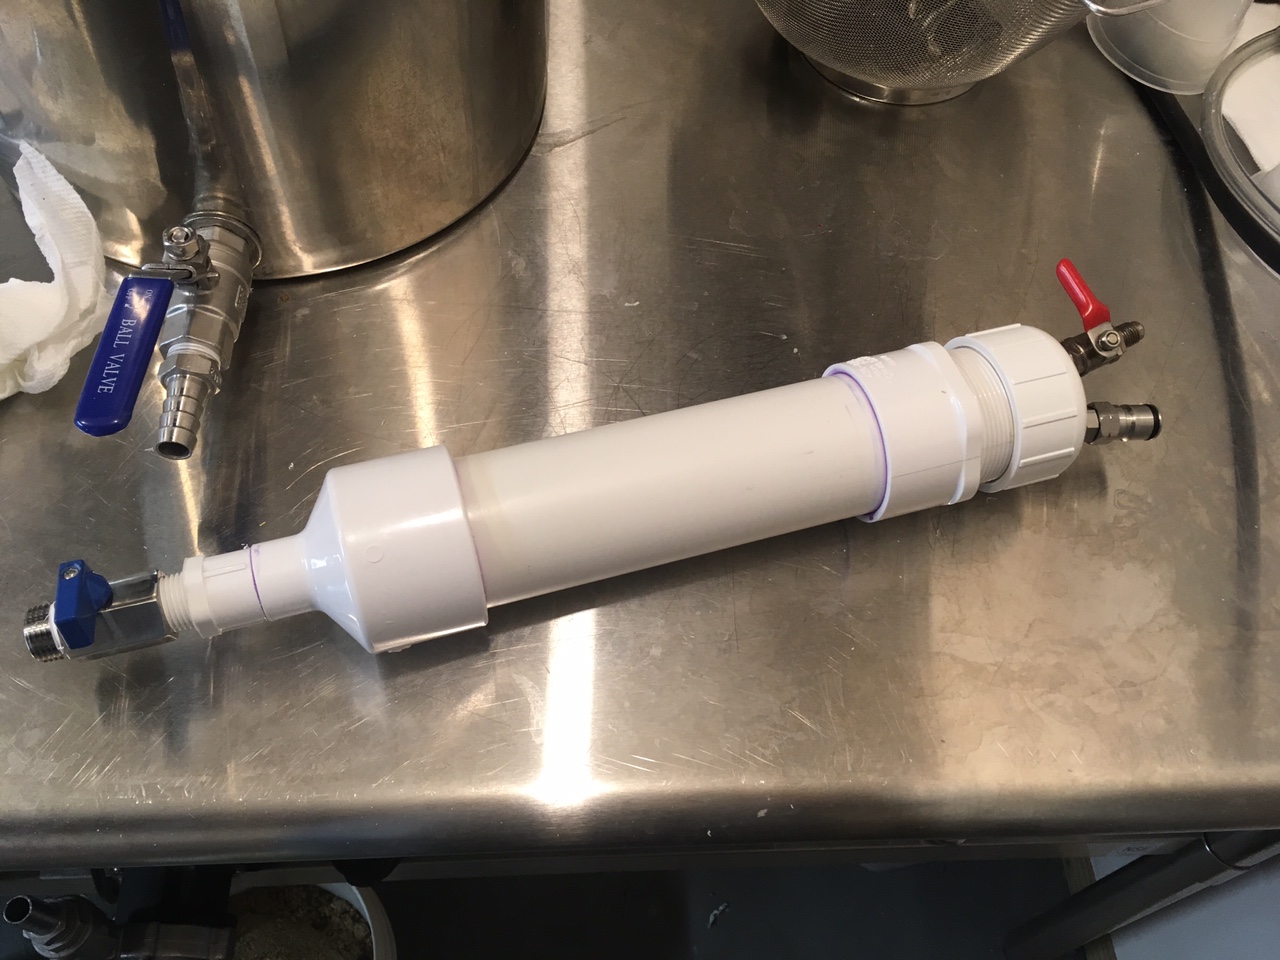
I made this about three weeks ago:

IMG_2991.JPG


The idea is to use it with a corny keg lid with a ball valve attached to it.

Inside the keg would be a bag around a flexible frame attached to the underneath of the valve...inside.

The bag would catch and filter the hops so they don’t clog the dip tube etc...

I posted about it in the low oxygen brewing forum:

http://www.lowoxygenbrewing.com/forum/viewtopic.php?t=1166

It’s been pressure tested but I haven’t made the lid part. I would crush the hop pellets so they don’t get caught up in the transfer...as the opening is only 1/2”.

There is a fine mesh screen installed in the top male fitting. I cut a 2” circle of it and pushed it into the slip side before inserting and gluing in the pipe. The pipe sandwiches the screen in place. The screen should prevent dust from hops clogging up the valve in the cap when pressure is purged/released. This I haven’t tested yet.

Because of this screen hops are put in from the bottom since in use the bottom valve would part of the keg lid contraption. The bottom valve in the picture is just for pressure testing.
 
Last edited:
If I wasn't using it for a cooling coil, that kind of thing might work.

I've given thought to having Spike add a second tri-clamp port on the fermenter lid (the other I use for the pressure manifold, though some use it for a blowoff cane), and then do something like @MaxStout drew above. The beauty of a design like he drew--using the term loosely :)--is that the hops are purged by CO2 from fermentation, and then close off the top and dump 'em in.

Of all the designs we've fiddled with here, I like that one the best.

DOH! I forgot about the cooling coil.
I agree with Max's diagram. It would actually be workable.

I've sent an email to Spike asking about having them add a second TC port to the lid....

But it occurs to me I could make something with only the one port that would work. Like this:

hopdump1.png
 
That would work.
You could vary the length of the tube to accommodate your typical dry hop volume.

What can you pressurize this to?

30 psi would be ideal in order to fully purge O2.

Also, triclover gaskets are made that have a mesh screen in them....in order to prevent dust and material clogging the PRV when you release pressure during the purge.

It can only be pressurized to about 12-13 psi.

Currently I only have the pressure manifold, which has a prv and a gas-out post on it. Typically what I do during active fermentation is attach a QD to the gas post, run a tube from that to a blowoff jar. I like monitoring fermentation by the bubbling, I can tell when it's slowing. Same result as a blowoff cane.

So there will be CO2 flowing out through the hop pellets and out to the blowoff jar; by the time fermentation is complete, the entire headspace and hop space would be completely purged of O2. Then it's just a matter of pulling off the QD from the gas post, which seals the fermenter, and then dumping the hop pellets into the wort. I wouldn't think dust would be much of an issue. The CO2 gas flow isn't hugely aggressive.

It would be better to have a separate port for this, and I could attach a gas-out post to the top of the 2" (or whatever) length of stainless tube I used. Otherwise, it would be kind of top-heavy, and a 2" valve would be less prone to the pellets bridging and not falling into the wort. Not sure how big a problem that would likely be.
 
I'm liking this idea but have same headspace reservation.

One thing on worrying about keeping the hops cold at least they will be in mainly CO2 pretty fast with a quick starting fermentation.
 
I'm liking this idea but have same headspace reservation.

One thing on worrying about keeping the hops cold at least they will be in mainly CO2 pretty fast with a quick starting fermentation.

That’s why (if i could get something rigged up) would prefer to put the hops in, purge with bottled co2, and drop them in right away.

I’m not comfortable leaving them at fermentation temp for a prolonged period of time even if they are purged of o2.

Also....for a keg at least....and with my bag contraption....you could attach a blow off tube on the keg to either to gas post or the liquid post during dry hopping.

The contraption would be at a higher pressure and once the valve is opened hops would shoot into keg.

The blow off attached to one of the keg posts would allow any displacement from the incoming hops and gas to escape.

The bag also helps to keep the hops contained that may clog the post being used for blow off.
 
Last edited:
That is not good.

Well, maybe. How do you think they're shipped to your LHBS? And at the distributor--are they stored in a refrigerated environment? And if you order them online--do they come to you in a sealed environment with ice packs?

My point was that a few days at ferm temp isn't likely to do them any more harm than during all those other time periods when they aren't refrigerated or frozen.
 
Some of the online stores actually do keep them in purged sealed bags and at freezing temps.
I always pay for an ice pack for shipment.

My local store keeps a lot of hops in open bags with rubber bands around them on the counter.

I don’t buy those and ask for sealed bags which they keep in a freezer.

Some hops are very susceptible to degradation.

This recent podcast goes into details about hops and in there is some info on storage:
https://itunes.apple.com/us/podcast/hop-and-brew-school-podcast/id1446239821?mt=2&i=1000431447918

Just food for thought.
 
My point was that a few days at ferm temp isn't likely to do them any more harm than during all those other time periods when they aren't refrigerated or frozen.
Totally agree. However, as hop packets could stay on the shelf at your LBHS for the best part of a year, I'd be wary of buying them there if they are not kept at least refrigerated. Freezing is overkill unless you plan on keeping them longer than a year.
 
Some of the online stores actually do keep them in purged sealed bags and at freezing temps.
I always pay for an ice pack for shipment.

My local store keeps a lot of hops in open bags with rubber bands around them on the counter.

I don’t buy those and ask for sealed bags which they keep in a freezer.

Some hops are very susceptible to degradation.

This recent podcast goes into details about hops and in there is some info on storage:
https://itunes.apple.com/us/podcast/hop-and-brew-school-podcast/id1446239821?mt=2&i=1000431447918

Just food for thought.

My point again is how are they delivered to the store? When they are packaged at the hop plant, are they immediately--IMMEDIATELY--purged and stored in frozen or refrigerated environments? Are they shipped that way?

I have a hard time believing 3 or 4 days in an environment at 65 degrees is going to make any discernable difference at all. Do what you will, it's your beer.
 
My point again is how are they delivered to the store? When they are packaged at the hop plant, are they immediately--IMMEDIATELY--purged and stored in frozen or refrigerated environments? Are they shipped that way?

Any easy thing I can do to limit any destruction on my end is worth the effort. No need to worry about what I can’t control.

[QUOTE="mongoose33, post: 8545650, member: 218809”] I have hard time believing 3 or 4 days in an environment at 65 degrees is going to make any discernable difference at all. Do what you will, it's your beer.[/QUOTE]

A few years ago people had a hard time thinking o2 caused such drastic changes to their homebrewed beer. Now there are many threads/articles on reducing o2 in every imaginable way. Some ridiculous...some would say.

Stands to reason the same attitude towards storage temps (of key ingredients to a particular style) and degradation are expressed. From both sides.

Anyways, to each his own, please keep us posted on the progress of your build and any results. I appreciate the ideas and input.
 
Any easy thing I can do to limit any destruction on my end is worth the effort. No need to worry about what I can’t control.

[QUOTE="mongoose33, post: 8545650, member: 218809”] I have hard time believing 3 or 4 days in an environment at 65 degrees is going to make any discernable difference at all. Do what you will, it's your beer.

A few years ago people had a hard time thinking o2 caused such drastic changes to their homebrewed beer. Now there are many threads/articles on reducing o2 in every imaginable way. Some ridiculous...some would say.

Stands to reason the same attitude towards storage temps (of key ingredients to a particular style) and degradation are expressed. From both sides.

Anyways, to each his own, please keep us posted on the progress of your build and any results. I appreciate the ideas and input.

So it sounds like there's a choice to be made....introduce oxygen into the beer when dry hopping, but the hops previous to that have been refrigerated/frozen, and introducing hops w/ no oxygen but they were at ferm temps for a few days.

My hops are stored in the freezer, they come out when time to add...or in this case, if they go in the "device." Since I'm already getting excellent results with what I'm doing despite the O2, I'm anticipating even better results when I can get them in there without the O2.

BTW, to extend all this with the device I'm probably going to employ....my thinking is to add them to the device with the butterfly valve closed. This will isolate them from the fermenter at the outset, which will (because i'm typically oxygenating the wort with an O2 tank and wand), have a lot of O2 in the headspace.

But I'd want to purge that space too, so I'd have to figure out a way to do that, perhaps with CO2 from a tank.
 
Last edited:
I've sent an email to Spike asking about having them add a second TC port to the lid....

Heard back. "We actually do not offer customization to our conicals and cannot add or remove ports to the lids- sorry about that! We need to keep the integrity of the conical as engineering has laid them out to make sure they can withstand pressure and weight. "

Fast response, but too bad. I'm going to have to consider the idea above, with using the existing port.
 
This is what I did with my Unitank to enable me to dry hop with the tank fully pressurized and at a point in time of my choice.

I've added a second PRV that can never be disabled by user error (safety first!). In the case of the SSB Unitank I found it easiest to attach a tee to the end of the blow-off cane, second PRV attaches to the side port, shut-off valve to the other port. This way the tank is always protected by the PRV regardless of whether the shut-off valve is open or closed for spunding.

3" butterfly valve attaches to the top 3" TC port. 3" diameter pipe with TC attachments goes onto the valve and the first PRV (SSB provides one 3" PRV as standard equipment) attaches to the other end of the pipe.

Before pitching yeast the gizmo is removed (I pitch yeast through the 3" port anyway), the butterfly valve is opened and the dry-hop charge is dropped in. CO2 is attached to the valve with a series of step-down reducers going all the way from 3" TC to 1/4" John Guest adapter. Pressure is increased until the PRV starts venting and the gizmo is consequently purged of O2.

The butterfly valve is closed, the CO2 attachment removed and the gizmo is attached to the top port of the Unitank.

The dry-hop charge is thus kept in an oxygen-free environment and not exposed even to the fermentation by-products. The beer ferments as usual and is finally spunded to the desired carbonation.

When the time comes to dry hop the butterfly valve is slowly opened, pressure quickly equalizes and the pellets drop into the beer. Hop material will be removed with the rest of the trub/yeast through the dump valve.

Maybe I overdid it, maybe not, but it was surely as much fun as playing around with an erector set...
 
So it sounds like there's a choice to be made....introduce oxygen into the beer when dry hopping, but the hops previous to that have been refrigerated/frozen, and introducing hops w/ no oxygen but they were at ferm temps for a few days.

My hops are stored in the freezer, they come out when time to add...or in this case, if they go in the "device." Since I'm already getting excellent results with what I'm doing despite the O2, I'm anticipating even better results when I can get them in there without the O2.

BTW, to extend all this with the device I'm probably going to employ....my thinking is to add them to the device with the butterfly valve closed. This will isolate them from the fermenter at the outset, which will (because i'm typically oxygenating the wort with an O2 tank and wand), have a lot of O2 in the headspace.

But I'd want to purge that space too, so I'd have to figure out a way to do that, perhaps with CO2 from a tank.

I'm going to vote for the latter. I think the O2 is more injurious overall than the higher temp of the hops for a few days. Plus, with the low O2 arrangement, at least the hops are protected from O2 along the way. The potential harm of having hops in a low O2 environment at 68F for a week seems trivial to me.
 
This is what I did with my Unitank to enable me to dry hop with the tank fully pressurized and at a point in time of my choice.

I've added a second PRV that can never be disabled by user error (safety first!). In the case of the SSB Unitank I found it easiest to attach a tee to the end of the blow-off cane, second PRV attaches to the side port, shut-off valve to the other port. This way the tank is always protected by the PRV regardless of whether the shut-off valve is open or closed for spunding.

3" butterfly valve attaches to the top 3" TC port. 3" diameter pipe with TC attachments goes onto the valve and the first PRV (SSB provides one 3" PRV as standard equipment) attaches to the other end of the pipe.

Before pitching yeast the gizmo is removed (I pitch yeast through the 3" port anyway), the butterfly valve is opened and the dry-hop charge is dropped in. CO2 is attached to the valve with a series of step-down reducers going all the way from 3" TC to 1/4" John Guest adapter. Pressure is increased until the PRV starts venting and the gizmo is consequently purged of O2.

The butterfly valve is closed, the CO2 attachment removed and the gizmo is attached to the top port of the Unitank.

The dry-hop charge is thus kept in an oxygen-free environment and not exposed even to the fermentation by-products. The beer ferments as usual and is finally spunded to the desired carbonation.

When the time comes to dry hop the butterfly valve is slowly opened, pressure quickly equalizes and the pellets drop into the beer. Hop material will be removed with the rest of the trub/yeast through the dump valve.

Maybe I overdid it, maybe not, but it was surely as much fun as playing around with an erector set...

Any pictures?
 
Not right now. I'm not dry hopping the current batch and the gizmo is not assembled. To assemble it for demonstration purposes I would need to remove some parts from the fermenter and that would mean releasing pressure so it's a no go at the moment.
 
No problem
I’ve read it a couple times and think i get it.

What PSI and how many times?

What I’m struggling with is the fact that it takes I think 10-12 purge/vent cycles to completely eliminate almost all o2 from any size vessel. This is according to purge chart that’s floating around on the inter webs and talked about by many.

The chart in this article:
http://www.lowoxygenbrewing.com/bre...rging-transferring-stabilizing-finished-beer/
 
If you keep the pipe properly sized for the amount of dry hops you usually add then purging won't use up that much CO2. The SSB PRV spunds at 18 PSI (non adjustable). As the volume of the headspace is much larger than the volume of the pipe any residual oxygen will also be strongly diluted once you open the valve.
 
If you keep the pipe properly sized for the amount of dry hops you usually add then purging won't use up that much CO2. The SSB PRV spunds at 18 PSI (non adjustable). As the volume of the headspace is much larger than the volume of the pipe any residual oxygen will also be strongly diluted once you open the valve.

The way I understand it in relation to the article referenced, “headspace” is the entire volume that is not taken up by some other mass...be it liquid or solid.

So if a keg is empty....that entire volume is “headspace”.

So the purge cycles and pressure needed to clear a vessel of o2 stays constant.

The smaller the headspace the less co2 needed BUT it still takes 16 pressurize/release cycles at 30psi to get to zero o2.
 

Latest posts

Back
Top