• Please visit and share your knowledge at our sister communities:
  • If you have not, please join our official Homebrewing Facebook Group!

    Homebrewing Facebook Group

New To Home Brewing - Thoughts before I buy

Homebrew Talk

Help Support Homebrew Talk:

This site may earn a commission from merchant affiliate links, including eBay, Amazon, and others.

weaver

Active Member
Joined
Dec 10, 2014
Messages
26
Reaction score
5
Hello fellow home brewers! This is my first post here and from the looks of it, this is a very supportive community. A friend suggested I check out this forum so here I am.

I decided to get into home brewing about 2-3 ago and I've been doing some research before making my final purchase. I went out and purchased How To Brew by John Palmer to get myself familiarized with the whole process. I was originally going to buy a $40 kit but I ended up buying two $125 gift cards from Northern Brewer (each gift card came with an additional $25 gift card). So that means I have $300 to get into home brewing after shipping.

With that being said, this is what I've come up with so far. I was originally going to buy more items like an immersion wort chiller and a burner but I kind of wanted to struggle a little at first on purpose.

http://www.northernbrewer.com/shop/deluxe-brewing-starter-kit.html
http://www.northernbrewer.com/shop/brix-specific-gravity-refractometer-with-atc.html
http://www.northernbrewer.com/shop/21-stainless-steel-spoon.html
http://www.northernbrewer.com/shop/the-brew-hauler.html
http://www.northernbrewer.com/shop/star-san.html

I also plan on buying the following pot and a digital thermometer.
http://www.target.com/p/imusa-32-qt-aluminum-tamale-steamer/-/A-10910892

After shipping, the Northern Brewer items come to $309.25 and I have a $10 off coupon. Do you think my options are the most efficient way to spend the $300 budget I have? Would you switch out any items?

Thanks in advance,
Weaver
 
To be honest, I prefer better bottle carboys over glass carboys (Search this forum for the horror stories of broken carboys). Also I'd skip the refractometer for now, a hydromter will suit you better. I see you added Starsan, you definitely still need a cleaner PBW or Oxyclean Free will work. I like to use a long whisk over the spoon to mix stuff it.
If you have the cash the chiller and burner will make your brewdays much shorter and less frustrating.

Good Luck and welcome to the hobby.
 
I'll let the more experienced guys give advice but do you have a local homebrew shop?

On top of being helpful and supporting the local economy, homebrewing supplies and equipment are one of the few things I have actually found to be cheaper in stores than online.
 
I'd suggest the plastic big mouth bubbler kit for the reasons listed above.

I've never liked a hydrometer, so I think the refractometer is the way to go myself!
 
Ill play the devils advocate here... I use glass carboys, just have to be a little more careful. As tmendick said, skip the refractometer and get a hydrometer. Also, the 32 qt kettle will be fine for now when you're doing extract/partial boils but in the near future youre gonna wish you had a bigger one (trust me, it happened to me). So I would suggest digging up a little extra cashola (if you can afford to do so) and get a bigger kettle from northernbrewer, morebeer, etc. Welcome welcome! Enjoy the addiction!
 
To be honest, I prefer better bottle carboys over glass carboys (Search this forum for the horror stories of broken carboys). Also I'd skip the refractometer for now, a hydromter will suit you better. I see you added Starsan, you definitely still need a cleaner PBW or Oxyclean Free will work. I like to use a long whisk over the spoon to mix stuff it.
If you have the cash the chiller and burner will make your brewdays much shorter and less frustrating.

Good Luck and welcome to the hobby.

I was going back and forth between the glass carboys vs plastic carboys and decided to go with the glass because I would probably have more longevity with it. Unless it breaks of course. But one little scratch in a plastic bottle can harbor bacteria and I didn't really want to get into that situation. I also read some bad reviews regarding the big mouth bubbler in that the lid has issues keeping a tight seal.

The main reason I chose the refractometer is because a friend of mine said it was easier to use and used less sample beer.

I added Starsan to use up an extra $10, the deluxe kit actually comes with cleaner and sanitizer. I do plan on going out and buying some unscented oxy-clean when I need more cleaning supplies.


I'll let the more experienced guys give advice but do you have a local homebrew shop?

On top of being helpful and supporting the local economy, homebrewing supplies and equipment are one of the few things I have actually found to be cheaper in stores than online.

I do have some local brew shops but since I already purchased the gift cards at Northern Brewer, I'm going to stick with them for now. Any side purchases I'll probably make at my local shop.
 
As a noob myself, I would definitely suggest you get at least a 5 gal brew kettle, if not bigger.

I've only done 2 batches now and I'm already wishing I had a bigger kettle (I have a SS 3 gal kettle).

Oh, and a burner. I use a turkey fryer burner, but I did the first one on my grill side-burner and it suuuuuuucked.
 
If you decide to go with the glass carboys I would email Northern Brewer, and find out if those are Italian carboys or Chinese. If they are the Chinese version then I would either go with the plastic ones, or see if they can upgrade you to the Italian carboys instead. It might cost you a little more (their catalog shows them being about $10 more) but the better quality will be worth it, and who knows they may just upgrade you for free in the spirit of Christmas and hoping to keep a customer around for a long time.
 
The challenge with refractometers is they don't give true readings with alcohol in solution, and the conversion formulas are iffy at best. Yeah, your samples are bigger with the hydrometer, but you can throw your pre-boil samples right back in, and between one sample immediately post-boil and a couple to make sure fermentation's done, that's less than a beer out of 2+ cases you're pulling.

Also, yeah, go with the 10-gallon pot. Between boil-off and the volumes of gunk you leave behind when transferring and extra runnings when you screw up your mash (not relevant for you now, but you'll likely get the all-grain itch at some point...) and just having some margin of error when you wanna give 'er a vigorous stir or your hot break or hop additions start foaming, you'll be glad you had that "extra" space.
 
Ill play the devils advocate here... I use glass carboys, just have to be a little more careful. As tmendick said, skip the refractometer and get a hydrometer. Also, the 32 qt kettle will be fine for now when you're doing extract/partial boils but in the near future youre gonna wish you had a bigger one (trust me, it happened to me). So I would suggest digging up a little extra cashola (if you can afford to do so) and get a bigger kettle from northernbrewer, morebeer, etc. Welcome welcome! Enjoy the addiction!

Okay, it seems like everyone's recommending the hydrometer over the refractometer. Should I go with something like this:
http://www.northernbrewer.com/shop/...wery-essentials-gravity-testing-assembly.html

I do plan on starting with extract/partial boils for now. I was thinking about buying a kettle from NB but I really want to stick to the $300 budget for my first take at this.


As a noob myself, I would definitely suggest you get at least a 5 gal brew kettle, if not bigger.

I've only done 2 batches now and I'm already wishing I had a bigger kettle (I have a SS 3 gal kettle).

Oh, and a burner. I use a turkey fryer burner, but I did the first one on my grill side-burner and it suuuuuuucked.

Yes, the pot that I'm buying is 8 gallon. As far as the burner, I'm going to start with doing it in my kitchen and then figure out where I want to go from there.


If you decide to go with the glass carboys I would email Northern Brewer, and find out if those are Italian carboys or Chinese. If they are the Chinese version then I would either go with the plastic ones, or see if they can upgrade you to the Italian carboys instead. It might cost you a little more (their catalog shows them being about $10 more) but the better quality will be worth it, and who knows they may just upgrade you for free in the spirit of Christmas and hoping to keep a customer around for a long time.

I talked with Northern Brewer about the carboys and they said the carboys are made in India, China, or USA depending on the availability. I asked if I could upgrade and they said during the holiday season they have a strict policy regarding replacements. He said if I really wanted the Italian I could go with the Essential Kit and then just purchase additional Italian Carboys.

Do you think this is really needed?
 
Okay, it seems like everyone's recommending the hydrometer over the refractometer. Should I go with something like this:
http://www.northernbrewer.com/shop/...wery-essentials-gravity-testing-assembly.html

I do plan on starting with extract/partial boils for now. I was thinking about buying a kettle from NB but I really want to stick to the $300 budget for my first take at this.

Looks like a good little hydrometer kit to me. You dont necessarily need to get a "brew kettle" on northern brewer (complete with spigot etc), but should definitely consider a larger one. I got my first brew kettle at smart and final (dont know where you are/if there are smart and finals there) but they are more inexpensive and can easily be converted later into a brew kettle with spigot. You can get a 10 gallon one for like 70-80 bones
 
I live very close to the St. Paul Northern Brewer - their starter kit is nice but IMO a little overpriced. I would HIGHLY recommend waiting for a sale - they often throw in free kits, parts and sometimes even a free burner when you buy that deluxe starter kit.

Go hydrometer - far cheaper. I would personally not get the brew hauler either, instead just use a milk carton crate if you have one around. Save some money.

You will quickly need more bottlecaps, too.

Personally I would grab the equipment list from the deluxe kit and hit my local craigslist for most of it, then buy the rest new. You will save a lot of money. I see many people around here selling that exact same kit used once or twice for 60-100ish.....
 
As someone that had the bottom of his 6.5 gal carboy just blow out while sitting with warm water and oxyclean in it yes I really would go with the better Italian carboys; of course I'm sticking with plastic from here on out personally. I'm just glad that when it happened we still had the living room gated off so my 2 year old wasn't anywhere near the kitchen when the 6.5 gal of water/glass shards when flooding through the room.
 
One comment about the brewhauler. I bought one and personally don't care for it. I just use a milk crate that I picked up from the Container Store for around $10. I feel like the milk crate provides some protection against bumping for the carboy.

With that said, I have both glass carboys and plastic buckets for fermentation and I have gone almost exclusively to using the buckets. The only time I ever get the glass out is when I have brewed something that needs to age. I will rack to glass to free up one of my buckets for my next brew.

If you are planning on always brewing indoors then the smaller pot will be fine, but if you ave the space and ever plan on moving to outdoor brewing, I would suggest as others have that you get a larger pot right off. I brew exclusively indoors and don't have the space to move outdoors so my smaller pot works great, but if I ever planned to move outside, my first investment would be a 10 gallon or larger pot.

Otherwise what you have and what others have suggested looks good.
 
Don't use the NB gift cards for a refractometer. They are cheaper elsewhere. Check amazon.

The biggest buy in terms of item cost I got from them was a mega pot. I love it. They have great customer service and I highly recommend them. Got alot of my stuff from them. Great recipes too.

Best of luck with the new hobby. You will not be disappointed.
 
Also check out different setups to get an idea where you might ultimately like to be in terms of your dream rig. Some initial pieces of equipment you buy can contribute to this. My setup is fairly simple.
 
Sounds like you've chosen a path to brewing that is very similar to mine, in that, you have done a fair amount of research before jumping in. That is great and will be helpful in the short and long run. Just so long as you don't let the glut of information out there bog you down and delay your first brew from taking place like it did me. As soon as you get your gear and ingredients, just jump right in and do it.

As far as your gear goes, I agree with most that a refractometer is more than you need now. It is more helpful for all grain brewing since you can take measurements of your mash without cooling your sample, etc. The hydrometer will be much more useful and cheaper for extract brewing. (It's pretty lame that the NB "Deluxe" starter kit doesn't include one. My Brewers Best kit did.)

I personally think that, for stove top brewing, the 8 gallon kettle is sufficient. I used a 6 gallon one until I moved to all grain. Also, 8 gallon should be big enough to serve as a hot liquor kettle should you decide to make the move to all grain.

You are also wise to be using Star San. It's probably a superior sanitizer to anything you'll find in a kit.

Here is a good, reasonably priced thermometer: http://www.williamsbrewing.com/SELF-CALIBRATING-DIGITAL-P1434.aspx

Also, have you thought about a scale for hop weighing once you move away from kits? I use a $20 one I got from Meijer in the cookware department.

Other than that, don't forget to have fun!

Happy brewing!
 
I've had me eye on these 6 gallon plastic carboys, they are straight smooth sides which I'm told make for easier cleanup.

http://morebeer.com/products/plastic-carboy-6-gallon.html

[Edit] My reasoning for 6 gallon over 5 gallon being it's a vessel I can primary in with full 5 gallon batches, you'll need some head space in your primary. Also, with these I wouldn't generally plan on using a secondary at all. For some reason I don't really care for my fermenting buckets.
 
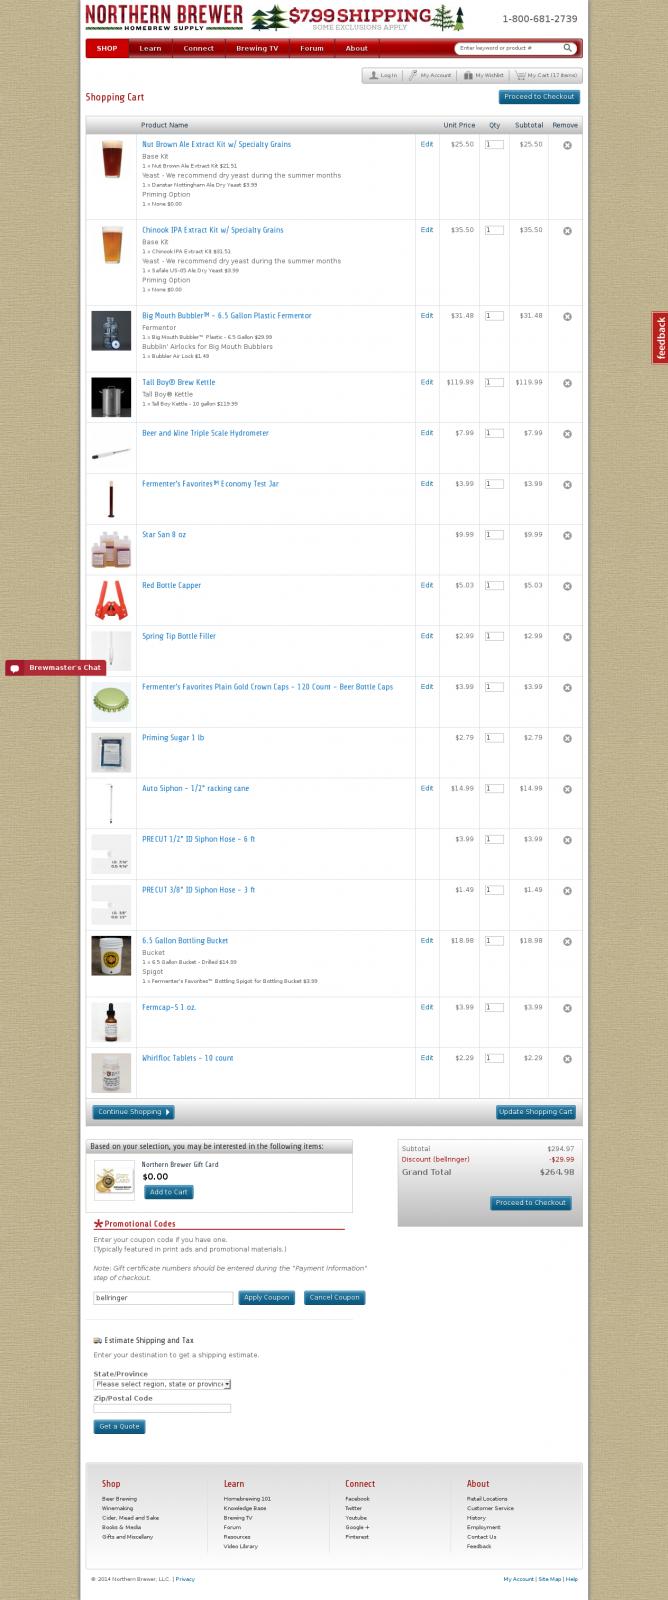
Here's your cart. Everything you need. Nothing you don't. Enough left over to buy another ingredient kit of your choice. Notice the promo code to get the fermenter with two kits. Go buy some oxiclean free and get empties from your friends.

Optional upgrades:
- either get a 15gallon kettle directly or go get a Concord kettle from ebay. The second option leaves more for ingredients.
- add another fermenter so that you can get a pipeline of beers going.

Don't forget to have fun!

Firefox_Screenshot_2014-12-10T19-08-04.050Z.jpg
 
I started with a glass carboy...it now collects pennies:) I switched to buckets and then to plastic carboys. The buckets are now used either for milled grain or were converted to bottling bucket. Damn glass was just too heavy and dangerous for me. I had a hauler that I now use for moving some of SWMBO's heavy flower pots that will fit in it. The plastic carboys are fine...just don't but a brush or anything abrasive inside. Easy to clean if left inverted with oxyclean for a day and then drop in a good clean washcloth and turn it into a washing machine by swirling it around inside.

And yep, a refractometer can wait till you go all grain or BIAB.
 
I use plastic buckets to ferment in. I'm starting the 9th year on the originals and they still aren't scratched enough to get me an infected batch. I won't have a glass carboy, not after looking at the thread showing the accidents. I can replace my buckets 10 times a year for what one trip to the emergency room would cost(maybe more than 10). I can have more buckets for the same cost and with care they can be stacked one inside the other when empty to reduce the space needed.

Buckets have handles already for moving them about. The lid comes off giving you lots of access for cleaning or taking samples. If I drop one while cleaning, it bounces. The are much lighter than the glass carboys too. The big downside is that I can't watch the fermentation.
 
As someone that had the bottom of his 6.5 gal carboy just blow out while sitting with warm water and oxyclean in it yes I really would go with the better Italian carboys; of course I'm sticking with plastic from here on out personally. I'm just glad that when it happened we still had the living room gated off so my 2 year old wasn't anywhere near the kitchen when the 6.5 gal of water/glass shards when flooding through the room.

That is crazy! I have seen a bunch of stories about this and I don't think I'm going to take the chance of going with glass. I have my first kid on the way and all I can think of are horror stories. Plastic it is! Thanks for the advice.


I live very close to the St. Paul Northern Brewer - their starter kit is nice but IMO a little overpriced. I would HIGHLY recommend waiting for a sale - they often throw in free kits, parts and sometimes even a free burner when you buy that deluxe starter kit.

Go hydrometer - far cheaper. I would personally not get the brew hauler either, instead just use a milk carton crate if you have one around. Save some money.

You will quickly need more bottlecaps, too.

Personally I would grab the equipment list from the deluxe kit and hit my local craigslist for most of it, then buy the rest new. You will save a lot of money. I see many people around here selling that exact same kit used once or twice for 60-100ish.....

Yeah, that's pretty much what I'm doing right now, waiting for the sale and right time to buy. And you fine folks are helping me make some changes to my selections! I've also decided not to go with the brew hauler, I have a milk carton create down in the basement that I can use


I personally think that, for stove top brewing, the 8 gallon kettle is sufficient. I used a 6 gallon one until I moved to all grain. Also, 8 gallon should be big enough to serve as a hot liquor kettle should you decide to make the move to all grain.

You are also wise to be using Star San. It's probably a superior sanitizer to anything you'll find in a kit.

Here is a good, reasonably priced thermometer: http://www.williamsbrewing.com/SELF-...TAL-P1434.aspx

Also, have you thought about a scale for hop weighing once you move away from kits? I use a $20 one I got from Meijer in the cookware department.

Other than that, don't forget to have fun!

Happy brewing!

I have not put thought into a scale yet as my mind is 100% focused on extract kits and just learning the process. I don't even want to think about purchasing anything regarding all grain yet.


Here's your cart. Everything you need. Nothing you don't. Enough left over to buy another ingredient kit of your choice. Notice the promo code to get the fermenter with two kits. Go buy some oxiclean free and get empties from your friends.

Optional upgrades:
- either get a 15gallon kettle directly or go get a Concord kettle from ebay. The second option leaves more for ingredients.
- add another fermenter so that you can get a pipeline of beers going.

Don't forget to have fun!
This is AWESOME! Thanks for spending the time to put this together for me. And on top of it, it includes the pot that I was going to have to spend extra on anyways. I think I just might go with this pre-defined selection that you gave me. I actually haven't taken bottles back in a while and have 250+ empty pry off bottle openers which I will be using.

One question I have is, does this not include a blowoff assembly? I've watched a few videos where this is needed sometimes.


I use plastic buckets to ferment in. I'm starting the 9th year on the originals and they still aren't scratched enough to get me an infected batch. I won't have a glass carboy, not after looking at the thread showing the accidents. I can replace my buckets 10 times a year for what one trip to the emergency room would cost(maybe more than 10). I can have more buckets for the same cost and with care they can be stacked one inside the other when empty to reduce the space needed.

Buckets have handles already for moving them about. The lid comes off giving you lots of access for cleaning or taking samples. If I drop one while cleaning, it bounces. The are much lighter than the glass carboys too. The big downside is that I can't watch the fermentation.

Yeah, I have decided to go with plastic after looking into this a little. Worse case scenario, I just buy another plastic carboy.
 
This is AWESOME! Thanks for spending the time to put this together for me. And on top of it, it includes the pot that I was going to have to spend extra on anyways. I think I just might go with this pre-defined selection that you gave me. I actually haven't taken bottles back in a while and have 250+ empty pry off bottle openers which I will be using.

One question I have is, does this not include a blowoff assembly? I've watched a few videos where this is needed sometimes.

It's always fun to spend other peoples' money.

I guess I overstated it when I said "everything." I do recommend a blow off assembly (tube, jug of sanitizer, etc), but I'm not personally familiar with the BMB. There were some options on that page. I'm sure an email to NB would answer any questions. Their online support is superlative.

One other thing not covered in that list is a way to boil. I don't recall if you were planning to do stove top, but you should be sure to check clearance for the pot with any hoods/microwaves. Better yet, you could get a burner and get out of the kitchen. Also, an induction cooker (~ $150, requires a 220V outlet) would be compatible with the pot in the cart.
 
I started in a similar fashion, with kegging as my target. Of all the suggestions, if I could go back in time I would have started with 8 gal turkey fryer I have now. It was 40 or 50 bucks, got me out of the kitchen and easily saved me a hour per day and aggravation of the wife. I am now looking to upgrade to a 15 gal stainless kettle for future BIAB, but I've still got lots of work to do getting partial mashes more consistent. And while you can have fun with all extract, you'll want to move quickly to specialty grains and partial mash, where outdoors saves on some mess.
 
It's always fun to spend other peoples' money.

I guess I overstated it when I said "everything." I do recommend a blow off assembly (tube, jug of sanitizer, etc), but I'm not personally familiar with the BMB. There were some options on that page. I'm sure an email to NB would answer any questions. Their online support is superlative.

One other thing not covered in that list is a way to boil. I don't recall if you were planning to do stove top, but you should be sure to check clearance for the pot with any hoods/microwaves. Better yet, you could get a burner and get out of the kitchen. Also, an induction cooker (~ $150, requires a 220V outlet) would be compatible with the pot in the cart.

It seems like that's going to up the cost slightly since the BMB has it's own accessories. Looks like I would need the lid, fermometer, airlock, blowoff assembly, and bung (I didn't see this as an option). I think all that is $15 (so not a big increase) if I added everything properly. I also noticed that the list you posted does not include a secondary fermenter. A buddy of mine told me that I'll definitely want to go with a secondary fermenter. Maybe I start out with just one primary and then if I want to go secondary I could do that in the future. I'm no expert at all of this so could you explain what benefit I would get over going with the custom picks instead of just going with the kit and adding extra stuff until I hit $300?

http://www.northernbrewer.com/shop/brewing/big-mouth-bubbler-deluxe-brewing-starter-kit.html

I was planning on going stove top due to cost right now. If I could work out the costs, I might be able to get a burner and brew either in my basement or my garage. The problem with brewing in my garage is that I live in New York and it gets pretty cold out there. I would have to carry my batch back into my house to ferment. I would prefer that I brew in my basement but I'm not sure how safe that is. I do have the option to open up some windows down there for ventilation during the brewing process.

Thoughts?
 
I don't think brewing with propane in your basement would be wise without a serious ventilation system. I brew with it in my garage with the overhead door a quarter of the way open and the screen open on the rear entry door. I get plenty ventilation and the heat from the burner keeps it quite comfortable, even in the sometimes harsh NW Ohio winters, when I do 90% of my brewing.
 
It seems like that's going to up the cost slightly since the BMB has it's own accessories. Looks like I would need the lid, fermometer, airlock, blowoff assembly, and bung (I didn't see this as an option). I think all that is $15 (so not a big increase) if I added everything properly.
Worth the money.

I also noticed that the list you posted does not include a secondary fermenter.
A buddy of mine told me that I'll definitely want to go with a secondary fermenter.
That was intentional. I do not think secondaries are necessary. For the majority of beers, just leaving it in primary until it is done fermenting results in the highest quality beer with the minimal infection risk. Here's a side by side test of primary vs secondary:

http://brulosophy.com/2014/08/12/primary-only-vs-transfer-to-secondary-exbeeriment-results/

I encourage you to come to your own conclusions.

I was planning on going stove top due to cost right now. If I could work out the costs, I might be able to get a burner and brew either in my basement or my garage. The problem with brewing in my garage is that I live in New York and it gets pretty cold out there. I would have to carry my batch back into my house to ferment. I would prefer that I brew in my basement but I'm not sure how safe that is. I do have the option to open up some windows down there for ventilation during the brewing process.

Thoughts?

Please don't brew with propane indoors. If your stove can handle it, stove top brewing works great. My first 30 or so batches were on the stove. Add 4 or 5 drops of ferm cap as it is getting close to a boil to help guard against boil overs. Having a large pot (2x times your finished volume) helps as well (hence why I suggested the 10g over the 8g).

You could take a wait and see approach. Get everything to do a batch on the stove. If it works, great. If not, hunt around for an old turkey fryer (got mine for free from my aunt) or wait for another NB deal on a burner.
 
Noticed you plan on using plastic fermentors; word of advice if you clean them up as soon as you are done with them they easily wash out with hot water and a soft cloth. Doing that will minimize the risk of scratches to almost nil and then you won't need to worry about an infection hiding out in one. If you let it sit for a while prior to cleaning then a good soak in hot water and Oxiclean/PBW will knock any crusties loose and a simple wipe with a soft cloth will get it cleaned out.
 
Looks like you are pretty set with that list made for you. For a blow off I use some tubing I got from NB and stuck it on the middle part of a three piece airlock and cut the plastic '+' off the bottom. Works flawless and only cost a few dollars. I think the tube is a 1" or 1/2" ID tube but can't quite remember.

joc5vAe.jpg


Eff4pHN.jpg
 

Latest posts

Back
Top