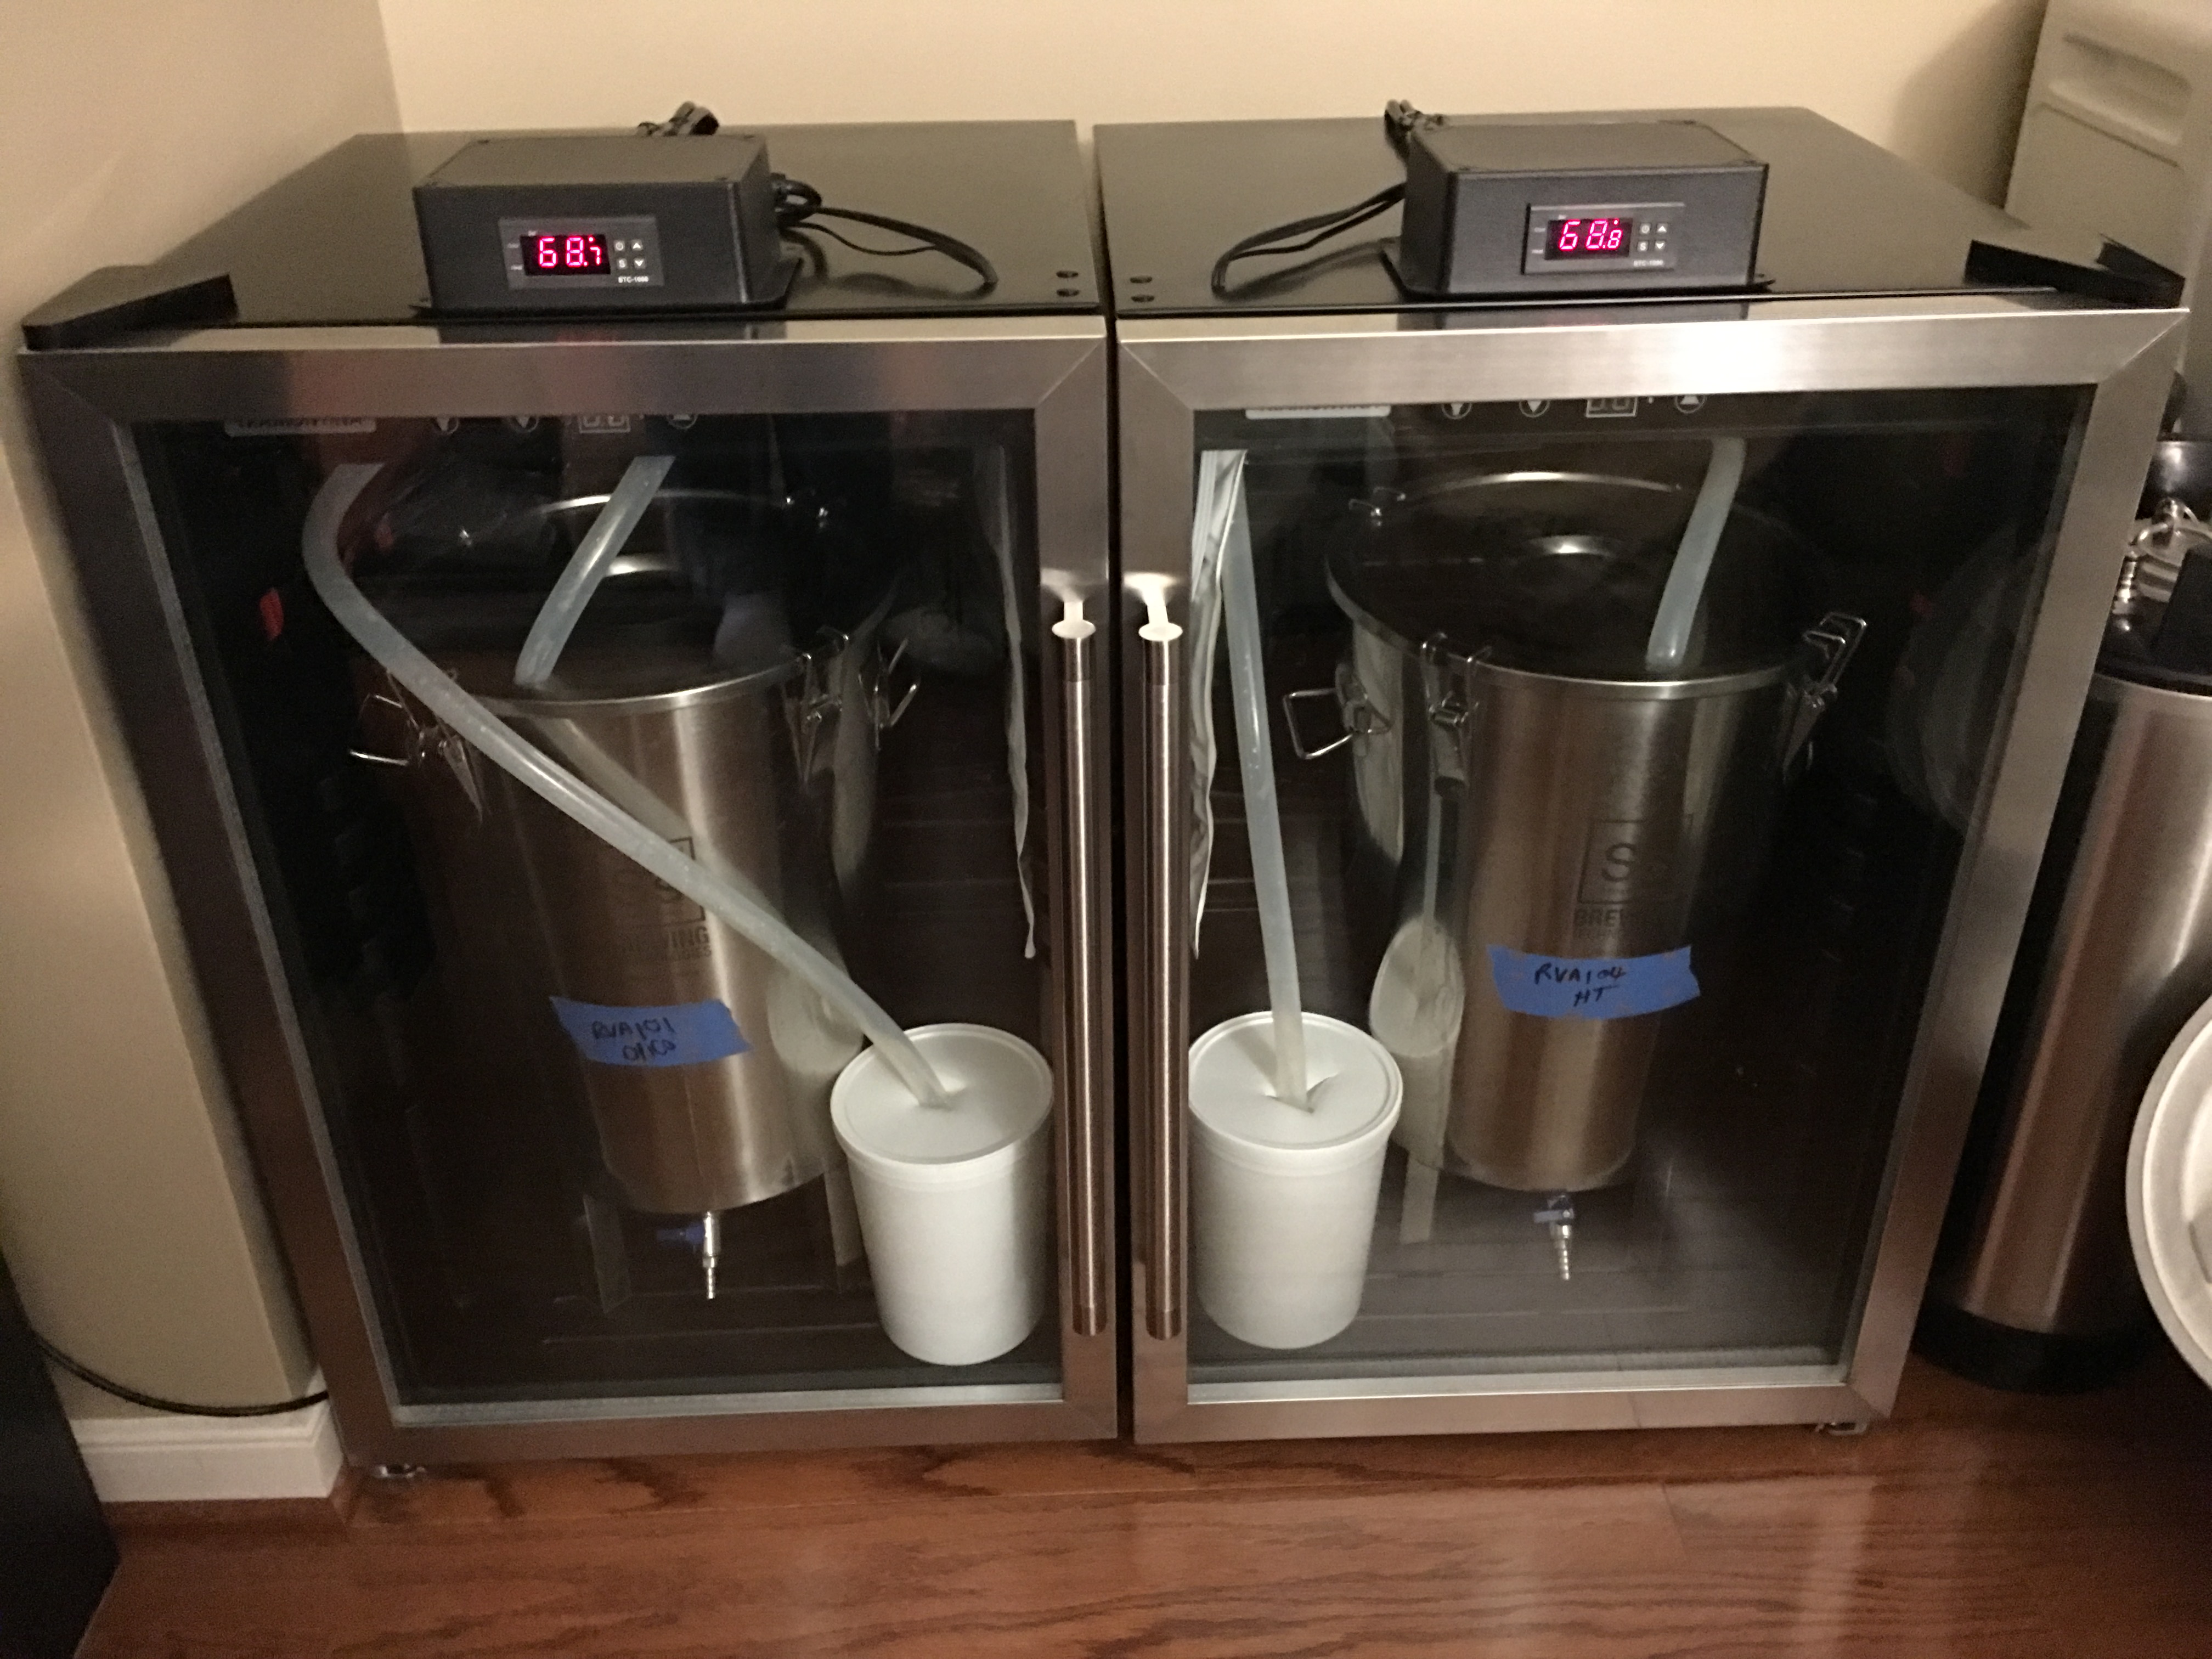
New fermentation chambers to show off brew buckets

Homebrew Talk - Beer, Wine, Mead, & Cider Brewing Discussion Forum

Help Support Homebrew Talk - Beer, Wine, Mead, & Cider Brewing Discussion Forum:

This site may earn a commission from merchant affiliate links, including eBay, Amazon, and others.
Just a word on the double pane polycarb or plexiglass window. They sell cans of nitrogen and other trace gases for wine preservation. If you were to caulk both of those panels together then puncture a hole for the preservation gas and another hole for gas to escape out the other side and let it flow for a few minutes, you would insert a lot of nitrogen and other trace gases that would keep the condensation from happening between the panes. I doubt that this would be a concern but that would be a very cheap and easy way to inject that gas. You just need to make sure to leave that other hole open for a while while the two panels have a chance to let all the extra pressure escape. Then seal it up.
 
The problem I'm having now is getting the corners of the FRP trim to stick due to the curvature of the door. The silicone sealant is doing an "ok" job but it's long term is concerning me.
 
3M 03614 Scotch-Mount is great for this kind of mounting. Its holding on all my panels on my truck and millions others as well.
 
true, forgot all about that stuff. probably would have been the wise way to go and then caulk around the seams inside and out.
 
Here is my attempt. No quite as great as the original but hopefully gets the trick done as I've been struggling at keeping temps consistent during fermentation.

sprayed the door with red enamel paint to match the rest of the garage color scheme. added the ferm wrap inside as a heating element and the temp prove from the inkbird 308. wrapped all the exposed insulating foam in foil tape to cover up any exposed foam cells and used silicone sealant on the inside of the door seal. I've got my brewmaster brew bucket on order so can't wait to testify that when it comes in. I will be able to adjust the temp on the inkbird without opening the door as I'll have the digital readout of the internal wort temp. lets hope it works out.

IMG_4034.jpg


IMG_4035.jpg


IMG_4036.jpg


IMG_4038.jpg


IMG_4039.jpg


IMG_4040.jpg
 
confirmed this will only work with these brew buckets without modifying other fermenters or screwing with the freezer section somehow. the offset bung on the brew buckets allow clearance needed for the stopper.
 
if anyone is interested

I did find a good option at Sams Club

http://www.samsclub.com/sams/126-can...rod18910248.ip

Fits SS Brew Bucket
Fits Glass 6.5 g Carboy
Fits Plastic Brew Bucket

No modification needed to fit - just take out the glass shelves

Here is a pic, with the SS brew Bucket

I can't get the link to work. Is it this model: 80901/502DS?

That unit would be perfect for me.

EDIT - Never mind, the link in the other thread worked.
 
@steveoatley
Do you just close the door on the cords for heater and probe then? Or did you drill anything?
 
@steveoatley
Do you just close the door on the cords for heater and probe then? Or did you drill anything?

Right now, I am closing the door on the cords
Look at the pic - about 1/2 the way up next to the handle

I plan to drill a hole at some point to get the Heater Cord & Temp prob
inside in a neater fashion, right now they are taped to the door edge.

I just haven't had the time to find a good spot to drill

S
 
Here are Better Pics
Found on my phone - does anyone really own a camera any more ?

Testing each Fermentor.
These have no reflections - you can see that there is plenty of room

Brew Bucket
6.5 gal Carboy
SS Brew Bucket - 7 gal

I do not know why my pics upload sideways - there are not that way ?

Hope this helps

Steve

IMG_5007.jpg


IMG_5008.jpg


IMG_5009.jpg
 
Sweet! The 126 can beverage cooler is in stock at my local "Spam Club" for $178.98. Thinking one of those and a temperature controller from my local homebrew supply is going to be at the top of my 'To Do For Brew' wish list right next to 'Upgrade to all-grain brewing'.
 
Right now, I am closing the door on the cords
Look at the pic - about 1/2 the way up next to the handle

I plan to drill a hole at some point to get the Heater Cord & Temp prob
inside in a neater fashion, right now they are taped to the door edge.

I just haven't had the time to find a good spot to drill

S

Hey Steve,
Not sure if you're still closing the door on the cord, but I used your idea here for my Brew Buckets and also drilled holes to run the cords:
RuabE2Z.jpg

The heat pad had your standard electrical outlet on the end, so I cut and spliced the power cord in order to run it. The probe fit through the hole just fine. If you lift one of the caps for the door handle mounts, there is nothing underneath other than foam insulation and plastic. Just drill slightly larger and you should be able to feed everything through. Hope this helps, and very happy I found these pics when you posted them! :mug:
 
That' s a great idea to get cords into the Fridge !!


But..... mine are an older version

I do not have the reversable door option - no holes on the top for the hinge.

I drilled out the 'weep' hole at the back - just below the chill plate.

Steve
 
Is this the model at Sam's? I happened to see it last night and snapped a photo, I had no idea someone in this thread already bought it.

Sure is cheap, I was just wondering what might fit in it.

20171023_193334.jpg
 
Is this the model at Sam's? I happened to see it last night and snapped a photo, I had no idea someone in this thread already bought it.

Sure is cheap, I was just wondering what might fit in it.

That is it... Have it myself and it fits a carboy/ss brewtech brew bucket perfectly. Looks classy to boot!
 
Hey Steve,
Not sure if you're still closing the door on the cord, but I used your idea here for my Brew Buckets and also drilled holes to run the cords:
RuabE2Z.jpg

The heat pad had your standard electrical outlet on the end, so I cut and spliced the power cord in order to run it. The probe fit through the hole just fine. If you lift one of the caps for the door handle mounts, there is nothing underneath other than foam insulation and plastic. Just drill slightly larger and you should be able to feed everything through. Hope this helps, and very happy I found these pics when you posted them! :mug:

This is exactly what I needed to figure out as well. Are you guys just plugging the fridge directly into the STC power supply or did you do a hack to intercept the temp controller on the Tramontina?
 
I have been able to get 1 of mine to 35 F
The 2nd can only get to 40 F

Not sure why.... so i just Lager in the 1 st one !

S

I read a review that said Tramontina has a circuit board mod they will send to you free that allows you to set the digital temp to 32F
 
I read a review that said Tramontina has a circuit board mod they will send to you free that allows you to set the digital temp to 32F

I read that new models are being fitted with the 32F circuit board, so the mod shouldn't be necessary anymore.

I wrote customer support and asked how to increase the max temp from 60F to 70F. They told me they can do it, but they'd need multiple units ordered. Anyone want some new circuit boards? Wouldn't need an external controller anymore.

I'd definitely be down, how many would they require?
 
I would be in for 2.

Any idea on price? And how easy it would be to install them?

edit: my quoting skills suck. This was in reference to purchasing the circuit boards.
 
I'd definitely be down, how many would they require?

I would be in for 2.

Any idea on price? And how easy it would be to install them?

edit: my quoting skills suck. This was in reference to purchasing the circuit boards.

Still waiting on their response. I followed up today. I assume it's easy to install because they mailed out modified boards a year ago to get the temperature down to 32.

Just thought about it.. you'd need to have a room temperature above your fermenting temperature for the special circuit board to work correctly. Dagnabbit!
 
Last edited:
Still waiting on their response. I followed up today. I assume it's easy to install because they mailed out modified boards a year ago to get the temperature down to 32.

Just thought about it.. you'd need to have a room temperature above your fermenting temperature for the special circuit board to work correctly. Dagnabbit!

Or a heating element inside the fridge?
 
Still waiting on their response. I followed up today. I assume it's easy to install because they mailed out modified boards a year ago to get the temperature down to 32.

Just thought about it.. you'd need to have a room temperature above your fermenting temperature for the special circuit board to work correctly. Dagnabbit!
I'm in Az. Ambient temps below fermentation temps are never a concern. Let us know if you're giving up on the circuit boards. I may get in contact with the company if so.
 
Or a heating element inside the fridge?
To use a heating element, you'd need a two stage external temperature controller.

I'm in Az. Ambient temps below fermentation temps are never a concern. Let us know if you're giving up on the circuit boards. I may get in contact with the company if so.
I haven't given up. On Apr 19th the representative said that she would get back to me in a week. She's waiting on their technician to answer her. I will keep updating.
 
Haven't heard back.. PM me if you'd like the contact information of the representative.
 
I read that new models are being fitted with the 32F circuit board, so the mod shouldn't be necessary anymore.

I wrote customer support and asked how to increase the max temp from 60F to 70F. They told me they can do it, but they'd need multiple units ordered. Anyone want some new circuit boards? Wouldn't need an external controller anymore.
I would definitely be on board to order 2 or more if the company is able to do this! Thanks for looking into it!
 
Resurrecting an old thread.. I am currently working on modifying mine... has anyone found a way to bypass the tramontina temp controller? and use a STC-1000???

Also looking to add heater, and a way to get temps up to 70-75....
 
I replied to your other posting re: bypassing the controller. I'm sure it's doable, less sure it's a good idea.

On the heating side, I bought a two pack of these seedling mats: https://www.amazon.com/gp/product/B015PD8I7I/?tag=skimlinks_replacement-20

They work great. I've had no issue with them getting the chamber up to 68, or holding my wort at 65 for weeks on end in a cold (20-40F) garage. Haven't tried higher, but they raise it quickly enough that I don't think 75 would be a problem at all.
Did you mount them to one of the inner walls in the fridge? Does the power cord disconnect so that I can route the cable through a drilled hole without having to make a hole large enough to fit he plug through? TIA
 
Did you mount them to one of the inner walls in the fridge? Does the power cord disconnect so that I can route the cable through a drilled hole without having to make a hole large enough to fit he plug through? TIA

No, I just laid the mat across the bottom. It comes about 4” up each side of the fridge.

The power cord does NOT disconnect. I cut about 2’ off of mine, ran it through the rear drain that I had already expanded with a drill, then re-spliced the cord outside the fridge. If I cared about appearances, I would have used some quick disconnect plugs, but it’s behind the fridge and under a countertop, so I really don’t care.
 
Back
Top