New Control Box Build - Need assistance

Homebrew Talk - Beer, Wine, Mead, & Cider Brewing Discussion Forum

Help Support Homebrew Talk - Beer, Wine, Mead, & Cider Brewing Discussion Forum:

This site may earn a commission from merchant affiliate links, including eBay, Amazon, and others.

lzrdkng14

Well-Known Member
Joined
May 18, 2011
Messages
264
Reaction score
17
Location
Downingtown
Hey guys,

Looking to do my first Electric Brew Control Panel build. Been on these forums off and on for a few years, but I have finally decided to take the plunge to electric!

My plan is to start with a Single PID Single Element system, with no pumps. Going to use a couple 5 gallon coolers for MT and HLT and heat all water in the BK. I would like to eventually add at least one pump and possibly put another element in the HLT, but I only have 30A to work with so can only run one heater at a time.

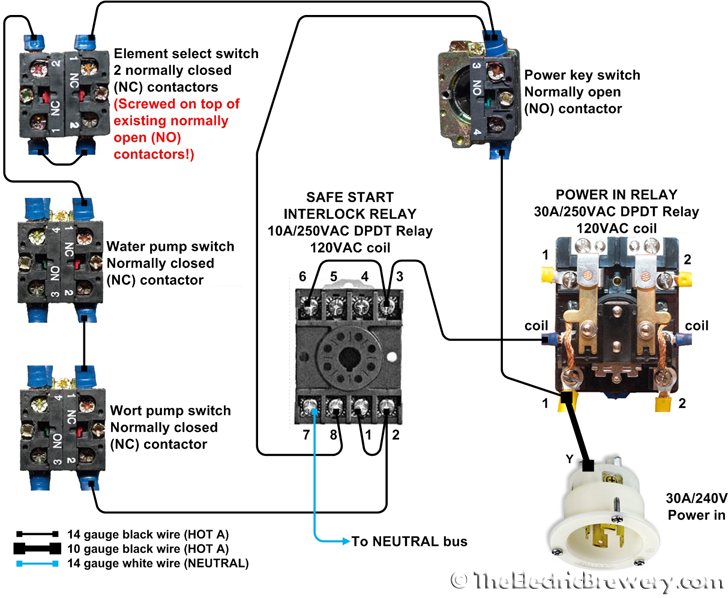
Using these diagrams as my inspiration for this design:
Auberin-wiring1-a4-4500w-BIAB-30d
Auberin-wiring1-a4-5500w-BIAB-30d6


But this controller will be slightly different than the above deisgns. I would like to use a key switch as a main power switch with a green LED. Will use a Red Illuminated push button switch to power the 5500 watt Element and a Yellow Illuminated push button switch to power the PID. Will also have an Emergency stop button to kill everything.

Here is my parts list:
Cantex 12x12x6 Box
Auber SYL-2352 PID
40a SSR
Heat Sink for SSR
Contactor
RTD Sensor 1/2 NPT 6 inch
Key Selector Switch - 2 NO
Green LED Indicator
Illuminated Pushbutton Switch - Red
Illuminated Pushbutton Switch - Yellow
Emergency Stop Button

So here is what I am looking for:
  • Will these parts all work together? (Specifically the Key Selector and E-Stop as they are variances to the above drawings)
  • Is there an existing drawing/design that is the same as what I am doing? I have searched but did not find one...
  • Will this design facilitate expansion later on?
 
Last edited:
Forgot to include the RTD connectors to the parts list....

Any comments to my above questions?
 
The key switch is rated for 10 amps. That limits your total power draw to 2,400 watts or less. I cannot say to use it as your power On/Off. You have the same 10 amp limit on the red switch.

There are critics of the trip the GFI E-Stop design. I am one of those critics. Search this forum for opinions.
 
Kal's parts list uses 10amp switches too...I'm confused
http://www.theelectricbrewery.com/control-panel-part-1?page=2

I am going to advise always use components rated for the load it is going to carry. 240 VAC system, 10 amps switch = 2,400 watts max.

Look as if Kal uses a 10 amp switch to turn on a 30 amp contactor. The switch sees only the coil of the contactor as a load. No problem there

Your schematic shows no main On/Off switch. In the OP you say you wish to use a key switch for the main power If you meant a 10 amp key switch PLUS a 30 amp contact to turn on the main power, that is different and OK.
 
personally I've decided to remove the main on-off switch from the control panel itself and installed it in the electrical box that is on the adjacent wall. It's a basic 2 pole mechanical switch rated for 60A (I run 2 4500W kettles simultaneously. Also we have 240V electrics here in Russia, so just 2 wires: Hot and Neutral). This allows me to get rid of more expensive 60A contactor and simplifies the wiring as I don't have to wire the contactor and key switch. The load switch on the wall just breaks in the mains power and I can safely work with the panel
 
The key switch is rated for 10 amps. That limits your total power draw to 2,400 watts or less. I cannot say to use it as your power On/Off. You have the same 10 amp limit on the red switch.

There are critics of the trip the GFI E-Stop design. I am one of those critics. Search this forum for opinions.

So, question.... should I use a contactor relay to wire the E-Stop? Trying to wrap my head around this thread: https://www.homebrewtalk.com/showthread.php?t=529694&highlight=rufusbrewer
 
Check out the prices on ebrewsupply.com, one of the site sponsors.

Yeah this was clutch - awesome site! Re working my parts list and am planning on building out a full Kal Clone (minus a few pieces). Not going to invest in pumps or get the additional RTDs and element yet, but the control box will be ready to go - so easy upgrades later.
 
OK have a new parts list for the panel. Still looking for some of the odds and ends for the outlets, but I think I have a good design for the panel. Going to draw out the front controls in sketchup as well.

Qty
1 Adamax 12x12x6 NEMA Enclosure $33.60
3 Auber SYL-2352 PID $46.50
1 RTD Sensor 1/2 NPT 6 inch $34.35
2 40a SSR $12.00
2 Heat Sink for SSR $3.50
3 40a Contactor Relay $13.50
1 3-Way Switch - 2 NO $4.50
2 2-Way Switch - 2 NO $3.50
1 Key Selector Switch - 2 NO $4.50
1 Push Button Switch - NO (Red) $3.50
1 Green LED Indicator $3.00
2 Blue LED Indicator $3.00
2 Yellow LED Indicator $3.00
1 Emergency Stop Button $5.00

I would suggest using the larger home depot enclosure for sure like the one in my build thread linked below....

Edit* looks like home depot discontinued the 12x12x8 Carlon boxes.... Maybe Lowes still has them?
And you can save $100 if you replace the auber controllers with the mypin td4 or the xmt 612 which is an identical clone to the auber units your looking at (jury is still out on whether they are made in the same factory as the units auber has made in china)

#1 - why do you think I should change the box? HD still has a Carlon 12x12x6 which is the box I originally had on my list. Was thinking plastic is much easier to work with, but steel is a bit nicer. This steel box I have listed is the same price as the plastic one and they are both the same size. So, does the extra 2" in depth really make a big difference?

#2 - Found this on amazon which cuts almost $50 off the total price: http://www.amazon.com/dp/B008ZUDUSG/?tag=skimlinks_replacement-20

I am also considering the PT100 therm probe to cut some costs... Will this one work? http://www.amazon.com/dp/B008YP1D04/?tag=skimlinks_replacement-20 Seems a bit short...
 
Last edited by a moderator:
#1 - why do you think I should change the box? HD still has a Carlon 12x12x6 which is the box I originally had on my list. Was thinking plastic is much easier to work with, but steel is a bit nicer. This steel box I have listed is the same price as the plastic one and they are both the same size. So, does the extra 2" in depth really make a big difference?

#2 - Found this on amazon which cuts almost $50 off the total price: http://www.amazon.com/dp/B008ZUDUSG/?tag=skimlinks_replacement-20

I am also considering the PT100 therm probe to cut some costs... Will this one work? http://www.amazon.com/dp/B008YP1D04/?tag=skimlinks_replacement-20 Seems a bit short...
the link you shared is different than the one I had saved along with the brand (cantex) and the image on the site which along with, the impression my box was 12x12x8 not 6 and everything was a tight fit for me led me to suggest a bigger box but you should be fine, and yes the plastic is much easier to work with, I use three of these enclosures in different setups related to my brewery. and YES the 2 inches would have made a huge difference.... once you take the depth of the ssrs on heatsinks and pids into account it changes everything.

@. 3 auber pids will cost you 3x 46.50 =139. + shipping of around $12 so $151.... three of those td4 units would be $79 including shipping plus eliminate the need to buy ssrs which you had at $12 so your actually comparing $162 to $79.... which will save you just over half the cost. plus the td4 has a 1 secound cycle time which is superior when using manual mode over the auber units from everything I can put together.
for sensors I suggest these or the ones linked below.
http://www.ebay.com/itm/RTD-PT100-T...833?pt=LH_DefaultDomain_0&hash=item3aac6d7971
I suggest using these with some 99cent rtd connectors at the control panel end, I went with the cheaper $6-10 probes and while they do work fine they are a pain when you need to clean and the stainless braided cables suck, they kink and snag on things, (the auber RTD sensors are actually pt100 sensors btw) I ruined two by puting shorts in the cables before upgrading but still use one thats stationary for my rims.
These are the ones auber buys from china and resells...
http://www.aliexpress.com/store/pro...or-with-1-2-BSP-thread/100309_1653069175.html
 
Last edited by a moderator:
the link you shared is different than the one I had saved along with the brand (cantex) and the image on the site which along with, the impression my box was 12x12x8 not 6 and everything was a tight fit for me led me to suggest a bigger box but you should be fine, and yes the plastic is much easier to work with, I use three of these enclosures in different setups related to my brewery.

it seems you have some extra components as well, with the extra pump and the RIMS... I think I will be OK. Thanks
 
it seems you have some extra components as well, with the extra pump and the RIMS... I think I will be OK. Thanks
I guess I didnt explain well.. I was mistaken, my box is only 6" deep since I used the same one you are they just changed the name and web page for it...

And I did not have the rims and pumps when I built the panel... That stuff came later as I added them...
why do you have 3 pids if your only using 2? why not just use a $10 digital temp readout instead of the third pid them?

My system started as a herms and evolved. My advice is to save room if there is even the slightest possibility they you might add things later.
 
Here's a shot of my panel which I am almost done with. Pretty happy with it so far.

20150412_132804.jpg


20150412_132817.jpg
 
I guess I didnt explain well.. I was mistaken, my box is only 6" deep since I used the same one you are they just changed the name and web page for it...

And I did not have the rims and pumps when I built the panel... That stuff came later as I added them...
why do you have 3 pids if your only using 2? why not just use a $10 digital temp readout instead of the third pid them?

My system started as a herms and evolved. My advice is to save room if there is even the slightest possibility they you might add things later.

Can you recommend a good digital temp readout?

EDIT - I found the one you linked to in your thread: http://www.ebay.com/itm/25128100015...&ssPageName=STRK:MEBIDX:IT&afsrc=1&rmvSB=true

I am in a little bit of a time crunch, but thinking maybe I order this now as it is coming from Asia.... I need to get an IPA brewed and ferm'd before Aug 17. Do you remember what kind of lead times you got on all your ebay china stuff?

The other thing is, for an extra $20 I would get a uniform look on my panel for all three temps... but I might be able to fit this in to the plan with a combo amp/volt meter above it
 
So, question.... should I use a contactor relay to wire the E-Stop? Trying to wrap my head around this thread: https://www.homebrewtalk.com/showthread.php?t=529694&highlight=rufusbrewer


You wire the keyswitch as one of the switches in string in D, E or F as shown in Figure 3. The Mushroom button is another in the string D, E or F. The keyswitch would needs to be closed to turn on the system.

The design is a bit counter intuitive. Off buttons are wired as closed, the On buttons are wired as open. You are making a fancy On/Off switch.

If you are using a 2 pole 30 amp normally open contactor, you must add 1 ea 120 VAC DPDT relay. The coil, and relay contacts shown in Figure 3 are part of the new relay. The coil for the 30 amp contactor gets connected to the point that says "to load"
 
I guess I didnt explain well.. I was mistaken, my box is only 6" deep since I used the same one you are they just changed the name and web page for it...

And I did not have the rims and pumps when I built the panel... That stuff came later as I added them...
why do you have 3 pids if your only using 2? why not just use a $10 digital temp readout instead of the third pid them?

My system started as a herms and evolved. My advice is to save room if there is even the slightest possibility they you might add things later.

Any thoughts on making the box out of wood? I have some good maple scraps laying around that would make it very easy to put something together. I like stained maple and have the tools to make it. I would definitely put some metal like this inside to mount components on and might even make the jack panel out of a metal sheet embedded in the wood. Thoughts?
 
Any thoughts on making the box out of wood? I have some good maple scraps laying around that would make it very easy to put something together. I like stained maple and have the tools to make it. I would definitely put some metal like this inside to mount components on and might even make the jack panel out of a metal sheet embedded in the wood. Thoughts?

If you sealed up the wood, perhaps chalk the seams well. Maybe rubber gaskets around the door. As long as you do not turn a hose on the thing, I think it would be OK.

Hard for me to imagine generating enough heat for long enough that wood and combustion is a concern.
 
Any thoughts on making the box out of wood? I have some good maple scraps laying around that would make it very easy to put something together. I like stained maple and have the tools to make it. I would definitely put some metal like this inside to mount components on and might even make the jack panel out of a metal sheet embedded in the wood. Thoughts?

Realistically, although its not the ideal medium, if you used standoffs and mounted everything to a backerplate it should be as safe as any old floor console tv from the 80s or older... There are some nice builds here that are made of wood. there is no reason it has to be airtight or waterprrof since the switches and buttons certainly are not anyway.. I have a cpu fan blowing air thru in from the side and across the heat sinks and exhausts out the top... been using it for over 2 years now with no problems.
 
Can you recommend a good digital temp readout?

EDIT - I found the one you linked to in your thread: http://www.ebay.com/itm/25128100015...&ssPageName=STRK:MEBIDX:IT&afsrc=1&rmvSB=true

I am in a little bit of a time crunch, but thinking maybe I order this now as it is coming from Asia.... I need to get an IPA brewed and ferm'd before Aug 17. Do you remember what kind of lead times you got on all your ebay china stuff?

The other thing is, for an extra $20 I would get a uniform look on my panel for all three temps... but I might be able to fit this in to the plan with a combo amp/volt meter above it
I used that same readout in a build I havent finished yet but it worked fine when testing it... some stuff comes within a week but most can take up to 20 days max... You can sort by US seller only and pay the more modest markup fees from ebay sellers vs twice the price markups of some of the other popular suggestions here by folks that dont know its usually the same china products they are buying just through another middleman.
 
I used that same readout in a build I havent finished yet but it worked fine when testing it... some stuff comes within a week but most can take up to 20 days max... You can sort by US seller only and pay the more modest markup fees from ebay sellers vs twice the price markups of some of the other popular suggestion.

Yeah I think I might use the PID after all - would give me some flexibility later if I wanted to control a pump using the MT temp... It also makes for a nicer looking panel.
 
You wire the keyswitch as one of the switches in string in D, E or F as shown in Figure 3. The Mushroom button is another in the string D, E or F. The keyswitch would needs to be closed to turn on the system.

The design is a bit counter intuitive. Off buttons are wired as closed, the On buttons are wired as open. You are making a fancy On/Off switch.

If you are using a 2 pole 30 amp normally open contactor, you must add 1 ea 120 VAC DPDT relay. The coil, and relay contacts shown in Figure 3 are part of the new relay. The coil for the 30 amp contactor gets connected to the point that says "to load"
So, like this one?
http://www.ebrewsupply.com/mk2p-ns-110.html Please forgive me - I am having some trouble grasping this concept. Pictures help... ;-)
 
I might have just figured it out... so I wire in with the Key Switch and the 30A relay with one of these, correct?

The switch you linked is a normally open pushbutton. For the circuit @RufusBrewer posted earlier, you need a normally closed pushbutton.

Brew on :mug:
 
Here is my rough sketch of the control panel. It's a modified version of Kal's build...hopefully you can see it all. Plan on doing this in sketchup too.
Looks like mine only with ac pumps instead of dc pumps and speed control and no rims element control.
Good luck with your build,
You should be able to build that for less than the $300 mine cost to build.
 
Here is my latest (final?) parts list....

All of the items below have been ordered and roughly half has already been delivered. I opted to go with a steel enclosure and not build a wooden one. Main reason was the pain of trying to get switches and lights to mount properly. Also found this really nice box on ebay for a decent price.

Also, with the money I am saving by going with non Auber PIDs and RTD I added a timer and digital current/voltage display.

Qty
1 12x12x6 NEMA Enclosure $60.00
1 2 pack of Sugatsune 9" Steel Handles $10.80
3 TD4-SNR PID Controller with 40a SSR $95 ($32 each)
1 RTD Sensor 1/2 NPT 2 inch $20.00
1 Sestos Quartic Timer with Relay $30
1 Digital Current/Voltage Multimeter $13
1 Camco 02965 UWLD Stainless Heater Element $60
2 40a SSR $12.00
1 Aluminum Heatsink 8"x4" $18
1 General Purpose Relay (for E-Stop) $10
3 40a Contactor Relay $13.50
1 3-Way Switch - 2 NO $4.50
2 2-Way Switch - 2 NO $3.50
1 Key Selector Switch - 2 NO $4.50
1 Green LED Indicator $3.00
2 Blue LED Indicator $3.00
2 Yellow LED Indicator $3.00
1 Emergency Stop Button $5.00
1 Flashing Buzzer $5
1 Push Button Switch - NO (Red) $5.65
1 L14-30 Flanged Inlet $11.99
1 L14-30 Locking Female Plug $7.89
2 2.5mm Dia 3 Pins Circular Aviation Connector Adapter 25A AC 250V (for heater elements) $7.70
1 3 Pack of XLR Plugs (temp probes) $5.47
1 4 pack of XLR Jacks (temp probes) $5.26

STILL NEED:
Wiring
Terminal Block(s)
120v outlets for pumps
 
Last edited by a moderator:
Yes, that would work fine. :mug:

I am building out my wiring diagram and still need a little help with the EStop piece. The concept makes sense with the NC switch opening up the circuit to shut everything down. I just don't quite understand how the Contactor and Relay should be wired together and where the switches sit in relation.

This diagram on your thread is a bit confusing to me...
yFig-4_zpsalkijlyu.jpg


Was thinking it would look something like this
interlock.jpg


A Description of the Safe start interlock method

The safe start circuit is a little different than mine. The safe requires the switches are in the Off (safe start) position to turn the system on. Once the system is on, you can put the wort pump switch, water pump switch or element switch in any On & Off combinations that you like. The power switch will shut down the system.

The circuit that I show, the NC push buttons must be on the closed position to turn the system ON. AND they must stay closed to keep the system on. Open any one of the NC push buttons and the system shuts down.

In the safe start circuit, looks like the relay contacts that latch up the relay, the latch includes the wort pump, water pump and element switches.

I do not want to speak for the guys at The Electric Brewery. Tell them you have one of their red mushroom switches and wish to add it into their Safe Start circuit. They should able to tell you tell you how to incorporate it properly.
 
Here is my latest (final?) parts list....

All of the items below have been ordered and roughly half has already been delivered. I opted to go with a steel enclosure and not build a wooden one. Main reason was the pain of trying to get switches and lights to mount properly. Also found this really nice box on ebay for a decent price.

Also, with the money I am saving by going with non Auber PIDs and RTD I added a timer and digital current/voltage display.

Qty
1 12x12x6 NEMA Enclosure $60.00
1 2 pack of Sugatsune 9" Steel Handles $10.80
3 TD4-SNR PID Controller with 40a SSR $95 ($32 each)
1 RTD Sensor 1/2 NPT 2 inch $20.00
1 Sestos Quartic Timer with Relay $30
1 Digital Current/Voltage Multimeter $13
1 Camco 02965 UWLD Stainless Heater Element $60
2 40a SSR $12.00
1 Aluminum Heatsink 8"x4" $18
1 General Purpose Relay (for E-Stop) $10
3 40a Contactor Relay $13.50
1 3-Way Switch - 2 NO $4.50
2 2-Way Switch - 2 NO $3.50
1 Key Selector Switch - 2 NO $4.50
1 Green LED Indicator $3.00
2 Blue LED Indicator $3.00
2 Yellow LED Indicator $3.00
1 Emergency Stop Button $5.00
1 Flashing Buzzer $5
1 Push Button Switch - NO (Red) $5.65
1 L14-30 Flanged Inlet $11.99
1 L14-30 Locking Female Plug $7.89
2 2.5mm Dia 3 Pins Circular Aviation Connector Adapter 25A AC 250V (for heater elements) $7.70
1 3 Pack of XLR Plugs (temp probes) $5.47
1 4 pack of XLR Jacks (temp probes) $5.26

STILL NEED:
Wiring
Terminal Block(s)
120v outlets for pumps

home depot and lowes has 12x12x8 plastic electrical enclosure boxes for $34 thats what I used on my control panel as well as my stc1000+ based glycol/heatwrap fermenter controller.

no grounding post to deal with either since the box is non conductive.
 
Last edited by a moderator:
So I am taking a crack at the wiring diagram and I know this is a bit of a hack job... I want to do this to make sure I understand all the components and how they work together.

The PIDs and Timer will definitely need a more detailed diagram. Conceptually, does this look like it will work? Specifically, I want to use the Momentary DPST switch to act as a reset for the timer (using the NO side) and then break the alarm signal coming from the PIDs (using the NC side).

I am also still trying to figure out how the E-Stop fits in as well as how I want to incorporate a fuse...

Any feedback is appreciated.

control%2Bpanel%2Bwiring%2Bdiagram.jpg
Using PID's for mash and boil are a bit of a waste. If you can't heat the MLT, you only need a temperature indicator, not a PID. PID's can't control boil temperature, as that is set by local atmospheric pressure and wort composition. To control boil rate you can use a PID in manual mode, which is a bit of overkill, or you can use a manually adjusted power controller like a potentiometer controlled SSVR, or an Auber DSPR1. No real need for temperature measurement in the BK.

Brew on :mug:
 
I put a put a moderately priced bi-metal thermometer in my boil kettle. Let's me know him well close to boiling I am and how close I am to have to hover and monitor for hot break and the potential boil over. Using a $15.00 dial or a PID + probe? It is your brewery and your budget. You could go with a digital thermometer and probe. With PID in place, you have future proofing. Maybe an alarm to warn you it s getting close boil?

Your schematic is drawn confusing. Maybe I do not know my 220VAC standard wiring. Are the pins on the socket that look like droopy eyes, are they the two 120 volt legs and the mouth at the bottom the ground?

If you are going to use double pull relays, make sure you switch the two 120 volt legs and never switch the ground. Distribute the ground with the most home runs to central location without the possibility of a disconnection.
 
E-stop you have some choices.

If I read your schematic correctly, you can put a NC mushroom punch button in series with series with your key switch. Both need to be closed for the system to operate. Slap the mushroom button to open the path and it stays open until you twist and pull it closed again.

IMHO. This is a better design than the fuse + resistors short to ground and trip the GFI design. It cost less and is more simple and more reliable.

I hesitate to mention the next choice, but what the neck.

A while back I posted an alternative to the E-stop. It's main advantage for you is you can put multiple E-stop buttons around your brewery. It is a bit involved, and requires more parts and stuff.

If you only want only a single slap and shut down button the first choice is cheap, reliable and a properly designed circus.
 
Using PID's for mash and boil are a bit of a waste. If you can't heat the MLT, you only need a temperature indicator, not a PID. PID's can't control boil temperature, as that is set by local atmospheric pressure and wort composition. To control boil rate you can use a PID in manual mode, which is a bit of overkill, or you can use a manually adjusted power controller like a potentiometer controlled SSVR, or an Auber DSPR1. No real need for temperature measurement in the BK.

Brew on :mug:

Valid points but I offer an alternative view,

I always set my boil pid to 208 degrees and set my alarm and walk away to do other work. That way I dont have to worry about a boil over and it being unattended... Then, when I'm ready to monitor it I hit the manual button and set it at 75-80% for a vigorous boil.. pids have this advantage plus at $26-30 for the mypin pid your still further ahead than a ssvr and potentiometer with a digital temp readout...
 
Back
Top