fireslayer
Well-Known Member
Great looking build!

It's a grain storage chest with a motorized grain milling cabinet, so yes, it's the hopper for the mill.
Now back to the OP's thread and its pure awesomeness!
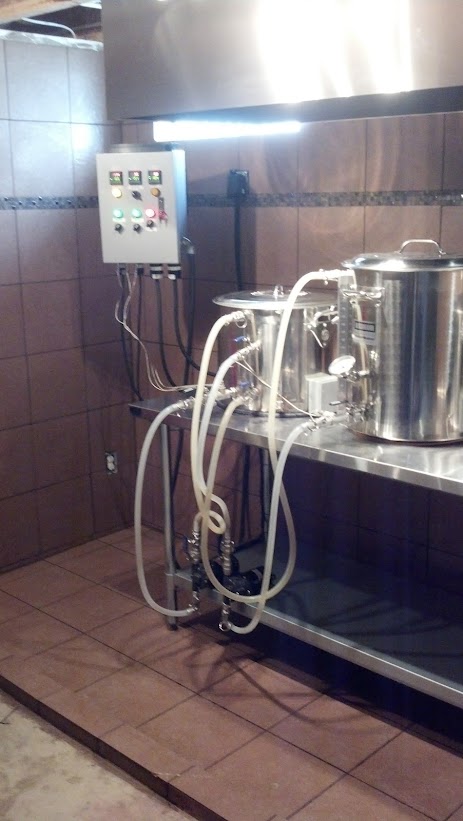


The view from my chair this morning...nothing goes better with coffee than the smell of mash!!


That is a really amazing setup!!!! I just put together an electric set up and have used it once. But I just went as cheaply as I could, and my "spot" in the basement is totally unfinished. I can dream of one day having something as sweet as this I guess. But if you want to check it out, here are some of the pics of my stuff:
www.edsheadbrewing.blogspot.com
Keep up the great work and I hope your brew session goes well!!!!!
Thats true.. hadn't thought of it that way.. looks like some cork mats are in order!!

Sorry for not getting back to this for a while, but yes, that was my concern and it seems like you have a viable solution! Everything is looking utterly amazing!
") . Make sure you get that ceiling finished with drywall and painted. You dont want any free vapor escaping the vent and geeting into the wood framing, which could lead to mold.
. Make sure you get that ceiling finished with drywall and painted. You dont want any free vapor escaping the vent and geeting into the wood framing, which could lead to mold.Wow, I would need to label all those hoses to prevent confusion. Going to be sooo nice just brewing with everything in place, vs. lugging around and setting up mlt/hlt/kettle for each brew session.
When you set the element to 70%, how does the controller "control" the element? Does it decrease voltage? Something like PWM?
WARNING: browsing the forums on HomeBrewTalk will make you feel POOR

All done! 10 gallons in primary... Man I love my new brew area, easy to use easy to clean!! Not having to move stuff around to chill and then clean really knocks some time off my brew day. Started heating my strike water @ 5:15 a.m. completely done now with cleanup and everything. 5.5 hours pretty solid!!
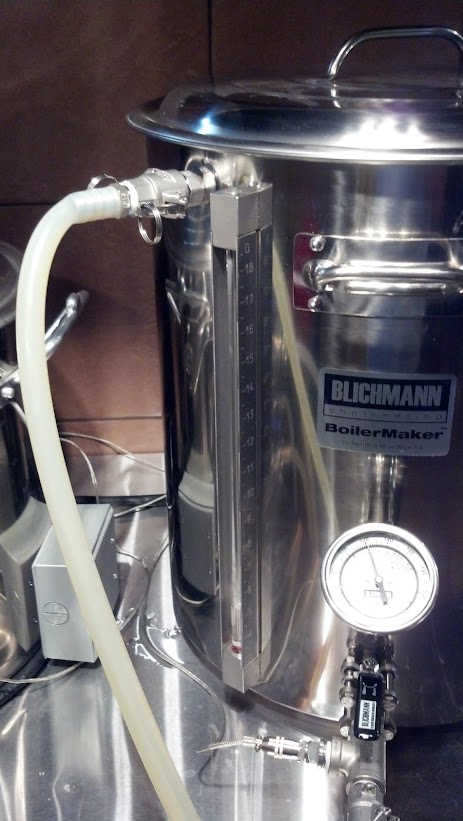
Ok so here is something I wanted to see when heating my strike/sparge water, how far behind is the mash tun in relation to the HLT? I found that the MT was about 10 - 12 degrees behind. I turned my element in the HLT all the way up to 195 and when the mash reading was 155 I turned the HLT down to 164 (my mash in temp target was 153.8). The HLT dropped off pretty quick and the mash MT of stalled at 158 so I kicked it back up to 175 and it reach my temp and overshot slightly, so I added some cold water to the HLT to adjust and got it back to temp.
The other thing I wanted to make notes on was the mash out. I set my HLT on 175 and let everything run for a while, about 10 minutes into heating up to mash out temp I took a reading on the inlet on the MT and was only at 165 flowing into the MT (the outlet reading was 155 on the PID). Waited another 3-4 minutes and checked it again and the wort coming into the MT was 169. My reading on the outlet of the MT was still only at 163, so at that point I said screw it and mashed out. I want to work on trying to figure out ramping up the temps without going over, so any suggestions from the notes here are appreciated.
One last thing is I found out my HLT probe was 1 degree high on its reading and the MT was 1 degree low, on top of that the brewmometer on the MT was 2 degrees low. So after making those adjustments some of the readings made a little more sense. I did not initially, but definitely advise calibrating all of your probes with a known good reading thermometer, it will save you some frustration.
Brian


![Craft A Brew - Safale S-04 Dry Yeast - Fermentis - English Ale Dry Yeast - For English and American Ales and Hard Apple Ciders - Ingredients for Home Brewing - Beer Making Supplies - [1 Pack]](https://m.media-amazon.com/images/I/41fVGNh6JfL._SL500_.jpg)


