• Please visit and share your knowledge at our sister communities:
  • If you have not, please join our official Homebrewing Facebook Group!

    Homebrewing Facebook Group

New Anvil Bucket Fermentors

Homebrew Talk

Help Support Homebrew Talk:

This site may earn a commission from merchant affiliate links, including eBay, Amazon, and others.
Can you snap another pic of your stopper? It looks like you have a 2 hole with a thermowell... this is exactly what I want to add to mine and wanted to see a better picture so I can replicate.

Didn’t quote me but I have the same setup. I originally drilled my own #7 stopper with 2 holes but was worried how jagged they were so I ended up ordering a pre-made one off of amazon.

https://www.amazon.com/dp/B01KP4D0K2/?tag=skimlinks_replacement-20
 
Last edited by a moderator:
To anyone that is curious about closed pressure transfers with the Anvil fermenter, I contacted Anvil and they sent me this:

"We haven't tried it but the lid was not designed to withstand pressure and we didn't provide any other type of safety relief I over pressured. Sorry"

So, it looks like it wasn't specifically designed to support pressure transfers, but with the right hardware and only 1-2psi, I'm still convinced it could work. One way to find out, right?
Right, you could use a propane regulator to keep the pressure low and constant.
 
Didn’t quote me but I have the same setup. I originally drilled my own #7 stopper with 2 holes but was worried how jagged they were so I ended up ordering a pre-made one off of amazon.

https://www.amazon.com/dp/B01KP4D0K2/?tag=skimlinks_replacement-20
i'm using the exact same thermowell, as part of this package: https://www.amazon.com/gp/product/B01N37ATGL/?tag=skimlinks_replacement-20. when i bought it 2 months ago, it was $50.... pic of them in action here.

To anyone that is curious about closed pressure transfers with the Anvil fermenter, I contacted Anvil and they sent me this:

"We haven't tried it but the lid was not designed to withstand pressure and we didn't provide any other type of safety relief I over pressured. Sorry"

So, it looks like it wasn't specifically designed to support pressure transfers, but with the right hardware and only 1-2psi, I'm still convinced it could work. One way to find out, right?
i certainly wouldn't hesitate to try it. i can't see how a few PSI could cause any issue (other than maybe popping out the stopper if not jammed in sufficiently... such woe).

i currently have my second batch in my Anvil buckets. cleaning after the first batch was a breeze, took just a few minutes per bucket.
 
Last edited by a moderator:
The valves can't be broken down into individual pieces? So if the seal slips, you can't just break it down and align everything back up.
I have a similar problem with one of my valves. The seal is not seated correctly. I hope Anvil handles it the same way as Austin did for you.
 
The valves can't be broken down into individual pieces? So if the seal slips, you can't just break it down and align everything back up.

I think you can. However, they opted to send a replacement. In fact I think you have too be able to disassemble. How would you get the seal seated?

It's looks like the main body of the valve is in two pieces. Look to the seam just to right of the 1/2" Mark.

20180426_172519.jpeg
 
Last edited:
Yea, it looks like it splits in half. I was thinkin the ball might pop out after you got it apart and than the seals could have a grooves they fit into. I have a valve that does that on my BK. Two teflon seals on both sides of the ball that go into grooves. Than when you tighten the two haves everything snugs up nice. Hopefully you can do that in case they slip again.
 
@apl_seed

I busted it apart tonight. It came apart pretty easily. The seal was a bit buggered up from being squished half out of place. I managed to re-center the seal and quickly tighten the male part to re-seat the seal.

It's doable. Frankly if you put a drill bit into the valve with the ball open so it ran all the way through. There's no reason you can't drop the seal over the drill bit followed by the male half of the valve body and hand tighten until its snug, tighten it with two wrenches. Then remove the drill bit. It'd be perfectly centered.
 
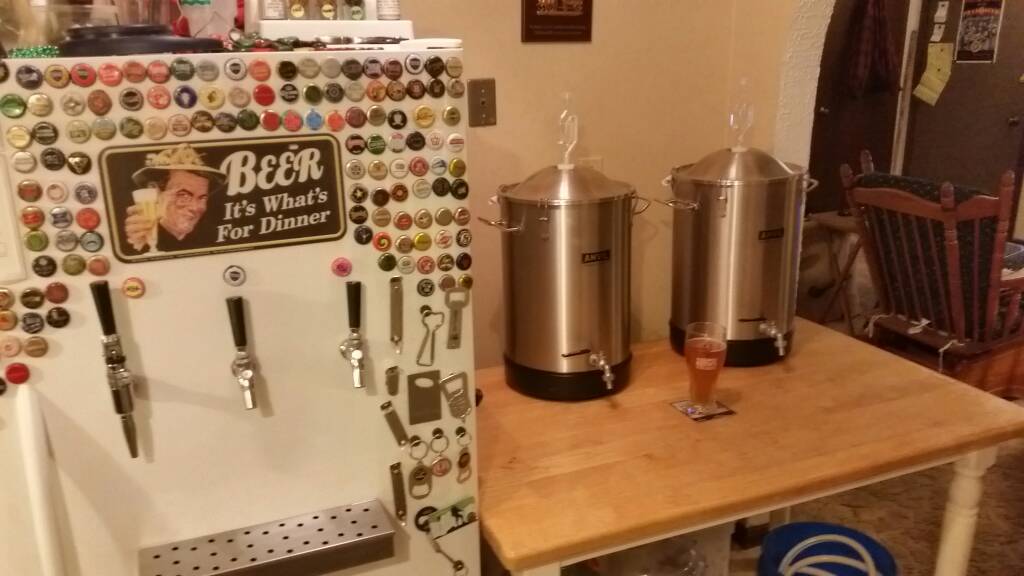
Two Anvil's filled;

- Cascade Pale Ale -NEIPA Style

- Gratzer (Prussian) or Grodziske (Polish) - Oak Smoked Wheat Beer, as in oakey, smokey lawn mower bier/pivo.

Drinking Polish Wąsosz ... Basically a Wheat Beer from Konopiska Poland.

20180430_232658.jpeg
 
Last edited:
So I added a gas post to the lid to be able to purge the fermenter with CO2 whenever I open it or do a pressure transfer. Used a gas post on a 1/4 inch bulkhead. Drilled a 1/2 inch hole and threaded in perfect!
View attachment 568331
View attachment 568332
View attachment 568333
That's beautiful! Nice work! So, have you successfully tried a pressure transfer yet? If so, how did it work?

I've been toying with the idea of picking up a 1.5" TC flange from brewhardware and soldering that to the top. This would open up the possibility of pressure transfers, CIP cleaning, and more refined airlocks than just using a #7 stopper... I just don't know if it's worth the extra money.
 
No pressure transfer yet but I don’t think it’ll be a problem. I’ve seen multiple people do it on the SS brew buckets which pretty much have the same clamps. Just have to be careful to just give it enough pressure to get the beer moving.
 
So about the volume marks...maybe I figured wrong, but it seems the marks are off by a quart? The 5 gallon mark would be 5 1/4 gallons, the tick below it, the actuall 5 gallons, for example. My "into the fermenter" measurement seemed to confirm this as well.
 
So about the volume marks...maybe I figured wrong, but it seems the marks are off by a quart? The 5 gallon mark would be 5 1/4 gallons, the tick below it, the actuall 5 gallons, for example. My "into the fermenter" measurement seemed to confirm this as well.
Yeah, that's my thoughts on this. Nobody is going to intentionally rack trub into a keg or bottling bucket, so I see this as probable wort yield. ~95% primary wort. It's 1 quart loss out of 20.

I typically try to brew 5.25~5.5 gallons to get a full keg. Sometimes I don't always get that if boil longer or I have a lot of hops, fruit remnants, or whatever in the brew kettle.
 
Ok, so I've had my 4 gallon model for a few months. I'm on the third batch in it. I thought I would reply to my original post in this thread. After putting the fermenter together, upon closer inspection, I found a couple small specks of rust in the bottom. They did not clean out using standard methods. After contacting the company, they advised cleaning it off with Barkeeper's Friend cleaner, which they sent me out a couple small packs. After cleaning with this, I found that the rust spots had been removed and was happy. After the first batch came out, I found the rust spots back again. Repeat process, etc. So far, I guess I am happy with the fermenter, but I do not expect it to last a long time, from the construction. For the money, I think they are a value, but I would treat them gently to extend life span. Also buy some Bar Keeper's Friend cleaner, because the "stainless steel" stains. /cheers
 
I hate to be that new guy whose first post is a rant, but this thread always pops up at the top of searches about Anvil fermenters.

I just received mine, and straight from the factory there is a 1 inch wide band of really rough machining marks in the inside wall running along above the bottom rim. When I stuck my head in as best I could to get a closer look, I found pitting everywhere in the scratches, and dark discoloration inside the pits that cannot be seen from the top looking in. The "QC Pass" sticker on the bottom is clearly there for looks (or a cruel joke). I wish I could get a picture good enough to show, but I already packed it back up for a refund.

The whole point buying stainless steel is to avoid scratches where spoilage organisms can grow and have something that will last for years. I am completely turned off by the Anvil brand now. How can you put out a product with such an obvious defect?
How deep were the scratches? Are you sure they aren't buffing marks?

These are stamped in a deep draw dies. The drilled hole is out, but that's it for machining. The handles are spot welded to kettle.

Stainless is low maintenance but not free from needing to be cleaned. My two anvil fermenters where spotless when I got them. I did get a goofed up ball valve. However they made good on that problem.

SS Brew Tech Bru Bucket has had its problem with not being clean when it was arriving to customers. It had a black oily film on it, that requires people to break out
Barkeeper's Friend (BkF)

The best thing about stainless is easy cleaning and it doesn't require much scrubbing if at all. If it's needed a scotch bright pad will do the job with BkF. Tiny buff marks aren't a problem. Most stainless has a brushed look unless it's been polished.
 
How deep were the scratches? Are you sure they aren't buffing marks?

I'm positive they are not your typical buffing marks. I can get my fingernails stuck in them. Regardless, there is pitting everywhere in the marks, which is probably what they were trying to get rid of (or cover up?)
 
I went ahead and got some pictures. The first one shows the noticeable roughness looking down in, and the second I highlighted the pitting.

20180512_124658.jpg Pitting.jpg
 
I'm positive they are not your typical buffing marks. I can get my fingernails stuck in them. Regardless, there is pitting everywhere in the marks, which is probably what they were trying to get rid of (or cover up?)
After seeing your post here and seeing the photos, rejecting them was the right thing to do.

They should have cut that out of the sheet before blanking out the round to do the deep draw punch.
 
Re pressure transfers, if you're racking to a keg, another option is to connect the gas out on the keg to either your airlock or that keg post you installed. The co2 in the keg (assuming you've purged) should replace the beer in the fermenter. You shouldn't need the pressure to push the beer out since you have a spigot. You just need co2 to fill the headspace.

I've done this successfully with my fermonster.
 
I love my 7.5gal fermenter. I really feel it has helped me brew better hoppy beers, especially NEIPAs, by being able to close transfer to a keg with no oxygen pickup.

Below is a pic of how I avoid oxygen pickup through my airlock when transferring to my keg. The output hose on my C02 tank fits perfectly into the top of my airlock so I set my regulator as low as it will go and let it run for the entire transfer. The c02 isn't pushing the beer to the keg (it is gravity fed) it is just getting sucked in by the displaced beer. Works like a charm!
20180513_094146.jpg
 
I love my 7.5gal fermenter. I really feel it has helped me brew better hoppy beers, especially NEIPAs, by being able to close transfer to a keg with no oxygen pickup.

Below is a pic of how I avoid oxygen pickup through my airlock when transferring to my keg. The output hose on my C02 tank fits perfectly into the top of my airlock so I set my regulator as low as it will go and let it run for the entire transfer. The c02 isn't pushing the beer to the keg (it is gravity fed) it is just getting sucked in by the displaced beer. Works like a charm!View attachment 570013

Is the keg flushed and pressurized with CO2 during transfer? Do you have to vent the keg periodically to keep it flowing?
 
Is the keg flushed and pressurized with CO2 during transfer? Do you have to vent the keg periodically to keep it flowing?

I fill the keg with starsan and push it all out through a picnic tap to completely flush out all the oxygen. Then I connect the fermenter spigot to the outpost on the keg and fill it from the bottom up. I leave the pressure relief valve turned to vent during the transfer.

It has made a huge improvement to my hoppy beers.
 

Latest posts

Back
Top